Table of Contents
Advertisement
Quick Links
Advertisement
Table of Contents

Subscribe to Our Youtube Channel
Related Manuals for Sonnet Qio Professional Universal Media Reader & Writer


Summary of Contents for Sonnet Qio Professional Universal Media Reader & Writer
- Page 1 User’s Guide ® for Qio Professional Universal Media Reader & Writer ™...
-
Page 3: Table Of Contents
2 Qio Enclosure Description......................2 3 Software/Hardware Installation Steps.................. 3 A – Software Download B – Software Installation Steps C – Express Bus Extender PCIe Installation Steps 4 Connecting Qio......................... 4 Connecting Qio to a MacBook Pro WITH a Thunderbolt Port Connecting Qio to a MacBook Pro WITHOUT a Thunderbolt Port Connecting Qio to a Mac Pro 5 Memory Card and Adapter Card Use................... 6 Inserting and Removing Cards All Card Types Inserting/Removing SxS Media and ExpressCard/34 Adapters Inserting/Removing P2 Media and CardBus Adapters Inserting/Removing CF (CompactFlash) Cards Using the Sonnet PCIe Bus Extender ExpressCard/34 Adapter SxS and P2 Memory Card Write Protect Switches 6 Formatting Drives Connected Via eSATA.................. 7 Mac OS X Drive Formatting—RAID Sets Mac OS X Drive Formatting—Individual Drives (Not in a RAID Set) 7 Tips and Known Issues......................9 Tips Known Issues 8 Specifications, Precautions, FCC Compliance, and Support Information........10 Specifications Safety Precautions FCC Compliance Contacting Customer Service... -
Page 5: Introduction And Package Contents
ExpressCard/34 adapter 2 – Q io universal professional media reader/writer (enclosure) 3 – Carrying case 4 – 1 -meter external PCIe x1 interface cable 5 – S onnet Multimedia Memory Card Reader & Writer ExpressCard/34 6 – U niversal 12V power supply with 10-foot cable Package Contents—QIO-PCIE 1 – Sonnet Express Bus Extender PCIe adapter card 2 – Q io universal professional media reader/writer (enclosure) 3 – Carrying case 4 – 1 -meter external PCIe x1 interface cable 5 – S onnet Multimedia Memory Card Reader & Writer ExpressCard/34 6 – U niversal 12V power supply with 10-foot cable... -
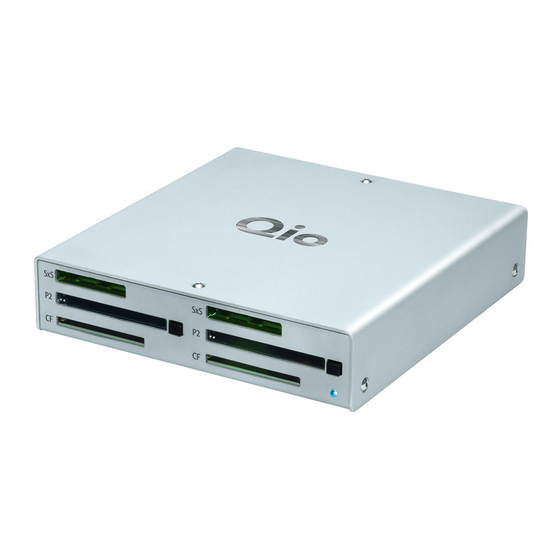
Page 6: Qio Enclosure Description
Chapter 2 – Qio Enclosure Description 1 – Power Indicator LED 3 – P2 Media Slots This indicator lights when Qio is powered, the Sonnet adapter These slots accept both P2 memory cards and CardBus card is installed properly in its slot, the PCIe cable between adapter cards the two is plugged in properly, and the computer powered on 4 – Eject Buttons for P2 Media Slots 2 – SxS Media Slots Press these buttons to eject cards from the P2 slots These slots accept both SxS memory cards and ExpressCard/34 adapter cards. Use the included Sonnet multimedia memory 5 – CF (CompactFlash) Card Slots card adapter in these slots to work with Memory Stick, SDXC, These slots accept Type I CF memory cards. Qio is not SDHC, SD, MMC, and xD-Picture memory cards compatible with Type II (Microdrive, etc.;... -
Page 7: Software/Hardware Installation Steps
1. Double-click the Qio System Installer x.x.x.pkg file inside • M ac Pro (Mid 2010), Mac Pro (Early 2009), and Mac Pro the QIO System x.x.x Installer window to launch the installer; (Early 2008) users may install the card into any available slot when the Welcome to the Qio System Installer window appears, click Continue. • Mac Pro (Early 2008) users must only use slot 3 or 4 2. When the Important Information window appears, click 3. Remove the Sonnet card from its packaging, and then Continue. install it into the slot; make sure the card is firmly seated and secured. 3. When the Software License Agreement window appears, read the license, click Continue, and then click Agree. 4. Close your computer. 4. When the Standard Install window appears, accept the 5. If you installed the card into a Mac Pro (Mid 2010), Mac default install destination or choose a new destination. -
Page 8: Connecting Qio
Chapter 4 – Connecting Qio Connecting Qio to a MacBook Pro WITH a Thunderbolt™ Port It is important that you connect the PCIe Bus Extender ExpressCard/34 adapter and the Qio enclosure in the proper order; if your MacBook Pro has a Thunderbolt port, you must plug in the PCIe Bus Extender ExpressCard/34 adapter after turning on your computer. After installing the software, do the following: 1. Connect the external PCIe x1 interface cable to the PCIe Bus Extender ExpressCard/34 adapter. 2. Connect the other end of the interface cable to the Qio enclosure. 3. Connect either the AC adapter or the optional XLR power cable (connected to a battery or other power source). Note that the Power Indicator LED on the Qio will not light until after you insert the ExpressCard/34 adapter into the ExpressCard slot. 4. Turn on your computer, and then insert the PCIe Bus Extender ExpressCard/34 adapter into your computer’s ExpressCard slot; Qio is ready for use. -
Page 9: Connecting Qio To A Mac Pro
Chapter 4 – Connecting Qio Connecting Qio to a Mac Pro It is important that you connect and power Qio in the proper order, before you turn on your computer: 1. Install the software and Bus Extender PCIe adapter card as described in the previous chapter. 2. Connect the external PCIe x1 interface cable to the Bus Extender PCIe adapter card in your computer. 3. Connect the other end of the interface cable to the Qio enclosure. 4. Connect either the AC adapter or the optional XLR power cable (connected to a battery or other power source). Note that the Power Indicator LED on the Qio will not light until after you turn on the computer. 5. Turn on your computer; after a pause, Qio is ready for use. S upport Note: When you first turn on your computer after installing the drivers and the adapter, and connecting the Qio enclosure, you may experience a very long pause (around 4–6 minutes) at the blue screen before the desktop appears and the OS becomes usable. -
Page 10: Memory Card And Adapter Card Use
Inserting/Removing P2 Media and CardBus Adapters • T o insert a card, push it into the slot until it stops; the eject button next to the slot will pop out • To remove a card, push in the eject button next to the card slot Inserting/Removing CF (CompactFlash) Cards • To insert a card, push it into the slot until it stops • To remove a card, pull it straight out of the slot Using the Sonnet PCIe Bus Extender ExpressCard/34 Adapter • A lways connect the external PCIe x1 interface cable to the PCIe Bus Extender ExpressCard/34 adapter before inserting it into your computer’s ExpressCard slot • D o not eject the PCIe Bus Extender ExpressCard/34 adapter from your computer unless the computer is shut off • If Your MacBook Pro does NOT have a Thunderbolt port, hot-plugging the PCIe Bus Extender ExpressCard/34 adapter is not supported. -
Page 11: Formatting Drives Connected Via Esata
Qio enclosure with a built-in hardware RAID controller like Sonnet’s Fusion D400QR5 may not present its drives separately to the operating system. For instance, if you chose RAID 0 or RAID 5 configuration, only one “drive” will appear in Disk Utility. -
Page 12: Mac Os X Drive Formatting-Individual Drives (Not In A Raid Set)
Chapter 6 – Formatting Drives Connected via eSATA Mac OS X Drive Formatting—Individual Drives (Not in a RAID Set) This section describes the process of formatting (initializing) individual hard drives connected to the Qio enclosure’s eSATA ports using Disk Utility under Mac OS X Version 10.5; the process is nearly identical under Mac OS X Version 10.6. If you intend to create a Mac OS-formatted RAID set, go back to “Mac OS X Drive Formatting—RAID Sets” on the previous page. 1. Turn on your computer. During startup, your computer will display one or more messages referring to unreadable volumes; click Initialize… to launch Disk Utility. After Disk Utility launches, click the Initialize button in each remaining message window. 2. If it is not already open, launch Disk Utility (Figure 4). Note that all attached drives appear in the information window, regardless of being formatted or not. Figure 4 3. Select a drive you want to format by clicking the drive icon or the “name” of the drive (Figure 5). At the bottom of the window, drive capacity, connection type, and connection ID information are listed. 4. Click on the Partition button (Figure 5). Click on the drop down menu beneath “Volume Scheme:” and select a number of partitions for the volume; you may optionally choose to partition each drive to create two or more smaller drives connected “virtual” drives. to Qio 5. Click to highlight a partition, and then type a name in the Name field; repeat for each partition (Figure 5). After formatting, each partition will appear in the Finder window as a drive*. -
Page 13: Tips And Known Issues
Occasional Slow Wake from Sleep plugged into Qio when you turn on the computer. When storage devices are attached to an adapter card inserted in Selecting Power Off Card from the Finder Menu the Qio enclosure, your computer may occasionally take several Do not select Power Off Card from the Finder menu. minutes to wake from sleep. Sonnet expects to resolve the issue in a future software update. Drives Connected to Qio are Identified as SCSI Devices Drives connected to the Qio enclosure’s eSATA ports appear as Sleep Not Supported With P2 Memory Cards SCSI drives in Disk Utility, regardless their actual interface. This is If a P2 memory card is present in the Qio enclosure and its normal and is a function of the driver implementation. -
Page 14: Specifications, Precautions, Fcc Compliance, And Support Information
Weight (Qio Enclosure) 1.1 lbs (0.5 kg) service staff can better assist you: RoHS Compliant • Product name • Date and place of purchase * S upport for up to 16 drives requires the use of drive enclosures • Hard drive model(s) employing a hardware RAID controller (like Sonnet's Fusion • Computer model D400QR5 or R400QR5). • Operating system version • Software/firmware versions SAFETY PRECAUTIONS Please read this section carefully before proceeding. These If further assistance is needed, please contact Sonnet Customer precautions explain the correct and safe use of this device, Service at: thereby helping to prevent injury to you or others, and also help Online Service Form: http://serviceform.sonnettech.com you to minimize the risk of damaging the device. Tel: 1-949-472-2772 (Monday–Friday, 7 a.m.–4 p.m. Pacific Time) Warnings Fax: 1-949-457-6349 E-mail: support@sonnettech.com Always follow the basic warnings listed here to avoid the risk of serious injury or death from electrical shock, short-circuiting, fire, and other hazards. These warnings include, but are not limited to: For Customers Outside the USA For support on this product, contact your reseller or local • W ith the exception of the user-swappable parts, do not attempt... - Page 15 This Page Left Intentionally Blank...
- Page 16 ©2011 Sonnet Technologies, Inc. All rights reserved. Sonnet, the Sonnet logotype, Creativity Stored Here, Simply Fast, the Simply Fast logotype, Fusion, Qio, and Tempo are trademarks of Sonnet Technologies, Inc. FireWire, Mac, the Mac logo, Mac OS, and MacBook are trademarks of Apple Inc., registered in the United States and other countries.
Need help?
Do you have a question about the Qio Professional Universal Media Reader & Writer and is the answer not in the manual?
Questions and answers