Table of Contents
Advertisement
Quick Links
Marco Beverage Systems Ltd.
63d Heather Road,
Sandyford Industrial Estate,
Dublin 18,
Republic of Ireland
UNDERCOUNTER
SERVICE MANUAL
Ecoboiler UC4L 2.4kW
1000740
Ecoboiler UC10L 2.8kW
1000741
Ecoboiler UC10L 5.6kW
1000742
Ecosmart UC4L 2.4kW
1000750
Ecosmart UC10L 2.8kW
1000751
Ecosmart UC10L 5.6kW
1000752
Ireland Tel:
(01) 295 2674
Ireland Fax:
(01) 295 3715
UK Tel:
(0207) 274 4577
UK Fax:
(0207) 978 8141
Advertisement
Table of Contents

Related Manuals for Marco marco 1000740


Summary of Contents for Marco marco 1000740
- Page 1 UNDERCOUNTER SERVICE MANUAL Ecoboiler UC4L 2.4kW 1000740 Ecoboiler UC10L 2.8kW 1000741 Ecoboiler UC10L 5.6kW 1000742 Ecosmart UC4L 2.4kW 1000750 Ecosmart UC10L 2.8kW 1000751 Ecosmart UC10L 5.6kW 1000752 Marco Beverage Systems Ltd. Ireland Tel: (01) 295 2674 63d Heather Road, Ireland Fax: (01) 295 3715 Sandyford Industrial Estate, UK Tel:...
-
Page 2: Safety Instructions
1. INTRODUCTION: The information provided in this manual is intended to assist in the installation and maintenance of the Marco Ecoboiler Water boiler. Please read the instructions carefully to prevent accidents and ensure an efficient installation. This manual is not a substitute for any safety instructions or technical data affixed to the machine or its packaging. -
Page 3: Basic Instructions
3. BASIC INSTRUCTIONS: 3.1. INSTALLATION DETAILS: Electrical installation: Ecoboiler UC4L 2.4kW, Ecosmart UC4L 2.4kW - A moulded 13A plug is factory fitted. Ecoboiler UC10L 2.8kW, Ecosmart UC10L 2.8kW - A moulded 13A plug is factory fitted. Ecoboiler UC10L 5.6kW, Ecosmart UC10L 5.6kW - This unit must be connected to a suitable single phase power supply. -
Page 4: Temperature Calibration
After this amount of water has heated to about 96ºC the boiler will draw more water in until the temperature drops by 1 or 2 degrees. The boiler will then heat again. This heat fill cycle continues until the boiler is full. ... -
Page 5: Troubleshooting
2. In Calibration Mode the machine will heat continuously until the tactile switch on the PCB is pressed for a second time (NB: The tactile switch should be pressed for at least 1 second) 3. Using a thermometer to measure the temperature at the thermistor pocket, the machine should be allowed to reach the desired set-temperature. -
Page 6: Maintenance
3.6. MAINTENANCE: Marco machines have been designed to give many years of trouble free service. Marco Beverage Systems manufacture and test to ISO9002:2000 standard. The only regular maintenance required is occasional de-scaling. Descaling Procedure: Isolate machine from power supply. ... -
Page 7: General Description
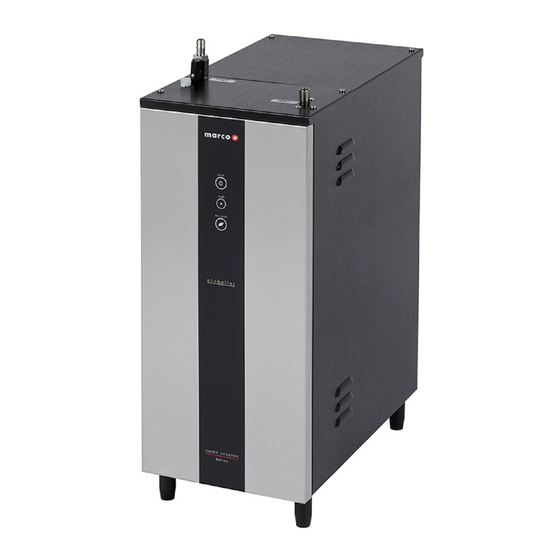
4. Technical Data: 4.1. GENERAL DESCRIPTION: Ecoboiler Ecoboiler Ecoboiler Ecosmart Ecosmart Ecosmart UC4L UC10L UC10L UC4L UC10L UC10L 2.4kW 2.8kW 5.6kW 2.4kW 2.8kW 5.6kW Height (mm) Width (mm) Depth (mm) mmediate Draw-Off (litres) Max. Hourly Output (L/hr) Connection 2.4kW, 2.8kW 5.6kW. -
Page 8: Access To Internal Com Ponents
4.3. ACCESS TO INTERNAL COM PONENTS: To access the tank: Allow to cool. Remove the outer lid. To remove outer lid, undo 4 pozi headed screws. Ensure that the tank is cool, before removing insulation and inner lid. To remove inner lid, undo 4 butterfly nuts. - Page 9 To access the internal components: Disconnect the machine from the electrical supply. Allow to cool sufficiently. On the 10L machine insert a flat headed screwdriver at the four locations indicated on the picture above and rotate. Note:- There is no need to ‘lever’ the screwdriver – a small rotation is all that is required.
-
Page 10: Internal Arr Angement
4.4. INTERNAL ARR ANGEMENT: Thermal Switch 90deg, M4 Stud Mount (1502088) Font connection assembly ( see: UCEC-001A) Thermal Switch Mount Brass Connector Mini Fit 4 Way Socket 1400611 (1502089) PCB Display Ecoboiler 10L (1600349) High Level Probe Assembly (2300463) PCB Ecosmart Display (1600357) PCB Bracket... - Page 11 Font connection assembly Connector Mini Fit 4 Way Socket 1400611 ( see: UCEC-001A) Thermal Switch High Level Probe Assembly 90deg, M4 Stud (2300463) Mount (1502088) Thermal Switch Mount Brass (1502089) P.C.B 24V DC Pump Supply (1600366) PCB Ecoboiler Control (1600345) P.C.B Eco Slave Mid Level Probe Assembly (1600354)
- Page 12 PCB Eco Slave (1600354): Controls the heater switching Controls the water inlet switching Controls tank temperature/temperature adjustment PCB Ecosmart display (1600367) consists of: LCD screen Power On/Off button Power On LED Status/Ready LED ...
- Page 13 12. External Connector 13. Thermistor Connector 14. Dip Switch – 3 way. Allows selection of software for specific machine 15. Tactile Switch. For use during calibration procedure (refer to Calibration in Sec 3.3) 16. Water Level – 5-way connector (low voltage). Connects to Low level and High level probes. Also connects push button on PB variants.
-
Page 14: Troubleshooting - Di Agnostic Guide
4.6. TROUBLESHOOTING – DI AGNOSTIC GUIDE: NOTE FOR THE ECOSMART RANGE IN ADDITION TO THE STATUS LED FLASHING TO INDICATE AN ERROR – THE DISPLAY WILL ALSO PROVIDE INFORMATION 2 FLASH CYCLE – BELOW LOW LEVEL 2 flashes then a short pause - repeated. Display pattern: ... - Page 15 4 FLASH CYCLE – NOT HEATING 4 flashes then a short pause - repeated. Display pattern: This checks that the temperature is increasing when the heater is on. Electronic check Measures the rate that the temperature increases in a specified time. and action: This error is only displayed after 20 mins of the heater being on continuously.
- Page 16 the error and if the water supply is ok, the machine will return to normal operation. NOTE: If the water supply is the problem, ensure that this is rectified or this error will re-occur. If there is no problem with the mains water supply, check that the inlet solenoid valve is working.
- Page 17 4.8. Descaling Procedure To descale the machine thouroughly: Unplug the machine. Disconnect from the water supply. Drain as much water from the tank as possible. Remove the lids and allow the machine to cool completely. Drain all the water from the machine. ...
- Page 18 4.9. Wiring diagram: Ecoboiler UC4L 2.4kW 1000740 Service manual 1000740 1000741 1000742 1000750 1000751 1000752 06-12-11 Page 18 of 24...
- Page 19 4.10. Wiring Diagrams: Ecoboiler UC10L 1000741 Service manual 1000740 1000741 1000742 1000750 1000751 1000752 06-12-11 Page 19 of 24...
- Page 20 4.11. Wiring Diagram: Ecoboiler UC10L 5.6kW 1000742 Service manual 1000740 1000741 1000742 1000750 1000751 1000752 06-12-11 Page 20 of 24...
- Page 21 4.12. Wiring Diagram: Ecosmart UC4L 1000750 Service manual 1000740 1000741 1000742 1000750 1000751 1000752 06-12-11 Page 21 of 24...
- Page 22 4.12. Wiring Diagram: Ecosmart UC10L 1000751 Service manual 1000740 1000741 1000742 1000750 1000751 1000752 06-12-11 Page 22 of 24...
- Page 23 4.12. Wiring Diagram: Ecosmart UC10L 5.6kW 1000752 Service manual 1000740 1000741 1000742 1000750 1000751 1000752 06-12-11 Page 23 of 24...
- Page 24 4.13. Spare Parts List Part Description Model Variant Number Ecoboiler Ecoboiler Ecoboiler Ecosmart Ecosmart Ecosmart UC4L UC10L UC10L UC4L UC10L UC10L 2.4kW 2.8kW 5.6kW 2.4kW 2.8kW 5.6kW 1000740 1000741 1000742 1000750 1000751 1000752 1500950 Element 2.4kW 230V Ring Shape 1500985 Element 2.8kW 230V 1501430 Moulded Plug and cord...
Need help?
Do you have a question about the marco 1000740 and is the answer not in the manual?
Questions and answers