Advertisement
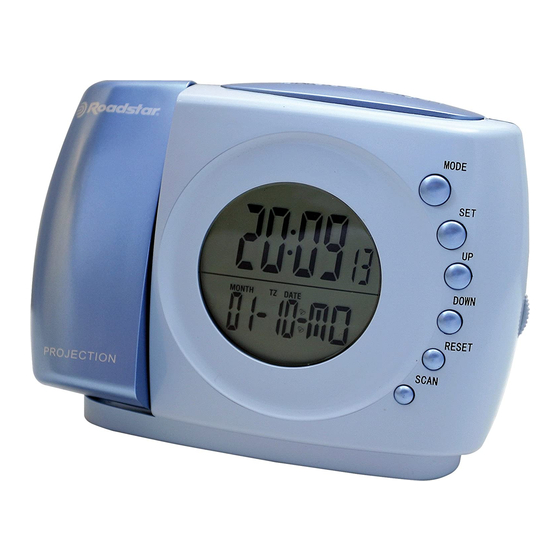
CONTROLS AND FUNCTIONS
ENGLISH
1. Projection Clock
2. Reset Radio button
1
3
3. Light/Snooze Button
4. Mode Button
5. Down button
6. Up Button
4
7. Set Button
7
6
8. Scan Radio
9. Battery Pack
5
10. Projector Switch
2
11. Reset button
8
POWER SUPPLY
1. Open the battery cover on the
bottom.
2. Insert and connect 4 UM-4 (AAA)
11
10
batteries following the correct
9
polarities.
3. Replace the battery cover.
Note: Check your batteries regularly.
Old or discharged batteries must be
CLR-3005P
replaced to avoid acid leaking that may
damage your unit. If the unit is not to be
Digital LCD Alarm Clock with FM
used for a long time, remove the
Scan Radio and Pojection Clock.
batteries from their compartment.
(Battery is not included in the packing).
KONTROLLE UND FUNKTIONEN
DEUTSCH
1. Projektion-Uhr
2. Radio RESET-Taste
3. LICHT/SNOOZE-Taste
1
3
4. MODE-Taste
5. DOWN-Taste
6. UP-Taste
7. SET-Taste
4
8. UKW-Scan-Taste
7
9. BATTERIEFACH
6
10. Projektion-Taste
5
11. Radio Reset-Taste
2
8
STROMVERSORGUNG
1. Den Deckel des Batteriefachs in der
unteren Seite abnehmen.
2. 4 UM-4 Batterien einlegen.
11
3. Den Deckel des Batteriefachs
10
9
wieder anbringen.
Anmerkung: Die Batterien regelmässig
prüfen. Alte oder entladene Batterien
auswechseln, um eine Beschädigung
CLR-3005P
des Geräts durch auslaufende Batterie
Digital-LCD-Uhr mit Wecker, UKW
zu vermeiden. Wenn das Gerät langere
Zeit nicht benutzt wird, die Batterien
Scan-Radio, Uhr-Projektion und
aus dem Batteriefach herausnehmen.
Kalendar.
(Batterien nicht mitgeliefert).
COMMANDES
FRANCAIS
1. Projecteur Horloge
2. Touche Reset Radio
3. Touche de LIGHT/SNOOZE
1
3
4. Touche de MODE
5. Touche Down
6. Touche de UP
7. Touche de SET
4
8. Touche Scan Radio
7
9. Compartiment Batterie
6
10. Touche projection
5
11. Touche Reset apareil
2
1. Ouvrir le logement des piles sur l'arrière
8
de l'appareil
2. Introduire 4 piles de type UM-4 (pas
incluses) dans le logement en veillant à les
bien placer conformément au schéma
11
indiqué à l'interieur du logement (nous
10
recommandons des piles Alcalines).
3. Fermer le logement.
Note: Contrôlez vos piles régulièrement.
Les piles trop vieilles ou déchargées
CLR-3005P
devront être remplacées afin d'éviter un
endommagement résultant de fuites d'acide.
Horloge numérique LCD avec
Si l'appareil ne doit pas être utilisé pendant
alarme, FM Scan Radio et
une longue période de temps, enlevez les
affichage calendrier.
piles du logement.
DISPLAY
digit will flash. Press UP/DOWN to
1. Normally the LCD DISPLAY
adjust the DATE digit.
indicates the CALENDAR, which
5. To set the DAY, press SET again
shows the MONTH, DATE, DAY,
and the DAY CHARACTERS will
and TIME.
flash. Press UP/DOWN to adjust
2. Press LIGHT/SNOOZE once and the
the DAY.
BACKLIGHT will activate. The
BACKLIGHT will automatically turn
SETTING THE ALARM
OFF after 6 seconds.
1. In the normal Display mode, press
MODE once and the display will
SETTING THE LCD DISPLAY
show the ALARM TIME. The
1. In the normal Display mode, to set
"ALARM 1" icon indicates that the
the TIME, keep pressed SET Button
display is showing the ALARM
for 8 seconds and the HOUR digits
TIME.
will flash. Press UP/DOWN to
2. To set the ALARM TIME, keep
adjust the HOUR digits.
pressed SET Button for 8 seconds
2. To set the MINUTE, press SET once
and the HOUR digits will flash.
more and the MINUTE digits will
Press UP/DOWN to adjust the
flash. Press UP/DOWN to adjust the
HOUR digits.
MINUTE digits.
3. To set the ALARM MINUTE, press
3. To set the MONTH, press SET again
SET once more and the MINUTE
again and the MONTH digits will
digits will flash. Press UP/DOWN
flash. Press UP/DOWN adjust the
to adjust the MINUTE digits.
MONTH digit.
4. When the Time meets the PRESET
4. To set the DATE, press SET again
ALARM TIME, the alarm sound will
one more time and the DATE DIGIT
be on. Press SNOOZE (3), and the
ANZEIGE
Datumanzeige. Drücken Sie UP/
1. Normalerweise zeigt das Gerät
DOWN um das Datum einzustellen.
das Kalendar, mit Monat, Datum,
5. Um den Tag einzustellen, drücken
Tag, und die Zeit an.
Sie SET zweimal, blinkt die
4. Drücken Sie LIGHT/SNOOZE einmal
Taganzeige. Drücken Sie UP/
um die Hinterbeleuchtung zu
DOWN um den Tag einzustellen.
aktivieren. Die Hinterbeleuchtung
6. Drücken Sie SET nochmals um zur
schaltet nach 6 Sekunden aus.
normalen Anzeige zurückzukehren.
LCD-ANZEIGE EINSTELLEN
WECKER-EINSTELLEN
1. In normalem Anzeigemodus,
1. Im normalen Anzeigemodus,
Drücken Sie die SET-Taste (7) und
drücken Sie MODE einmal. In der
Die Stun-
halten Sie sie gedrückt.
Anzeige wird die Alarmzeit
den blinken.
Drücken Sie die UP-
angezeigt. Das symbol "ALARM 1"
DOWN-Taste, bis die gewünschte
erscheint um zu bestätigen, dass
Weckzeit auf dem Display ange-
die Alarmzeit angezeigt wird.
zeigt wird.
2. Um die Weckerzeit einzustellen,
2. Um di Minuten einzustellen, drücken
Drücken Sie die SET-Taste (7) und
Sie SET nochmals. Die Minuten
halten Sie sie gedrückt.
blinken.
den blinken. Drücken Sie UP/DOWN
3. Um den Monat einzustellen,
um die Stunden einzustel-len.
drücken Sie SET zweimal, blinkt die
3. Um di Minuten einzustellen, drücken
Monatanzeige. Drücken Sie UP/
Sie SET nochmals. Die Minuten
DOWN um den Monat einzustellen.
blinken. Drücken Sie UP/DOWN um
4. Um das Datum einzustellen,
die Minuten einzustellen.
drücken Sie SET einmal, blinkt die
4. Drücken Sie SET nochmals um zur
normalen Anzeige zurückzukehren.
AFFICHEUR
4. Pour régler la date, presser SET
1. Normalement l'afficheur LCD montre
une fois et la date clignotera.
le calendrier avec le mois, la date
Presser UP/DOWN pour régler la
le jour et l'horaire.
date.
2. Pour sélectionner le système
5. Pour régler le jour, presser SET une
d'affichage de l'heure, presser la
fois encore et le jour clignotera.
touche MODE en séquence.
Presser UP/DOWN pour régler le
3. Presser LIGHT/SNOOZE une fois et
jour.
la rétro-illumination s'activera. Elle
6. Presser SET encore une fois pour
s'éteindra automatiquement après
retourner à l'affichage normal.
6 secondes.
REGLAGE DE L'ALARME
REGLAGE DE L'AFFICHEUR LCD
1. Dans la modalité d'affichage
1. Dans la modalité d'affichage
normale, presser MODE une fois et
normale, pour régler l'horaire,
l'afficheur montrera l'horaire
presser SET jusqu' au les chiffres
d'alarme. Le symbole ALARM 1
des heures clignoteront. Presser
indique que l'horaire montré est
UP/DOWN pour régler les heures.
celui de l'alarme.
2. Pour régler les minutes, presser
2. Pour régler l'horaire d'Alarme,
SET une fois et les minutes
presser SET jusqu' au les chifres
clignoteront. Presser UP/DOWN
des heures clignoteront. Presser
pour régler les minutes.
UP/DOWN pour régler les heures.
3. Pour régler le mois, presser SET
3. Pour régler les minutes de l'alarme,
une fois encore et le mois
presser SET une fois et les
clignotera. Presser UP/DOWN
minutes clignoteront. Presser UP/
pour régler le mois.
DOWN pour régler les minutes.
alarm will turn off, and automati-
Specifications subject to change without
cally turn on after 5 minutes.
notice.
RADIO FUNCTION
Correct Disposal of ThisProduct(Waste
1) Press the SCAN (8) continuously
Electrical &Electronic Equipment)This
marking shown on the product orits literature,
to tune the desired FM station.
2) When the frequency reach 108
indicates that it should notbe disposed with
other householdwastes at the end of its
MHz, press RESET (2) to re-start
working life. Toprevent possible harm to
from 87.5 MHz
theenvironment or human health from
uncontrolled waste disposal, pleaseseparate
PROJECTION CLOCK
this from other types ofwastes and recycle it
1) To switch ON the projection, move
responsibly topromote the sustainable reuse
the switch (10) to ON.
ofmaterial sources. Household users should
1) Press the SNOOZE / LIGHT button
contact eitherthe retailer where they pur-
(3) to switch ON the projector
öchased thisproduct, or their local governmen
for 5 seconds.
toffice, for details of where and howthey can
Focus setting : To adjust the projec
take this item forenvironmentally safe
tion clock definition by turningthe
recycling.Business users should contact
FOCUS until the project's time is
theirsupplier and check the terms and
clearly shown on theceiling or wall.
conditions of the purchase contract.This
product should not be mixed withother
NOTE : PROJECTS TIME IMAGE ON
THE CEILING OR WALL OF A DAR
commercial wastes for disposal.
KENED ROOM. MAXIMUM PROJE-
CTION DISTANCE IS 3-9 FEET.
5. Wenn die Weckerzeit erreicht,
Änderungen vorbehalten
ertönt der Wecker. Wenn der
Korrekte Entsorgungdieses
Wecker ertönt und Sie die
Produkts(Elektromüll)Die Kennzeichnung auf
SNOOZE (3) drücken, stoppt der
dem Produktbzw. auf der dazugehörigen
Wecker zeitweilig für ca. 5
Literaturgibt an, dass es nach seiner
Minuten, danach ertönt er
Lebensdauer nicht zusammen mit dem
wieder.
normalen HaushaltsmüIl entsorgtwerden darf.
Entsorgen Sie diesesGerat bitte getrennt von
RADIO-FUNKTION
anderenAbfallen, um der Umwelt bzw.
1. Drücken Sie SCAN-Taste einmal
dermenschlichen Gesundheit nicht dur-
(8), um ununterbrochen die
chunkontrollierte Müllbeseitigung zus-chaden.
gewünschte FM-Station zu
Recyceln Sie das Gerät, umdie nachhaltige
stimmen.
Wiederverwertung vonstofflichen Ressourcen
2. wenn die Häufigkeitsreichweite
zu fördern.Private Nutzer sollten den Händler,
108 MHz, Drücken Sie RESET (2)
beidem das Produkt gekauft wurde, oderdie
zu Wiederanfang von 87.5 MHz.
zuständigen Behördenkon-taktieren, um in
Erfahrung zubringen, wie sie das Gerät
aufumweltfreundliche Weise recycelnkönnen.
ZEITEINSTELLUNG - PROJEKTION
Gewerbliche Nutzer sollten sich anIhren
Stellen Sie den Projektionsschalter
. Die Stun-
Lieferanten wenden und dieBedingungen des
(10) auf Position ON.
Verkauf svertragskonsu-ltieren. Dieses Produkt
Schärfeneinstellung: Drehen Sie so
darf nichtzusammen mit anderem
lange an derSchärfeneinstellung
Gewerbemüllentsorgt werden.
FOCUS, bis die Zeit klar an die
Wandoder an die Decke projiziert
wird.
4. Presser SET encore une fois pour
Les fonctions et le design peuvent faire
l'objet de modifications sans préavis.
retourner à l'affichage normal.
5. Lorsque l'horaire d'alarme arrive
Comment éliminer ceproduit (déchets
le réveil sonne. En appuyant sur
d'éuipements électriqueset électroniques)Ce
la touche de SNOOZE (3), on
symbole sur le produit ou sadocumentation
l'arrête momentanément pendant
indique qu'il ne doit pasêtre éliminé en fin de
environ 5 minutes, après quoi le
vie avec lesautres déchets ménagers.
réveil recommence à sonner.
L'éliminationincontrôlée des déchets pouvant
porter préjudice a l'environ-nement ou ala
RADIO
santé humaine, veuillez le séparerdes autres
1. Appuyer sur le bouton SCAN (8)
types de déchets et lerecycler de façon
pour sélectionner la station désirée.
responsable. Vous favoriserez ainsi la réutilisa-
2. Appuyer sur le bouton RESET (2)
tion durabledes ressources matérielles.Les
Pour retournér sur 87.5 MHz.
particuliers sont invites acontacter le distribu-
teur leur ayantvendu le produit ou a se rensei-
RÉGLAGE DE L'HORAIRE POUR LA
gnera uprès de leur mairie pour savoir ou
etcom- ment ils peuvent se débarrasserde ce
PROJECTION
produit afin qu'il soit recyclé enrespectant
Mettre la commande de la projection
l'environ-nement.Les entreprises sont invitées
(10) sur la position ON.
aconta-cter leurs fournisseurs et aconsulter les
Réglage du zoom: Pour ajuster la
cond-itions de leur contratde vente. Ce produit
définition de la projection entournant
ne doit pas êtreéliminé avec les autres
le ZOOM jusqu'à ce que le temps de
déchets commerciaux.
projection soitclairement montré sur
le plafond ou le mur.
Advertisement
Table of Contents

Related Manuals for Roadstar CLR-3005P


Summary of Contents for Roadstar CLR-3005P
- Page 1 MONTH digits will digits will flash. Press UP/DOWN THE CEILING OR WALL OF A DAR commercial wastes for disposal. CLR-3005P replaced to avoid acid leaking that may flash. Press UP/DOWN adjust the to adjust the MINUTE digits.
- Page 2 Orologio digitale LCD con allarme, DOWN per regolare il giorno. LAC-2588TC della Roadstar è prodotto in DISPLAY nuovamente. conformità al D.M. no. 548 datato 28/08/ calendario, Radio FM e proiezio- 6.
Need help?
Do you have a question about the CLR-3005P and is the answer not in the manual?
Questions and answers