Advertisement
Quick Links
Download this manual
See also:
User Manual
Getting the Most From the Festool
For many woodworkers the construction of a butterfly leaf dining table like the small one
shown here is considered a rite of passage because it is very difficult to do correctly.
The table tops slide apart to reveal a self storing leaf that folds in the middle. By pulling
up on one half of the leaf both halves rise up to perfectly align with the table top both on
the flat top surface as well as along each edge. Then the two halves of the top slide to-
gether to engage the butterfly leaf in its deployed position.
Properly executed,
this operation is a
thing of beauty in
and of itself. Most
people watching a
butterfly leaf table
open for the first
time seem to be
transfixed as they
watch everything
side so effortlessly
into perfect align-
ment. And, watching
the leaf fold down
and store below the
table top is no less
captivating.
I often caution my
customers to be
prepared for the first
dinner party on their
new table. If the
guests see the butterfly leaf deploy, they
usually will stand around opening and
Domino Machine
Text and Photos by Jerry Work
aligning, self squaring and self locking
features of the sliding dovetail joint, build-
closing it time after
time just because it
is fun and interesting
to do.
Using conventional
tools and techniques
it is very difficult to
get all the pivot
points in exactly the
right places so de-
signing and building
such a table can be
quite complex and
intimidating. But, as
we will see while we
follow the construc-
tion of the table
shown here from
start to finish, using
the innovative Fes-
tool Domino ma-
chine and the self
Advertisement

Related Manuals for Festool Domino Machine


Summary of Contents for Festool Domino Machine
- Page 1 Getting the Most From the Festool Domino Machine Text and Photos by Jerry Work For many woodworkers the construction of a butterfly leaf dining table like the small one shown here is considered a rite of passage because it is very difficult to do correctly.
- Page 2 How should we describe this innova- tive tool? Early in the U.S. introduction planning I was asked by Festool USA how I thought the machine should be de- scribed. Because I had lots of experi- ence with loose tenon joinery using the three dimensional sliding table on my industrial slot mortising machine, I first...
- Page 3 fit perfectly into the mortise slot cut by the Domino machine and they are quite economical to buy. My recom- mendation is to simply use the Festool dominos and not try to reinvent that wheel on your own.
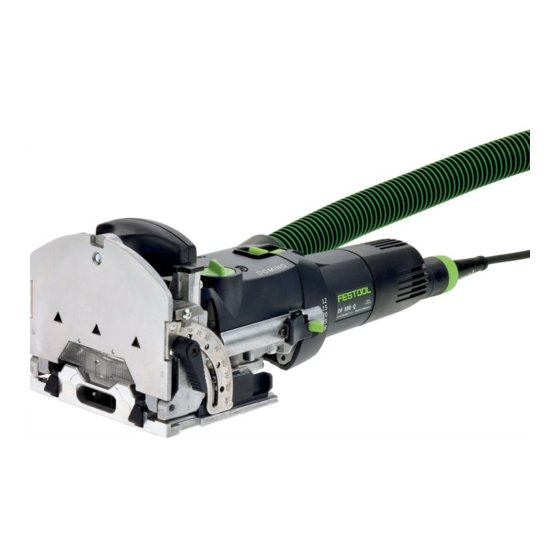
- Page 4 The Domino Body This sequence of photos shows how the body and fence can easily be separated by simply raising the lock tab as shown here. The wrench used to change cutters The fence will start to slide off the body as shown in the photos left and above exposing the rotating and oscillating cut- ter (red arrow).
- Page 5 The cutters can be easily changed as they just screw onto the threaded end of comes with the set of domino te- nons. the gear-driven shaft as shown by these photos. The photo below shows the cutters with Above, the wrench is positioned on the flats of the cutter tip.
- Page 6 shorter than the depth of the corresponding mortise. The top green knob turns to set the desired width of cut. Three settings are provided. The narrowest width (the set- ting shown below) matches the supplied domino tenon for each domino (tenon) thick- ness.
- Page 7 into the sides of the mortise slot, but the slot is longer than the width of the tenon al- lowing some assembly adjustment room side to side. The third width setting increases the oscillation to 23.2mm resulting in a 28.2mm mortise slot which pro- vides close to 10mm side to side adjustment...
- Page 8 10mm above the centerline of the cutter. The Domino Fence A lock lever secures the fence at the de- sired height. The fence moves up and Now let’s look at the adjustments on the down on machined ways so it remains fence part of the Domino machine.
- Page 9 The stop block is marked to center the bit on work pieces 16, 20, 22, 25, 28, 36 and 40mm thick. You can also simply use the height scale to set the fence any distance you want it to be above the horizontal cen- terline of the bit within the range of 7mm to 30mm.
- Page 10 This first photo is looking at the front of The right and left spring loaded alignment the Domino fence with the fence piece pins are shown in detail below. The right raised to the zero degree angle for clarity pin is mounted in an eccentric with a of view.
- Page 11 The vertical centerline of the cutter is also base of the fence (the fixed portion). I marked in several other ways (red ar- placed a rule on the inverted base of the rows) as well: by the “V” cast into the fence for the bottom left photo so you can fence base, by the line scribed on the see the centerline of the cutter lined up...
- Page 12 moving portion of the fence. As we saw The spring loaded pins are especially fast earlier, the center scribe line with the cir- and accurate. By hooking one of the pins cle cut through it is the horizontal center over an end or edge of your work piece, of the bit oscillation movement and hence you will place a mortise slot centered ex- is the side to side center of any mortise...
- Page 13 The first is a two part fence extender. One part attaches to each side of the Domino fence and each features a mov- able spring loaded reference pin and nu- meric scale. They attach by a clever dovetail machined into each side of the In the photo above the inside edge of the spring loaded pin is set to be 150mm away from the horizontal center of the...
- Page 14 The second very useful positioning ac- the in-out motion of the cutter (yellow ar- cessory is a saddle fence that attaches row). They capture and hold the edges of to the bottom of the moving portion of the the work piece making it easy to cut mor- fence.
- Page 15 end grain no matter which cutter you use Now that we are familiar with the or which width setting you select. Neat! Domino machine and the variety of ways to accurately register the The third accessory is for stabilizing the location of the mortise slot, let’s Domino machine when used upright cut- ting into the face of a work piece regis-...
- Page 16 There are only six ways you can join two pieces of wood together. I will refer to the surfaces of a board as the faces (the wide flat top and bottom of the board), the edges (the sides of the board) and the ends. Boards can be joined: 1) edge-to-edge Do that on both boards.
- Page 17 “wis- two part fence extender (called a “side dom” would have you place them in the stop” in Festool literature) we saw earlier. middle of the two work pieces to be Set the pin spacing to match the desired joined.
- Page 18 well. And, by having glue on both sides of the trapped narrow 1mm tongue wall, the joint is incredibly strong. In the example shown on this page the In the photo left my finger points to the R&S components are Purple Heart while joint going together and above is a photo the panels are Maple Burl.
- Page 19 Just for fun here is an edge-to-edge joint used to join two thick pieces of maple together to make a fancy countertop chopping block. Waterproof glue and four 10mm x 50mm Domino tenons make sure this chopping The Domino machine makes a fast, secure &...
- Page 20 glues. If your application demands ex- auxiliary spring loaded pins to position ceptional strength and the work pieces the Domino mortise slot(s). are more than 3.5 x the thickness of the If your work pieces are exactly the same tenon you intend to use, I suggest setting width, you can work from both edges.
- Page 21 through to the good side of your work pieces. Usually that will mean placing the mortise below the joint center as shown on the previous page and using a short tenon. This is where the 12mm cut depth setting is really handy. Edge-to-face joints are common when you want to mount one piece of wood You may need even more pocket...
- Page 22 The shorter the dis- This photo (supplied by Festool) shows tance between the edge of the leg (in this one example. The leg to base joint uses...
- Page 23 The legs are cabrio style cut from glued Domino Machine In Action up blocks of Maple. The Blood Wood skirts are attached to the legs with one Now let’s turn our attention to how the Domino loose tenon which is more than Domino machine simplifies and improves strong enough given the small size of this the construction of several different furni-...
- Page 24 “edge-to- outline on two adjoining faces of each edge” joints. block lying on the Festool MFT just be- hind the leg block in the bottom picture. Now set up the Domino machine to cut the leg-to-apron mortises in each face of Next, place the four blocks together so each leg blank as shown.
- Page 25 we discussed earlier. Simple to do, just Place the Domino fence on the leg sur- set the height pointer to 25mm and lock face where you want the mortise and the fence as shown in this photo (the slide it to where the centerline mark Domino body has been removed from the aligns with the mark you made on the leg fence so you can more easily see the...
- Page 26 machine to be plenty good enough for you to cut all the mortises on the mini- mum width setting allowing the tenon to do the leg top to skirt top alignment for you. However, if you prefer to cut a wider mortise slot and do your own alignment, there will be very little difference in the leg-to-skirt joint strength as most of the...
- Page 27 It is easy to make a tongue block with the base of the tongue up slightly less than 7mm from stock that is 12mm thick. That will pre- sent a 5mm tongue to insert into the 6mm slot cut on the inside of the skirts.
- Page 28 down as shown and you are done. Al- most..Be sure to sign and date your work be- fore delivering it to family, friends or cus- tomers. Generations from now that owner will want to know who built your beautiful piece of art furniture and when.
- Page 29 Next let’s move to another more challeng- two hands to do a one handed operation - ing coffee table that will help illustrate not good. even more and different ways the Domino I hit on the idea of the “convertible” coffee machine will speed up and improve the table shown quality of...
- Page 30 Inverted into the traditional create a ma- mode the table looks more ple frame fixed in the environment and around the the drawer opens easily in the walnut skirts traditional way. and drawer fronts when The book matched intermedi- the table was ate shelf and legs in Oregon in either Big Leaf Maple compliment the...
- Page 31 registered to the legs, and a Domino mor- tise and tenon frame-to-leg connection on both the upper and lower frames to pro- vide the strength necessary to offset the leg stress imposed by rolling the unit around and/or converting it from one mode to the other.
- Page 32 surface. We know that the Domino base- to-cutter centerline is 10mm. Our plat- form frame is made from 20mm stock so the resulting mortise will be exactly cen- tered on the frame and hold the frame fence to one-half the leg thickness so the leg will snugly fit inside the saddle fence.
- Page 33 holds it in that position while the cut is I keep a set of metric gauge blocks made. around just for such purposes. Remem- ber the step block built into the base of To check to make sure both mortises in the Domino machine? That slides back both sides of all four legs line up cor- rectly, I put a dry (no glue yet) Domino...
- Page 34 Here I have clamped one of the platform pieces down to the top of a Festool 1080 MFT. I have five MFTs in my studio and they all are in use constantly as I...
- Page 35 with the end of the work piece and plunge to make the cut. The result is shown on the bottom of the previous page along with one of the legs that it will mate to. The photos on this page show how the ends of the 10 x 10mm tongues on the side skirts are cut back to clear the Dom- how the vertical M&T joint between...
- Page 36 make the four square openings for the book matched top panels. Mitered corners are not strong enough for such an application so Domino M&T joints were used to re- inforce them as shown below left and in detail below. The Domino fence was set to center the bit on the 20mm thickness of these pieces.
- Page 37 For more info on clamping into a known square corner, look at the manual I wrote about the Festool MFT which is available for download from the festoolusa.com web site.
- Page 38 The following photos show how I like to finish all components in the flat, before final assembly. With no top in the way it is easy to polish the book-matched maple pan- els that form the intermediate shelf and to spruce up the skirts, legs and frame members.
- Page 39 Let’s switch gears a bit from how the Domino machine does all sorts of very precise M&T joints to how it can do many other things with ease as well. Wine Service Center First, let’s look at an interesting wine service center, this one made from Purple Heart and Maple Burl.
- Page 40 and lower side frame members and to hold the leg stretchers. Since those frame members are oriented with their wide face up and down (where the front and rear frame members are ori- ented with their narrow edge up and down) we need to cut those mortises in a vertical, rather than horizontal orientation as shown below.
- Page 41 photos below. Here is the locating of the leg stretcher mortises. With both sides of the leg curved you need the cut off piece to get a reference. Be sure to align the cut off pieces in the same place up and down on the leg so the relative saw kerf is the same on all four legs.
- Page 42 such as cutting the tracks for the door slides, cutting the dados to hold the bottom of the cabinet, cutting the dados that hold the side burl panels, etc. Meanwhile, let’s see what the skeleton looks like. The shelf is not in place for these photos.
- Page 43 These are the main pieces of the skele- ton. Note that the top edge of the front, back and side frame members all align with the top of the legs. The lower edge of the front, back and side frame mem- bers align together.
- Page 44 In the photo above When I first started this notice how handy the piece I thought it would Festool DX 93 E de- look good with a book tail sander is for matched maple top. reaching into tight...
- Page 45 Now let’s construct the rail, stile and ma- ple burl back panel. The doors will be done the same way. We saw earlier how I now use Domino M&T joints cut inside the tongue and groove joints of the rail and stile components to both reinforce these joints and to make them self- aligning.
- Page 47 The self-aligning feature of a Domino grain component that will attach to the M&T joint cut inside a normal R&S long grain of the back lower stile, we can tongue and groove joint really speeds up screw these two together with the screws the process of assembling a multi-panel placed inside the sliding dovetail slot.
- Page 48 mum depth) is cut parallel with and centered on the bottom and top surfaces of the door. Then I turned the Domino machine sideways and cut a 5mm mortise centered on the 10mm mortise both side to side and top to bot- tom.
- Page 49 smaller in diameter than the width of the sliding door tracks machined in the front upper and lower frame members. I cut the length of the tenon so the end of the pin would be flush with the bottom or top surface of the door when it was fully in- serted into the 10mm mortise.
- Page 50 Now that we have seen how the Domino The “finished product” pictures were M&T can be used for joining pieces, taken in a show context in one corner of aligning pieces to be joined by other my booth space along with a couple of means, and used for things like hidden the other “Domino inspired”...
- Page 51 Retro, modern, clean, colorful and func- tional all describe what I was after, and what I though she would want. She also needed to be able to recon- figure her work space to fit a variety of the projects she does so “flexibility”...
- Page 52 always does, to examine the various Sliding dovetail stringers going front to pieces on display, oohing and awing as back and spaced about 300mm apart, she went. A friend with them noticed the such as I use under solid wooden kitchen “happy birthday”...
- Page 53 But, how do you hold the blood wood couple of pages back. The slide-out work banding across the end grain of the ma- surfaces are what allow her to configure ple top? The top has to move front to the work space to fit the requirements of back so you can’t just attach the blood wood to the top.
- Page 54 The oversized hole will take up any error if the top wants to contract more than I al- lowed for. I also used a Festool counter-sink on the side of the tongue that would be against the top to provide...
- Page 55 Here you can see how the rear corners fit so nicely while properly allowing for the movement. The next step was to provide for the banding across the front. I made work Worked like a charm! surfaces by Domino M&Ting (is that be- coming a verb?) the plywood extending The whole top can simply be lifted off and work surface to a side slide that would...
- Page 56 would be considered the “back” of the desk? The answer to this set of questions was to make the pedestals look exactly the same on both the front and the back and also to make them look the same side to side even though they are different widths.
- Page 57 stile. By gluing the Domino tenon into a tight fit mortise in the back side of the solid maple pedestal end, the exposed end of the te- non would be visible through the 5mm mor- tise slot as in the photo at the bottom of the last page (photo taken be- fore the tenon was...
- Page 58 through holes as we discussed earlier in In the photo above I have installed the this manual. other side with all the drawer slides in place and I am obviously please with this slick solution. Again, thanks, Domino ma- chine! It was easy to build the blood wood top-of- pedestal stand offs us-...
- Page 59 I added decorative corner dovetails made from blood wood to the corners of the pedestal bases to dress them up a bit. While you may never make a desk such as this, I hope some of the Domino ma- chine specific procedures demonstrated here find their way into your woodworking experience.
- Page 60 Festool Domino machine - the but- of the Domino and the edge of the top terfly leaf table.
- Page 61 At the vary beginning of this manual I Butterfly leaf table said that the construction of a butterfly leaf table was for many woodworkers a This example is a very small dining table bit of a rite of passage. Because it is so sized to fit an upscale arts and crafts difficult to build cor- rectly using conven-...
- Page 62 ble top on hinges that allow it to auto- leaf assemblies and align them the way matically deploy and line up with the rest they will be when the leaf is deployed. of the table surface just by lifting one sec- Then the table mechanism is placed up- tion of the leaf.
- Page 63 tail slots so they can be properly adjusted and the legs to allow the diner knee after the table is completed as well. space without hitting the leg structure. Let’s go back to the beginning and start For such a small table, the minimum with the functional design requirements.
- Page 64 Gluing up the top plates is just a matter of out flat and remain that way. The glue grain matching to achieve the desired lines sand off quickly with the Festool Ro- look. In this case there are four boards in tex sander followed by working up each half of the top.
- Page 65 of stock so the hinge line would define two different leaf halves rather than just being an interruption to the flow of the grain. It looks really good in person, almost jewel like. While we are on these pho- tos, notice how Domino te- nons are used for the verti- cal positioning of the two ta- ble halves and the leaf to...
- Page 66 100mm apart. Line up the edges. As you can see in this photo, I used two Festool MFTs held side to side with table joining ele- ments but left a bit of a gap between the two tables. We...
- Page 67 Most books say to cut through dovetails a bit long and sand them down clamp a long Festool guide rail parallel with my intended line of cut for the slid- ing dovetail slots that will hold the side skirts (photo above).
- Page 68 slots in the underside of the top. And, Break the edges on the ends and under- you have to be able to slide these dove- side of the skirt pieces so they will have a tails more than 750mm without binding. nice feel to the hand.
- Page 69 height of your skirts, four cross members, and stiffeners to reinforce the cross members. Each joint is a sliding dovetail for strength and positional accuracy pinned with screws. Make the overall hinge line in the leaf will be ex- actly in the middle of your table. When the leaf is folded and stored beneath the top plates the hinge side of the leaf must clear...
- Page 70 15mm projection of the alignment tenons On normal size tables the frame can be and dowels and around 20mm of net generous in size and still leave plenty of support for the pivot mechanism. room for the leaf and leg movement so the inside of the end skirt to the outside of The only other measurement you need to the outboard-most cross member is not...
- Page 71 Note in the lower photo how I am using two Festool MFTs, each with a rubber pad protecting the finished top surface, to slide the whole thing together.
- Page 72 Next, let’s tackle the leg assemblies. preventing rack when the table is pushed Here is where the extreme strength of the from one end. Since we don’t have a stretcher, we need to build the leg with the anti-rack strength derived in some other way.
- Page 73 The photos on this page show more de- the details better. The frame will remain tail. One interesting thing about this con- stationary. The skirt, table top, leg and struction technique is if you don’t glue the torsion box fillers (red arrow) will all move leg to top plate tenons you can take the together as the table top plates are re- whole assembly apart if you ever need to...
- Page 74 This is easily done with a neat Domino “trick.” Drill the through holes to be larger than the diameter of the attachment screws. Center a Domino mor- tise about 5mm to 10mm deep on those at- tachment holes as shown here. If the maple top plate wide grain moves relative...
- Page 75 Once you also add the leaf guide pad assembly, use screws to pin these dovetails in place and you are nearly done. Notice how handy the Festool right angle attachment for the drill is in getting into the tight re- cesses of the frame.
- Page 76 The only thing left to do is add stop blocks to the inside of the skirts and the inside of the frame to limit how far the two top plates can be retracted. These are not absolutely necessary, but they do help the ergonomics of the table.
Need help?
Do you have a question about the Domino Machine and is the answer not in the manual?
Questions and answers