Festool DOMINO XL DF 700 EQ Instruction Manual
Hide thumbs
Also See for DOMINO XL DF 700 EQ:
- Original operating manual (93 pages) ,
- Instruction manual (56 pages) ,
- Operating manual (20 pages)
Table of Contents
Advertisement
Quick Links
Festool Group GmbH & Co. KG
Wertstraße 20
73240 Wendlingen
Germany
www.festoolusa.com
Instruction manual
Page 6
IMPORTANT: Read all instructions before using.
Guide d'utilisation
Page 22
IMPORTANT: Lire toutes les instructions avant de démarrer les travaux.
Manual de instrucciones
Página 39
IMPORTANTE: Lea todas las instrucciones antes de usar.
Manual de instrucciones
DF 700 EQ
DISTRIBUTED BY:
Pro Wood Finishes
14622 Southlawn Lane
Rockville MD 20850
Ph: (301) 424-3033
Instruction manual
Guide d'utilisation
Advertisement
Table of Contents

Related Manuals for Festool DOMINO XL DF 700 EQ


Summary of Contents for Festool DOMINO XL DF 700 EQ
- Page 1 DISTRIBUTED BY: Pro Wood Finishes 14622 Southlawn Lane Rockville MD 20850 Ph: (301) 424-3033 Festool Group GmbH & Co. KG Wertstraße 20 73240 Wendlingen Germany www.festoolusa.com Instruction manual Page 6 IMPORTANT: Read all instructions before using. Guide d’utilisation Page 22 IMPORTANT: Lire toutes les instructions avant de démarrer les travaux.
- Page 2 1-10 1-11 1-12 1-13 1-17 1-16 1-15 1-14...
-
Page 3: Table Of Contents
Contents Diameter Revolutions or reciprocation per minute Symbols..........6 Safety instructions ....... 6 speed General safety instructions ....6 maximal no load speed Technical data ........8 0 max millimeter Intended use ........8 advise, hint Functional description ......9 Class II Construction Electronics ........... - Page 4 carrying, pulling or unplugging the power tool. power tool for your application. The correct Keep cord away from heat, oil, sharp edges or power tool will do the job better and safer at the moving parts. Damaged or entangled cords in- rate for which it was designed.
-
Page 5: Technical Data
(to the State of California) to cause cancer, – Only cutters provided by Festool for this pur- birth defects or other reproductive harm. Some ex- pose may be mounted on the power tool. The... -
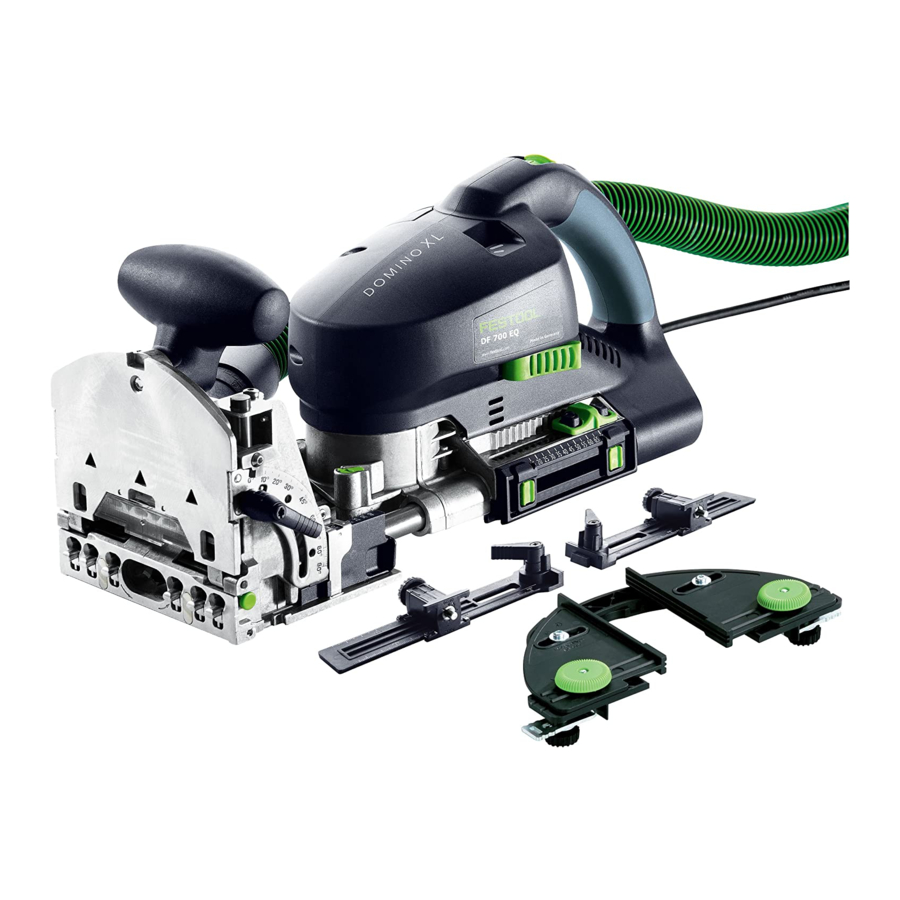
Page 6: Functional Description
In North America, only Festool machines with the voltage specifications 120 V/60 Hz may be With the joiner unplugged, inspect the mortis- used. - Page 7 tightened on the spindle (Refer to "Settings Set up the joiner for the appropriate type of op- Changing tools"). eration as described throughout the remainder of this section. WARNING Make sure that the fence height and angle lock- ing levers are properly tightened. Mortising bits that are bent or damaged should no Install the power cord into the Plug-It recepta- longer be used.
- Page 8 is the distance between the bottom of the fence face a) with selection slide and the centerline of the mortising bit. Loosen the clamp lever for the routing height There are two features available for setting the adjustment [4-1]. fence height: Using the front handle [4-2] raise the front part of the guide frame.
- Page 9 Risk of injury Never use dull or damaged mortising bits. Press one or two snap buttons [6-1]. Only mortising bits provided by Festool for this Set the slide for the routing depth setting [6-2] purpose may be mounted on the power tool.
- Page 10 Removing the tool Lift the unlocking device [7-2] until it audibly disengages using the open-ended spanner [7- 3] supplied (SW 12). Separate the motor unit [7-5] from the guide frame [7-4]. Press and hold the spindle lock [8-1]. Loosen the cutter [8-3] using the open-ended spanner [8-2] and remove.
-
Page 11: Operation
Setting stop pins Widening the contact surface The stop pins on the front of the fence are used to The contact surface widening device [10-1] can be register the tool against the edge of the workpiece. used to enlarge the contact surface when routing This provides rapid and precise placement of the on the workpiece edge, thus allowing safer guid- tool on the workpiece. - Page 12 Always read applicable national regulations be- fore extracting hazardous dust. At the extractor connector [1-15], a Festool mobile dust extractor with an extraction hose diameter of 27 mm can be connected. Always work with a dust extractor for safety and...
-
Page 13: Working With The Machine
Working with the machine Overview, General Notes and Tips see page We recommend routing and joining a test work- piece before machining the actual workpiece. Wood is a natural, non-homogenous material and because of this, its dimensions will most likely de- viate slightly during processing, even if the machine is set accurately. -
Page 14: Service And Maintenance
see page 12-3 Our recommendation: Please check each dowel hole for chippings and clear these if necessary. Always work with a dust extractor to improve the removal of chippings. Route the first hole for each workpiece without play (dowel hole width = DOM- INO dowel width) and the other dowel holes with the large dowel hole width. - Page 15 imately 1mm. Any more than this and the bit will CAUTION be too short for proper fit of the tenons. Cleaning and maintenance Certain cleaning agents and solvents are harmful to plastic parts. Blow off the exterior of the machine with low- pressure compressed air to remove dust, but do Some of these include, but are not limited to: not blow air directly into the air cooling vents on...
-
Page 16: Troubleshooting
The order numbers of the accessories and tools can Many Festool products are shipped in a unique sys- tem container, called "Systainer". This provides be found in the Festool catalogue or on the Internet protection and storage for the tool and accessories. under "www.festoolusa.com". -
Page 17: Environment
Excluded from the coverage under this warranty All customers receive a free extended limited war- are: normal wear and tear, damages caused by ranty (1 year + 2 years = 3 Years) on new Festool misuse, abuse, or neglect; damage caused by any-... - Page 18 Festool portable power tool that is found to have a Festool reserves the right to reject the repair of any defect in materials or workmanship during the tool that is not part of the US/Canada product line.
Need help?
Do you have a question about the DOMINO XL DF 700 EQ and is the answer not in the manual?
Questions and answers