Thermador PC36 Care And Use Manual
Professional cooktops
Hide thumbs
Also See for PC36:
- Care and use manual (104 pages) ,
- Installation instructions manual (52 pages) ,
- Care and use manual (68 pages)
Advertisement
Available languages
Available languages
Quick Links
Advertisement

Related Manuals for Thermador PC36

Summary of Contents for Thermador PC36
- Page 1 D USE For Thermador Professional ® Cooktops ModeLs P24WK PC36 PC48 Thermador...
- Page 2 A Special Message to our Customers Thank you for selecting the Thermador Professional ®Cooktop. We recommend that you take time to read this entire booklet before using your new appliance for the first time. The booklet contains suggestions we believe will be helpful as well as directions...
- Page 3 Surface Burner Cooking Recommendations .14- terials and the back edge d the Cooktop must Using the Grill ............ be installed with a Thermador Low Back Back- Grill Cooking Recommendations ....19- guard. If more than 12" (305 mm) horizontal Using the Griddle ............
- Page 4 Section 1 : GENERAL SAFETY INSTRUCTIONS Safety Precautions ELECTRICAL REQUIREMENTS AND GROUNDING iNSTRUCTiONS CAUTION PLEASE READ CAREFULLY DO NOT UNDER ANY C_RCUMSTANCES CUT OR REMOVE All Cooktop models and the Wok require an electri- THE SEPARATE GROUND W_RE OR cal circuit rated at 120 volts, 60 Hz., 10 Amps, THE THIRD (GROUND} PRONG...
- Page 5 Section1: GENERAL S AFETY INSTRUCTIONS CAUTmON SAFETY PRACTICES TO AVOID PERSONAL INJURY Your new Thermador ProfessionaP • In the event a burner goes out or too close to any element, Cooktop has been designed to be and gas escapes, turn off the...
- Page 6 Section 1: GENERAL SAFETY INSTRUCTIONS , Do not use flammable clean- Never _eave the cooktop work areas, cooking areas or the attended when using high flame edge of the cooktop. ers when c_eaning the grill. settings. Boil-overs cause smok- * Be sure aH cooktop and grill ing and greasy spills that may ig-...
- Page 7 Board for built-in griddle area. A portable griddle and other accessories are available from your Thermador dealer. Ensure that the burner caps are seated correctly on the burner bases. Turn on each burner to check for proper flame color. See Page 11 for details.
- Page 8 Section3: DESCRiPTiON MODEL AND PARTS IDENTIFICATION FOR 48" MODELS Model PC484WK Model PC486GE (6 Burners and Griddle) (4 Burners and Wok) Model PC484GGE Model PC486GL (4 Burners and Griddle and Grill) (6 Burners and Grill) Key for P048 Models 12" Low Back or Island Trim (ordered separately) Burner Grates &...
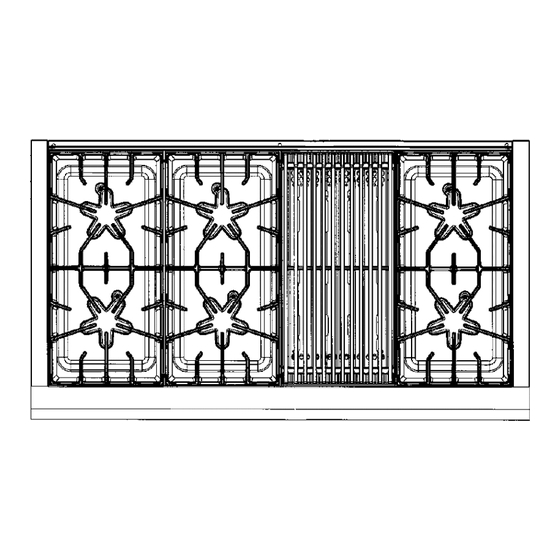
- Page 9 Section 3: DESCRiPTiON MODEL AND PARTS IDENTIFICATION FOR 36" MODELS Modem PC364GL (4 Burners and Grill) Mode_ PC364GE (4 Burners and Griddle) Key for P036 Mode_s 1 - 12" Low Back or island Trim (ordered separately) 2 - Burner Grates & Burners 3 - Griddle (PC364GE) 4 - Grill (PC364GL) - shown in top view...
- Page 10 Section 3: DESCRiPTiON MODELAND PARTS IDENTIFICATION FOR 24" MODELS ® Mode_ P24WK Key for Mode_ P24WK and PC484WK Low Back Guard (shown). Optional Island Trim available. (Low Back or Island Trim must be ordered separately.) 24" Wok cooktop Wok Pan with Wok pan support ring Control knob...
- Page 11 Section 4: USING THE COOKTOP Using The Cooktop CONTROL KNOBS Sea_ed Burners BTU Output for Standard Burners , HI is equivalent to 15,000 BTU / HR The control knobs for two sealed , LO is equivalent to 2,100 BTU / HR gas burners, one in front and one in the rear, are located directly...
- Page 12 Section 4: USING THE COOKTOP To maintain a low or simmer Operation of the ExtraLow • Burners heat, bring food to a rolling $ingte Point ignition boil. Stir well, then cover the • XLO, the very lowest setting, pan and lower the heat to a Brass is achieved by cycling...
- Page 13 Section4: USING THECOOKTOP AUTOMA?[C REqGNmON POWER FAILURE FLAME HEIGHT In the event of a power failure, The correct flame height If any one or more burners or grill standard burners pends on 1 ) size and material blow out, the electronic igniter automatically sparks to reqight the...
- Page 14 Section4: USING THECOOKTOP Cookware Recommendations CAUTmON'. Food packaged in aluminum foil should not be placed directly on the burner grate. Aluminum foil can melt during cooking. Do not let plastic, paper or cloth come in contact with a hot burner grate. They may (51 mm) melt or catch fire.
- Page 15 Section4: USING THECOOKTOP Specialty Cookware Canning Tips: A flat base pan is preferred to one with a con- cave, convex or rippled base. When using two canners at the same time, use staggered burners. Do not block air to the burn- ers.
- Page 16 Section4: USING THECOOKTOP Surface Burner Cooking Recommendations Food Start Setting Finish Setting Finish Setting Standard Burners ExtraLow@ Burners BEVERAGE8 MED - heat milk, LO - finish heating XLO = keep warm, Cocoa cover cover* BREAD8 MED = preheat skillet MED LO to MED = Same as Standard French Toast, Pancakes, cook...
- Page 17 Section4: USING THECOOKTOP Surface Burner Cooking Recommendations Food Start Setting Finish Setting Finish Setting Standard Burners ExtraLow® Burner Simmering: Stewed Nt = cover, 4 to 1 = simmer slowly Chicken, Corned Beef, bring liquid Tongue, etc. to a boil PASTA8 Nt = bring water to a MED HJ to HI = to Same asfor StandardBurners...
- Page 18 It no fixed positions on the Your Thermador Pro= should burn completely along control knob between HI and LO. fessionaP grill is equipped with an both sides of the burner tube.
- Page 19 Section4: USING THECOOKTOP Using the Grill DisassemHy/Assembiy of the Grill Follow steps below to disassemble components in the grill box. Use extreme care when placing grill components into grill Remove the grill grate, stainless steel radiant compartment. Avoid contacting and burner from the grill box. ceramic igniter which...
- Page 20 Section4: USING THECOOKTOP Using the Grill COOKING ON THE GRILL GRtLLING Suggestions • The burner should light within approximately 5 seconds. € _ Trim any excess fat from the meat before cooking. Cut slits in the remaining fat around the edges at 2"...
- Page 21 Section4: USING THECOOKTOP Grill Cooking Recommendations Food Weight Control Total Suggested Special instructions Thickness Setting Cooking Time and Tips MEATS Beef 1/2 to 3/4 inch 14 to 18 minutes Hamburgers Grill, turning once when uices rise to the surface. (13 mm to 19 ram) 12 to 15 minutes Do not leave hamburgers unattended since a flare...
- Page 22 Section4: USING THECOOKTOP Grill Cooking Recommendations Food Weight Control Total Suggested Special hstructions Thickness Setting Cooking Time and Tips MEATS (continued) Pork Ham Steaks Remove excess fat from 1/2 inch 4 to 8 minutes (precooked) edge. Slash remaining fat at 2-inch (51 mm) intervals.
- Page 23 Section4: USING THECOOKTOP About the Electric Griddle (Available on some models) DESCRIPTION soapy water then rinsed with clearwater prior to use. The built in griddle is made of restaurant quality The griddle may be used without any butter, margarine aluminum coated with titanium.
- Page 24 Control Knob Your new Thermador Professional Wok, has a heavy cast iron burner typical of those used in restaurants. There are no fixed positions on the knob between HI and LO.
- Page 25 Section5: WOKOPERATION ASSEMBLY Wok Trivet Remove all packaging materials and tempo- rary labels from the wok pan. Make sure that the plastic ties used for shipping have been removed. ( 55.2 mm) 21-3/4" Bottom Support Ring (attached to cooktop) Check that the support ring is properly placed above the burner.
- Page 26 Section6:CARE ANDMAINTENANCE Care and Maintenance Use clean applicators, i.e. soft cloths, sponges, paper towels, soap-filled pads, for cleaning scouring. Avoid cleaning any part of the cooktop while it The use of brand names in these recommenda- is hot. Do not clean any removable part of the tions is intended only to indicate a type of cleaner.
- Page 27 Section6:CARE ANDMAINTENANCE Cooktop Cleaning Recomm Cooktop Part / Material Suggested Cleaners Important Reminders Nonabrasive Cleaners: Stainless steel resists most Exterior Finish/Back Guard water detergent, food stains and pit marks Stainless Steel ammonia, Fantastic ® Formula provided the surface is kept 409 ®.
- Page 28 Section6:CARE ANDMAINTENANCE Cooktop Cleaning Recommendations Cooktop Part / Material Suggested Cleaners Important Reminders Never flood a hot griddle Griddle / Titanium-surfaced Remove drip tray and discard with cold water. This grease into a grease resistant warp or crack the aluminum container for disposal.
- Page 29 Section6: CARE ANDMAINTENANCE Cooktop Cleaning Recomm Cooktop Part / Materia_ Suggested C_eaners _mportant Reminders GrHm Drip Pan I Stainless • Hot sudsy water; rinse and dry clean in a self- thoroughly. cleaning oven. After grease removal, drip pan may be put into dishwasher. Stee_ GrH_ Grate/Porcelain While the grate is hot (but the...
- Page 30 Section6: CARE ANDMAINTENANCE Cooktop Cleaning Recomm! _mportant Reminders Cooktop Part t Materia_ Suggested C_eaners Surface Trim Strips The over-spray from liquid Hot sudsy water; rinse and drY cleaners leave thoroughly. outline shadow. If allowed Formula 409 ® or Fantastic ®. dry, leave Wipe...
- Page 31 Section 7: BEFORE CALLING FOR SERVICE POWER FAILURE knobs to the position. The two ExtraLow ® burners In the event of a power failure, the far left side cannot be used Then, the standard burners only standard (non m grill can be lighted by holding during a power...
- Page 32 Be sure to check these items first: or see our website: Is there a power outage in the area? Is the household fuse blown or the circuit breaker tripped? w_Nv,.thermador.com Is the Cooktop disconnected from the electrical supply? Before installation, record mFTHE BURNERS...
- Page 33 (i.e., airplane flights, ferry charges, isolated geographic regions). Thermador WH[ Pay For: All repair labor and replacement parts found to be Warranty applies to appliances used in residential...
- Page 35 EL D'UTILISATIONET D'ENTRETIEN Mod61es P24WK Des tables de cuisson Thermador Professional ® PC36 PC48 Thermodor...
- Page 36 Si vous nous ¢crivez, n'oubliez pas d'indiquer le mod61e et le numero de scrie de votre cuisiniere. Cordialement, Les scientifiques du Service aux consommateurs chez Thermador AVERTISSEMENT L'information fournie dans le present manuel doit etre rigoureusement respectee, sous risque d'incendie...
- Page 37 I"appareil. Si I'emplacementou le lieu d'installation requiert une conversion d'un type de gaz a un autre, contactez Thermador au 1 (800) 735°4328 ou le detaillant chez qui vous avez achete ESSAIS CONFORMES,_ LA NORME AMERICAINE l'appareiLLe necessairede conversionsursite de touteslestables ANSI Z21.1 REGISSANT LES APPAREILS...
- Page 38 Chapitte1 : CONSIGNES G C:NERALES DESECURITE _:_ Consignes de securit6 EXlGENCES ELECTRIQUES ET INSTRUCTIONS POUR MISE A LA TERRE MISE EN GAP, DE A LIRE ATTENTlVEMENT NE COUPEZ ET NJ N'ENLEVEZ Tousles modeles de tables de cuisson et le wok AUCUN CAS LE FIL DE TERRE doivent...
- Page 39 Chapitre1 : CONSIGNES G C:NERALES DESECURITE MJSE EN GARDE CONSIGNES DE SECURIT¢: DESTINFES A ¢:VITER LES BLESSURES Votrenouvelletablede cuissonThermador Si un brOleurs'eteintetquedu gazs'en cuisson, des br_leurs ou des echappe, eteignezole et ouvrez une ProfessionaJ®a et6 congue pour 8tre un griJJes de br_31eurs tant qu'iJs ne fen6tre ou une porte.
- Page 40 Chapitre1 : CONSIGNES G C:NERALES DESECURITE MISE EN GARDE CONSIGNES DE SECURJTE DESTINEES A EVJTER LES BLESSURES placez poignees • * Ne laissez jamais la table N'utilisez produits euisson sans surveillance Iorsq ue recipients vers I'interieur, d'entretien inflammables pour vous utilisez une flamme forte.
- Page 41 Chapitre 2 :AVANT D'UTILISER L 'APPAREIL Avant d'utiliser votre table de cuisson pour la premiere fois I. Assurez-vous que vous avez tous les articles correspondant a votre mod¢le tels qu'6numer6s darts le tableau ci-dessous. 2. Notez le modSle et le numero de s6de de votre appareil tel que decrit a la page 64. Ces renseignements vous seront utiles si devez contacter votre centre de service...
- Page 42 Chapitre 3 : DESCRiPTiON Identification du modeteet des pieces- modelesde 121 cm (48") MOD_:LE PC484WK MOD#LE PC486GE (6 brQleurs et une plaque de cuisson} (4 br_leurs et un wok} =:II:::::=U=:::::_* 2_IIII _. MOD_:LE PC484GGE MOD_:LE PC486GL (4 br61eurs, une plaque de cuisson (6 brQleurs et un gril}...
- Page 43 Chapitre 3 : DESCRIPTION Identification du modeleet des pieces- modelesde 91,5 cm (36") MOD#LE PC366 MOD#:LE PC364GL (6 bre_eurs) (4 brQ_eurs et un gri_) MOD#:LE PC364GE (4 brQmeurs et une p_aque de cuisson) modules P036 L6gende Plaque de protection basse de 30,5 cm (12") ou enjoliveur pour installation...
- Page 44 Chapitre 3 : DESCRiPTiON Identification du modeleet des pieces- modelesde 61 cm (24") MOD#LE P24WK L6gende des modules P24WK et PC484WK Plaque de protection basse (voir illustration ci-dessus). Enjoliveur pour installation en ilot disponible en option. (la plaque de protection Wok avec son couvercle I'enjoliveur sont a commander s6par6ment)
- Page 45 Chapitte4 : UTILISATION DELATABLE DECUISSON Utilisation de la table de cuisson BROLEURS Puissance de sortie BTU des BOUTON8 DE COMMANDE br_leurs standard Les boutons de commande ° HI est equivalent a 15 000 BTU/h. deux br01eurs avant et arriere, * LO est equivalent a 2 I00 BTU/h. hermetiquement encastres, sont...
- Page 46 Chapitte4 : UTILISATION DELATABLE DECUISSON ou non d'un couvercle sont des Fonctionnement disparaissent quand elle est facteurs influent eteinte. M6me quand elle est brQleurs ExtraLow@ I'homogen6it6 eteinte, de la vapeur et un leger • XLO, le reglage le plus bas, fremissement seront temperature...
- Page 47 Chapitre4 : UTILISATION DELATABLE DECUISSON Aucun deux brGleurs DESCRIPTION DE LA FLAMME RALLUMAGE AUTOMATIQUE ExtraLow ne peut 6tre utilise Si un ou plusieurs brGleurs ou le pendant une panne de courant. gril s'eteignent, I'allumeur fonce Assurez-vous vous electronique produit auto- avez _teints.
- Page 48 Chapitte4 : UTILISATION DELATABLE DECUISSON Recipients recommandes MiSE EN GARDE Les aliments enveloppes dans du papier d'aluminium ne doivent pas 6tre places directement sur la grille des brOleurs. La feuille d'aluminium peut fondre pendant la cuisson. Ne laissez ni plastique, ni papier ni chiffon 51 mm (2") en contact...
- Page 49 Chapitre4 : UTILISATION D ELATABLE DECUISSON Recipients pour specialit6s CONSI=ILS D'UTILISATION : II est pref6rable d'utiliser un recipient a fond plat plut6t qu'a fond concave, convexe ou ondul& * Si vous utilisez deux cocottes en m6me temps, placez-les sur des brOleurs d6cales. Ne bloquez pas la circulation d'air autour...
- Page 50 Chapitre4 : UTILISATION DELATABLE DECUISSON Conseils de cuisson les brOleurs avec Aliments R_glage initiat R_glage final R_glage final Br_leurs standard BrQleurs ExtraLow® BOI88ON8 MAD- Chauffertelait,couvrir. LO - Finirla cuisson XLO - Maintenir au chaud, Cacao couvrez* PAIN MAD- Prechaufferte po6bn MADLO a MAD - Cuire Identiqueaux brOleursstandard Pain dore, c r6pes,...
- Page 51 Chapitre4 : UTILISATION DELATABLE DECUISSON ConseHs de cuisson avec les brOleurs Aliments R_glage initial R_glage final R_glage finat Br_leurs standard Br_leurs ExtraLow@ Faire mijoter : poulet a HI- Couvnr, porter le liquide a 4 a 1 = Pour mijoter F6touff6e,corned-beef, 6bullition langue, etc.
- Page 52 HI et LO. deux cetes du tube. Pour allumer le brQleur, appuyez Votre nouveau gdl Thermador Un melange air-gaz incorrect peut sur le bouton et tournezde dans le Professional® 6quipe d'un produire une flamme...
- Page 53 Chapitre4 : UTILISATION DELATABLE DECUISSON Utilisation du gril D6montage/remontage du gril MISE EN GARDE Suivez les instructions ci=dessous pour demonter 61ements du compartiment du gdl. Soyez extr_mement prudent quand vous pJacez Retirez la grille du gril, le foyer radiant en acier inoxydable et le brGleur du compartiment.
- Page 54 Chapitre4 : UTILISATION DELATABLE DECUISSON Utilisation du gril CUISSON SUR LE GRJL Suggestions de cuisson au GRIL • Le brOleur doit s'allumer au bout de cinq secondes. Enlevez le surplus de gras avant de faire cuire la viande. Faites des incisions dans le gras restant autour des bords a intervalles o Prechauffez le gril pendant de 51 mm (2").
- Page 55 Chapitre4 : UTILISATION DELATABLE DECUISSON Conseils de cuisson au gril Aliments Temps de cuisson Instructions partieuii_res et ¢onsei[s Fairegrilleren ne retoumantqu'une VlANDES seule fois au moment o_ les jus Boeuf remontent a [a surface. Ne pas 134 19mm 14 a 18 minutes Hamburgers laisser pas les hamburgers sans (1/2 a 3/4")
- Page 56 Chapitre4 : UTILISATION DELATABLE DECUISSON Conseils de cuisson au gril Aliments Poids ou R_glage Temps de euisson Instructions sp_ciates _paisseur sugg_r_ et eonseils VlANDES (suite) Porc Retirer rexcesde grasdes bords. Faites des incisions dans le gras Steaks de jambon restanta desintervallesde 51 mm 4 a 8 minutes (precuits) 13 mm (1/2")
- Page 57 Chapitre4 : UTILISATION DELATABLE DECUISSON A propos de la plaque de cuisson (Presente sur certains modeles) PREPARATION DE LA PLAQUE DE CUI$$ON Pour un resultat optimal, la plaque de cuisson doit La plaque de cuisson encastree est de m6me qualite _tre a niveau ou legerement inclinee...
- Page 58 Instructions d%stallation foumies avec I'appareil et aux regbmentations localesapplicabbs au b_:timent. Votre nouveau brOleur pour wok Thermador Professional Boutondecommande est en fonte et identique a ceux utilises dans les restaurants. Puissance...
- Page 59 Chapitte5 : UTILISATION D UWOK Fonctionnement du wok MONTAGE DU WOK Tr6pied du wok I. Retirez tousles matedaux d'emballage et les etiquettes du wok. 2. Assurez-vous d'avoir bien enleve toutes attaches en plastique utilisees pour le transport. (21-s/4") 55,2 cm Anneau support (fix6 a la table...
- Page 60 Chap{tre 6 : ENTRETIEN E TNETTOYAGE et nettoyage eviter les traces d'eau. MISE EN GARDE Utilisez des chiffons, eponges, serviettes en papier, tampons a recup@er, etc. doux et propres, pour Evitezde nettoyerla table de cuisson quand elle est encore nettoyer et recurer. chaude.
- Page 61 Chap{tre 6 : ENTRETIEN ETNETTOYAGE Conseils de nettoyage de la table de cuisson Pi_ce/mat_riau Produits d'entretien Rappels sugg_r_s importants Produits d'entretien non abrasifs : Finition externe/Plaque L'acier inoxydable resiste a la eau chaude et produit detergent, plupart des taches d'aliments et de protection : Acier ammoniac,...
- Page 62 Chapitre 6 : ENTRETIEN ETNETTOYAGE Conseils de nettoyage de la table de cuisson Pi_ce/mat_riau Produits d'entretien Rappe_s sugg_r_s importants Retirer le bac a graisse et en jeter le Nejamaisrincerlaplaquechaudea Plaque de cuisson/ contenu dans un contenant prevu Feaufroide. La plaque d'aluminium Rev®tements en titane cet effet.
- Page 63 Chapitre 6 : ENTRETIEN ETNETTOYAGE Conseils de nettoyage de la table de cuisson Pi_ce/mat_riau Produits d'entretien Rappels sugg_r_s irnportants Bac _ graisse du gril/ Eau chaudesavonneuse ;rinceret Ne pas le nettoyer dans un four Acier inoxydable s6c_ersoigneusement. autonettoyant. , Apr6s avoirenleveia graisse,le bac peut ®tremis au laveovaisselle.
- Page 64 Chapitre 6 : ENTRETIEN ETNETTOYAGE Conseils de nettoyage de la table de cuisson et du wok Produits d'entretien suggeres Rappels importants Element/Mat6riau F:l_ments enjoJiveurs Eau chaude savonneuse La vaporisation de trop de la table de cuisson rincer puis secher produits d'entretien liquides soigneusement.
- Page 65 CHAPITRE 7 :AVANT D'APPELER L ESERVICE T ECHNIQUE Entretien a faire par vous-m6me PANNE DE COURANT standard puis toumez le bouton de que les boutons de commande En cas de panne de courant, seuls commande sur la position aient 6t6 plac6s sur OFF puis brGleurs standard (non...
- Page 66 Ou visitez notre site web : o Les fusibles ont-ils saute le disjoncteur s'est-il d6clenche www.thermador.com La table de cuisson est-elle d6branchee Sl LES BROLEURS NE S'ALLUMENT o Les chapeaux des brQleurs sont=ils correctement alignes et poses darts leurs bases (brOleurs hermetiquement...
- Page 67 Lesfraisde main-d'oeuvre pourdes r@arations pendantla p@riode lieux. de garantielimitCe. Lesffaisde voyageetde d@lacement e ncourusIom_que leproduit est install€dans un lieu d'acc&slimit€ ou restreint(c'est-&-dire Thermador® prend en charge : billetsd'avion, d@enses de traversiefi regions g¢ographiques Toute la main-d'oeuvre de r@aration et de remplacement isolees).
- Page 68 Wereserve theright t ochange specifications ordesign without n otice. S omemodels a recertified forusein Canada.Thermador is notresponsible f or products w hicharetransported f romthe U.S.foruseinCanada. C heck withyourlocaJ C anadian distributor ordeaJer.
Need help?
Do you have a question about the PC36 and is the answer not in the manual?
Questions and answers