Table of Contents
Advertisement
Available languages
Available languages
,®
ual / Ma
Pressure Washer
/ Lavadora de Presi6n
Modem / Modelo 020209
iMPORTANT:
READ
SAFETY
RULES AND
iNSTRUCTiONS
CAREFULLY
Ii'IPORTANTE: LEYO LA SEGURIDAD
LAS ORDENESY
LAS INSTRUCCIONES
DETENIDANENTE
Questions_
Preguncas?
Helpline
- 1-888-611-6708
M=FS=SCT
Troy=BH_
is a registered
_:rademark ofTroy=BH_:, LLC and is used under Hicense _:o Briggs & S_:ra[[on Power Produc[s.
Troy=Bill®
es una marca regis[rada de Troy=Bile, LLC y se usa abajo licencia a Briggs & S[ra[[on
Power Produc_:s.
BRJGGS
& STRATTON
POWER
PRODUCTS
GROUP,
LLC
JEFFERSON,WiSCONSiN,
U.S.A.
PrintedinUSA
Manual No, 194172GS
Revision 4 (05/:20/2004)
Advertisement
Table of Contents

Subscribe to Our Youtube Channel
Related Manuals for Troy-Bilt 20209


Summary of Contents for Troy-Bilt 20209
- Page 1 ,® ual / Ma Pressure Washer / Lavadora de Presi6n Modem / Modelo 020209 iMPORTANT: READ SAFETY RULES AND iNSTRUCTiONS CAREFULLY Ii'IPORTANTE: LEYO LA SEGURIDAD LAS ORDENESY LAS INSTRUCCIONES DETENIDANENTE Questions_ Preguncas? Helpline - 1-888-611-6708 M=FS=SCT Troy=BH_ is a registered _:rademark ofTroy=BH_:, LLC and is used under Hicense _:o Briggs &...
-
Page 2: Safety Rules
Safety Rules TABLE OF CONTENTS SAFETY RULES Safety RuHes ........This is the safety alert symbol, is used Know Your Pressure _¢Vasher ......alert potential persona[ injury AssembHy ........hazards. Obey a[[ safety messages that follow Operation ........9- H 2 this symbol to avoid... - Page 3 Section 1: Safety Rules DANGER WARNING WHEN ADDING FUEL Turn pressure washer" OFF and let it cool at least 2 minutes before removing gas cap. Operate pressure washer ONLY outdoors, Fill fuel tank outdoors. Use a respirator or mask whenever there is a chance that DO NOT overffil[ tank.Allow...
- Page 4 Section 1: Safety Rules WARNING CAUTION DO NOT tamper with governed speed. DO NOT operate pressure washer above rated pressure. DO NOT touch hot surfaces. CAUTION , Stay dear of exhaust gases. Allow equipment to cool before touching. DO NOT secure spray gun in open position. DO NOT leave spray, gun unattended while machine is running.
-
Page 5: Features And Controls
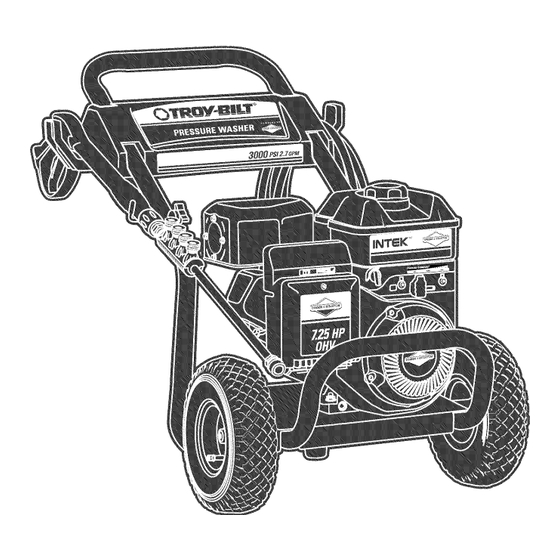
Features and Controls KNOWYOUR PRESSURE WASHER Read this owner's manual and safety rules before operating your pressure washers Compare the ilhstrations with your pressure washer to familiarize yourself with the locations of various controls and adjustments. Save this manual for future reference, Throttle Lever Accessory Tray... -
Page 6: Attach Handle
#2 Phillips Screwdriver PREPARING PRESSURE ASSEMBLY WASHER FOR USE IMPORTANT: Read entire owner's manual before you attempt to assemble or operate your new pressure washer, If you have any problems with the assembly of your Remove Pressure Washer From pressure washer or if parts are missing or damaged, call the pressure washer heipiine at i =888=6 [ i =6708o To prepare your... - Page 7 Section 3: Assembly Secure tray to handle with self tapping screws using a Pinch chemical hose and slide it into metaH chip as shown in Figure 5. #2 phillips screwdriver, Ensure screws are tight but not crushing the plastic accessory tray. Place handle assembly onto handle supports connected to main unit.
-
Page 8: Checklist Before Start
Section 3: Assemb(y Run water through garden hose for 30 seconds to Connect Hose and Water Supp[y to clean out any debris.Turn off water. JMPOP_TANT: DO NOT siphon standing water for the iMPORTANT:To avoid pump damage,you must assemble water supply. Use ONLY cold water (less than [00°F). the nozzle extension to the spray gun and attach all hoses Connect garden hose (not to exceed 50 feet in length) before you start the engine. - Page 9 Operation NOWTO USEYOUR Place colored quick connect spray tips in slots on holder that's attached to nozzle extension (Figure II). PRESSURE WASHER If you have any proNems operating your pressure washer, pHeasecall the pressure washer heHpHine at 1-888-611-6788. To Start Pressure Washer To start your pressure washer for the first time, follow...
-
Page 10: Section 4: Operation
Section 4: Operation [. Start engine according to [nstrucdons given in engine Hang chemical solution botde on "J" hook and place owner's manuaLA[so see operating instructions detergent siphoning fiker in last slot on [eft (Figure [4). located on the pressure washer. Place utility brush in the second to last slot on right in tray (Figure 14). - Page 11 Section 4: Opecation PuHH bacH(coHHar o n quick-connect and puHH current Now to Use the Utility Brush spray tip off. Store spray tips in hoHder provided on the The utiHity brush allows you to scrub surfaces with water nozzHe extension. filtering through the bristHes.
-
Page 12: Pressure Washer Rinsing
Section 4: Operation After you have applied detergent, scour the surface Phce smallflHter end of detergentsiphoning tube into and rinse it dean as fommows: detergentcontainer. Apply safety latch to spray gun. Remove black chemical nozzle from nozzle extension. Select and install desired high pressure nozzle following instructions "How to Use SprayTips"... -
Page 13: Cleaning Detergent Siphoning Tube
GENERAL MAmNTENANCE WARNING RECOMMENDATmONS The pressure washer warranty does not cover items that have been subjected to operator abuse or neghgence.To receive full value from the warranty, the operator must main_in the NEVER repair high pressure hose. Replace k. pressure washer as instructed in this manual Replacement hose rating HUST exceed maximum pressure rating of unit. -
Page 14: Section 5: Maintenance
Section 5: Maintenance H. Shut off engine and turn off water supply. Detach spray gun and nozzHe extension from high pressure hose. Detach nozzHe extension from spray gun Remove spray tip from end of nozzHe extension. and remove o-ring and screen from nozzHe extension. -
Page 15: Engine Maintenance
Section 5: Maintenance ENGINE MAINTENANCE See the engine owner's manuaHfor instructions on how to property maintain the engine. cAuTlo. Copy HodeH MODEL _'_'_ Number Here REV NO Copy Revision , Used motor oil has been shown to cause skin cancer in Here certain laboratory animals,... -
Page 16: Storing The Engine
Storage PREPARmNG THE fJNmT FOP, STORAGE • Failure to do so will permanently damage your pump and VVater shouHd not remain in the unit for Hongperiods of render your unit inoperable, time. Sediments or mineraHs can deposit on pump parts and Freeze damage is not covered under warranty. -
Page 17: Troubleshootmng
TROUBLESHOOTmNG Probmem Cause Corr÷ction Low pressure spray tip installed. Replace spray tip with high pressure spray tip. Clear inlet. Water inlet is blocked. Provide adequate water flow. Inadequate water supply. Straighten inlet hose, patch leak. Inlet hose is kinked or leaking. Pump has foRowing probmems:... - Page 18 E×pIoded Views and Parts Lists EXPLODED V[EWAND PARTS L[ST _ UN[T (tern Part # Description item Part # BASE P[ 90 [ 56GS 88185GS BRUSH, Udlity HANDLE PI87602GS 95457GS CONNECTOR+ Garden Hose BILLBOARD [ 87606GS 94004GS KIT, Inlet+ Hose+ Grdn+ Srv HOSE 185877GS 90668GS...
- Page 19 Section 8: E×pioded Views and Parts Lists EXPLODED VmEW AND PARTS LIST -- PUMP intern Part # Description intern Part # Description OoRING 194434GS 90657GS KIT,CHECK VALVE SPACER 190639GS 92914GS KIT,CHEMICAL INJECT WASHER 190640GS 94425GS KIT,SEAL OIL PISTON_Guide 190646GS 94426GS KIT,INJECTOR KIT,BALL &...
- Page 20 Reglas de Seguddad TABLA DE CONTENIDOS REGLAS DE SEGURJDAD Reglas De Seguridad ........ 20-22 Este es ems_mbo_o de alerta de seguridad. Sirve Conozca Su Maquina Lavadora De Presion ....para advertir al usuario de un posibme riesgo para Ensambraie ........24-26 su integridad fisica.
- Page 21 5ecd6n 1: Reglas de Seguridad Opere el lavadora de presi6n SOLAMENTE al aire libre. CUANDO AI_ADA COMBUSTIBLE Udlice un respirador o m4scala siempie que exista la posibilidad inhalar vapores. Apague el lavadora de pl esi6n(posici6e OFF) y d_je]o enfriar al menos po! 2 minuLos antes de remover la tapa de la gasolina.
- Page 22 5ecd6n 1: Reglas de Seguddad ADVERTENCIA PRECAUCION NO asegure la pistola de rociado en la posici6n (open = abierto). NO abandone la pistola de rociado cuando la m_quina est6 en funcionamiento. NO toque las superficies calientes. NUNCA udlice una pistola de rociado que no tenga un segulo pala gadllo o pro_eeci6n...
- Page 23 Caracter[sticas y ControIes CONOZCA SU MAQUINA LAVADORA DE PRE$iON Lea emmanual dem propietario y las reglas de seguridad antes de porter en marcha su rn_quina lavadora a presi6n, Compare [as iJustradones con su m#,quina Javadora a presi6n para familiarizarse con Jas ubicadones de los diferentes controles y ajustes.
-
Page 24: Montaje
Montaje #2 destorn[Hador de phflJips EL LAVADOR PREPARANDO PARA SU U$O PRE$I6N [MPORTANTE: Lea tota[mente el manual del propietario antes que intente ensamblar u operar su lavador a alta presi6n. Si usted tiene un problema aJ ensamblar Ia unidad o si hacen faJta algunas piezas o se encuentran... - Page 25 Secci6n 3: Montaje Co[oque el manubrio sobre los soportes de[ mismo que ya est_n adheddos a la unidad pdncipaLAseg_rese de que los orifidos en eJ manubrio est6n arineados con los orifidos los soportes det mismo manubdo (Figura 25). Incline la unidad arriba por et asidero y conecte el clip de metal a Ia costiila en la cara inferior central de Ia bandeia accesoria (Figura 29).
- Page 26 Secd6n 3: Montaje Conecte maNanguera y el Suministro Haga correr el agua a trav6s de Ia manguera de su iardin 30 segundos para Iimpiar cualquier escombro que se Agua a maBomba encuentre en etla. Desconecte et agua. mNPORTANTE: Usced deber_i armar Ia extensi6n para boqollas mNPORTANTE: Hate...
- Page 27 Operad6n ¢OMO USAR SU MAQUmNA LAVADO A PRESI6N Si tiene problemas operando su m_quina lavadora a presi6n, pot favor Ilame a la linea de ayuda para m_quinas lavadoras a presi6n al 1o888o6t 1o6708, C6rno DaHe Arranque a su M_quina Lavadora a Presi6n Para darIe arranque a su m_quina Iavadora a presi6n movida a...
- Page 28 $ecci6n 4: Operaci6n C6rno Usar Ias Puntas de Rocio C6mo Detener su M_quina Lavadora Presi6n La conexi6n r@ida de [a extensi6n para boquiJIas [e permite usar einco puntas de rocio diferentes, Las puntas de rocio tienen Mueva la palanca variable dd control de Ja presi6n a ia posici6n "Stop"...
- Page 29 $ecci6n 4: Operaci6n Para una iimpieza m_s efectiva, mantenga ia boquiJia de Limpieza y Apiicaci6n de[ Quimico rociado de 8 a :24 pulgadas de la superficie de limpieza. Si coloca Ia boquilla muy cerea, podHa dafiar la superfieie que IMPORTANTE: Uti[ice qu[micos disehados...
- Page 30 Secd6n 4: Operad6n Aplique et deter_ente sobre la superficie seca, comenzando Mantenga la pistola de rociado a una distancia segura de[ _rea la parte inferior det _rea y dirigi_ndose hacia arriba, utiJizando que planea rociar. movimientos largos, pareios y superpuestos. ADVERTENCIA Permita que el detergente...
- Page 31 RECOMENDACIONE$ GENERALES La garant[a de [a m_quina I_vadora a presi6n no cubre los dementos que han sido sujetos a abuso o negJigencia por parte de[ operadon Para hacer vfi[ida [a cobertura total de [a garantia, el operador deber_ mantener la [avadora de presi6n tal y como se indica en el manual NUNCA repale...
- Page 32 $ecci6n 5: Mantenim[ento Retire Ia pisto[a y [a extensi6n para boqo[[as de [a manguera Apague d motor y @ague eJ suministro de agua. de aka presi6n. Retire la extensi6n para boquillas de la Remueva la puntas de rocio dd extremo de Ja extensi6n pisto[a y reth-e el anillo 'o' y el cdador de [a extensi6n...
- Page 33 $ecci6n S: Manten[m[ento y Aimacenam[ento NANTENINIENTO MOTOR Vacle el tubo de detergence, co!ocando el filtro en un envase Ileno de agua limpia miencras est6 corriendo et agua a baia Consulte el manual de[ propiecario del motor para las presi6n. Lave por I o 2 minutos. instrucdones de c6mo mantener...
- Page 34 Diagnosticos de Aver as REPARACmON DE DANOS Problema Soluci6n Causa Est_ usando Ia punCas de roclo de baia Cambie Ia puntas de roclo a una de Ias presi6n (negra). tres puncas de roc[o de alta presi6n. La entrada de agua espY.bloqueada. Limpie la encrada.
- Page 35 DE EQUIPOSTROYoBILT® Efecdva desde em m2 ro de Noviembre, 2003 GARANTmA U HITADA 'Troy-Bilt® es una marca registrada deTroy-Bilt, LLC baio licencia de Briggs & Str_tton Power Products. Briggs & Stratton Power Products _eparar_i o sustituir_ sin cargo alguno cualqoer componente det equipo :<_que presente...
- Page 36 TROY-BILT® OWNERWAR_NTY POLICY Effective November m2,2003 LIMITED WARP_NTY "Troy-BiWD is a registered trademark ofTroy-BiHt, LLC and is used under Hicense to Briggs & Stratton Power Products. Briggs & Stratton Power Products wiHH repair or repHace_ free of charge_ any part_ or parts of the eqopment *_ that are defective in materiaH or workmanship or both.Transpor_tion...
Need help?
Do you have a question about the 20209 and is the answer not in the manual?
Questions and answers