Table of Contents
Advertisement
Available languages
Available languages
O
®
Operator's
ual/
nual dei Operario
Pressure Washer / Lavadora de Presi6n
Model / iVlodeio 020241
I:i:
WARNING
Before using this product, read this manual and follow
all Safety Rules and Operating Instructions.
i ]ii
ADVERTENCIA
Antes de utilizar el producto, lea este manual y siga
todas las Reglas de Seguridad e Instrucciones de Uso.
Questions?
Preguntas?
Helpline-
1-888-611-6708
M-F 8-5 CT
Troy-Bilt® is a registered trademark of Troy-Bilt, LLC and is used under license to Briggs & Stratton Power Products.
Troy-Bilt® es una marca registrada de Troy-Bilt, LLC y se usa abajo licencia a Briggs & Stratton Power Products.
BRIGGS
& STRATTON
POWER PRODUCTS
GROUP, LLC
JEFFERSON,
WISCONSIN,
U.S.A.
Printed in USA
5
Manual No. 196019GS
Revision C (07/21/2006)
Advertisement
Chapters
Table of Contents

Related Manuals for Troy-Bilt 20241


Summary of Contents for Troy-Bilt 20241
- Page 1 M-F 8-5 CT Troy-Bilt® is a registered trademark of Troy-Bilt, LLC and is used under license to Briggs & Stratton Power Products. Troy-Bilt® es una marca registrada de Troy-Bilt, LLC y se usa abajo licencia a Briggs & Stratton Power Products.
-
Page 2: Table Of Contents
Safety Rules SAVE THESE iNSTRUCTiONS TABLE OF CONTENTS SAFETY RULES Section 1 - Safety Rules ..... This is the safety alert symbol, it is used to Section 2 - Features and Controls ....alert you to potential personal injury Section 3 hazards. -
Page 3: Safety Rules
Section 1: Safety Rules WARNING WARNING WHEN ADDING FUEL Turn pressure washer OFF and let it cool at least 2 minutes before removing gas cap. Operate pressure washer ONLY outdoors. Fill fuel tank outdoors. Keep exhaust gas from entering a confined area through DO NOT overfill tank. - Page 4 Section 1: Safety Rules WARNING WARNING ALWAYS point gun in safe direction and squeeze spray gun trigger, to release pressure and avoid kickback each time, before starting engine. Engage trigger lock when NEVER aim spray gun at people, animals or plants. not in use.
- Page 5 Section 1: Safety Rules CAUTION CAUTION If you have questions about intended use, ask dealer or DO NOT tamper with governed speed. contact Briggs & Stratton Power Products. DO NOT operate pressure washer above rated pressure. NEVER operate units with broken or missing parts, or without protective housing or covers.
-
Page 6: Features And Controls
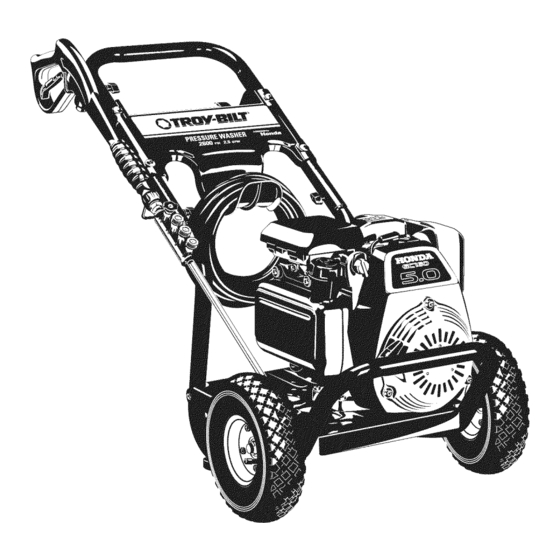
Features and Controls KNOW YOUR PRESSURE WASHER _Read this Operator's Manual and safety rules before operating your pressure washer. Compare the illustrations with your pressure washer to familiarize yourself with the locations of various controls and adjustments. Save this manual for future reference. Air Filter Accessory Tray Pump equipped with... -
Page 7: Assembly
Assembly ASSEMBLY PREPARING PRESSURE WASHER FOR USE IMPORTANT: Read entire operator's manual before you attempt to assemble or operate your new pressure If you have any problems with the assembly of your washer. pressure washer or if parts are missing or damaged, Remove Pressure Washer from... - Page 8 Section 3: Assembly insert carriage bolt through left side hole from Place accessory tray over holes on handle outside of unit and attach a plastic knob from (viewing from front of unit). Push the tree clips into inside of unit (viewing from rear of unit). Tighten by the holes until they sit flat against the accessory hand (Figure 2).
- Page 9 Section 3: Assembly Run water through garden hose for 30 seconds to Connect Hose and Water Supply to clean out any debris. Turn off water. Pump IMPORTANT: DO NOT siphon standing water for the IMPORTANT: To avoid pump damage, you must water supply.
-
Page 10: Operation
Operation HOW TO USE YOUR To Start Pressure Washer To start your pressure washer for the first time, follow PRESSURE WASHER these instructions step-by-step. This starting If you have any problems operating your pressure information also applies if you have let the pressure washer, please call the pressure washer helpline at washer sit idle for at least a day. - Page 11 Section 4: Operation Engage trigger lock to spray gun trigger (Figure 10). WARNING lO. When starting engine, position yourself as recommended in Figure 11 and start engine DO NOT touch hot surfaces and avoid hot exhaust gases. according to instructions given in engine operator's Allow equipment to cool before touching.
- Page 12 Section 4: Operation Follow these instructions to change spray tips: How to Use Accessory Tray Engage trigger lock on spray gun. The unit is equipped with an accessory tray with places to store your spray gun and nozzle extension. Pull back collar on quick-connect and pull current There is also a hook at the front of the accessory tray spray tip off.
- Page 13 Section 4: Operation Remove black spray tip from nozzle extension. Cleaning and Applying Detergent Select and install desired high pressure spray tip iMPORTANT: Use detergents designed specifically following instructions "How to Use Spray Tips'.' for pressure washers. Household detergents could damage pump.
-
Page 14: Maintenance
Maintenance SPECiFiCATiONS PRESSURE WASHER MAINTENANCE Max Outlet Pressure ....2600 psi Max Flow Rate ..2.5 gallons per minute (gpm) Detergent ..Use detergent approved for pressure Check and Clean Inlet Screen washers Examine the screen on the water inlet. Clean it if the Water Supply Temperature Not to Exceed 100°F screen is clogged or replace it if screen is damaged. - Page 15 Section 5: Maintenance Detach spray gun and nozzle extension from high Reinstall spray tip and in-line filter into nozzle extension. pressure hose. Detach nozzle extension from spray gun and remove o-ring and screen from Reconnect nozzle extension to spray gun. nozzle extension.
- Page 16 Section 5: Maintenance Data Tag Data tag information is very important if you need help from our Customer Service Department or an authorized service dealer. Copy Model * The data tag (Figure 17) is located on the base of the MODEL [ "_ Number Here...
-
Page 17: Storage
Storage PREPARING THE UNiT FOR CAUTION STORAGE Water should not remain in the unit for long periods of ,, Failure to do so will permanently damage your pump time. Sediments or minerals can deposit on pump parts and render your unit inoperable. and "freeze"... -
Page 18: Section 7 - Troubleshooting
Troubleshooting TROUBLESHOOTING Problem Cause Correction Low pressure spray tip installed. Replace spray tip with high pressure spray tip. Water inlet is blocked. Clear inlet. Inadequate water supply. Provide adequate water flow. Inlet hose is kinked or leaking. Straighten inlet hose, patch leak. -
Page 19: Warranty
Effective February 1, 2006replaces all undated Warranties andall Warranties datedbeforeFebruary 1, 2006 LiMiTED WARRANTY "Troy-Bilt@ is a registered trademark of Troy-Bilt, LLC and is used under license to Briggs & Stratton Power Products. Briggs & Stratton Power Products Group, LLC will repair or replace, free of charge,... - Page 20 Reglas de Seguridad CONSERVE ESTAS INSTRUCCIONES TABLA DE CONTENIDOS REGLAS DE SEGURIDAD Secci6n 1 Reglas De Seguridad ....20-23 Secci6n 2 Caracteristicas y Controles ....leste es el simbolo para advertir al usuario de un posible riesgo para de alerta de seguridad. Sirve Secci6n 3 Ensamblaje ......
-
Page 21: Secci6N 1 Reglas De Seguridad
Secci6n 1: Reglas de Seguridad ADVERTENCIA ADVERTENCIA CUANDO AI_IADA COMBUSTIBLE Apague el lavadora de presi6n (posici6n OFF) y dAjelo enfriar al menos per 2 minutes antes de remover la tapa de la gasolina. Opere el lavadora de presi6n SOLAMENTE al aire libre. Llene el tanque al aire libre. -
Page 22: Secci6N
Secci6n 1: Reglas de Seguridad ADVERTENCIA ADVERTENCIA Antes de arrancar el motor, apunte SIEMPRE con la pistola rociadora hacia una direcci6n segura y apriete el gatillo para descargar la presi6n y evitar el retroceso. NUNCA apunte la pistola a la gente, animales o plantas. Cuando arranque el motor, tire lentamente del cable hasta sentir NO permita en ningQn momento que NIIXIOS operen la maquina... -
Page 23: Secci6N
Secci6n 1: Reglas de Seguridad PRECAUCION PRECAUCION NO juegue con partes que puedan aumentar o disminuir la Si usted tiene alguna pregunta acerca de las finalidades de uso velocidad de mando. del generador, pregOntele a su concesionario o contacte a Briggs &... - Page 24 Caracteristicas y Controles CONOZCA SU IVlAQUINA LAVADORA DE PRESION _[_- _1Lea el Manual del Operario y las reglas de seguridad antes de porter en marcha su m&quina lavadora a presi6n. Compare las ilustraciones con su m_quina lavadora a presi6n para familiarizarse con las ubicaciones de los diferentes controles y ajustes.
- Page 25 IViontaje MONTAJE PREPARANDO EL LAVADOR PRESION PARA SU USO IMPORTANTE: Lea tota]mente e] manual de] operario antes que intente ensamblar u operar su lavador a presion. Si usted tiene un problema al ensamblar la unidad o si Desembale la Lavadora a Presi6n hacen falta algunas piezas o se encuentran daF_adas, Ilame a la linea directa del lavador a presi6n, al 1-888=611-6708.
- Page 26 Seccibn 3: Montaje Inserte un perno de cabeza redonda en el orificio lateral Coloque la bandeja de accesorios sobre los orificios del derecho, desde el exterior de la unidad, y coloque un asa (vista desde la parte delantera de la unidad). pomo de plb_sticodesde la parte interior (vista desde la Presione las pinzas de b, r bol para introducirlas en los parte delantera de la unidad).
- Page 27 Secci6n 3: Montaje Haga correr el agua a traves de la manguera de su Conecte la Manguera y el Suministro jardin por 30 segundos para limpiar cualquier escombro Agua a la Bomba que se encuentre en ella. Desconecte el agua. IMPORTANTE: Usted debera armar la extensi6n para IMPORTANTE:...
- Page 28 Operaci6n COIVIO USAR SU MAQUINA C6mo Dar[e Arranque a su M_quina Lavadora a Presi6n LAVADORA A PRESION Para darle arranque a su mAquina lavadora a presi6n Si tiene problemas operando su mAquina lavadora a presi6n, movida a motor por primera vez, siga estas instrucciones por favor Ilame a la Ifnea de ayuda para mAquinas lavadoras paso a paso.
- Page 29 Secci6n 4: Operaci6n Seleccione la puntas de rocio de conexi6n r&pida que ADVERTENCIA usted desee e insertela en el extreme de la extensi6n de la lanza (Vea "Come Usar las Puntas de Rocio"). Coloque el pasador de seguridad al gatillo de la pistola rociadora (Figura 27).
- Page 30 Secci6n 4: Operaci6n Para cambiar las puntas de rocio: C6mo Usar la Bandeja de Accesorios Coloque el pestillo de seguridad de la pistola de rociado. La unidad estb_equipada con una bandeja de accesorios con habitAculos para guardar la pistola rociadora y el prolongador Desplace hacia atrb,s el anillo del conector rapido y tire de la boquilla.
- Page 31 Secci6n 4: Operaci6n Retire la puntas de rocio negra para detergente de la PRECAUCION extensi6n para boquillas. Seleccione e instale la puntas de rode de alta presi6n que desee siguiendo las instrucciones de "C6mo Usar las Puntas de Rocfo'_ • Arrancar el motor sin tener todas las mangueras conectadas y sin el suministro de agua ABIERTO (ON) causar_,el daflo de Mantenga la pistola de rociado a una distancia segura la bomba.
-
Page 32: Mantenimiento
NOTA: Debe tiene las preguntas acerca de reemplazar los componentes en su mAquina lavadora a presi6n de Troy-Bilt, Ilaman por favor 1-888-611-6708 para la ayuda. NUNCA repare la manguera de alta presi6n. Remplacela. - Page 33 Secci6n 5: Mantenimiento Retire la pistola y la extensi6n para boquillas de la Instale de nuevo la puntas de rocio yen el filtro en-linea en la extensi6n. manguera de alta presi6n. Retire la extensi6n para boquillas de la pistola y retire el anillo 'o' y el colador de Conecte de nuevo la extensi6n de la boquilla a la pistola la extensi6n para boquillas.
-
Page 34: Aimacenamiento
Aimacenamiento El salvador de la bomba de la marca del uso a previene Etiqueta de Datos la corrosi6n construye y helado de bomba. Localice la etiqueta de datos del lavadom de presi6n y copie la informaci6n on el espacio disponible a continuaci6n. Esta Almacene la unidad en un lugar limpio y seco. -
Page 35: Diagnosticos De Averias
Diagnosticos de Averias REPARACION DE DANOS Problema Soluci6n Causa Est_ usando la puntas de rocfo de Cambie la puntas de rocfo a una baja presion (negra). de las tres puntas de rocio de alta presi6n. La entrada de agua estA Limpie la entrada. -
Page 36: Garantia
GARANTJA UMITADA "Troy-Bilt® es una marca registrada de Troy-Bilt, LLC bajo licencia de Briggs & Stratton Power Products. Briggs & Stratton Power Products Group, LLC reparar;i o sustituir_ sin cargo alguno cualquier componente de la lavadoraa presi0n qua presente defectos de materiales y/o mane de obra. Los gastos de transporte de las producto enviadas para reparar o sustituir conforme a los tOrminos de esta garantia correr_n a cargo del comprador.
Need help?
Do you have a question about the 20241 and is the answer not in the manual?
Questions and answers
This Briggs and Straton engine has 3 oil ports - lower with yellow on both side and one white ...... please explain how to fill the upper
To fill the upper oil port on a Troy-Bilt engine with part number 20241:
1. Place the pressure washer on a level surface.
2. Refer to the engine operator's manual for the correct type and amount of oil.
3. Locate the upper oil fill port on the engine.
4. Remove the oil fill cap.
5. Add oil slowly into the upper oil port until it reaches the proper level.
6. Replace the oil fill cap securely.
Make sure not to overfill. Check the oil level using the dipstick if available.
This answer is automatically generated