Advertisement
Available languages
Available languages
Quick Links
Download this manual
See also:
Owner's Manual
0
®
i
WARNING
ADVERTENCIA
Before
using this product_
read this manual
and follow
a[[
Antes
de ud[izar
e[ produc[o_
lea es[e manual
>, siga [odas [as
Safety Rules and Operating
hstrucdons.
Reg[as de Seguridad
e hstrucdones
de Uso.
Questions?
Pregun_s?
He[p[ine
- [-888-6[
[-6708
H°F 8-5 CT
Tro>'-Bilt®
is a registered
trademark
of HTD
and is used under
license to griggs & Stratton
Power
Products,
Tro>,-BiJt® es una marca
registrada
de MTD 7 se usa abaio
licencia a Briggs & Strat_on
Power
Products.
BRJGGS
& STRATTON
POWER
PRODUCTS
GROUP,
LLC
JEFFERSON,WiSCONSiN,
U.S.A.
Printed
in USA
Hanual
No. 1%015GS
Revision
5 (I U09/2005)
4
Advertisement

Related Manuals for Troy-Bilt 20240


Summary of Contents for Troy-Bilt 20240
- Page 1 ® WARNING ADVERTENCIA Before using this product_ read this manual and follow Antes de ud[izar e[ produc[o_ lea es[e manual >, siga [odas [as Safety Rules and Operating hstrucdons. Reg[as de Seguridad e hstrucdones de Uso. Questions? Pregun_s? He[p[ine - [-888-6[ [-6708 H°F 8-5 CT Tro>'-Bilt®...
- Page 2 Safety Rules SAVE THESE INSTRUCTIONS TABLE OF CONTENTS SAFETY RULES Section H o Safety RuHes ......This isthe safety amert symbol itisused to Section 2 - Features and ControHs ....amert you to potentiam personam iniury hazards. Section 3 o AssemHy ......
- Page 3 Section 1: Safety Rules WARNING WARNING WHEN ADDING FUEL Turn pressure washer OFF and let it cool at least 2 minutes before removing gas cap. Fi[[fiJe[ tank outdoors, Operate pressure washer ONLY outdoors, Keep exhaust gas from entering a confined area through DO NOT overfill tank, AIIow space for fue! expansion.
- Page 4 Section 1: Safety Rules WARNING WANNING ALWAYS point gun in safe direction and squeeze spray gun trigger_ to release pressure and avoid kickback each time, NEVER aim spray gun at people, animals or plants, before starting engine. Engage trigger lot!< when not in use. DO NOT allow CHILDREN to operate pressure washe_:...
- Page 5 Section 1: Safety Rules CAUTION [f you have questions about intended use, ask dealer or , DO NOT tamper with governed speed contact Briggs & Stratton Power Products. DO NOT operate pressure washer above rated pressure. NEVER operate units with broken or missing parts, or without protective...
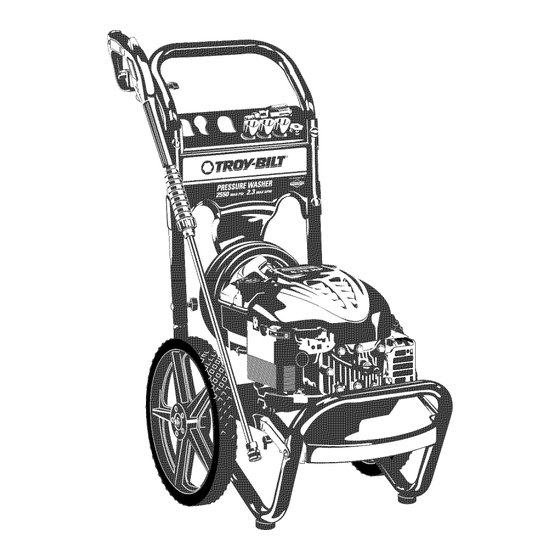
- Page 6 Features and Controls KNOWYOUR PRESSURE WASHER iI- lil.ead t h,. O porotor's .a°..,, . ,°,, .,,,ety ru,es be,ore oporat,°, ..our pressure wa.her. Compare the ilhstrations with your pressure washer to familiarize yourself with the locations of various controls and adjustments. Save this manual for future reference. Spray Gun Utility Brush Rotating Brush...
- Page 7 ASSEMBLY PREPARING PRESSURE iMPORTANT: Read entireOperator'sHanuai beforeyou WASHER attempt to assemble or operate your new pressure washer. If you have any problems with the assembly of your Remove Pressure Washer From pressure washer or if parts are missing or damaged, cail the pressure washer helpline at m =888=6 mm =6708.
- Page 8 Section 3: Assembly Insert carriage boHts through holies from outside of unit Insert"L" boHt through hoHe just above biHHboardon Heft and at_ch a pHastic knob from inside of unit (Figure 2). side of handHe (viewing from front of unit). HoHd boHt in Tighten by hand.
- Page 9 Section 3: Assembly Run water through your garden hose for 30 seconds Connect Hose and Water Supply to to clean out any debris. mMPORTANT: DO NOT siphon standing water for the IHPORTANT: To avoid pump damage, you must assembie water supply. Use ONLY cold water (less than 100°F).
- Page 10 Operation HOW'TO USEYOUR $tartYour Pressure Washer To start your pressure washer for the first time, follow PRESSURE WASHER these instructions step:by:step.This starting information also applies if you have let the pressure washer sit idle for If you have any proHems operating your pressure washer, at least a day.
- Page 11 Section 4: Operation When starting engine, position yourseff as recommended WANNING in Figure H 2 and start engine according to instructions given in engine operator's manuaLAHso see operating instructions tag located on the pressure washen DO NOT touch hot surfaces and avoid hot exhaust gases. AJJow equipment to cool before touching.
- Page 12 Section 4: Operation How to Use Accessory Tray The unit is equipped with an accessory tray with places to Pressure store your rotating brush_ utility brush_ turbo nozzle_ and ProjectPro TMnozzles.There is also a hook at the front of the accessory tray to hold your hgh pressure hose. Store your gun and nozzle extension on the hooks Bhck attached to the base and handle, as shown in Figure 13.
- Page 13 Section 4: Operation For generaH rinsing (medium pressure and medium PuHH back on collar, insert selected ProjectPro TMnozzle llow)_ ideaHfor most aHpurpose cleaning such as and release collar.Tug on ProjectPro TMnozzle to make home siding_ brick pados_ wood decks, driveways sure it is securely in place.
- Page 14 Section 4: Operation Pressure Washer Rinsing Rinsing: Apply trigger lock to spray gun. Remove black cleaning detergent nozzle from nozzle extension. and A_ Deter_ent Select and install desired high pressure nozzle following mNPORTANT: Use detergents designed speci_caHy instructions "How to Use ProjectPro TM Nozzle System".
- Page 15 SPECIFICATIONS PRESSURE WASHER MAINTENANCE outmet Pressure ..... "_550 psi Max Fmow Rate ..2.3 gallons per minute (gpm) Detergent Use detergentapproved forpressurewashers Check and Clean InletScreen Water ....Not to Exceed H OO°F Suppmy Examine the screen on the pump's water inHet. CHean it if the screen is clogged or repHace it if screen is damaged, Automatic coom...
- Page 16 Section 5: Maintenance Using a garden hose, remove additional debris by back Detach spray gun and nozzle extension from flushing water through nozzle extension (Figure 23). pressure hose. Detach nozzle extension from spray Back flush between 30 to 60 seconds. gun and remove o:ring and screen...
- Page 17 Section 5: Maintenance ENGmNE MAmNTENANCE Pump Maintenance Changing Pump See the engine operator's manual for instructions on how Change oil every 50 hours or once yearly, whichever to properly maintain the engine. occurs first. CAUTION NOTE: Purchase a premeasured bottle of pump oil item number 190586GS,...
- Page 18 Storage PREPARING fJNJT FOP, STORAGE * Failure to do so will permanently damage your pump and VVater shouHd not remain in the unit for Hong periods of render your unit inoperable, time. Sediments or mineraHs can deposit on pump parts and * Freeze damage is not covered...
- Page 19 TROU B LES H OOTi NG Probmem Correction Cause Replace nozzle with high pressure Low pressure nozzle installed. nozzle. VVater inlet is blocked. Clear inlet. Inadequate water supply. Provide adequate water flow. Inlet hose is kinked or leaking. Straighten inlet hose, patch leak. Pump has following problems: Check...
- Page 20 Notes...
- Page 21 TROYoBILT® OWNERWARRANTY POLICY Effective November m,2004 LiMiTED WARRANTY "TroyoBilt® is a registered trademark of HTD and is used under license to Briggs & Stratton Power Products. Briggs & Stratton Power Products will repair or rephce, free of charge_ any part, or parts of the eqopment _:'_ that are defective in material or workmanship or both.Transpor[ation charges on parts submitted for repair or replacement...
- Page 22 Reg[as de Seguddad CONSERVE ESTAS [NSTRUCC[ONES TABLA DE CONTEN[DOS REGLAS DE SEGUR[DAD Secd6n Reglas De Seguridad ...... 22-25 [_ste es el s[mbo[o de a[erta de seguridad. Sirve Secd6n 2 Caracteristicas y Controles ....para advertir a[ usuar[o de un posible riesgo para Secci6n 3 Ensambla]e ......
- Page 23 Secd6n 1: Re [as de Seguddad ADVERTENCIA CUANDO ANADA COMBUSTIBLE Apague el lavadora de presi6n (posici6n OFF) y d6jelo enfl ia_ al menos pol 2 minuEos antes de [emover la tapa de la gaso!ina. Opere el lawdora de presi6n SOLAHENTE al aile libre.
- Page 24 Secd6n 1: Reglas de Seguddad ADVERTENClA Antes de arrancar el motor, apunte SIEMPRE con la pistola rociado_a hacia una direcci6n segula y apriete el gadllo para descalgal NUNCA apunte la pistola a la genre, anirnales o plantas. presi6n y evitar el letroeeso.
- Page 25 $ecd6n 1: Re Jas de $eguridad PRECAUCI6N NO juegue con paltes que puedan aumental o disminui! h velocidad Si usted tiene alguna pregunta acerca de las finalidades de uso del de rnando, generado!: preg0ntele a su eoncesionario o contaete a Bliggs & NO opere la m_quina lavadora a presidn...
- Page 26 Caracter[sticas y ControIes CONOZCA SU HAQUINA LAVADORA DE PRESION L/=_.=_:=_ l Compare las ilustraciones con su m3.quina lavadora a presi6n para famiJiarizarse con las ubicaciones de los diferentes contro[es y ajustes. Guarde este manual para referencias futuras. Pistola de Rociado CepiHos Utilidad Cepillos Giratorio BoqoHa Turbo...
- Page 27 Montaje PREPARANDO EL LAVADORA ALTA PRE$16N PARA SU U$O IMPORTANTE: Lea to_lmence el Manual del Operario antes que inten_:eensambiar u operar su lavador a alia presi6n. Si usted dene un problema aI ensambIar Ia unidad o si hacen f_lta aIgunas piezas o se encuentran daffadas, IIame a Ia [inea direc_ Remueva el Lavador...
- Page 28 Secci6n 3: Montaje Inserte un gancho en "L" a trav6s del orificio situado iusto Inserte el perno del soporte a trav6s de los orificios desde fuera de la unidad y su]ete una perilla de pl#,stico desde encima del panel, en el lado izquierdo del manubrio (vista desde la parte delantera...
- Page 29 Secci6n 3: Montaje Conecte [a Manguera y e[ Suministro Haga correr el agua a trav6s de la manguera de su iardin por 30 segundos para limpiar cua[quier escombro que se Agua a [a Bomba encuentre en ella, Corte el agua. iMPORTANTE: Usted deber_...
- Page 30 Operaci6n C()MO USAR $U MAQUINA C6mo DarJe Arranque a su M_quina Lavadora a Presi6n LAVADORA A PRE$1ON Para darle arranque a su m_quina lavadora a presi6n movida a Si tiene prob[emas operando su m_qona [avadora a presi6n, pot paso a paso, Esta motor por primera vez, siga estas instrucciones...
- Page 31 Secci6n 4: Operaci6n Cuando arranque el motor; col6quese en la posid6n ADVERTENCIA recomendada en Ia Figura 37 y siga las instrucciones manuaI del operario del motor_ Consuke tambi6n Ia edqueta de instrucciones situada en la limpiadora a presi6n. NO toque las supelficies calientes y evi_e los gases del escape a alta...
- Page 32 $ecci6n 4: Operaci6n UtUizaci6n de maBandeja de Accesorios y tire de Desplace hacia arras e[ aniHo del conector r_pido las boquillas ProiectPro TM.Guarde las boquillas ProiectPro La unidad est_ eqopada con una bandeia de accesorios en et soporte de la bandeia de accesorios.
- Page 33 $ecci6n 4: Operaci6n Desp[ace hacia atrS.s el ani[Io, inserte [a boqui[Ja ProiectPro TM elegida y sue[re e[ anillo,Tire de Ia boquilla Pro]ectPro TM para comprobar que est_ bien montada. Para una limpieza m_s efectiva, mantenga [a boquiJJa de rociado de 8 a 24 pulgadas de la superficie de [impieza. Si coloca la boquiHa muy cerca, podria dafiar la superficie est_ [impiando.
- Page 34 $ecci6n 4: Operaci6n l=niuage de la H_quina Lavadora a Presi6n Para Enjuage: Co[oque ei eerroio de seguridad a ia pisto[a de roeiado. Retire [a boqui[[a de detergente negra de[ pro[ongador de [a boquilla. Seleceione e instale [a boquilla de aka presi6n deseada Detergente Limpieza y Ap[icaci6n...
- Page 35 ESPECJFJCACIONES DE LA MANTENINIENTO Presi6n de Sa[ida M_×ima ..... 2550 PSU MAQUINA LAVADORA Caudal M_x[rno ....2.3 ga[ones por minuto (gpm) Detergente Use el detergente adecuado para lavadores a presi6n Temperatura de[ Suministro Revise y Limpie el Colador Entrada de Agua ......
- Page 36 $ecci6n 5: Manten[m[ento Lfnea Revise em FHtro Use e[ pequef:_o su]eta papeles para liberar cualquier material extraf:_o que est_ tapando la boquilla (Figura 47). Consulte la FJgura 46 y suminJstre servicJo a[ fiJtro en Nnea si se tapa siguiendo estos pasos: Use et alambre _O,1 aqu r, a ra eliminar...
- Page 37 $ecci6n 5: Mantenimiento Mantenimiento de [a Bo_ba MANTENIMIENTO MOTOR Cambio de[ ace[re de [a bomba Consulte el manual dd operario de[ motor para las instrucciones de c6mo mantener adecuadamente el motor. Cambie el aceite cada 50 horas o una vez al afro, Io que suceda PRECAUCION antes.
- Page 38 $ecd6n 6: AImacenamiento PREPARANDO LA UNIDAD PARA A[ uso el PumpSave_, cerci6rese la arandela de la presi6n se apaga y desconecta del agua del suminisCro. Lea y siga sodas ins_rucciones SU ALMACENAMIENTO y las advertencias dadas en el conr.enedor de PumpSaver: El _gua no debe permanecer en Ia unidad por un largo pedodo de _:iempo.
- Page 39 Diagnosticos de Aver[as REPARACION DE AVERIAS Prob[ema Somuci6n Causa Est_ usando la boquiJla de baja presi6n Cambie la boquilla a una de las tres (negra). boquilJa de aka presi6n, La entrada de agua est'. bJoqueada. Limpie la entrada. Sumin[stro de agua [nadecuado, Proporcione fluio de agua adecuado, La manguera de entrada est,.
- Page 40 POLiTiCA PARA EL PROPiETARIO DE EQUiPOSTROY=BiLT® Efecdva desde [ ro de Noviembre, 2004 GARANTmA LiMmTADA "Troy_Bik® es una marca registrada de MTD baio licencia de Briggs & Stratton Power Products. Briggs & Stratton Power Products reparar_ o susdtuir_ sin cargo atguno cuaJquier componente del equipo** que presente defectos de materiales y/o mano de obra.
Need help?
Do you have a question about the 20240 and is the answer not in the manual?
Questions and answers