Troy-Bilt 1904 Owner's Manual
Mtd
briggs & stratton
Hide thumbs
Also See for 1904:
- Owner's manual (36 pages) ,
- Owner's manual (20 pages) ,
- Owner's manual (36 pages)
Table of Contents
Advertisement
Available languages
Available languages
Owner's Manual / Manual del Propietario
Pressure Washer
/ Lavadora
de Presi6n
Model / Modelo 01904
,®
IMPORTANT:
READ
SAFETY
RULES AND
INSTRUCTIONS
CAREFULLY
IMPORTANTE:
LEYO
LA SEGURIDAD
LAS ORDENESY
LAS INSTRUCCIONES
DETENIDAMENTE
Questions? Pregunr_s?
Helpline
- 1-888-611-6708
M-F 8-5 CT
Troy-Bilt® is a registered trademark of MTD and is used under license to Briggs& Stratton Power Products.
Troy-Bilt® es una marca registrada registrada de MTD y se usa abajo ticencia a Briggs & Stratton Power Products.
BRIGGS
& STRATTON
POWER
PRODUCTS
GROUP,
LLC
I!!!U!!!!!U EFFERSOO,W,
SCONS,O,U.S.A
Printed in USA
Manual No. 193121GS
Revision 0 (04/08/2003)
O
7
Advertisement
Table of Contents

Related Manuals for Troy-Bilt 1904


Summary of Contents for Troy-Bilt 1904
- Page 1 M-F 8-5 CT Troy-Bilt® is a registered trademark of MTD and is used under license to Briggs& Stratton Power Products. Troy-Bilt® es una marca registrada registrada de MTD y se usa abajo ticencia a Briggs & Stratton Power Products. BRIGGS &...
-
Page 2: Equipment Description
Safety Rules TABLE OF CONTENTS SAFETY RULES Safety Rules........Know Your PressureWasher ...... his is the safety alert symbol. It is used to alert you to potential personal injury Assembly........hazards. Obey all safety messages that follow Operation ........9-12 this symbol to avoid possible injury or death. -
Page 3: Section 1: Safety Rules
Section 1: Safety Rules DANGER WARNING WHEN ADDING FUEL Turn pressure washer OFF and let it cool at least 2 minutes before removing gascap. Operate pressure washer ONLY outdoors. Fill fuel tank outdoors. Use a respirator or mask whenever there is a chance that DO NOT overfill tank.Allow spacefor fuel expansion. - Page 4 Section 1: Safety Rules CAUTION WARNING DO NOT tamper with governed speed. DO NOT operate pressure washer above rated pressure. DO NOT touch hot surfaces. CAUTION Stay dear of exhaust gases. Allow equipment to cool before touching. DO NOT secure spray gun in open position. DO NOT leave spray gun unattended while machine is running.
-
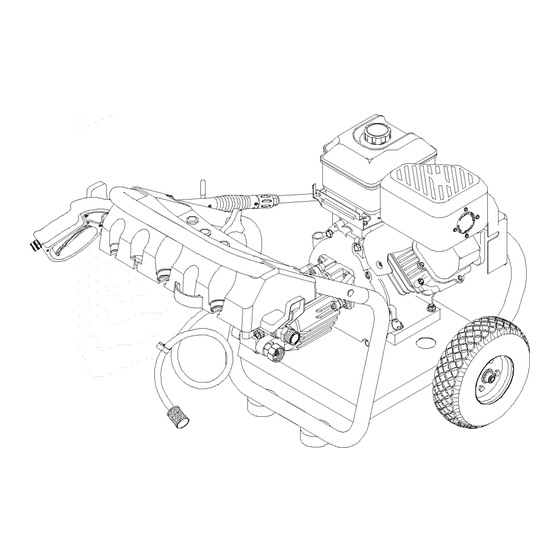
Page 5: Features And Controls
Features and Controls KNOWYOUR PRESSURE WASHER Read this owner's manual and safety rules before operating your pressure washer. Compare the illustrations with your pressure washer to familiarize yourself with the locations of various controls adjustments. Save this manual for future reference. SprayTips FuelTank Throttle Lever... - Page 6 ASSEMBLY PREPARING PRESSURE WASHER FOR USE IMPORTANT: Read entire owner's manual before you attempt to assemble or operate your new pressure washer. If you have any problems with the assembly of your pressure washer or if parts are missing or damaged,call the Remove Pressure Washer From...
-
Page 7: Add Engine Oil And Fuel
Section 3: Assembly Secure tray to handle with self tapping screws using a Pinch chemical hose and slide it into metal clip as shown in Figure 5. #2 phillips screwdriver. Ensure screws are tight but not crushing the plastic accessory tray. Place handle assembly onto handle supports connected to main unit. -
Page 8: Checklist Before Starting Engine
Section 3: Assembly Connect Hose and Water Supply to Pump IMPORTANT: To avoid pump damage,you must assemble the nozzle extension to the spray gun and attach all hoses before you start the engine. NOTE: Your pressure washer comes with a quick connect that you can use to attach the high pressure hose to either the spray gun or pump. -
Page 9: Operation
Operation TO USEYOUR Attach nozzle extension to spray gun (Figure 10). Tighten by hand. PRESSURE WASH ER If you have any problems operating your pressure washer, please call the pressure washer helpline at 1-888-611-6708. To Start Pressure Washer Choose spray tip you want to use and insert it into nozzle extension. -
Page 10: How To Stop Your Pressure Washer
Section 4: Operation 10. Start engine according to instructionsgiven in the NOTE: The extra holes in the tray are for storing a brush and a turbo wand.The brush and turbo wand are NOT engine owner's manual. includedwith your pressure washer.You can buy these NOTE: If the recoil starter is hard to pull, it may be items as optionat accessories. -
Page 11: How To Use Spraytips
Section 4: Operation How to Use SprayTips Cleaning and Applying Chemical The quick-connect on the nozzle extension allows you to IMPORTANT: Use soaps designed specifically for switch between five different spray tips.The spray tips vary pressure washers. Household detergents could damage the spray pattern as shown below (Figure 8). - Page 12 Section 4: Operation Place small filter end of detergent siphoning tube into After you have applied detergent, scour the surface and rinse it clean as follows: detergent container. Apply safety latch to spray gun. CAUTION Remove black chemical nozzle from nozzle extension. Select and install desired high pressure nozzle following instructions "How to Use Spray Tips"...
-
Page 13: Before Each Use
Maintenance GENERAL MAINTENANCE WARNING RECOMMENDATIONS The pressure washer warranty does not cover items that have been subjected to operator abuse or negligence.To receive full value from the warranty, the operator must maintain the NEVER repair high pressure hose. Replace it. pressure washer as instructed {n this manual. -
Page 14: Section 5: Maintenance
Section 5: Maintenance Flush screen,spray gun, and nozzle extension with Shut off engine and turn off water supply. clean water to clear debris. Remove spray tip from end of nozzle extension. If screen is damaged,the o-ring kit contains a Remove in-line filter from other end of nozzle replacement in-line filter screen and o-ring. -
Page 15: Engine Maintenance
Section 5: Maintenance ENGINE MAINTENANCE _m_ D_',All _ See the engine owner's manual instructions on how to properly maintain the engine. CAUTION Copy Model Number Here MODEL .<..Copy Revision REV NO Here Used motor oil has been shown to cause skin cancer in certain laboratory animals. -
Page 16: Protecting The Pump
PREPARING THE UNIT CAUTION FOR STORAGE • Failure to do so will permanently damage your pump and Water should not remain in the unitfor longperiods of render your unit inoperable. time.Sediments or minerals can deposit on pump parts and • Freezedamage is not coveredunder warranty. "freeze"... -
Page 17: Troubleshooting
Troubleshooting TROUBLESHOOTING Problem Cause Correction Low pressure spray tip installed. Replace spray tip with high pressure spray tip. Water inlet is blocked. Clear inlet. Inadequate water supply. Provide adequate water flow. Pump has following Inlet hose is kinked or leaking. Straighten inlet hose, patch leak. - Page 18 Exploded Views and Parts Lists EXPLODED VIEW PARTS LIST --- UNIT 9 O0 1 7 _\\\ Item Part # Item Part # Description Description PI90156GS BASE 10 95519GS QUICK CONNECT, Wand End PI87602GS HANDLE 95518GS QUICK CON NECT,Wand/Acc 190147GS PUSHNUT 192096GS ASSY,Billboard 185877GS...
-
Page 19: Section 8: Exploded Views And Parts Lists
Section 8: Exploded Views and Parts Lists EXPLODEDVIEWAND PARTS LIST PUMP i ° B, C, E, G A, C, D Item Part # Description Item Part # Description 190638GS PLUG 190652GS BALL 190639GS SPACER 190653GS SPRING 190640GS WASHER 190654GS PUMP HEAD 190641GS PLUG 190655GS... -
Page 20: Reglas De Seguridad
Reglas de Seguridad TABLA DE CONTENIDOS REGLAS DE SEGURIDAD ReglasDe Seguridad ......20-22 Conozca Su Maquina Lavadora De Presion...._ste es el simbolo de alerta de seguridad. Sirve para advertir al usuario de un posible riesgo para Ensamblaje........24-26 su integridad fisica. Siga todos los mensajes de Funcionamiento ........ -
Page 21: Secci6N 1: Reglas De Seguridad
Secci6n 1: Reglas de Seguridad ADVERTENCIA PELIGRO Opere el lavadora de presi6n SOLAMENTE al aire libre. CUANDO AI_IADA COMBUSTIBLE Utilice un respirador o m_scara siempre que exista la posibilidadde inhalar vapores. Apague el generador (posici6n OFF) y d6jelo enfriar al menos por 2 minutos antes de remover la tap_ de la gasolina. - Page 22 Secci6n 1: Reglas de Seguridad ADVERTENCIA PRECAUCION NO asegure la pistola de rociado en la posici6n (open = abierto). NO abandone la pistola de rociado cuando la mgquina est_ en funcionamiento. NO toque {assuperficies calientes. NUNCA utilice una pistola de rociado que no tenga un seguro para gatillo o protecci6n...
-
Page 23: Caracteristicas Y Controles
Caracteristicas y Controles CONOZCA SU MAQUINA LAVADORA DE PRESION Lea el manual del propietario y las reglas de seguridad antes de poner en marcha su m_quina lavadora a presi6n. Compare las ilustraciones con su m_quina lavadora a presi6n para familiarizarse con las ubicaciones de los diferentes controles... -
Page 24: Montaje
PREPARANDO EL LAVADORA MONTAJE PRESI(_N PARA SU USO IMPORTANTE: Lea totalmente el manual del propietario antes que intente ensamblar u operar su lavador a alta presibn. Si usted tiene un problemaal ensamblar la unidad o si hacen falta algunas piezas o se encuentran dahadas,Ilame a la llnea directa del Remueva el Lavador a Presi6n... - Page 25 Secci6n 3: Montaje Coloque el manubrio sobre los soportes del mismo que ya es_n adheridos a la unidad principaI.Aseg6rese de que los oriflcios en el manubrio est6n alineados con los orificios en los soportes del mismo manubrio (Figura 22). Alinear Oriflcios Incline la unidad arriba por el asidero y conecte el clip de metal a la costilla en la cara inferior...
- Page 26 Secci6n 3: Montaje Conecte la Manguera y el Suministro Agua a la Bomba IMPORTANTE: Usted deber_ armar la extensibn para boquillas y conectar todas las mangueras antes de darle arranque al motor. La bomba resultar_ dahada si arranca el motor sin tener todas las mangueras conectadas y el suministro agua abierto.
- Page 27 Operaci6n COMO USAR SU MAQUINA Coloque el pasador de seguridad al gatillo de la pistola rociadora (Figura 31). LAVADORA A PRESI( N Si tiene problemas operando su mgquina lavadora a presi6n, pot favor Ilame a la linea de ayuda para m_quinas lavadoras a presi6n al 1-888-61 1-6708.
- Page 28 Secci6n 4: Operaci6n Utilizaci6n de la Charola de Accesorios El unidad est_ equipado con una charola de accesorios. Posee ires orificios para sostener la extensi6n de su boquilla, conexi6n r_pida boquillas, su varilla turbo y su cepillo, asi como dos ranuras para sostener la botella de soluci6n limpiadora y el flltro para el...
- Page 29 Secci6n 4: Operaci6n Sostenga la solucibn detergente en el gancho "J" adherido al Para cambiar las puntas de rocio: charola de accesorios, tal y como Io muestra la Figura 35. Coloque el pestillo de seguridad de la pistola de rociado. Desplace hacia atr_s el anillo del conector r_pido y tire de la punta de rociado que est6 montada.
- Page 30 Secci6n 4: Operaci6n Enjuage de la M_quina Lavadora a Presi6n ADVERTENCIA Lavado y Enjuage de la Superficie Este Lavadoraa Presi6n permite la regulaci6n de la presi6n de salida del agua variando la velocidad del motor. El palanca variable del control de la presibn encontrb en la frente del motor puede ser puesto, como mostrado en la Figura36: Mantenga la boquilla de rociado de 8 a 24 pulgadasde la superficie de limpieza.
-
Page 31: Mantenimiento
Mantenimiento RECOMENDACIONES GENERALES ADVERTENCIA La garantfa de la m_quina lavadoraa presi6n no cubre los elementos que hart sido sujetos a abuso o negligencia por parte del operador. Para hacer v_lida la cobertura total de la garantia, el operador deberg mantener la lavadora de presi6n tal y como se indicaen e[ manual. - Page 32 Secci6n 5: Mantenimiento Retire la pistola y la extensi6n para boquillas de la manguera Remuevala puntas de rocio de[ extremo de [a extensi6n de de alta presi6n. Retire la extensi6n para boquil[as de [a la boqui[la. pisto[a y retire el anil[o 'o' y el co[ador de la extensibn para Quite el en el fi[tro de [a linea de[ otro fin de la extensi6n de boquillas.
- Page 33 Secci6n 5: Mantenimiento y Almacenamiento MANTENIMIENTO DEL MOTOR Vacie el tubo de detergente, colocando el filtro en un envase Ileno de agua limpia mientras est6 corriendo el agua a baja Consulte el manual del propietario del motor para las presibn. Lave por I o 2 minutos. instruccionesde c6mo mantener adecuadamente el motor.
-
Page 34: Diagnosticos De Averias
Diagnosticos de Averias REPARACION DE DAI IOS Problema Soluci6n Causa Est_ usando la puntas de rocio de baja Cambie la puntas de rocio a una de las presi6n (negra). tres punt.as de rocio de alta presi6n. La entrada de agua est_ bloqueada. Limpie la entrada. - Page 35 POLJTICA PARA EL PROPIETARIO DE EQUIPOSTROY-BILT® Efectiva desde el Iro de Enero, 2003 GARANTIA LIMITADA "Troy-BiltO es una marca registrada de MTD bajo licencia de Briggs & Stratton Power Products. Briggs & Stratton Power Products reparar_ o sustituir_ sin cargo alguno cualquier componente del equipo** que presente...
- Page 36 TROY-BILT® OWNER WARRANTY POLICY Effective January I, 2003 LIMITED WARRANTY "Troy-Bitt_ isa registered trademark of MTD and is used under licenseto Briggs & Stratton Power Products.Briggs & Stratton Power Products will repair or replace, free of charge, any part, or parts of the equipment** that are defective in material or workmanship or both.Transportation charges on parts submitted for repair or replacement under this...
Need help?
Do you have a question about the 1904 and is the answer not in the manual?
Questions and answers