Panasonic VDR-M53PP Operating Instructions Manual
Dvd video camera
Hide thumbs
Also See for VDR-M53PP:
- Operating instructions manual (170 pages) ,
- Service manual (144 pages)
Table of Contents
Advertisement
Quick Links
Panasonic
Operating Instructions
DVD Video Camera
Model No.
VDR-M53PP
VDR-M55PP
VDR-M75PP
VDR-M95PP
The illustration shows VDR-M95PP.
VDR-M55PP
VDR-M53PP
VDR-M95PP
VDR-M75PP
Built-in Flash
O
usa
O
O
Remote Controller
O
O
PC Software
O
O
- : Not available
Thank you for buying a Panasonic product. Please take the time to become familiar with the operating
instructions
and how it is set up. Keep this manual handy for future reference.
RAM
_IM
Printed on recycled paper.
VQTOR00-1
This manual
w_s plinted
QR35665
withsoyb_sedink
M0205KZ-1035
Advertisement
Table of Contents

Related Manuals for Panasonic VDR-M53PP


Summary of Contents for Panasonic VDR-M53PP
- Page 1 Remote Controller PC Software - : Not available Thank you for buying a Panasonic product. Please take the time to become familiar with the operating instructions and how it is set up. Keep this manual handy for future reference. Printed on recycled paper.
-
Page 2: Important Information
Important Information For Your Safety The power switch turns the DVD Video Camera on and off, leaving the date/time feature unaffected. If the camera is to be left unattended for a long period of time, turn it off, WARNING : TO PREVENT FIRE OR SHOCK HAZARD, DO NOT EXPOSE TH S UN T TO RA N OR MO STURE. - Page 3 Model No.: VDR-M53PP / VDR-M88PP / VDR-M75PP / VDR-M95PP ResponsibUe party: Panasonic Corporation of North America One Panasonic Way, Secaucus, NJ 07094 Support Contact: Panasonic Consumer Electronics Company 1-800-211-PANA (7262) This device complies with Part 15 of the FCC Rules. Operation...
-
Page 4: Be Sure To Read The Following Before Opening The Cd-Rom Package
Be sure to read the following before opening the CD-ROM package This Agreement will take effect at the moment you open the package of the storage device (CD-ROM) provided with this product, if you agree to the terms herein. If you do not accept the terms of this Agreement. immediately return the unopened package of storage medium and... -
Page 5: Important Safeguards
IMPORTANT SAFEGUARDS In addition to the careful attention devoted to quality standards in the manufacture of your video product, safety is a major factor in the design of every instrument. But, safety is your responsibility too. This page lists important information that will help to assure your enjoyment and proper use of DVD Video Camera and accessory equipment. - Page 6 SERVICE An appliance and cart combination should be moved with care, Quick Servicing -- Do not attempt to service this video stops, excessive force, and uneven product yourself as opening or removing covers may surfaces may cause the appliance expose you to dangerous voltage or other hazards.
-
Page 7: Cautions When Using
Cautions When Using Handle the liquid crystal display (LCD) with care: • The LCD is a very delicate display device: Do not press its surface with force, hit it or prick it with a sharp object. • If you push the LCD surface, unevenness in display may occur. If unevenness does not disappear, turn the DVD Video Camera off, wait for a few moments, and then turn it on again. - Page 8 Heat on surface of product: • The surface of the DVD Video Camera will be slightly warm, but this does not indicate a fault. Screen on connected • Never leave the disc navigation screen, still image or camera image displayed on your TV to which the DVD Video Camera is connected: Doing so could result in displayed image retention or phosphor...
- Page 9 Be careful of moisture condensation: • When you move the DVD Video Camera between places where the difference in temperatures is great - such as entering a lodge from a ski slope or going out of a cooled room or vehicle - condensation (vapor in air warmed or cooled to water droplets) could occur on the lens and/or inside the DVD Video Camera.
-
Page 10: Cautions When Storing
DVD Video Camera, disc or card. Also, Panasonic cannot be responsible for your recorded video and audio. • If you or a third party makes a mistake when handling this DVD Video Camera, disc, card, etc., the recorded contents may be lost. -
Page 11: Read This First
DVD Video Camera for more Get to know your DVD Video Camera by using this advanced usage. manual, and get to know Panasonic. We appreciate • The section on "Disc Navigation" explains editing your business. with Disc Navigation: Refer to this section when... -
Page 12: Introduction
Introduction QYou can record even immediately following playback (page 51) Unlike tape devices, you do not need to search for the recording start position or locate the beginning of a blank portion. New recording will not overwrite any previously recorded data. Recorded scenes ÷... -
Page 13: Quick Start Guide For Software
Quick Start Guide for Software Only for VDR-M55PP/VDR-M75PP/VDR-M95PP Features The following software programs are contained on the provided CD-ROM. DVD-RAM Driver Install this driver when using stills and video clips recorded on a DVD- RAM disc on a PC. DVD-MovieAIbumSE By using DVD-MovieAIbumSE with DVD Video Camera, it is possible to perform playback, recording and editing of the DVD-RAM disc. - Page 14 Export video clips to PC using DVD-MovieAIbumSE. DVDfunSTUDIO program will automatically start. (see page 144 for details) Edit video clip files and introduce interactive DVD menus using DVDfunSTUDIO Software. Insert a new DVD-R disc into the DVD Video Camera. • When making an original DVD-R disc using DVDfunSTUDIO software, a message for initialization appears on the LCD of DVD Video Camera.
-
Page 15: Table Of Contents
Table of Contents Important Information ........Inserting Disc ............Removing Disc ............ Be sure to read the following before opening Inserting and Removing Card ......the CD-ROM package ........IMPORTANT SAFEGUARDS ......Basic Techniques Cautions When Using ........Basic Operation of DVD Video Camera... - Page 16 What is program"? ..........Setting Up Camera Functions ......Switching to Thumbnail Display of Specific Date Selecting Shooting Mode to Match the Subject (Switch) ............(Switching Program AE Mode) ......Playing Back Program (Play) ......Adjusting Color (White Balance) ......Changing Title of Program (Title) ......
- Page 17 Supplementary Information Introduction to Optional Accessories .... Video Camera Accessories ....... 145 Cleaning ............Terminology ..........Before Requesting Service ......Error Messages ..........Troubleshooting ..........System Reset ..........Major Specifications ........Request for Service Notice (USA Only) ..166 Limited Warranty (For USA Customers) ..
-
Page 18: Check Provided Accessories
Check Provided Accessories Make sure that you have found all the following accessories in the package: DC Cord: Battery Pack: AC Adaptor/Charger (VSK0677): YDR.M53PPNDR.M55PP/VDR-M75PP:(CGA.DU07A) Used to power the DVD Video Camera from When powering the DVD Video Camera from VDR-M95PP:(CGA-DU14A) AC outlet, or charge battery pack. -
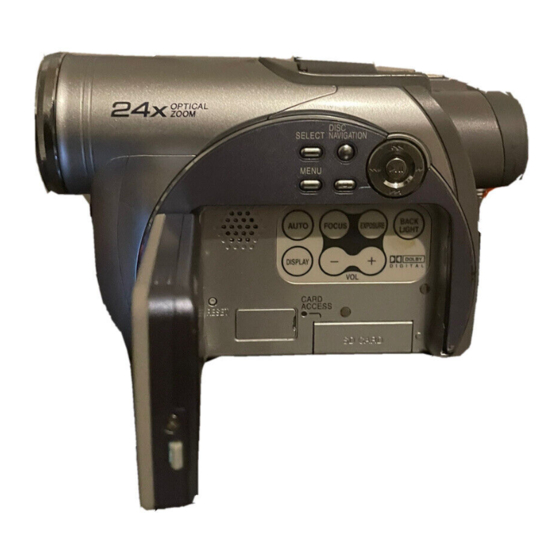
Page 19: Names Of Parts
Names of Parts (Inside the cover) Built-in flash (VDR-M95PP) (P.68) 8 Zoom lever (P. 57) There is a sensor at the top of the flash. Push the lever to the T side for telephoto, or to the W side for wide-angle. Lens cap string attachment hole (P. - Page 20 17 18 19 15 Viewfinder (P, 7, 37) 22 Battery attachment platform (P. 42) 16 Diopter control (P. 37) 23 Record (REC) button (P. 51) To adjust the focus of image appearing in the Used when recording movies. viewfinder (pull out the viewfinder). 24 LOCK switch (P.
- Page 21 29 AUTO button (P. 67) 36 SELECT button (P. 99, 111) To switch the DVD Video Camera to full automatic. 37 DISC NAVIGATION button (P. 96) 38 MENU button (P. 40, 79, 102) 30 FOCUS button (P. 64) To switch between manual focus and auto- Press this button to display the menu for setting focus.
- Page 22 Not included with VDR-M53PP. 44 Photo shot button (P,52) 52 ZOOM T button (P, 57) 45 START/STOP (REC) button (P, 51) 53 DIGITAL ZOOM button (P, 57) 46 MENU button (P, 40, 79, 102) 54 ZOOM W button (P, 57) 47 SELECT button (P, 99, 111) 55 Reverse skip button (P, 61) 48 Reverse search button (P, 60)
-
Page 23: Setting Up The Battery Pack
Setting Up the Battery Pack The CGA-DUOTA/CGA-DU14A battery pack provided with this DVD Video Camera has not been charged at purchase time: Charge it before using the DVD Video Camera. Note: • Be sure to use the specified battery pack CGA-DU07A/CGA-DU 14A (provided) for the DVD Video Camera: using other batteries could cause the DVD Video Camera to malfunction, or result in fire. - Page 24 Connect power supply (R 45). _ower cable AC adaptor Connect everything in this sequence _ - @. Insert a disc (R 46). 1. Press down the DISC EJECT lever once and Note: release • Do not use excessive force when opening cover.
- Page 25 Start recording (R 51). 3.Set the LOCK switch to _ (to the upper left) 1 .Open the LCD monitor (See page 38). to prevent accidental switching of recording mode.* * Only in _ mode. 2. Set the switch to" _U "or" I_"...
-
Page 26: Record And Play Back Using Card (Photo)
Connect power supply (R 45). Power cable AC adaptor Connect everything in this sequence _ - (4). 2 Insert a card (R 49). 3.Putin a card. 1.Open the LCD monitor. 2.Open the cover of card insertion block with power turned off. 4.Insert the card ell the way until it locks. - Page 27 3 Start recording (R52). 3.Set the switch to"_" while p ressing down on 1.Open the LCD monitor (See p age 3 8). the button tothe right ofthe power switch. t, X .' 4.Press the Photo shot button. itonce w ill r ecord one 3hoto. Pressing 2.Set the LOCK s witch to_ (to the lower right).
-
Page 28: Discs And Cards
DVD Video Camera. cannot be used. Always remove bare discs from these containers prior to use. Note: • It is recommended that you use Panasonic discs, since their compatibility with this DVD Video Camera has been confirmed. Using... -
Page 29: Information On Dvd-R Disc
Information on DVD-R Disc OFinalizing DVD-R disc You cannot record a still on DVD-R disc, or delete any recorded images or data. Before using the 8 cm DVD-R disc in a DVD player For optimum recording on DVD-R disc, this DVD or DVD video recorder that is compatible with 8 cm Video Camera writes control data to the disc in DVD-R disc, the disc must be finalized on this DVD... -
Page 30: Handling Discs
Handling Discs OUsing discs QStoring discs DVD-RAM and DVD-R discs are very delicate • To store a disc, insert it in the plastic case you recording media. Carefully read the following received when you purchased it. cautions and observe them: •... - Page 31 • When the write-protect switch on SD Memory Card is locked, no recording, deletion or editing Note: will be possible on the card. • We recommend that you use a Panasonic brand SD = II Memory Card. • This DVD Video Camera...
-
Page 32: Storage Capacity Of Disc Or Card
Storage Capacity of Disc or Card Recordable Time of Movie (Video) The recordable time will vary depending on the recording quality: See page 84 for the setting of recording quality. Movie recordable time on one disc (on single side) (when recording only movies) XTRA... -
Page 33: Recordable Stills (Photos) On Disc
Recordable Stills (Photos) on Disc Note: • Cards used in other devices can be used in this DVD ONumber of recordable stills on one Video Camera. side of disc: • No movie or music data recorded on card can be checked, viewed or heard on this DVD Video Camera. -
Page 34: Setting Up The Dvd Video Camera
This section explains preparations for recording - setting up the DVD Video Camera and battery pack. Setting Up the DVD Video Camera Holding DVD Video Camera Using Grip Belt • VDR-M95PP Insert your right hand from the bottom of DVD Video Camera up to the base of your thumb. -
Page 35: Attaching Shoulder Belt
To use as a Grip Belt again (Only for VDR-M95PP) / Attach the tip of the grip belt to the DVD Video Camera (1). Press down the lock cover in the direction of the arrow so that the belt will not fall out (2). Lock cover '"_ ,{2_'... -
Page 36: Removing Battery From Remote Controller
Inserting Battery into Remote Controller (Not included with VDR-M53PP) Insert the provided button type battery into remote controller. Pull the battery holder out towards yourself while Slide the battery holder to close it. pressing a thin rod or other object into the PUSH hole. -
Page 37: Viewing Subject Through Viewfinder
OUsing Remote Controller Note: • When using the remote controller, make sure that the To operate the DVD Video Camera with the remote infrared receiver on DVD Video Camera is not exposed to controller, point it at the infrared receiver before direct sunlight or any intense light. -
Page 38: Viewing Image On Lcd Monitor Screen
Viewing Image on LCD Monitor Screen I open t he LCD monitor. The LCD monitor has a spot where you can hook your finger. Hook the finger there to open the monitor. Note: the bottom • See LCD/EVF Setup" (R92) information displaying the viewfinder... -
Page 39: Closing Lcd Monitor
Closing LCD Monitor Before closing the LCD monitor, be sure to reset at a right angle to the DVD Video Camera. Close the LCD monitor, with the LCD screen facing inward, until a click is heard. Note: • Be sure to return the LCD monitor to a right angle to the DVD Video Camera before closing it. -
Page 40: Setting Date And Time
Setting Date and Time Set the current date and time so that the date and time at which you make a recording can be recorded correctly. The following procedure can also be used to correct the date and time you have already set. P re ss !_1_ / _ll_|/'ql_l/l_l_ buttons to select, and then press I_/11 to... -
Page 41: Changing Display Format Of Date And Time
Changing Display Format of Date and Time You can select one of three date display formats: month/day/year, day/month/year, or year/month/day. time display format will also change as follows: !!i! !!!!!!!!!!i! ..5:00PM M/D/Y SEP 30 2005 D/M/Y 17:00 30.9.2005 17:00 Y/M/D 2005.9.30 1 Press the MENU button. -
Page 42: Attaching Battery Pack To Dvd Video Camera
About the Battery Pack Attaching Battery Pack to DVD Video Camera Fit the battery pack to the battery attachment Note: platform on this DVD Video Camera and slide it • Make sure that the battery pack is in the correct orientation. - Page 43 ORecordable time with fully charged Continuous Recording (without zoom): battery pack (with no zoom The continuous recording time of DVD Video Camera in the left table shows the available operation, etc.) recording time when the DVD Video Camera is in For your reference, the approximate...
-
Page 44: Remaining Battery Level Indicator
Remaining Battery Level Indicator When the battery pack is used to power the DVD Video Camera, the battery remaining level appears in the viewfinder or on the LCD screen as follows: Fully charged (Blinks) Shows remaining level Note: • If you use the provided battery pack, the remaining level indicator" •... -
Page 45: Using Dvd Video Camera With Ac Adaptor
Using DVD Video Camera with AC adaptor It is recommended that you use the AC adaptor to power the DVD Video Camera from a household AC outlet when you perform settings on it, play back or edit images, or use it indoors. Note: Be sure to use the specified AC adaptor to power the DVD Video Camera. -
Page 46: Inserting Disc
Inserting and Removing Disc Inserting Disc Press the DISC EJECT lever down once Oldentifying recording/playback release sides of disc: This section describes double- "SIDE A" mark A few moments after the ACCESS/PC indicator sided discs. Note that blinks, the cover of disc insertion compartment included... - Page 47 OWhen using brand-new DVD-R disc Note: • Disc cannot be inserted or removed unless the battery Recognition of the disc will pack or AC adaptor is connected to DVD Video Camera. i _rmai bY_ start. • If there is some delay before recording starts, refer to The messages on the right "Check 4"...
-
Page 48: Removing Disc
Removing Disc Press down DISC EJECT Note: • It is recommended that you turn the DVD Video Camera lever once and release _" .K-:_/_ before inserting removing disc prevent misoperation. In a moment, • If the disc cover is open, the power will not turn off even cover of disc if the power switch is set to OFF". - Page 49 Inserting and Removing Card Turn the DVD Video Camera off. Note: • Do not close the LCD monitor while the cover is open, Open the LCD monitor. • Do not push the label pasting portion of Card when removing it: Doing so could damage Card. •...
-
Page 50: Turning Dvd Video Camera On Or Off
This section explains the basic techniques of recording movies and still images, and also basic settings on DVD Video Camera. Basic Operation of DVD Video Camera Turning DVD Video Camera On or Off Set the switch to the appropriate recording function Note: •... -
Page 51: Recording Movie
On/Off. • For various functions available during recording, Setting Up Camera Functions" on page 80. • Panasonic cannot be responsible for video and audiothat 1 Turn the DVD Video Camera on. cannot be recorded or edited because of any defect. -
Page 52: Recording Stills
Recording Stills Check the subject on the screen (viewfinder or Note: Recording of still images is possibleon DVD-RAMdisc and LCD). card. Photo shot button 3 Press the photo shot button halfway down (half press). The DVD Video Camera automatically focuses on the subject at the center of screen (when auto focus is selected). - Page 53 Compensating for Backlight Press the BACK LIGHT button during recording. Backlight correction icon _EM _ r,_ sEP_02n0 The backlight correction icon will appear. Note: • Pressing the BACK LIGHT button will alternate backlight setting between on and off. • The backlight setting will automatically return to "off"...
-
Page 54: On-Screen Information
On-Screen Information Various types of information will appear in the viewfinder or on the LCD screen during recording. Information Display during Recording Manual focus No display : Autofocus : (display in English or German): Manual focus --15 : (display in French or Italian): --16 Manual... - Page 55 8. Zoom 13. Movie recording quality (only when using disc) w r--lr--'1 XTRA : Image quality prioritized FINE : Standard (Digital Zoorn: Off) i • iT : Recording time prioritized [Digital Zoom: 40x (VDR-M75PP/ Still recording quality (when using card) VDR-M95PP), 60x (VDR-M53PP/ FINE...
- Page 56 OSwitching the information display mode You can switch the display mode of on-screen information: Press the DISPLAY button. The full and minimum display modes will alternate. • Full display mode: All types of information will appear. • Minimum display mode: The recording mode (see 1 on page 54) and recording status (see 7 on page 54) will appear.
-
Page 57: Zooming
Zooming This DVD Video Camera allows you to record using optical 24- (on VDR-M53PP/VDR-M55PP) or 1O- (on VDR-M75PP/VDR-M95PP) power zoom and digital zoom. If you continue to hold the zoom lever on the "T" W:Recording wide area (wide-angle) control side with Dig. Zoom 60x or 800x specified (on VDR-M53PP/VDR-M55PP) or Dig. -
Page 58: Macro Recording
Macro Recording Use the macro function when recording a small object from close-up position: You can shoot the subject as close as approximately 13/16" (2 cm) from the lens surface, magnifying the image to fill the screen. Aim the DVD Video Camera at the subject, and Note: press down the zoom lever to "W"... -
Page 59: Playing Back
Playing Back Before You Begin • Insert a disc or card recorded on this DVD Video Camera (R 46, 49). • Turn the DVD Video Camera on (R 50). arae_eram Playing Back Note: • During playback of movie, playback sound will be heard from the speaker. -
Page 60: Playback From Start Of Disc Or Card
Playback from Start of Disc or Card Use the Go To function (P. 62) or Disc Navigation function (R 96) to play back from the start of disc or card. Search Playback of Movie During playback, press one of the following buttons Note: and hold it: Search playback will start. -
Page 61: Skip Playback Of Movie
Skip Playback of Movie During playback, press the following buttons to Portion being played back locate the start of desired scene. Pressthe_14 Pressthe|_ I Pressthe_l_ Pressthe_l_ Press the IN_| button:To skip to the first image of the scene following the one being played back, and start Scene 3v, _... -
Page 62: Jumping To Specified Point (Go To)
Jumping to Specified Point (Go To) :To go to the start, and enter playback pause. :To go tothe end of last scene, and enter playback pause. Specify :To go to a specified point and enter playback pause. See the following for details. -
Page 63: Information Display During Playback
On-Screen Information Display Information Display during Playback Various types of information on recording will be superimposed on playback image you are viewing. ÷ No display Playback information Recording date/time display OSwitching the information display "1 _ (movie), (still with disc) or _1 (stillwith mode card) "2(_ Program or %_Play List... -
Page 64: Focusing During Recording
Q=l'_m Manually Focusing Subject The DVD Video Camera usually focuses on a subject automatically (autofocus). You can also manually focus a subject depending on the recording conditions. Focusing during Recording This DVD Video Camera automatically focuses a subject at the center of screen (auto-focus). When the DVD Video Camera is turned on, auto-focus will always be set. - Page 65 Manually focus the following objects, which may not be automatically focused (See page 64): Objects that are far and ... little variation _ecenter near at the dl in brightness, same time 9_ ......k£j suchasawhite wa,, "% _10bjectsnotin t:::2?_:_?z:_l Objects with Objects Objects lit by Dark objects...
-
Page 66: Manually
Adjusting Exposure Manually The DVD Video Camera usually adjusts the exposure automatically You can also manually adjust the exposure depending on the recording conditions. 1 Press the EXPOSURE button during recording. The exposure indicator will appear on the screen. RKM S _t_lr_ Exposure indicator Adjust with ""... -
Page 67: Using Auto Function
Using Auto Function Pressing the AUTO button will fully automate the camera functions. -,!1 / Press the AUTO button. "FULL AUTO" will be displayed on the screen of DVD Video Camera for several seconds. FULL AUTO The following settings will reset to defaults: Program Auto... - Page 68 Built-in Flash (Only for VDR-M95PP) When recording photos in a dark place, or if the Note: subject is lit from rear, the VDR-M95PP makes use • When recording dark subjects without using Flash". shutter speed will be slower, so don't let the camera of the built-in flash for automatic brightening: shake.
-
Page 69: Setting Flash
Setting Flash (See "Introduction to Optional Accessories" on page 145) When shooting stills, you can use the optional VW- Note: FLH3 .1 Flash (R 145). Refer to the Flash manual for • The DVD Video Camera automatically sets the shutter instructions. -
Page 70: Using External
Recording in Dark Locations Using the Light from the LCD Monitor When Program AE is set to "Low Light", you can use the light from the LCD monitor to record a subject. 1 Press the MENU button, and choose "Program Note: AE"... -
Page 71: Viewing On Tv Screen
Viewing on TV Screen Connecting to a TV Use the provided AV/S input/output cable to connect the DVD Video Camera to a TV as follows: * If your TV has an S-VIDEO input jack, you can connect the S-VIDEO plug into it. Note: •... -
Page 72: Viewing On Tv Screen
Viewing on TV Screen Turn on the TV and set the input selector to the Note: Input connection the DVD Video Camera • Adjust the sound volume on TV. • The infrared remote controller is useful when operating connected to. This is often refered to as "line". -
Page 73: Playback On Dvd Video Recorder/Player
Playback on DVD Video Recorder/Player You can use a DVD video recorder (see "Terminology" on page 147) or DVD player that conforms to 8 cm DVD-RAM to play back DVD-RAM discs recorded on this DVD Video Camera. Note, however, that such DVD-RAM discs are not compatible with all DVD video recorders and all DVD players. -
Page 74: Playback On Dvd Player
Note: • DVD-R discs recorded on this DVD Video Camera can be Note: played back on Panasonic DVD players, but playback on Use this DVDVideo Camera to finalize the DVD-R disc all DVD players is not guaranteed. recorded on the DVD Video Camera. -
Page 75: Recording (Dubbing) Images
Recording (Dubbing) Images • Before connecting this DVD Video Camera to another device, be sure to Before You Begin turn both devices off. • Insert a recordable disc or card in this DVD Video Camera (see R 28, 30). Recording (Dubbing) Images from Other Video Device You can record (dub) images from other video devices to disc or card in this DVD Video Camera. -
Page 76: Recording (Dubbing) Images From Other Video Cameras
Recording (Dubbing) Images from Other Video Cameras You can record (dub) images from other video cameras on a disc or card in DVD Video Camera. Use the AV/S input/output cable (provided) to connect the DVD Video Camera to the other video camera. -
Page 77: Recording (Dubbing) Images On Other Video Devices
Recording (Dubbing) Images on Other Video Devices You can record (dub) images played back on this DVD Video Camera, onto other video devices. Use Disc Navigation to create a play list by selecting desired scenes from those recorded on this DVD Video Camera (R 116). - Page 78 This section explains various settings to further extend the usefulness of this DVD Video Camera. Understanding Flow of Menus Press the MENU button during recording pause. The "Camera Functions Setup" menu screen will appear. Press 141_A_1/_41/1)t_ buttons to select a menu item, and then press the I_/11 button to choose the option. The screens used here to explain menus are displayed when DVD-RAM disc is used.
- Page 79 OFIow of Menus Refer to page indicated for details about each function. Movie functions are described below. Camera Functions Setup Date Setup Program AE (P. 80) L,UDateSetup d Date setting (R 40) White balance R 81) EIS *t (R 83) onAut°...
-
Page 80: On-Screen Information Display
Setting Up Camera Functions Before You Begin • Seepage79 forhowto set. • No menu screen appears with external input. Selecting Shooting Mode to Match the Subject (Switching Program AE Mode) This DVD Video Camera automatically sets the shutter speed and aperture according to the subject brightness for optimum recording: You can also specify one of six modes depending on subject conditions, recording environment or purpose of filming. - Page 81 Adjusting Color (White Balance) OSetting white balance manually This DVD Video Camera automatically adjusts color of subject. Change the white balance setting depending on the recording conditions. Point the DVD Video Camera at a white /.-_ object so that it fills the screen.
- Page 82 Note: • Do not block the infrared sensor (see 'Terminology" page 147) with hand. etc. sensor block • Be sure to remove the lens cap before turning the DVD Video Camera on. If the DVD Video Camera is turned on with the lens capped, the white balance will not work normally.
-
Page 83: Using The Electronic Image Stabilizer (Eis)
Using the Electronic Image Stabilizer (EIS) When you use zoom to record a magnified subject image, it will correct fuzziness in the recorded image. After recording with EIS set to "Off", it is Press the MENU button, choose "EIS" on the recommended that you return the setting to "On"... -
Page 84: Setting Up Record Functions
Setting Up Record Functions Switching Movie Quality (VIDEO Mode) Choose the movie quality from "XTRA", "FINE" and "STD". / Press the MENU button, Note: choose"VIDEO Mode" on • The movie quality setting will be stored in memory even the "Record Functions when the DVD Video Camera is turned off. -
Page 85: Switching Quality Of Still Image (Quality)
Switching Quality of Still Image (Quality) You can switch the still recording quality only when using card. Press the MENU button Press the MENU button, choose "Quality" on the to end setting. "Record Functions REra_ Setup" menu screen, and then press the ,/ll button. -
Page 86: Setting To Wide Tv Screen Mode (Wide)
Setting to Wide TV Screen Mode (Wide) (Only for VDR-M75PP / VDR-M95PP) You can record video in Wide TV Screen Mode aspect ratio) for display on wide-screen TVs. (16:9 Wide 4:3" specified Wide 16:9" specified (aspect ratio 4:3) (aspect ratio 16:9) 1 Press the MENU button, choose "Wide"... - Page 87 Note: • The Wide setting will be kept even after the DVD Video Camera is turned off. • The VDR-M53PP/VDR-M55PP does not have the Wide setting. • Writing wide mode movies recorded to a DVD-RAM disc using [STD], to a DVD-R disc using the PC program software provided (DVDfunSTUDIO): Depending upon the ]Video settings] setting of DVDfunSTUDIO, when you play back the contents of a recorded DVD-...
-
Page 88: Receiving Image From Another Device (Input Source)
Receiving Image from Another Device (Input Source) Ifyou wish to input an imagefrom another device tothis DVDVideo Camera,you mustfirst switchthe setting on the DVDVideo Camera. Referto the explanation startingfrom page 75 on how to connect the DVDVideo Camera to other devices or record images input from them. CAMERA This option usually selected. -
Page 89: Self Timer
Note: • The PHOTO Input setting can be confirmed using the on- screen information. • The PHOTO Input setting will be stored in memory even when the DVD Video Camera is turned off. • Refer to Recording (Dubbing) Images" on page 75 to see how to connect the DVD Video Camera to another device. -
Page 90: Display
Setting OSD Output On or Off (On-Screen Display) If you connect this DVD Video Camera to a TV to view images on TV screen,you can switch off the on- screen information (displayed in the viewfinder or on the LCD screen) from the TV screen. Press the MENU button, Note: choose "OSD output"... -
Page 91: Lcd/Evf Setup
L CD/EVF Setup Setting Brightness of LCD Screen (Brightness) Press the MENU button to end setting. / Press the MENU button, choose "Adjust" on the "LCD/EVF Setup" menu Note: screen, and then choose The brightness setting will be stored in memory even when the DVD Video Camera is turned off, "LCD Brightness". -
Page 92: Setting Color Density (Color Level)
Setting Color Density (Color Level) Press the MENU button, 3 Press the MENU button to end setting. choose "Adjust" on the "LCD/EVF Setup" menu Note: screen, and then choose • The color level setting will be stored in memory even when the DVD Video Camera is turned off. -
Page 93: Initial Settings
Initial Settings Switching Operating Sound On or Off (Beep) Beep is heard when tile power switch is turned on/off, the REC button is pressed, etc. No beep is heard. 2 Select "On" or "Off", and then press the ,/H button. Press the MENU button,... -
Page 94: Turning Record Led On Or Off (Record Led)
Turning Record LED On or Off (Record LED) You can switch off the recording indicator on the front of DVD Video Camera even during recording. ndicator will light red to show that the DVD Video Camera is recording. indicator will not light even during recording. 2 Select "On"... -
Page 95: Resetting Menu Settings To Defaults (Reset)
Resetting Menu Settings to Defaults (Reset) You can restore menu settings to defaults [initial settings at the factory (R 163)]. / Press the MENU button, Press the MENU button to end setting. choose "Reset" on the "Initial Setup" menu Note: To cancel resetting midway, choose "NO"... -
Page 96: Disc Navigation
Using Disc Navigation Starting or Terminating Disc Navigation Disc Navigation is a tool for editing scenes recorded on this DVD Video Camera. Following is an explanation of "scene" and "program" so that you will be able to make the most use of the Disc Navigation function. - Page 97 The following screen will appear when DVD-RAM disc is used: Some display components will not appear when DVD-R disc or card is used. Thumbnail (see "Terminology" on page 147) Selected scene numberq/ Cursor -- page position _4 Still image icon _2 -- Operation guide .3 "1...
-
Page 98: Playing Back From Disc Navigation
Playing Back from Disc Navigation Screen Press the DISC NAVIGATION button. Press the _/ll button. Use the control buttons to select the desired Playback will start from the selected scene. scene. Note: Pressing the _/_ button will move the cursor to the The selected scene will be framed: This is called preceding or following scene. - Page 99 Selecting Multiple Scenes Press the DISC NAVIGATION button. Repeat steps 2 and 3 to randomly select multiple scenes. 2 Use the control buttons to select the desired To cancel a selected scene, select the scene to scene. be canceled, and then press the SELECT button.
- Page 100 Disc Navigation Menu Functions Available with Disc Navigation Disc Navigation allows you to do the following: Deletion of scenes tE_I_ You can delete unnecessary scenes. Editing of scenes You can attach fade and skip to a scene, 104 - 108 combine scenes, or divide...
-
Page 101: Menu
Understanding Flow of Disc Navigation Menu Press the MENU button on the Disc Navigation screen: The menu screens for Disc Navigation and menu screens for disc and card will appear. See pages 78-79 and 96 for how to interpret the screen. Refer to pages indicated... - Page 102 Scene Deleting Scenes (Edit-Delete) You may want to delete unwanted scenes. Scenes on DVD-R disc cannot be deleted. 1 Press the DISC NAVIGATION button. it Press the • button to quit. / EDelete Scene 005'013 2 Select the scene to be deleted.
- Page 103 OEditing using submenu Press the MEN U button before pressing the I_/11button in step 5 (see page 102): The submenu will appear. Edit ,_l,_Delete ....To delete selected scenes _Exit ....To restore the Disc Navigation screen Select,_l_Start_Current..To select scenes from the start to the one that the cursor is on at the moment I_Current_End...To select scenes from the scene the cursor is on to the end...
- Page 104 Changing Images for Thumbnails (Effect - Thumbnail) Normally,the first image of the recorded sceneis displayed as athumbnail: Youcan choose another image of the scenefor thumbnail. Ifyou set a vivid image as the thumbnail, you can know what you recordedfrom a glance at the Disc Navigation screen. Original !humbnail Youcan use this image as thumbnail.
- Page 105 Playing Back by Skipping Scenes (Effect - Skip) You can specify "Skip" for scenes you do not want to play back: The selected scenes will be skipped. Press the DISC NAVIGATION button. Press the • button to quit. 2 Select the scene to be skipped. A skip mark "_"...
- Page 106 Directing Scenes Effectively (Effect - Fade) You can add fading to the beginning and!or end of scene. There are three types of special effects: Fade Out Fade Out Fade Out Fade In Fade In Fade In Black: B/W: Wipe: Fades in from black screen Fades in from black screen Fades in from Black and White Fades out to black screen...
- Page 107 Combining Multiple Scenes (Edit - Combine) If you have recorded numerous short scenes, combining them will be facilitated by the use of Disc Navigation. Be sure to select consecutive multiple scenes. Combining scenes is possible only when "Category: All" is specified (page 128).
- Page 108 Dividing Movies (Edit - Divide) You can divide a scene into two parts. Todelete unnecessary portion of scene, first divide the scene, and then delete the unnecessary portion. Press the DISC NAVIGATION button. Note: • The status bar of scene being played back can be Select the scene to be divided.
- Page 109 Copying Stills on DVD-RAM Disc to Card (Copy) Set the power switch to" _" or" D ". Note: • No movie can be copied. Press the DISC NAVIGATION button. • When you copy stills recorded on DVD-RAM disc to card, recording quality will automatically be set to FINE", •...
- Page 110 Locking Scenes on Card (Lock) You can lock each photo recorded on card so that it will not be deleted or edited by mistake. OTo unlock the Set the power switch to" m ". scene: Select the locked scene, and then use the same 2 Press the DISC NAVIGATION button.
- Page 111 ii-ae_lmm Selecting Scenes Using Menu Screen (Select) You can use this "Select" function to select consecutive scenes at one time. This function is useful when there are numerous scenes. Press the DISC NAVIGATION button. Choose "Start _ Currenf', "Current _ End" or "All" 2 Press the MENU button.
- Page 112 Displaying Information Using Menu Screen (Detail) You can display various information for a scene: the recording mode, recording date/time and length, special effects and movie quality mode. Press the DISC NAVIGATION button. If you have selected multiple scenes, the information shown below will appear.
-
Page 113: What Is Program
Program What is "program"? Program refers to an assembly of scenes recorded on the same date regardless of whether they are movie or still. Scene No. 1 Scene No. 2 Scene No. 3 Scene No. 4 Scene No. 5 Scene No. 6 ROAM Movie 10:20AM... -
Page 114: Playing Back Program (Play)
Playing Back Program (Play) You can play back only the selected program. 1 Press the DISC NAVIGATION button. 4 Select the program to be played back, and then press the ,/ll button. 2 Press the MENU button. Playback will start from the first scene of the 3 Choose "Play"... - Page 115 6 After entering the title, OCharacters available for entering choose "Enter" and then title press the I_/11 button. You can use the control buttons to select characters from the "capital letter", "small letter" and "symbol" input modes. At step 5, select the input mode and then press 1,,/11 button, or press...
-
Page 116: Play List
Play List What is "Play List"? You can create a play list on this DVD Video Camera by gathering your favorites from the recorded scenes. Since the play list is not created by copying data, you will consume little of the disc capacity by making a play list. -
Page 117: (Editing Play List)
Switching to Display of Each Play List (Switch) Select the desired play list: The Disc Navigation screen of the selected play list will appear. 1 Press the DISC NAVIGATION button. 4 Use the "Switch Playlist" screen to select the play 2 Press the MENU button, list you wish to display, and then press the I_/11... -
Page 118: Adding Scenes To Play List (Editing Play List)
Adding Scenes to Play List (Editing Play List) Press the DISC NAVIGATION button. 5 Press the IN_I button to move the cursor to the lower row, and press the _/1_1_ button to select Press the MENU button. the point where the scene is to be inserted. Choose "Edit"... - Page 119 Deleting Scenes from Play List (Editing Play List) Press the DISC NAVIGATION button. Press the ,/ll button. 2 Display the editing screen Repeat steps 3 and 4 to delete other scenes. of the play list to be edited. 5 Press the • button: The Perform steps 24 page 118.
- Page 120 Deleting Scenes Using Submenu for Editing (Editing Play List) You can delete scenes from play list on the editing screen. 1 Press the DISC NAVIGATION button. 5 Choose "Delete" on the "Edit" menu screen, and 2 Displaythe editing screen then press the l,-/ll button.
-
Page 121: Arranging Order Of Scenes (Move)
Arranging Order of Scenes (Move) You can move scenes only when "Category: All" is specified. 1 Press the DISC NAVIGATION button. The screen for verifying move will appear: Choose 2 Press the MENU button. "YES", and then press the _/ll button. -
Page 122: Changing Title Of Play List (Title)
Changing Title of Play List (Title) The play lists have serial numbers based on the order in which you have created them, along with the created dates/times. You can change these titles at any time. Press the DISC NAVIGATION button. 5 The screen verifying exit nTLE [ataPark from this menu will... -
Page 123: Top (End)
Irae_lmm Go To From the Disc Navigation screen, you can jump to the first scene or last scene. Top (End) Press the DISC NAVIGATION button. 2 Press the MENU button. 3 Choose "Top" or "End" on the "Go To" menu screen, and then press the ,/ll button. -
Page 124: Disc Or Card Management
Disc or Card Management Qmlr'_eram Verifying Remaining Free Space on Disc or Card (Capacity) You can find out how long you will be able to record on one side of disc or on card. 1 Press the DISC NAVIGATION button. Press the •... -
Page 125: Format Card)
r_ra'al Initializing (Format Card) DVD-RAM Disc or Card Disc. Format • Take great care that power is not turned off during initialization. If the DVD Video Camera is turned off during initialization and the initialization Before Begin interrupted, incorrect initialization will result, and at worst, the data recorded on disc or card before initialization was interrupted may be... - Page 126 Updating Control Information of DVD-RAM Disc (Update Control Info.) Disc Navigation inthis DVDVideoCamera handles information on scenes,such as thumbnail, skip,or fade, in a particular manner. If you use another device to edit a disc recorded on this DVD Video Camera, and then use the data again with Disc Navigation in this DVD Video Camera, the Disc Navigation may not appear normally.
- Page 127 Finalizing (Finalize Disc) DVD-R Disc • Be sure to use the AC adaptor to power the DVD Video Camera when finalizing a DVD-R disc. Finalization cannot be executed using a battery Before You Begin pack. If the DVD Video Camera is turned off during finalization and the finalization is interrupted, incorrect finalization will result, and at worst, the disc may be damaged.
- Page 128 Other Functions (Others) Displaying Movies or Stills Independently (Category) Scenes recorded on this DVD Video Camera will be displayed in the order of recording regardless of whether they are movies or stills. You can use the Disc Navigation screen to switch display to stills only or movies only.
-
Page 129: Slide Show (Continuous Playback Of Stills)
Slide Show (Continuous Playback of Stills) Ifyou playback stills recorded on a card,the DVDVideo Camera will enter playbackpause mode after each still is played back. Setting Slide Show allows you to continuously play back stills. Press the DISC NAVIGATIONbutton. Note: •... - Page 130 This software is compatible only with Windows Me/2OOO/XP. It will not run in other versions Windows, such as Windows 98SE. Before insta/ling the DVD-RAM Driver on the CD-ROM provided with this DVD Video Camera; If the packet writing software which supports the DVD-RAM disc is installed, it is necessary...
- Page 131 DVD-MovieAIbumSE Personal computer : IBM PC/AT compatible personal computer : Windows ® Millennium Edition/2000 Professional/XP Home Edition/XP Professional : Intel "s Pentium ® III 450 MHz or higher (1 GHz or higher recommended) or Intel _ Celeron ® 633 MHz or higher : 128 MB or more (256 MB or more recommended) Display : High Color (16 bit) or more...
- Page 132 DVDfunSTUDIO 2.2 Personal computer : IBM PC/AT compatible personal computer : Windows ® Millennium Edition/2000 Professional Service Pack 3 or later/XP Home Edition/XP Professional Service Pack 1 or later : Intel "s Pentium ® III 800 MHz or higher : 256 MB or more (512 MB or more recommended) Display : High Color (16 bit) or more Desktop resolution of 1024 x 768 pixels or more...
- Page 133 Contents on Provided CD-ROM Upon inserting the provided CD-ROM into the PC, the "Setup Menu" screen will appear. Youcan instafl the included software. If the "Setup Menu" screen does not appear, double-click the CD-ROM drive icon. ODVD-RAM Driver Note: If any trouble has oceured while installing DVD-RAM (see page 136 for installation) Driver :...
-
Page 134: Computer (Only When It Is Connected For The First Time)
"Start" menu, choose"Panasonic DVD-RAM" and "Programs'or "All Programs" from the Windows "DVD-RAM Driver", and then open "Using DVD- RAM disc". "Start" menu, choose "Panasonic" and "DVD- MovieAIbumSE', and then open "Operation ODVDfunSTUDIO Manual". • After installing DVDfunSTUDIO, open To read the above manual, you will need Adobe Acrobat Reader. - Page 135 OOperation with DVD Video Camera connected • The following operations are not possible when connected to PC: - Camera recording and playback using operation buttons on DVD Video Camera - Poweroffusingthepowerswitchon DVDVideo Camera • No image will appear on the LCD screen or viewfinder of DVD Video Camera when it is connected to PC: Make sure that the DVD Video Camera is properly...
-
Page 136: Installing Dvd-Ram Driver
Installing DVD-RAM Driver This software is compatible only with Windows Me/2000/XP. It will not run in other versions Windows, such as Windows 98SE. OBefore Installing DVD-RAM Driver If another DVD-RAM Driver is already installed in your PC, confirm the original DVD-RAM Driver. If the packet writing software which supports the DVD-RAM disc is installed, it is necessary to uninstall it, and then install the provided DVD-RAM Driver. - Page 137 5 Check the folder in which the DVD-RAM driver O Installation will start. When installation is will be installed, and then click "Next". complete, some notes will appear: check the contents, and then click "x" at the top right of window.
- Page 138 ¢Checking whether or not the DVD Video Camera has been correctly recognized by your computer You can check whether these installations have been completed successfully. Use the following procedure. 1 Process for getting to Device Manager as follows. Windows ® XP : Start - Control Panel - System - Hardware - Device Manager Windows®2000 : Start- Settings- Control Panel...
- Page 139 Installing DVD-MovieAIbumSE "DVD-MovieAIbumSE" software is used to edit movies that conform to DVD Video Recording format. This software is compatible only with Windows Me/2000/XP. It will not run in other versions Windows, such as Windows 98SE. If you do not change the folder where the / Insert the provided CD-ROM into the PC, and click "DVD-MovieAIbumSE 4.1"...
- Page 140 6 A message for verifying whether a shortcut icon Note: is to be created on desktop will appear. • If your PC uses Windows ce 2000 Professional/ XP Home Edition/XP Professional, set the user name If you want to create one, click "Yes". If not, to Administrator (computer's manager)"...
-
Page 141: Installing Dvdfunstudio
Installing DVDfunSTUDIO Does not support recording to DVD-RW or DVD+RW discs with the DVD Video Camera. This software is compatible only with Windows Me/2000/XP. It will not run in other versions of Windows, such as Windows 98SE. tz*_ / Insert the provided CD-ROM into the PC, and click O A message for verifying whether a shortcut icon "DVDfunSTUDIO 2.2"... -
Page 142: If You Insert An Unformatted Dvd-R Disc In The Dvd Video Camera
If you insert an unformatted DVD-R disc in the DVD Video Camera ..The following message is displayed oil the camera monitor: "This disc must be formatted before it can be used by this camera". Follow these steps when authoring DVD-R discs with DVDfunSTUDIO. 1 Press the •... - Page 143 Creating DVD Video on PC from DVD-RAM Disc Recorded on DVD Video Camera Using DVD-MovieAIbumSE and DVDfunSTUDIO, you can create a DVD Video disc (DVD-R disc) from the images recorded on this DVD Video Camera, following the procedure below: 1 Insert a recorded DVD-RAM disc into the DVD 5 The "Export a title"...
-
Page 144: Uninstalling Software
• Still images recorded using DVD-MovieAIbumSE or a Panasonic DVD recorder cannot be played back on the DVD Video Camera. • The following message may appear if you swap over discs while DVD-MovieAIbumSE is running. -
Page 145: Introduction To Optional Accessories
Introduction to Optional Accessories Video Camera Accessories LM-AF30U 8cm DVD-RAM LM-AF60U 8cm DVD-RAM LM-RF30V 8cm DVD-R PV-DAC13 AC adaptor with AC Cable and DC Cable CGA-DU14A* 1360mAh/Rechargeable Lithium Ion Battery Pack CGA-DU21A 2040mAh/Rechargeable Lithium Ion Battery Pack RP-SDH01GU1A 1 GB SD Memory Card RP-SDK512U1A 512 MB SD Memory... -
Page 146: Cleaning
Cleaning Be sure to set the power switch to "OFF" before cleaning this DVD Video Camera. QDo not use benzene or thinner to OCleaning LCD screen and camera lens clean DVD Video Camera case Use a dry, soft cloth to wipe dirt off. When cleaning The coating of case could peel off or the case could the LCD screen, be careful notto use force, scratch deteriorate. -
Page 147: Terminology
Terminology DVD-RAM disc: Rewritable DVD disc. DVD-R disc: One-time recerdable DVD disc. DVD Video format: This application format establishes the file name, directory structure, data format, etc. to record videos (movies). A generally available DVD video conforms to this format. DVD Video recorder: This device can record video and audio on any recordable DVD disc, such as DVD-RAM, that conforms... - Page 148 Disc-protect: This disables writing to disc (protects disc from writing) so that images recorded on DVD-RAM disc cannot be accidentally deleted and the disc cannot be initialized. Howling: This phenomenon occurs as follows: when the DVD Video Camera is connected to a device, such as TV, the audio input to the microphone of DVD Video Camera is amplified and output from the speakers of TV, and the signal is again input to the microphone.
-
Page 149: Before Requesting Service
Before Requesting Service Movie can be recorded only on DVD-RAM or DVD-R disc. If the temperature inside the DVD Video Camera Check the following: high, normal operation may not be possible. Turn the Is the correct type of disc inserted? DVD Video Camera off, wait for a few moments, then turn it on again for operation. - Page 150 Is DVD Video Camera connected to PC using USB cable? Unplug the USB cable. Does DVD Video Camera stop at the end of the scene to which wipe-out was set and played back? Press the DISC NAVIGATION button.
-
Page 151: Error Messages
Error Messages A message may appear while you are operating the DVD Video Camera. If a message appears, refer to the following table and take appropriate corrective action. Messages are arranged in alphabetical order. (1) Data error in a part of It is possible that the system cannot normally complete writing of file... - Page 152 Cannot execute. Division or change in thumbnail was executed when multiple Unselect multiple scenes were selected. scenes. Cannot read disc. An error occurred during disc recognition. Make sure the disc is not Please clean disc, check dirty, inserted upside down, or not fully inserted on the spindle.
- Page 153 DISC ACCESS The recorded scene is being stored on disc. Wait until the message disappears, and you can start to use the 51, 52 DVD Video Camera. This DVD Video Camera is verifying whether the correct disc has been inserted. Wait until the message disappears, and you can start to use the...
- Page 154 Drive overheat. Please The temperature inside the DVD Video Camera is too high, and retry later, reading or writing of the data on disc may not be performed normally. Turn the DVD Video Camera off and wait for a while. temperature will be effectively decreased...
- Page 155 Scenes over limit. The number of entered scenes has reached the limit that can be Cannot divide scene, entered. 108, 116 Delete several scenes. Scenes over limit. This message will appear if you try to move a scene when the Cannot move scene, number...
- Page 156 "1 • This message may also appear when dirt adheres to disc. If this message appears when a recorded disc is recognized immediately after it is inserted, do not repair the disc; remove it and then use Disc Cleaning Cloth to clean off the dirt before using it. •...
-
Page 157: Troubleshooting
Troubleshooting Check to see the following before asking for a repair. If the suggested solution still cannot restore the DVD Video Camera to normal, do not attempt to repair it yourself, but consult your dealer. Power supplies Battery pack cannot Is the ambient temperature too low or too high? - Page 158 During recording Pressing the REC button Is input image copy-guarded? will not start recording. Copy-guarded image cannot be recorded on this DVD Video Camera. Recording starts Is disc scratched or do dirt or fingerprints adhere to it? stops immediately. Clean the disc. If there is still no improvement, replace the disc.
- Page 159 During playback Is disc dirty? Recognition of disc is not complete Use Disc Cleaning Cloth to clean it. Pressing the playback Has the image been recorded by devices other than this DVD Video button will not start Camera? playback. Playback of images recorded on devices other than this DVD Video...
- Page 160 When Video Camera is connected to PC: No drive icon appears The DVD Video Camera is not turned on. Check the power supply. Turn PC off and then disconnect the USB cable. Turn PC on again, and then use the USB cable to connect the DVD Video Camera Make sure the USB cable is completely plugged...
- Page 161 An image that should Click the "Preference" button at top right of DVD-MovieAIbumSE have been recorded screen, click the "Device Setting" tab to choose the drive where does not appear when DVD-RAM disc is loaded in the "Drive Select" column, and then click DVD-MovieAIbumSE "OK".
- Page 162 Miscellaneous Powerdoesnotcorneon, Execute system reset (press the RESET button). or no operation occurs by pressing button. Has the DVD Video Camera been subjected to impact? The DVD Video Camera could be damaged. Please contact The date and time are Has the DVD Video Camera been left unused for a long period...
-
Page 163: System Reset
System Reset If the DVD Video Camera does not operate normally, perform "System Reset": The DVD Video Camera may recover to normal. "System Reset" will reset all settings to factory defaults. The date and time will also be reset: Set the date and time again before using the DVD Video Camera. 1 Set the power switch to "OFF"... -
Page 164: Major Specifications
Major Specifications DVD Video Camera Information for your safety Power Source: DC 7.9/7.2 Power Consumption: When recording with LCD monitor VDR-M53PP/M55PP: 1/6-inch interlaced VDR-M75PP: 1/4.5-inch interlaced VDR-M95PP: 1/3.6-inch interlaced Total number of pixels VDR-M53PP/M55PP: approx. 680,000 VDR-M75PP: approx. 1,330,000 VDR-M95PP: approx. - Page 165 Maximum numberof DVD-RAM disc VDR-M53PP/M55PP/M75PP: recordable stills (per side) VDR-M95PP: However, if movies and stills are mixed on one disc, the recordable number may decrease. SD Memory Card VDR-M53PP/M55PP approx. 232 (in FINE mode) (when using 32 MBcard VDR-M75PP approx. 58 (in FINE mode) (Seepage31 for"Suitable...
-
Page 166: Request For Service Notice (Usa Only)
Mall this completed form and your Proof of Purchase along with your unit to: Panasonic Services Company 1705 N, Randall Road Elgin, IL, 60123-7847 Please write the displayed above Self Diagnostic number here, [... -
Page 167: Limited Warranty (For Usa Customers)
Service For Carrydn, Mail In or In HomeService (as applicable) in the United States c_{ll toll free cont_sct number list_!d above or visit Panasonic Web Site: Mlp:/iwww panasonic.corn For assistance in Puerto Rico call Panasonic Puerto Rico, Inc {787)W50 4300 ol fax (787)W88 2910... -
Page 168: Customer Services Directory
For hearing or speech impaired TTY users, TTY : 1-877-833-8855 Purchase Parts, Accessories and Instruction Books online for all Panasonic Products by visiting our Web Site at: http ://www.pasc.panasonic.com or, send your request by E-mail to: npcparts_,us.panasonic.corn You may also contact us directly at:... -
Page 169: Warranty (For Canadian Customers)
Warranty (For Canadian Customers) Panasonic Canada Uric. 5770 Ambler Drive, Mississauga, Ontario L4W 2T3 PANASONIC PRODUCT- LIMUTED WARRANTY Panasonic Canada inc. warrants this product to be free from defects in material arid workmanship and agrees to remedy such defect for a period as stated bek)w from the date of original... - Page 170 (201) 348-7000 Panasonic Company East: 6749 Baymeadow Drive, Gnen Burnie, MD 21060 Panasonic Company Centrak 1707 North Randall Road, Engin, n L 60123 Panasonic Company West: 6550 KateHa Avenue, Cypress, CA 90630 Division of Panasonic Corporation of North America Panasonic Puerto Rico, inc.
Need help?
Do you have a question about the VDR-M53PP and is the answer not in the manual?
Questions and answers