
Related Manuals for Hoover Turbo EmPower 4600 U5268900


Summary of Contents for Hoover Turbo EmPower 4600 U5268900
- Page 1 ® um C O_ner_s Manua| ENGL|SH -_ pp° 1°12 ESPANOL -_ pag, 13-20 FRANGAIS -_ p, 22-28 Read this _anua! before operating cleaner www.hoover.com...
- Page 2 Jf appJiance is not working as it should, been dropped, damaged, Jeft outdoors, or dropped into water, take it to a Hoover Factory Service Center or Authorized Hoover Warranty Service DeaJer (Depot). © 2004 The Hoover Company...
- Page 3 If you need any assistance: Visit our webske at www.hoover.com, Click on the "Service" button to find the service outlet nearest you OR Call 1o800o944o9200 for an automated referral of service outlet locations (U.S. only) OR Call 1=330=499=9499 to speak with a representative...
-
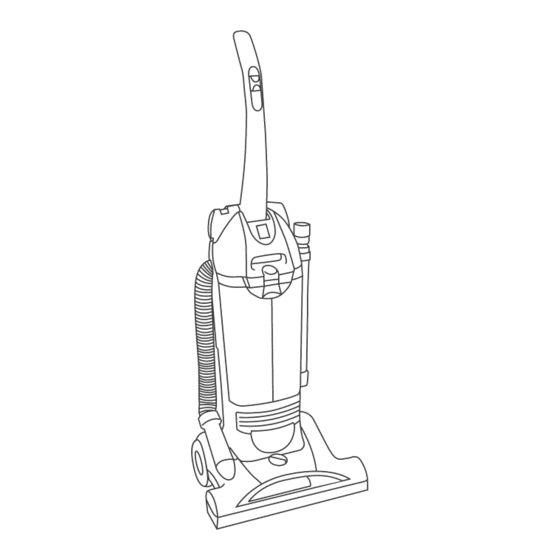
Page 4: Cleaner Description
Cleaner description 1. Folding handle 15, Hose 2. Upper handle release l& Furniture nozzle button 17. Dusting brash 3. Power Boost Switch 18. Extension wand 4. Dirt cap latch 19. Crevice wand: stores 5. Carrying handle inside wand 6. Preofi[ter 20. - Page 5 Handle positions Transper! ing cJeaner The handle of your cleaner has three posi- Put handle in upright position. Tilt cleaner back on rear wheels. Push tions; upright when using cleaning tools; forward. operating position for general operation on carpet and floors; low for reaching under low furniture.
-
Page 6: Cleaning Tools
Cleaning tools Tools allow for cleaning surfaces above the floor and for reaching hard to clean areas. The cleaner is ready for tool use when H f__-------- handle is in upright position. For best tool performance, set the ON- OFF-HUSW M switch to ON and set the SeJect preper too|... - Page 7 to €Jean tooJs To clean the hose, wipe off dirt with a cloth dampened in a mild detergent. Familiarize yourself with these home When to e_pty Rinse with a damp cloth, maintenance tasks as proper use and It is recommended that the dirt cup be Cleaning tools may be washed in warm care of your cleaner will ensure contin-...
-
Page 8: Filter Assembly/Cleaning
Using a screwdriver, remove the two screws as shown and lift off lens, Should you want to replace this filter, ask edge of dirt cup, for HOOVER part no, 387'65024 (filter Replace lid and return cup to cleaner package part no. 40110004), (Fig. 3-4). -
Page 9: Headlight Replacement
Excessive force is not required. Belt replacement The belt on your Hoover cleaner causes the agitator to rotate and is important for the effective operation of the cleaner. The belt is located under the hood of the cleaner and should be checked from time to time to be sure it is in good con- dition. - Page 10 'Belt replacement" section to replace cated periodically by a Hoover Factory if brushes do not touch card. belt, new agitator, agitator cover and Service Center or an Authorized Hoover hood.
-
Page 11: Thermal Protector
(U,S, only)= * Agitator brush roll worn * Replace brash roll * Dirt cup full Do not send your cleaner to The Hoover * Empty cup Company in North Canton for service, this will only result in delay. * Incorrect... -
Page 12: Clearing Blockages
2. Remove dirt cup, look in duct (A). the following Authorized Warranty 3. Clear blockage from dirt duct. Service outlets. Proof of purchase will be required before service is rendered. I. Hoover Factory Service Centers 2. Hoover Authorized Warranty Service Dealers (Depots) For an automated referral of...
Need help?
Do you have a question about the Turbo EmPower 4600 U5268900 and is the answer not in the manual?
Questions and answers