
Subscribe to Our Youtube Channel
Related Manuals for Gefen ToolBox GTB-MHDMI1.3-441


Summary of Contents for Gefen ToolBox GTB-MHDMI1.3-441
-
Page 1: For Hdmi
Gefen 4x1 Switcher ® for HDMI GTB-MHDMI1.3-441 GTB-MHDMI1.3-441-BLK User Manual www.gefentoolbox.com... - Page 2 Notice Gefen, LLC reserves the right to make changes in the hard ware, packaging and any accompanying doc u men ta tion without prior written notice. 4x1 Switcher for HDMI is a trademark of Gefen, LLC HDMI, the logo, and High-Defi...
-
Page 3: Table Of Contents
CONTENTS Introduction Operation Notes Features Panel Layout Panel Descriptions Connecting & Operating The GefenToolBox 4x1 Switcher for HDMI Connecting the GefenToolBox 4x1 Switcher for HDMI How to Operate the GefenToolBox 4x1 Switcher for HDMI Automatic Switching IR Remote Control Unit Description IR Remote Control Unit Installation 10 IR Remote Control Unit Confi... -
Page 4: Introduction
We invite you to explore our distinct product line. Please visit http://www.gefen.com for the latest offerings in High-Defi nition signal solutions or call us between the hours of 8:00 am and 5:00 pm Monday-Friday, Pacifi c Standard Time for assistance with your A/V needs. -
Page 5: Operation Notes
OPERATION NOTES READ THESE NOTES BEFORE INSTALLING OR OPERATING THE GEFENTOOLBOX 4X1 SWITCHER FOR HDMI • The GefenToolBox 4x1 Switcher for HDMI has an Automatic Switching feature: Each time a connected device is powered ON, GefenToolBox 4x1 Switcher for HDMI will switch to that input. Once the connected device is powered down, the product will switch to the last active input. -
Page 6: Features
FEATURES HDMI 1.3 Features • 225 MHz (up to 12 bit YUV 444 @ 1080p) • Deep Color • Dolby TrueHD and DTS-HD Master Audio • Lip Sync • CEC Pass-Through General Features • Switch between four (4) HDMI 1.3 sources without signal loss. •... -
Page 7: Panel Layout
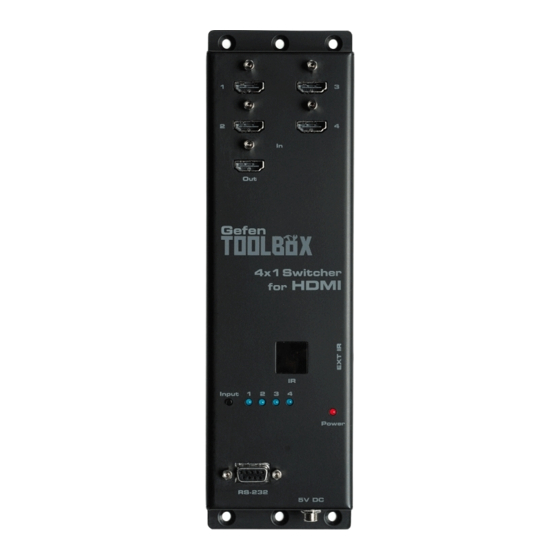
PANEL LAYOUT... -
Page 8: Panel Descriptions
PANEL DESCRIPTIONS HDMI Input Ports 1-4 Connect HDMI-compliant source device(s) to any of these input ports. HDMI Output Port Connect an HDMI-compliant display device to this output port. IR Window Receives IR commands from the included IR remote (EXT-RMT-4IR), shown on page 8. -
Page 9: Connecting & Operating The Gefentoolbox 4X1 Switcher For Hdmi
CONNECTING AND OPERATING THE GEFENTOOLBOX 4X1 SWITCHER FOR HDMI How to Connect the GefenToolBox 4x1 Switcher for HDMI Use HDMI cables (provided) to connect the source device(s) to the HDMI input port(s) of the GefenToolBox 4x1 Switcher for HDMI. Use additional user-supplied HDMI cables to connect an HDMI-compliant display to the output port on the GefenToolBox 4x1 Switcher for HDMI. -
Page 10: Automatic Switching
CONNECTING AND OPERATING THE GEFENTOOLBOX 4X1 SWITCHER FOR HDMI Example 2: Routing Input (source) 3 to the Output (display). Using Fig 1.1 (page 6) as a starting point. Press the Input Select button once. Fig 1.2 The row of LED indicators will now appear as in Fig 1.2. LED #2 will turn off and LED #3 will become enabled, indicating that Input 3 is being routed to the Output (display). -
Page 11: Ir Remote Control Unit Description
IR REMOTE CONTROL UNIT DESCRIPTION LED Button Press Indicator This LED will activate momentarily upon each button press. This visual indicator is to inform the user that a command has been sent by the IR remote control. Display and Source Selection Buttons These buttons will be used to send display and source selections to the GefenToolBox 4x1 Switcher for HDMI. -
Page 12: Ir Remote Control Unit Installation
IR REMOTE CONTROL UNIT INSTALLATION Installing the IR Remote Control Battery Remove the battery cover on the back of the IR Remote Control unit. Insert the included battery into the open battery slot. The positive (+) side of the battery should be facing up. Replace the battery cover. -
Page 13: Ir Remote Control Unit Confi Guration
IR REMOTE CONTROL UNIT CONFIGURATION Resolving IR Code Confl icts In the event that IR commands from other remote controls confl ict with the supplied IR remote control unit, changing the remote channel will alleviate this issue. The IR remote control unit has a bank of DIP switches for setting the remote IR channel. -
Page 14: Ir Remote Control Unit Operation
IR REMOTE CONTROL UNIT OPERATION The RMT-4IR remote control will allow selecting the source to display on the output. Each button on the remote control corresponds to one of the of four source inputs. Please use the information below when selecting the desired source: Table of IR Remote Commands for the GefenToolBox 4x1 Switcher for HDMI... -
Page 15: Ir Extender Installation
IR EXTENDER INSTALLATION Using the IR Extender An optional IR Extender (Gefen Part No. EXT-RMT-EXTIR) can be used to extend the IR capabilities of the GefenToolBox 4x1 Switcher for HDMI. One such application allows the Switcher to be hidden within or behind a cabinet (see illustration below). -
Page 16: Rs-232 Serial Control
RS-232 SERIAL CONTROL 5 4 3 2 1 1 2 3 4 5 9 8 7 6 6 7 8 9 Only Pins 2 (RX), 3 (TX), and 5 (Ground) are used on the RS-232 serial interface This feature allows for easy integration into automated systems capable of transmitting RS-232 commands. -
Page 17: Commands
RS-232 SERIAL CONTROL Commands Simplifi ed syntax was used for command implementation for faster operation with the device. These commands are not case-sensitive. Command Description Enable Auto-Switching Disable Auto-Switching Get System Status Displays Firmware Version A Command The A command enables auto-switching. The Switcher will automatically switch to the last source device that was powered on. - Page 18 RS-232 SERIAL CONTROL S Command The S command displays the current routing status of the Switcher. The S com- mand will also display the current auto-switching status (A or N). Syntax: Parameters: None V Command The V command displays the fi rmware version. Syntax: Parameters: None...
-
Page 19: Changing The Ir Channel
CHANGING THE IR CHANNEL Changing the IR channel Use the following procedure to set the proper IR channel on the GefenToolBox 4x1 Switcher for HDMI. Press and hold the Input Select button for 5 seconds to enter IR channel selection mode. The bank of blue LED indicators will now display the currently selected IR channel. -
Page 20: Wall Mounting Instructions
WALL MOUNTING INSTRUCTIONS The GefenToolBox 4x1 Switcher for HDMI should be mounted vertically in a wall or cabinet with wood/drywall screws as shown in the diagram above. There should be an inch or two of clearance between the edges of the unit and any walls or vertical surfaces to allow for enough clearance for insertion and retraction of cables at the HDMI connectors. -
Page 21: Specifications
SPECIFICATIONS Video Bandwidth ..................225 MHz Pixel Clock / Speed .................. 165 MHz Maximum Video Resolution ......1080p@60Hz, 1920x1200@60Hz with 12-bit Deep Color Input Video Signal ................... 1.2 V p-p Input DDC Signal ................5 V p-p (TTL) HDMI Connector ........type A 19 pin female; (4) input, (1) output LED Indicators (source mapping)..............4 (blue) LED Indicator (power)..................1 (red) RS-232 Interface................ - Page 25 Rev A6 20600 Nordhoff St., Chatsworth CA 91311 1-800-545-6900 818-772-9100 fax: 818-772-9120 www.gefentoolbox.com support@gefentoolbox.com...
Need help?
Do you have a question about the ToolBox GTB-MHDMI1.3-441 and is the answer not in the manual?
Questions and answers