Table of Contents
Advertisement
Advertisement
Table of Contents

Related Manuals for Asus PIKE 9230


Summary of Contents for Asus PIKE 9230
- Page 1 PIKE 9230 SATA RAID card...
- Page 2 Product warranty or service will not be extended if: (1) the product is repaired, modified or altered, unless such repair, modification of alteration is authorized in writing by ASUS; or (2) the serial number of the product is defaced or missing.
-
Page 3: Table Of Contents
Contents Contents ...................... iii Notices ......................iv Safety information ..................v About this guide ..................vi PIKE 9230 specifications summary ............viii Chapter 1: Product introduction Welcome! ..................1-2 Package contents ................. 1-2 Card layout ................... 1-3 System requirements ..............1-3 Card installation ................ -
Page 4: Notices
Notices Federal Communications Commission Statement This device complies with Part 15 of the FCC Rules. Operation is subject to the following two conditions: • This device may not cause harmful interference, and • This device must accept any interference received including interference that may cause undesired operation. -
Page 5: Safety Information
Safety information Electrical safety • To prevent electrical shock hazard, disconnect the power cable from the electrical outlet before relocating the server. • When adding or removing devices to or from the server, ensure that the power cables for the devices are unplugged before the signal cables are connected. -
Page 6: About This Guide
How this guide is organized This guide contains the following parts: • Chapter 1: Product introduction This chapter offers the ASUS PIKE 9230 SATA RAID card features and the new technologies it supports. • Chapter 2: RAID configuration This chapter provides instructions on setting up, creating, and configuring RAID sets using the available utilities. -
Page 7: Conventions Used In This Guide
Conventions used in this guide To ensure that you perform certain tasks properly, take note of the following symbols used throughout this manual. DANGER/WARNING: Information to prevent injury to yourself when trying to complete a task. CAUTION: Information to prevent damage to the components when trying to complete a task. -
Page 8: Pike 9230 Specifications Summary
PIKE 9230 specifications summary Chipset Marvell 88SE9230 Interface ASUS PIKE interface Ports 4 ports RAID levels RAID 0 / RAID1 / RAID10 Devices supported SATA 3 / SATA 2 / SATA devices Data transfer rate SATA 1.5 Gb/s, SATA 3 Gb/s, SATA 6 Gb/s Form factor 6.44 in x 1.57 in (1U compatible) -
Page 9: Chapter 1: Product Introduction
This chapter offers the ASUS PIKE 9230 RAID card features and the new technologies it supports. Chapter 1: Product introduction... -
Page 10: Welcome
PIKE 9230 RAID card! ® The ASUS PIKE 9230 allows you to create RAID 0, RAID 1, and RAID 10 set(s) from SATA hard disk drives connected to the SATA connectors on the motherboard Before you start installing the RAID card, check the items in your package with the list below. -
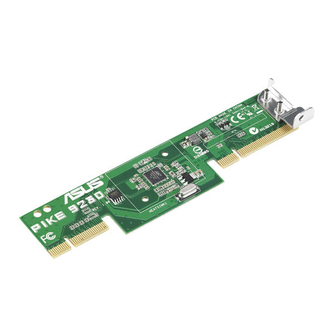
Page 11: Card Layout
The illustration below shows the major components of the RAID card. ASUS PIKE interface-1: PCI-E x2 System requirements Before you install the PIKE 9230 RAID card, check if your system meets the following requirements: • Workstation or server motherboard with a PIKE RAID card slot •... -
Page 12: Card Installation
Card installation Follow below instructions to install the RAID card on your motherboard. Locate the PIKE RAID card slot on the motherboard then remove the screw beside PIKE1 connector as shown. Align the golden fingers of the RAID card with the PIKE RAID card slot then insert the RAID card into the card slot. -
Page 13: Chapter 2: Driver Installation
This chapter provides instructions for installing the RAID drivers on different operating systems. Chapter 3: Driver installation... -
Page 14: Raid Driver Installation
Select the optical drive as the first boot priority to boot from the support CD. Save your changes, then exit the BIOS Setup. Restart the computer. The Make Disk menu appears. Select PIKE 9230 SATA card driver, and press <Enter> to enter the sub-menu. Chapter 2: Driver installation... - Page 15 Use the arrow keys to select the type of RAID driver disk you want to create. Place a blank, high-density floppy disk to the floppy disk drive. Press <Enter>. Follow screen instructions to create the driver disk. ASUS PIKE 9230...
-
Page 16: Windows ® Os
2.1.2 Windows ® During Windows Server 2008 OS installation ® To install the RAID controller driver when installing Windows Server 2008 OS ® Boot the computer using the Windows Server 2008 OS installation disc. Follow ® the screen instructions to start installing Windows Server 2008. When prompted to choose a type of installation, click Custom (advanced). - Page 17 When the system finishes loading the RAID driver, replace the motherboard Support DVD with the Windows Server installation disc. Select the drive to install Windows and click Next. Setup then proceeds with the OS installation. Follow screen instructions to continue. ASUS PIKE 9230...
-
Page 18: Support Cd Information
Place the support CD to the optical drive. The CD automatically displays the Drivers menu if Autorun is enabled in your computer. • You have to install the PIKE 9230 SATA RAID card on your motherboard BEFORE you can launch the Autorun function of the support CD. •... -
Page 19: Make Disk
2.2.3 Make disk The Make disk menu contains items to create the Marvell RAID driver disk. ® 2.2.4 Manual The Manual tab allows you to open the Marvell Storage Utility user manual. ASUS PIKE 9230... -
Page 20: Contact Information
2.2.5 Contact information Click the Contact tab to display the ASUS contact information. You can also find this information on the inside front cover of this user guide. Chapter 2: Driver installation... -
Page 21: Chapter 3: Raid Configuration
This chapter provides instructions on setting up, creating, and configuring RAID sets using the available utilities. Chapter 2: RAID configuration... -
Page 22: Setting Up Raid
Setting up RAID The RAID card supports RAID 0, RAID 1, and RAID 10 set(s). 3.1.1 RAID definitions RAID 0 (Data striping) optimizes two identical hard disk drives to read and write data in parallel, interleaved stacks. Two hard disks perform the same work as a single drive but at a sustained data transfer rate, double that of a single disk alone, thus improving data access and storage. -
Page 23: Marvell ® Storage Utility (Msu)
Storage Utility is a browser-based RAID management utility for ® Marvell RAID controllers that allows you to create and manage RAID 0, 1, and 10 set(s) from SATA hard disk drives that are connected to your PIKE 9230 SATA RAID card. •... -
Page 24: Launching Msu
Enabling Javacript in Firefox Javascript is enabled by default in Firefox. If MSU does not open in Firefox, ensure that Javascript is enabled.. To confirm that Javascript is enabled: From the menu bar, select Tools > Options..From the Options dialog box, select the Content tab. Ensure that Enable Javascript is checked. -
Page 25: Using The Msu Interface
System From the system pane, you can see the relationships between the various physical and virtual devices attached to the system. This includes: • Adapter • Physical Disk • Virtual Disk • Array • Enclosures • Battery. ASUS PIKE 9230... - Page 26 Properties The Properties pane lists the properties of the device selected in the System pane. Depending on the device selected, one or more of the following tabs appear: Property Allows you to view or modify the properties of the device selected in the System pane.
-
Page 27: Event Logs
Notes Normal event Example: Physical Disk 1 is assigned as spare. Unknown event Any event that was not recognized by MSU. Warning event Example: Virtual Disk 1 is deleted. Critical event Example: Virtual Disk 1 is degraded. ASUS PIKE 9230... -
Page 28: Marvell Raid Bios Setup Utility
Marvell RAID BIOS setup utility You can also create a RAID 0, RAID 1 or RAID 10 array using two SATA hard disk drives using the Marvell RAID BIOS Setup. To enter the Marvell RAID BIOS utility, press <Ctrl> + <M> during POST. All exisiting data on the hard disk drives will be erased when creating or deleting a RAID array. - Page 29 Create Virtual Disk Do you want to create this virtual disk ? Press <Y> to create the RAID array, or press <N> to cancel. The new RAID array appears under Virtual Disks, as shown in the image below. ASUS PIKE 9230...
-
Page 30: Delete An Existing Raid Array
Marvell BIOS Setup (c) 2011 Marvell Technology Group Ltd. Information Topology HBA 0: Marvell 0 Vendor ID 1B4B Virtual Disks Device ID 9130 ├ Revision ID │ └ VD 0: New_VD ├ PD 0: ST3160812AS BIOS Version 1.0.0.1028 │ └ PD 8: ST3160812AS Firmware Version: 2.2.0.1105 │... - Page 31 Press <Y> to delete the Master Boot Record (MBR) from the selected RAID array. Press <F10>. The following warning message appears: Exit Do you want to exit from Marvell BIOS Setup? Press <Y> to save the RAID setting and exit the Marvell Storage Utility. ASUS PIKE 9230 3-11...
- Page 32 3-12 Chapter 3: RAID configuration...
Need help?
Do you have a question about the PIKE 9230 and is the answer not in the manual?
Questions and answers