
Related Manuals for Asus PIKE II 3108 Series


Summary of Contents for Asus PIKE II 3108 Series
- Page 1 Questo manuale d’istruzione è fornito da trovaprezzi.it. Scopri tutte le offerte per Asus Pike II 3108-8I/240PD/2G o cerca il tuo prodotto tra le migliori offerte di Altre Schede PIKE II 3108 Series PIKE II 3108-8i PIKE II 3108-4i4e...
- Page 2 Product warranty or service will not be extended if: (1) the product is repaired, modified or altered, unless such repair, modification of alteration is authorized in writing by ASUS; or (2) the serial number of the product is defaced or missing.
-
Page 3: Table Of Contents
Contents Contents ........................iii About this guide ......................v PIKE II 3108 Series specifications summary ............vii Chapter 1: Product Introduction Welcome! ....................1-2 Package contents ..................1-2 Card layout ....................1-3 1.3.1 Switch settings ................1-4 System requirements ................. 1-5 Card installation .................. - Page 4 MegaRAID Storage Manager Window ........2-31 Chapter 3: Driver Installation RAID driver installation ................3-2 ® 3.1.1 Windows Server 2012 R2 OS ............ 3-2 ® 3.1.2 Red Hat Enterprise Linux OS 7.0 ..........3-4 3.1.3 SUSE Linux OS 12..............3-6 ASUS contact information ..................3-8...
-
Page 5: About This Guide
Where to find more information Refer to the following sources for additional information and for product and software updates. ASUS websites The ASUS website provides updated information on ASUS hardware and software products. Refer to the ASUS contact information. Optional documentation Your product package may include optional documentation, such as warranty flyers, that may have been added by your dealer. - Page 6 Conventions used in this guide To make sure that you perform certain tasks properly, take note of the following symbols used throughout this manual. DANGER/WARNING: Information to prevent injury to yourself when trying to complete a task. CAUTION: Information to prevent damage to the components when trying to complete a task.
-
Page 7: Pike Ii 3108 Series Specifications Summary
PIKE II 3108 Series specifications summary PIKE II PIKE II 3108-8i/16PD PIKE II 3108-8i/240PD 3108-4i4e/240PD LSI SAS 3108 Controller PCI-E Gen 3 Interface 8 SAS 12Gb/s Ports (2 Mini-SAS HD SFF-8643) 8 SAS 12Gb/s Ports (1 Mini-SAS HD SFF- Ports... - Page 8 viii...
-
Page 9: Chapter 1: Product Introduction
Product Introduction This chapter offers the PIKE II 3108 SAS RAID card features and the new technologies it supports. Chapter 1: Product Introduction... -
Page 10: Welcome
PIKE II 3108 Series SAS RAID card! ® The ASUS PIKE II 3108 Series SAS RAID card supports 12 Gb/s SAS Technology and allows you to create RAID 0, RAID 1, RAID 10, RAID 5, RAID 50, RAID 6, and RAID 60 sets from SATA II/SATA III/SAS/SAS II/SAS III hard disk drives connected to the SAS connectors on the card. -
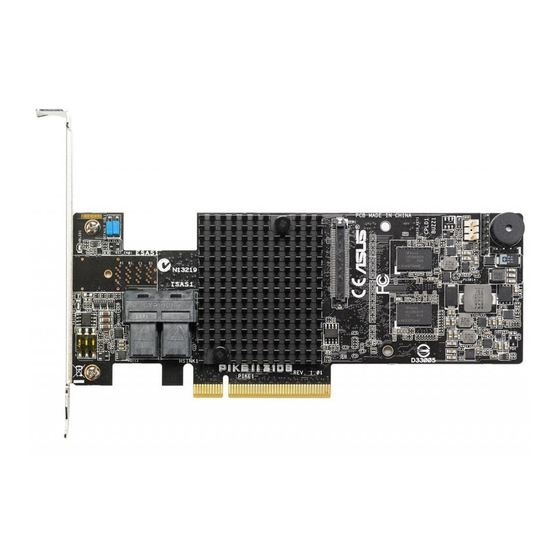
Page 11: Card Layout
DRLED1 (Dirty cache LED): Write Pending (light) Internal mini-SAS HD connectors FAILLED1 (Global Drive Fault LED): External mini-SAS HD connector Drive fault detected (light) Switch* (for more than one card) 8. CacheVault connector HBLED1 (HEARTBEAT LED): The LED shows the firmware heartbeat information (blinking) ASUS PIKE II 3108 Series... -
Page 12: Switch Settings
1.3.1 Switch settings When using more than one PIKE II card on your system, ensure to manually set the pin settings on the Switch on each of the PIKE II cards to ensure that the system detects all the cards installed. You can refer to the following table for the pin settings. DEFAULT_SEL1 HBLED1 DRLED1... -
Page 13: System Requirements
System requirements Before you install the PIKE II 3108 Series RAID card, check if the system meets the following requirements: • ASUS Server motherboard • PCI-E Gen3 slot • SAS or SATA hard disk drives • Mini-SAS HD cable • Supported operating system: Windows and Linux operating systems (refer to website for details) ®... -
Page 14: Card Installation
Card installation To install the RAID card on your motherboard: Locate the PCIE Gen3 slot on the motherboard. Align the golden fingers of the PIKE card with the PCIE Gen3 card slot. Insert the RAID card into the PCIE Gen3 card slot. Ensure the card is completely seated in place. PIKE RAID card PCI-E slot For PIKE II 3108-8i, connect the hard... -
Page 15: Chapter 2: Raid Configuration
RAID Configuration This chapter provides instructions on setting up, creating, and configuring RAID sets using the available utilities. Chapter 2: RAID Configuration... -
Page 16: Setting Up Raid
Setting up RAID The RAID card supports RAID 0, 1, 10, 5, 50, 6, and 60. 2.1.1 RAID definitions RAID 0 (Data striping) optimizes two identical hard disk drives to read and write data in parallel, interleaved stacks. Two hard disks perform the same work as a single drive but at a sustained data transfer rate, double that of a single disk alone, thus improving data access and storage. -
Page 17: Installing Hard Disk Drives
DO NOT combine Serial ATA and SAS disk drives in one volume. • The RAID setup screens shown in this section are for reference only and may not exactly match the items on your screen due to the controller version difference. ASUS PIKE II 3108 Series... -
Page 18: Starting The Megaraid Configuration Utility
2.2.1 Starting the MegaRAID Configuration Utility Follow these steps to start the MegaRAID Configuration Utility and access the main screen. Turn on the system after installing all SAS hard disk drives. During POST, press <Ctrl+R> when the following screen appears If the system has multiple SAS controllers, a controller selection dialog appears. -
Page 19: Megaraid Configuration Utility
Take note of the BIOS and FW version of your SAS RAID card. You will need it if you request support from the ASUS Technical Support team. You can get the BIOS and FW version of your SAS RAID card, navigate to the Properties screen. - Page 20 Utility Keystrokes Keystroke Action Displays help for the particular screen that you are in. Displays a list of commands that can be performed for the selected device. This key stroke is available only in the VD Mgmt, the PD Mgmt, and the Foreign View menus.
-
Page 21: Vd Mgmt Menu
CacheCade virtual drives. The right panel of the screen shows attributes of the selected device. Based on the controller settings, some options will be enabled or disabled. ASUS PIKE II 3108 Series... -
Page 22: Pd Mgmt Menu
2.2.4 PD Mgmt Menu The PD Mgmt menu shows information about all the physical drives connected to the selected controller. This menu also shows information about enclosures, the number of physical drives in an enclosure, and all of the direct-attached drives under a backplane node. -
Page 23: Ctrl Mgmt Menu
JBOD mode. If you enable the JBOD mode, the drive comes up as JBOD; otherwise, the drive comes up as Unconfigured Good. In the second screen, you can perform tasks, such as changing the link speed, the power save, and the battery settings of the controller. ASUS PIKE II 3108 Series... -
Page 24: Properties Menu
2.2.6 Properties Menu The Properties menu shows all of the properties of the active controller. The Properties menu consists of two screens. The information shown in these screens is read only. In the first screen, you can view properties, such as controller status, firmware version, BIOS version, and metadata size. -
Page 25: Foreign View Menu
You can use the Foreign Config View screen to view information about the foreign configuration, such as drive groups, virtual drives, physical drives, and hot spares. The Foreign View menu lets you import foreign configurations to the RAID controller or clear the foreign configurations. ASUS PIKE II 3108 Series 2-11... -
Page 26: Managing Software Licensing
2.2.8 Managing Software Licensing The MegaRAID advanced software offers the software license key feature to enable the advanced options. The license key is also known as the activation key. To configure the Advanced Software options by using the activation key: In the VD Mgmt screen, navigate to the controller and press the <F2>... -
Page 27: Creating A Storage Configuration
Enter a name for the virtual drive in the Name field. The name given to the virtual drive cannot exceed 15 characters. Press OK. Press Advanced to set additional properties. For more information, see the Selecting Additional Virtual Drive Properties section. ASUS PIKE II 3108 Series 2-13... -
Page 28: Selecting Additional Virtual Drive Properties
To initialize the virtual drive: Navigate to the Virtual Drive you just created. Press <Enter> and then choose one of the Initialization options. 2.2.10 Selecting Additional Virtual Drive Properties This section describes the following additional virtual drive properties that you can select while you create virtual drives. - Page 29 If the same data block is read again, it comes from cache memory. Direct I/O makes sure that the cache and the host contain the same data. ASUS PIKE II 3108 Series 2-15...
- Page 30 Disk cache policy – Select a cache setting for this virtual drive: Enable – Enable the drive cache. Disable – Disable the drive cache. Unchanged – Updating the drive cache policy to Unchanged may enable / disable the drive cache based on the WCE (Write Cache Policy) bit of the save mode page of the drive.
-
Page 31: Modifying Controller Properties
Rebuild Rate resources dedicated to rebuilding a failed drive. The higher the number, the more system resources that are devoted to a rebuild. The range of rebuild rate is between 0 and 100 percent. ASUS PIKE II 3108 Series 2-17... - Page 32 Options Descriptions Use this option to select the amount of system resources dedicated to background initialization of virtual drives connected to the selected BGI Rate controller. The range of background initialization (BGI) rate is between 0 and 100 percent. Use this option to select the amount of system resources dedicated to consistency checks of virtual drives connected to the selected CC Rate controller.
- Page 33 You can select from the options None, UG (Unconfigured Good), GHS Spare (Global Hotspare), or UG and GHS (Unconfigured Good and Global Hotspare). Enable Use this option to commission emergency hot spare drives for Emergency for predictive failure analysis events. SMARTer ASUS PIKE II 3108 Series 2-19...
-
Page 34: Viewing And Changing Virtual Drive Properties
2.2.12 Viewing and Changing Virtual Drive Properties The Utility shows the properties, policies, and the operations for virtual drives. To view these items for the currently selected virtual drive and to change some of these settings: In the VD Mgmt screen, navigate to a virtual drive, and press the <F2> key. Press <Enter>. -
Page 35: Deleting A Virtual Drive Group
Initialization erases all data on the virtual drive. Make sure to back up any data you want to keep before you initialize a virtual drive. Make sure the operating system is not installed on the virtual drive you are initializing. ASUS PIKE II 3108 Series 2-21... -
Page 36: Running A Consistency Check
2.2.16 Running a Consistency Check You should periodically run a consistency check on fault-tolerant virtual drives (RAID 1, 5, 6, 10, 50, or 60 configurations; RAID 0 does not provide data redundancy). A consistency check scans the virtual drive to determine whether the data has become corrupted and needs to be restored. -
Page 37: Megaraid Storage Manager
Follow these steps if you need to install MegaRAID Storage Manager software on a system running Microsoft Windows OS: Insert the ASUS PIKE 3108 Support CD in the optical disc drive. The CD automatically displays the Utilities menu if Autorun is enabled in your computer. - Page 38 Enter your user name and organization name. In the bottom part of the screen, select an installation option: – If you select All users, any user with administrative privileges can use this version of MegaRAID Storage Manager software to view or change storage configurations.
- Page 39 To begin installation, click on Install on the next screen that appears. – Select Custom if you want to specify individual program features to install. ASUS PIKE II 3108 Series 2-25...
- Page 40 If you select Custom, a window listing the installation features appears, as shown in the following figure. Select the features you want on this screen. 11. Click Next to proceed. 12. Click Install to install the program. 13. When the final Configuration Wizard screen appears, click Finish. If you select Client installation for a PC used to monitor servers, and if there are no available servers with a registered framework on the local subnet (that is, servers with a complete installation of MegaRAID Storage Manager...
-
Page 41: Installing Megaraid Storage Manager Software For Linux
(that is, servers with a complete installation of MegaRAID Storage Manager software), the server screen appears. The server screen does not list any servers. You can use this screen to manage systems remotely. ASUS PIKE II 3108 Series 2-27... -
Page 42: Linux Error Messages
2.3.4 Linux Error Messages The following messages may appear while you are installing MegaRAID Storage Manager software on a Linux system: • More than one copy of MegaRAID Storage Manager software has been installed. This message indicates that the user has installed more than one copy of MegaRAID Storage Manager software. -
Page 43: Starting The Megaraid Storage Manager Software
To start MegaRAID Storage Manager software on a SUSE SLES system, select Start > System > More Programs > MegaRAID Storage Manager. When the program starts, the select server window appears, as shown in the following figure. ASUS PIKE II 3108 Series 2-29... - Page 44 If the circle in Health column of the corresponding server is orange instead of green, it means that the server is running in a degraded state—for example, because a drive used in a virtual drive has failed. If the circle is red, the storage configuration in the server has failed.
-
Page 45: Megaraid Storage Manager Window
MegaRAID Storage Manager features and their status (enabled or disabled), and actions you can perform, such as creating a virtual drive and updating the firmware, as shown in the following figure. ASUS PIKE II 3108 Series 2-31... - Page 46 You can click the Physical tab to view the drives connected to the controller or Logical tab to view the virtual drives connected to the controller. The following icons in the left panel represent the controllers, drives, and other devices: •...
- Page 47 Tools Menu On the Tools menu you can select Configure Alerts to access the Event Configuration Notification screen, which you can use to set the alert delivery rules, event severity levels, exceptions, and email settings. ASUS PIKE II 3108 Series 2-33...
- Page 48 Help Menu On the Help menu you can select Help > Contents to view the MegaRAID Storage Manager online help file. You can select Help > About MegaRAID Storage Manager to view version information for the MegaRAID Storage Manager software. •...
-
Page 49: Chapter 3: Driver Installation
Driver Installation This chapter provides instructions for installing the RAID card driver on different operating systems. Chapter 3: Driver Installation... -
Page 50: Raid Driver Installation
RAID driver installation After creating the RAID sets for your server system, you are now ready to install an operating system to the independent hard disk drive or bootable array. This part provides instructions on how to install or update the RAID card drivers. The RAID card driver might be included in the Linux OS installation CD, and could be loaded automatically during OS installation. - Page 51 Click Browse my computer for driver software. Click Browse, locate the installer on the support DVD, click OK when done, and then click Next. Wait for the driver installation to finish. When done, click Close. Restart the system. ASUS PIKE II 3108 Series...
-
Page 52: Red Hat ® Enterprise Linux Os 7.0
To get the dd.iso from the support CD, go to Drivers > PIKE_II_3108-8i_16PD_PIKE_ II_3108-8i_240PD_PIKE_II_3108-4i4e_240PD > Driver > Linux > rhel7_oel7_centos7 > disks-1.To download dd.iso from the ASUS website, visit www.asus.com. ® Boot the system from the Red Hat OS installation CD. - Page 53 From the Driver disk device selection list, key in <5>, then press <Enter>. From the Choose driver disk ISO file list, key in <2>, then press <Enter>. Key in <C>, then press <Enter> to continue. ASUS PIKE II 3108 Series...
-
Page 54: Suse Linux Os 12
To get the dd.iso from the support CD, go to Drivers > PIKE_II_3108-8i_16PD_PIKE_ II_3108-8i_240PD_PIKE_II_3108-4i4e_240PD > Driver > Linux > sles12 > disks-1.To download dd.iso from the ASUS website, visit www.asus.com. Boot the system from the SUSE OS installation CD. From the initial installation page, press <F6> and select Yes to load the driver. - Page 55 Follow on-screen instructions to continue with the installation. ASUS PIKE II 3108 Series...
-
Page 56: Asus Contact Information
ASUS contact information ASUSTeK COMPUTER INC. Address 15 Li-Te Road, Peitou, Taipei, Taiwan 11259 Telephone +886-2-2894-3447 +886-2-2890-7798 E-mail info@asus.com.tw Web site http://www.asus.com.tw Technical Support Telephone +86-21-38429911 +86-21-58668722 ext: 9101 Online Support http://support.asus.com/techserv/techserv.aspx ASUSTeK COMPUTER INC. (Taiwan) Address 15 Li-Te Road, Peitou, Taipei, Taiwan 11259... - Page 57 800 Corporate Way, Fremont, CA 94539, USA +1-510-608-4555 Web site http://usa.asus.com Technical Support Support fax +1-812-284-0883 General support +1-812-282-2787 Online support http://support.asus.com/techserv/techserv.aspx ASUS COMPUTER GmbH (Germany and Austria) Address Harkort Str. 21-23, D-40880 Ratingen, Germany +49-2102-959911 Web site http://www.asus.de Online contact http://www.asus.de/sales Technical Support Telephone +49-1805-010923...
- Page 58 Web site http://www.asus.com Technical Support Telephone +31-(0)591-5-70292 +31-(0)591-666853 E-mail advance.rma.eu@asus.com Online Support http://support.asus.com/techserv/techserv.aspx ASUS Polska Sp. z o.o. (Poland) Address Ul. Postępu 6, 02-676 Warszawa, Poland Web site http://pl.asus.com Technical Support Telephone +48-225718033 Online Support http://support.asus.com/techserv/techserv.aspx ASK-Service (Russia and CIS) Address г.Москва, ул.
- Page 59 (1) This device may not cause harmful interference, and (2) this device must accept any interference received, including interference that may cause undesired operation. Representative Person’s Name : Steve Chang / President Signature : Apr. 07, 2015 Date : Ver. 140331 ASUS PIKE II 3108 Series 3-11...
- Page 60 We, the undersigned, Manufacturer: ASUSTeK COMPUTER INC. Address: 4F, No. 150, LI-TE Rd., PEITOU, TAIPEI 112, TAIWAN Authorized representative in Europe: ASUS COMPUTER GmbH Address, City: HARKORT STR. 21-23, 40880 RATINGEN Country: GERMANY declare the following apparatus: Product name :...
Need help?
Do you have a question about the PIKE II 3108 Series and is the answer not in the manual?
Questions and answers