Table of Contents
Advertisement
Advertisement
Table of Contents

Related Manuals for Hitachi AX-M140


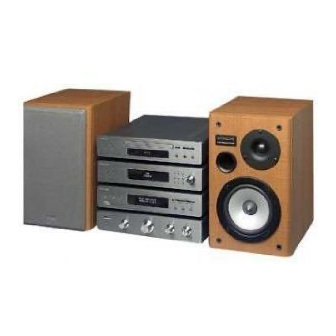
Summary of Contents for Hitachi AX-M140
-
Page 2: Table Of Contents
Table of Contents Before Connection ........................2 For your safety ............................2 Precautions .............................. 2 Connection ..........................3 Connect to the TV ........................... 3 Connecting the Speakers ........................3 Connecting the Antenna ......................... 3 Connecting Control Cable ........................4 Connect to the amplifier with digital signal input terminal ..............4 Connect to the VCR .......................... -
Page 3: Before Connection
Before Connection Thank you for purchasing this hi-fi component system, in order to fully utilize this system, please read this instruction book carefully before use it. For your safety Precautions 1. Before operating this system, check the voltage of CAUTION this system to see if it is identical with the voltage RISK OF ELECTRIC SHOCK of your local power supply. -
Page 4: Connection
Connection Caution: Please turn off all the equipment power before connecting. Connect to the TV Connecting diagram Safety precautions Terminal board for the DVD player Some settings should be made for the unit DIGITAL OUTPUT VIDEO MONITOR according to the TV connection. VCR SCART INPUT COAXIAL CONTROL CABLE... -
Page 5: Connecting Control Cable
Connecting Control Cable With the unit unplugged from the mains connect the power control cable to the DVD player, MP3 player, the amplifier and the radio via the connec- tions on the rear of the units as shown . Connect to the amplifier with digital signal input terminal DVD player connections Connection precautions DIGITAL OUTPUT... -
Page 6: Control Locations
Control Locations The DAB / FM RADIO DAB/FM Switch Information VFD Display Lens Number Buttons MENU Select Down Select Up DAB/ FM ANTENNA DAB/FM Antenna Jack CONTROL CABLE Control Cable Connector The DVD Player Vocal Mode Select / Language Select Subtitle Disc Tray Open/Close... -
Page 7: The Amplifier
13. USB Port (PC Connection ) 14. Control Cable Connector CONTROL CABLE (CONNECT TO PC) The Amplifier Standby Headphone Jack Function Volume Control Knob Bass Control Knob Treble Control Knob Right Speaker Output Terminals CONTROL CABLE Left Speaker Output Terminals SPEAKERS OUTPUT (8 ) Control Cable Connector 10. -
Page 8: Turning The Power On And Off
21. Mute 22. MP3 Function 23. TV/VCR Function 24. Random Menu Setting 25. Intro 26. Record 27. File Copy 28. Fast Forward Menu Select Up 29. Next Scan 30. Stop Menu Cancel 31. Program 32. Time Search 33. Direction ( ) 34. -
Page 9: Normal Playing
Normal playing Note: * When the unit is in VCR mode, the VCR connected with the unit by the scart cable is for playing only. If you want to record, the unit must be in standby mode. Use the discs In power on mode, press the DVD function button ( ) to select DVD function. - Page 10 This unit has a loudness function, it can automatically increase bass sound effect at low volume (the higher the volume, the smaller bass increase), which improves the output sound. You only need to press the loudness button ( ) to obtain the loudness LOUD function when it is playing.
- Page 11 If you are playing the general disc, the TV display is as following: 01 -- 06 -- 02 -- 07 -- 03 -- 08 -- 04 -- 09 -- 05 -- 10 -- Exit Start * Use the 0/10,1-9,10+ buttons to input the sequence number you want to program playing.
- Page 12 You may repeat a track or disc according to the following steps. Repeatedly press the repeat button ( ), the screen shows : Track Cancel Repeat (You can also operate the key “ ” on the panel of unit.) REPEAT You may directly enter a time, title or chapter number to search quickly on a disc.
-
Page 13: Play Picture Cd Disc
This function can be used to enjoy a motion or motionless picture. Press the zoom button ( ) when playing, the screen shows : ZOOM 1/2X 1/3X 1/4X * Use the , , , buttons to move the enlarged picture. Note: This function is not available for CD or MP3 playback. - Page 14 In the case of DAB mode (or if it is the first time the unit has been powered on) the following message will be displayed for 2 seconds. Hitachi DAB Radio System Reset If the MENU button is held down whilst the unit is powered on, then this is used to initiate a full system reset.
- Page 15 If tuning is successful then the display reverts to the tuned state Classic Air on a G String by If tuning is not successful, then the ‘not available’ message is displayed. If no preset has previously been stored then the following message is displayed for 3 seconds… Planet Rock DAB Preset 01 Empty Then reverts to the current station display.
- Page 16 Multiplex Name The bottom line displays the Ensemble/Multiplex name centred (in the long name format, max. 16 characters). Planet Rock DAB CE London Pressing INFO three times will give you the following option: Signal Quality The bottom line displays a graphical representation of the signal quality of the ensemble currently being decoded and shows an indication of the minimum signal quality necessary for successful decoding.
- Page 17 State Display (Tuned) When a user has tuned to a station, the station details are recorded in persistent storage so that if the radio is turned off and then on again, or an invalid preset or offair station is chosen, then the radio can revert to the last station.
-
Page 18: Listening To Mp3 Player
Signal Quality The bottom line displays a graphical representation of the signal quality of the station currently being demodulated. Poor signal quality… Classic FM Good signal quality… Classic FM This display will be continuously updated so that the user can use it to position the radio to obtain the best reception. - Page 19 You can have the hard disk or USB device played in a random order by pressing the button. RANDOM In stop mode, press the menu setting button ( ) to inter the menu setting mode. MENU (You can also operate the key “ )”...
-
Page 20: Setting The Clock
Press and hold the menu setting button ( ) until “1.FORMAT, 2.FDISK & FORMAT” are MENU displayed on the VFD, use the button to select the memory to be formatted SEL- SEL+ between hard disk and USB device. Then press button “ARE YOU SURE FORMAT? CONFIRM ”... -
Page 21: Setting The Daily Timer
- Press the clock button ( ), the built-in clock starts operating and the seconds start CLOCK counting from 0. Note: * The operating time of every step shouldn’t be longer than 3 seconds or it will return to the original display. -
Page 22: Function Menu Setting List
If you change the sleep timer, each time you press the sleep button ( ), it changes SLEEP the number of minutes shown on the VFD in this sequence: After setting the number of minutes for the sleep timer, the display will return to the display as before setting the sleep timer. -
Page 23: Video Setup Page
Audio Setup Page Speaker Setup When the disc has Dolby Pro Logic stereo, you can choose LT/RT or Stereo or V SURR mode to play this disc. SPDIF Setup For optic and coax output, this system is only used for simulation mode. -
Page 24: Preference Page
Preference Page Audio, Subtitle, Disc Menu When disc has subtitle, audio, disc menu support. Play- ing type was default. You can setup language. If not, this function is invalidated. Parental Setup this system when playing disc which had age control, you can through this function. Default Restore to factory setting. -
Page 25: Protect The Disc
Protect the Disc 1. To keep the disc clean, please don’t touch the disc’s surface when you are holding it. You should hold the edge. 2. If the disc is dirty, it will affect the sound quality. Please use the clean and soft cloth to wipe the disc from inside to outside. -
Page 26: Specification
Specification System Power supply ............. ~230V / 50 Hz Rated working power consumption ......≤ 130W Channel ..............≥ 40dB Distortion ..............≤ 0.7% Dimensions ............... DAB: 280(W) x 65(H) x 300(D) mm DVD: 280(W) x 65(H) x 280(D) mm MP3: 280(W) x 65(H) x 280(D) mm AMP: 280(W) x 65(H) x 300(D) mm Frequency response .......... - Page 27 Partmaster Direct can provide accessories, spares, batteries and replacement parts with Next Day Delivery available upon request. Please call: 0870 600 1338 (UK customers only) Calls charged at National Rate …or visit our website at www.partmaster.co.uk - 26 -...
- Page 28 Y o u r h i - f i s h o u l d i n cl u d e . . . Y o u r h i - f i s h o u l d i n cl u d e . . . R e m o te co n tr o l SLEEP/ TIMER...
- Page 29 Insert batteries in the remote control When inserting batteries make sure they are the correct way around as shown below. Remove battery cover Carefully slide then lift the battery cover from the back of your remote control. Insert batteries Insert two AAA size batteries into the battery compartment.
- Page 30 Fitting the system connection leads IMPORTANT: The separate parts of your hi-fi MUST be connected together before the unit is plugged into the mains. Make sure that all connections are made with your hi-fi system unplugged from the mains. DAB ( FM RADIO ) Position your hi-fi Stack the parts of your hi-fi as shown.
- Page 31 Connecting to a TV NOTE: Some settings might need to be made to your Hitachi AX-M140 to make it compatible with the settings on your TV TV Display Settings If the unit is connected to a 16:9 wide screen TV, then Teminal board for the DVD player set "TV display"...
- Page 32 Connecting the speakers Connect the speaker leads between the terminals as shown below. IMPORTANT NOTE: Before connecting or removing mains power, please turn off the power on the unit and turn the volume to minimum or it may damage the speaker This unit has a high power output and wide dynamic range .
- Page 33 Ditital audio output Connections Connecting to a surround sound amplifier DVD player connections Please note: You can only use coaxial OR optical-they cannot be used at the same time. With digital signal input terminal's DTS, Dolby Digital signal decode amplifier With digital signal input terminal's DTS, Dolby Digital signal decode amplifier terminal board Aux in Connections...
- Page 34 Connecting the Antenna Screw the antenna (aerial) rod clockwise onto the antenna base. Screw the antenna cable into the DAB/FM antenna socket Tighten the antenna by hand or using the tool provided. (Note: Do not overtighten, this could damage the antenna or it's fittings.) Optional Position the antenna for best reception.
- Page 35 Connecting to the mains Power Insert the mains plug into a wall outlet, switch on and your system is ready for use. Caution: Be sure to unplug the power cord from the outlet when going away or when the system is not in use for an extended period of time.
Need help?
Do you have a question about the AX-M140 and is the answer not in the manual?
Questions and answers