Table of Contents
Advertisement
Advertisement
Table of Contents

Related Manuals for Hitachi AX-M83


Summary of Contents for Hitachi AX-M83
- Page 2 SOME DO’S AND DON'TS ON THE SAFE USE OF EQUIPMENT This equipment has been designed and manufactured to meet international safety standards but, like any electrical equipment, care must be taken if you are to obtain the best results and safety is to be assured.
-
Page 3: Important Notes
This symbol on the product or in the instructions means that your electrical and electronic equipment should be disposed at the end of its life separately from your household waste. There are separate collection systems for recycling in the EU. For more information, please contact the local authority or your retailer where you purchased the product. -
Page 4: Features And Controls
FEATURES AND CONTROLS UK-3... -
Page 5: Remote Control
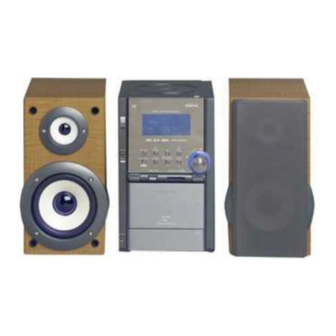
FEATURES AND CONTROLS 1. SPEAKERS 19. CASSETTE PAUSE BUTTON 2. CD DOOR 20. CASSETTE BUTTON DOOR 3. CD DOOR OPEN/CLOSE BUTTON 21. IR SENSOR 4. STANDBY BUTTON 22. LCD DISPLAY 5. STANDBY/POWER INDICATOR 23. NAME SEARCH/SKIP/TUNING UP BUTTON 6. REPEAT/M-UP BUTTON 24. -
Page 6: Clock Setting
STANDBY Press STANDBY button on the unit (or remote) to switch the unit on. Select the sound source (CD, TAPE, AUX IN, or TUNER) by pressing FUNCTION button. The corresponding display will light up. Adjust the volume with the VOLUME (UP or DOWN) button. Press STANDBY button again to turn unit to standby mode. - Page 7 Programming preset stations You can preset stations of your choice and store up to 10 AM and 20 FM stations in its memory. To store your selected broadcasting stations: Press the STOP/BAND button on the unit (or remote) to select between AM and FM. Tune to the required station.
-
Page 8: Cassette Operation
ON TIMER OFF TIMER SOURCE VOLUME PRESET DISC CARD TUNER PRE 01 PRE 02 PRE 20 1. Press the PLAY/PAUSE button to enter into preset station record setting. 2. Press the buttons to set to your desired station number. 3. Press the PLAY/PAUSE button but again to confirm. NOTE: When the desired timer settings have been selected. -
Page 9: Cd/Mp3/Wma Operation
Care Of Cassette Mechanism Gently clean the tape head and pinch-wheel/capstan assemblies after every 10 hours of use until all traces of oxide deposit have been removed. A range of cassette care products are available. RECORD/PLAY HEAD CAPSTAN ERASE HEAD PINCH ROLLER The erase head and record/play head and the surface of the pinch roller are delicate and must not be touched with metal objects such as screwdrivers. -
Page 10: Title Name
To interrupt playback, press the PLAY/PAUSE again, and the elapsed time in the display will flash. To resume playback, press the PLAY/PAUSE button again. To stop playback, press the STOP/BAND button. The display will show the total track number and time. -
Page 11: Repeat Play
REPEAT PLAY - CD/MP3/USB/CARD 1. Press the REPEAT/MEM-UP button once on the remote, “ ” is displayed. CD will play the current track repeatedly. 2. Press the REPEAT/MEM-UP button twice, “ ” ALL is displayed. CD will play all tracks repeatedly. 3. - Page 12 EQ CONTROL(on the remote) Press the EQ button to select different preset EQ mode. The display will show: JAZZ CLASSIC ROCK FLAT TO SET SLEEP FUNCTION If you want to fall asleep to music, press SLEEP button on the remote. You may adjust the Radio or CD player's sleep function to play from 120, 90, 60,45,15,5 minutes of music before shutting itself off automatically.
-
Page 13: Listen To The Music By Using Headphone
CARD CARD TUNER CARD CARD AUX PLAY 1. Press the FUNCTION button to select “AUX IN”. External equipment can be played through your AX-M83 unit. 2. Use a cable with RCA phono plugs to connect equipment. MUTE SETTING(on the remote) 1. -
Page 14: Compact Disc
COMPACT DISC Always use a compact discs bearing the mark as shown. Notes on handling discs * Do not touch the reflective recorded surface. * Do not stick paper or write anything on the surface. * Do not bend the disc. Storage * Store the disc in its case. -
Page 15: Lcd Display Window
LCD DISPLAY WINDOW AUX TAPE INTRO SLEEP USB CARD BASS PROGRAM TUNER RANDOM SNOOZE ALLB MEMORY A. REPEAT INDICATOR D. STEREO INDICATOR B. ENCODING INDICATOR TIMER INDICATOR C. TRACK/NUMBER/TIME INDICATOR SPECIFICATION POWER SUPPLY : 230V~50Hz OUTPUT POWER : 20 Watts x 2 UNIT DIMENSION : 160(W) x 230 (D) x 260 (H) mm SPEAKER BOX DIMENSION :...