Table of Contents
Advertisement
Advertisement
Table of Contents

Related Manuals for Hitachi AXM139E


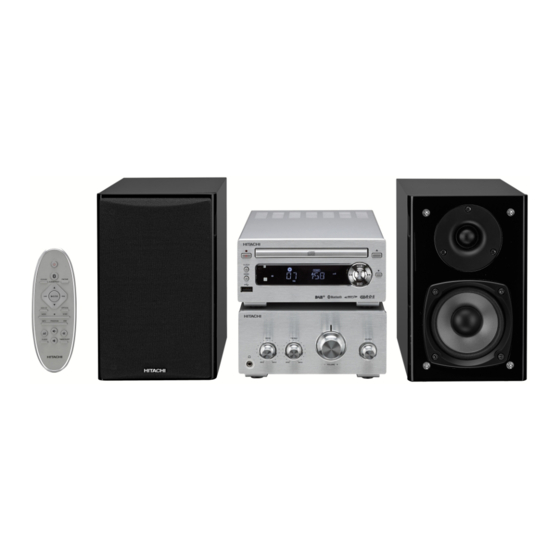
Summary of Contents for Hitachi AXM139E
- Page 1 Instruction Manual AXM139E Bluetooth Micro System ®...
-
Page 3: Table Of Contents
Contents Safety Warnings ........................7 Unpacking ..........................9 Product Overview .......................10 Main Unit ..............................10 Amplifier ............................... 12 Remote Control ........................13 Installation of Batteries ......................14 Remote Control Operation Range ..................15 Connections ........................16 Connecting the Amplifier and CD Player ..................16 Connecting the Speakers ........................16 Connecting the Aerial .......................... - Page 4 FM Operation ........................25 Tuning in a Station ............................ 25 Auto Tuning ..............................25 Manual Tuning ............................25 Preset Tuning (Available only after the stations are preset) ............25 Presetting Stations ............................ 25 To change the FM Reception Mode ....................26 FM Display Modes .............................
- Page 5 SOME DOS AND DON’TS ON THE SAFE USE OF EQUIPMENT This equipment has been designed and manufactured to meet international safety standards but, like any electrical equipment, care must be taken if you are to obtain the best results and safety is to be assured. read the operating instructions before you attempt to use the equipment.
- Page 6 Used correctly, domestic batteries are a safe and dependable source of portable power. Problems can occur if they are misused or abused – resulting in leakage or, in extreme cases, re or explosion. Here are some simple guidelines to safe battery use designed to eliminate any such problems.
-
Page 7: Safety Warnings
Safety Warnings Ventilation • Read all the instructions carefully before using the unit and keep them for future • To prevent the risk of electric shock or reference. fire hazard due to overheating, ensure • Retain the manual. If you pass the unit that curtains and other materials do not onto a third party make sure to include this obstruct the ventilation vents. - Page 8 Batteries Service • Batteries used in the remote control for this • To reduce the risk of electric shock, do not unit are easily swallowed by young children remove screws. The unit does not contain and this is dangerous. any user-serviceable parts. Please leave all maintenance work to qualified personnel.
-
Page 9: Unpacking
Thank you for purchasing your new HITACHI Bluetooth® Micro System. We recommend that you spend some time reading this instruction manual so that you fully understand all the operational features it offers. You will also find some hints and tips to help you resolve any issues. -
Page 10: Product Overview
Product Overview Main Unit Front View Fast Forward Button Standby Button Tuning forward button CLOCK Button Reverse Button REP/SHUF Button Tuning backward button USB Socket Next Button Remote Control Sensor Preset up Switch. Receives signal from the remote Previous Button control. - Page 11 Rear View Bluetooth® Aerial CABLE Socket OPTICAL INPUT Socket AUX IN 1 (L & R) Sockets AUX IN 2 (L & R) Sockets DAB+/FM AERIAL Socket...
-
Page 12: Amplifier
Amplifier Front View VOLUME Dial Headphones Socket SOURCE Dial BASS Dial TREBLE Dial Rear View AC ~ Power Cable CABLE Socket Speaker (L & R) Sockets... -
Page 13: Remote Control
Remote Control Standby Button PAIR Button CD/USB Button ALBUM/PRESET Button PAIR Play/Pause Button Button Button ALBUM/PRESET Button OPTICAL/AUX 1/2 Button Stop Button 11. REP/SHUF Button 12. INFO Button 13. EQ Button 14. CLOCK Button Open/Close Button 16. FM/DAB Button 17. SCAN Button 18. -
Page 14: Installation Of Batteries
Installation of Batteries Open the battery compartment Insert 2 AAA batteries with correct polarity (+/-) as indicated. Close the battery compartment Handling the Remote Control • Do not drop the remote control. • Do not allow anything to impact the remote control. •... -
Page 15: Remote Control Operation Range
Handling the Battery • Improper or incorrect use of batteries may cause corrosion or battery leakage, which could cause fire, personal injury or damage property. • Install the battery correctly in the battery compartment. Normally the battery’s positive polarity (+) will face up. •... -
Page 16: Connections
Connections Connecting the Amplifier and CD Player Place the CD player on top of the amplifier. Place the speakers to the left and the right of the unit. Ensure all connections are connected before connecting to the mains power socket. Connection Cable •... -
Page 17: Connecting The Aerial
Connecting the Aerial Connect the DAB/FM aerial to the DAB/FM AERIAL socket. Extend the aerial, to receive the best DAB/FM reception. Using the AUX Connection Use a RCA stereo audio cable (not included) to connect an auxiliary equipment to the main unit’s AUX IN sockets. -
Page 18: Playing Mp3'S From A Usb Device
Playing MP3’s from a USB Device When a USB device is connected to the unit, turn the SOURCE dial on the unit or press the CD/USB button on the remote control to select the USB mode. • The unit can only play MP3 and WMA file formats in USB operation. • If your USB device is loaded with MP3’s but the display keeps showing ‘NO DATA”... -
Page 19: Connecting To The Mains Supply
Connecting to the Mains Supply • This unit is designed to operate with an AC 220-240V ~ 50/60Hz power supply. • Connecting the unit to any other power source may cause damage to the unit. Unwind the mains cable to its full length. Connect the mains plug to a mains socket. Make sure the mains plug is fully inserted into the mains socket. -
Page 20: General Operation
General Operation Powering ON/OFF • Press the Standby button to switch the unit on. The word “HELLO” will scroll across the display. • Press the Standby button again to switch the unit to standby mode. The word “ECOPOWER” will scroll across the display . Switching the system to Clock Mode When the unit is in ON or STANDBY mode, press the CLOCK button on the unit or remote control to display the clock on the display... -
Page 21: Set The Alarm Timer
Set the Alarm Timer This unit can be used as an alarm clock. Ensure that you have set the clock correctly. In clock mode, press and hold the TIMER/SLEEP button on the remote control until [TIMER SET] (set timer) scrolls on the display. button on the unit or remote control to select DISC, USB, TUNER or DAB Press as alarm source. -
Page 22: Presetting Equalizer
Presetting Equalizer You can adjust the sound reproduced simply by choosing from 5 preset equalizers. Press the EQ button repeatedly to scroll through the following options: FLAT JAZZ ROCK CLASSIC Adjusting the Bass Rotate the BASS dial clockwise or counter clockwise on the amplifier to adjust the intensity of the bass output sound. -
Page 23: Dab Operation
DAB Operation Tuning to DAB for the First Time • Rotate the SOURCE dial on the amplifier or press the FM/DAB button on the remote control to select the DAB station. If no DAB service is available “NO DAB” will be displayed. •... -
Page 24: Dab Display Modes
DAB Display Modes Every time you press the INFO button, the bottom line of the display will cycle through the following display modes: Station Name, Ensemble, Clock, DLS, Signal Strength, Prgramme Type, Frequency, Bitrate, Audio. Station Name Station Name When a station is received, the name of that station will be displayed. -
Page 25: Fm Operation
FM Operation You can listen to FM stations. Stations can be tuned in manually, automatically, or from preset memory storage. Before listening to the radio, please check that the FM antenna is correctly connected and adjusted for length and direction. Tuning in a Station Repeatedly rotate the SOURCE dial on the amplifier or FM/DAB on the remote control to select TUNER mode. -
Page 26: To Change The Fm Reception Mode
To change the FM Reception Mode Press the REP/SHUF button to select the Stereo or Mono channel to receive the best FM reception mode. FM Display Modes Every time you press the INFO button, the display will cycle through the following display modes: Station Name, Programme Type, Date / Clock, Radio Text, Frequency. -
Page 27: Compatible Disc Types
Compatible Disc Types Disc Types Disc Logo Recorded Content CD-R (CD Recordable) AUDIO CD-RW (CD-Rewritable) AUDIO AUDIO-CD (Compact Disc Digital Audio) AUDIO CD Operation CD Playing Repeatedly rotate the SOURCE button on the front of the amplifier or press the CD/ USB button on the remote control. -
Page 28: Programme Play
Programme Play You can programme up to 20 tracks to play in any desired order. The player must be in STOP mode only with a CD inserted. Insert a disc and press the button when it starts playing. Press the PROGRAM button , “01-P-00” appears. Press the buttons on the remote control to select the desired track number. -
Page 29: Mp3/Wma Operation
MP3/WMA Operation MP3/WMA music playback from CD maybe be affected due to the type and format of disc or condition of the recording. If you are having trouble playing a certain disc, it is recommended to use USB input instead for best MP3/WMA playback. Rotate the SOURCE button on the unit or press the CD/USB button on the remote control. -
Page 30: Usb Operation
USB Operation By connecting an USB mass storage device (including USB flash memory, USB flash players or memory cards) to this unit, you can enjoy the device’s stored music through the unit. Insert the USB device’s USB plug into the socket on the front of unit. -
Page 31: Play From Bluetooth® Device
Turn on the Bluetooth® function on your device. Search for other Bluetooth® device with your device. Select “AXM139E” in the pairing list. Enter default password “0000” if necessary. Press and hold the PAIR button more than 2 seconds to clear pairing history. -
Page 32: Aux Operation
AUX Operation You can listen to an audio device through this unit. Make sure that the external audio device is connected to this unit. Press AUX1/2 button to select the audio input through the AUX IN 1/2 (L and R) sockets. -
Page 33: Maintenance
Maintenance Cleaning the Unit Ensure the unit is fully unplugged from the mains socket before cleaning. • To clean the unit, wipe the case with a slightly moist, lint-free cloth. • Do not use any cleaning fluids containing alcohol, ammonia or abrasives. •... -
Page 34: Hints And Tips
Hints and Tips If a problem occurs, it may often be due to something very minor. The following table contains various tips: Problem Solution No power • Ensure the mains cable is connected to the mains socket and switched on. • Press the Standby button. - Page 35 Problem Solution Bluetooth I cannot find • Ensure the Bluetooth function is activated on your Bluetooth “AXM139E” on my device. Bluetooth device If any functional abnormality is encountered, unplug the unit from the mains socket and reconnect it again.
-
Page 36: Specifications
Specifications AXM139E Model Disc Format CD, CD-R, CD-RW, MP3, WMA Terminals: USB 2.0, AUX IN1 (L/R) Sockets, AUX IN2 (L/R) Sockets, Aerial Socket Frequency Range DAB: BAND III FM: 87.5 – 108 MHz Power Supply 220-240V ~ 50/60Hz Power Consumption ECO Standby Power ≤... - Page 40 Importer: Elkjøp, Solheimsveien 6-8, PB 153, NO 1471 Lørenskog, Norge Norge: 815 32 000 Sverige: 0771 115 115 Danmark: 70 80 70 70 Suomi: 020321321 Manufacturer: Hitachi Europe Ltd., Whitebrook Park, Lower Cookham Road, Maidenhead, Berkshire SL6 8YA U.K. IB-AXM139E-GB-140605V2...
Need help?
Do you have a question about the AXM139E and is the answer not in the manual?
Questions and answers