Table of Contents
Advertisement
Quick Links
Table of Contents
(J4117A)
Contents
Product Overview
TCP/IP Network Settings
LPD
Installing Printers on Clients
Backing Up, Restoring, Resetting, Rebooting, and Upgrading the
Appliance
Viewing and Printing Diagnostics from the Web Interface
Contacting HP for Support
Warranty and Registration Information
http://albatross.rose.hp.com/~lindsay/pdfs/english/toc.htm [6/22/2001 11:25:45 AM]
Advertisement
Table of Contents

Related Manuals for HP Jetdirect 4200


Summary of Contents for HP Jetdirect 4200
-
Page 1: Table Of Contents
Table of Contents HP Print Server Appliance 4200 (J4117A) Contents Product Overview Product Specifications Getting Started Front Panel Hardware Installation Web Interface for the Appliance Administrator Account TCP/IP Network Settings Microsoft Networking Settings Printers Installing Printers on Clients Backing Up, Restoring, Resetting, Rebooting, and Upgrading the... -
Page 2: Product Introduction
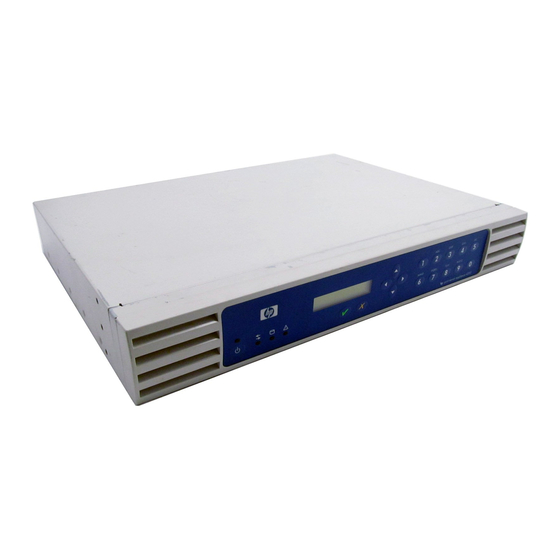
Figure 1: The HP Print Server Appliance 4200 The HP Print Server Appliance 4200 is a state-of-the-art device for managing and monitoring printing over a network. It is a network device that has been designed to provide a quick and easy way to add print capacity without affecting the general purpose server. -
Page 3: Product Description
Virtually no management required once installed Supports APC uninterruptible power supplies (UPSs) (simple or basic signaling protocol) Increases performance of general purpose servers Easy replication of configuration and printer drivers across appliances Reduces network traffic http://albatross.rose.hp.com/~lindsay/pdfs/english/prodover.htm (2 of 3) [6/22/2001 11:25:46 AM]... - Page 4 No personally identifiable information such as user name, email address, or physical address is gathered as part of this process. HP does monitor web logs in order to understand our customers and improve our products. All web transactions are subject to HP's privacy policy which can be found at:http://www.hp.com/country/us/eng/privacy.htm.
-
Page 5: System Requirements
Supported Printers Supported Web Browsers What Ships in the Box Security Features Physical Specifications Electrical Specifications Environmental Specifications Safety Certifications Figure 1: The HP Print Server Appliance 4200 Model Number Product Model number HP Print Server Appliance J4117A 4200 System Requirements The computer printing to the appliance must be running TCP/IP and have Microsoft Windows 95, 98, NT, 2000, or ME or other operating systems running LPD. - Page 6 Supported Clients Clients are networked PCs that submit print jobs to the appliance. The appliance can accept print jobs from the following clients: Windows 95 Windows 98 Windows NT 4.0 Windows 2000 Windows ME http://albatross.rose.hp.com/~lindsay/pdfs/english/prodspec.htm (2 of 5) [6/22/2001 11:25:47 AM]...
-
Page 7: Hp Print Server Appliance 4200
Print (print, pause, and delete your own print jobs) Manage Documents (print, pause, and delete other user's print jobs) Full Control (print, pause, and delete other user's print jobs, delete printers, and change security settings (using native NT tools)) http://albatross.rose.hp.com/~lindsay/pdfs/english/prodspec.htm (3 of 5) [6/22/2001 11:25:47 AM]... - Page 8 80 percent at 40 degrees C (104 degrees F) Temperature (Operating) +5 degrees Celsius (C) (41 degrees Fahrenheit (F)) to +40 degrees Celsius (104 degrees F) (Non-operating) -40 degrees Celsius (-38 degrees F) to +70 degrees Celsius (158 degrees F) http://albatross.rose.hp.com/~lindsay/pdfs/english/prodspec.htm (4 of 5) [6/22/2001 11:25:47 AM]...
- Page 9 Product Specifications Safety Certifications Products comply with: IEC 950: (1991)+A1,A2,A3,A4/EN60950 (1992)+A1,A2,A3,A4 UL 1950 CSA 950 http://albatross.rose.hp.com/~lindsay/pdfs/english/prodspec.htm (5 of 5) [6/22/2001 11:25:47 AM]...
-
Page 10: Getting Started
Hardware Installation Troubleshooting the Appliance What Ships in the Box The following items ship with appliance. If something is missing from the box, please contact the HP Dealer or Reseller where the appliance was purchased. Figure 1: Contents of the box... - Page 11 WINS server address and the Windows NT domain or workgroup. For NT Domain security, complete the other fields on this page. Install printers on clients. Back up the settings. Be sure to register the appliance (http://www.hp.com/go/printappliance_registration). http://albatross.rose.hp.com/~lindsay/pdfs/english/getstart.htm (2 of 2) [6/22/2001 11:25:47 AM]...
-
Page 12: Front Panel
Set or Change the Front Panel Password Troubleshoot the Appliance The front panel on the HP Print Server Appliance 4200 has the following components: LEDs There are four indicator lights (LEDs) on the front of the appliance. Understanding how the lights function is important for proper operation of the appliance. - Page 13 Use the numeric keypad to enter numeric values, such as IP address, subnet mask, etc., when configuring the appliance. The letters above the keys can be useful as a mnemonic aid when entering the device's password. http://albatross.rose.hp.com/~lindsay/pdfs/english/frontpan.htm (2 of 5) [6/22/2001 11:25:49 AM]...
- Page 14 After the front panel password is set, it must be entered before future configuration tasks can be performed at the front panel display. To set or change the front panel password, press once. The following screens are displayed: Press . Press http://albatross.rose.hp.com/~lindsay/pdfs/english/frontpan.htm (3 of 5) [6/22/2001 11:25:49 AM]...
- Page 15 Press to cancel the operation and go to the main display, or press to continue the configuration process. Configuring the IP Address Manually In Manual mode, the following is displayed: Display Action http://albatross.rose.hp.com/~lindsay/pdfs/english/frontpan.htm (4 of 5) [6/22/2001 11:25:49 AM]...
- Page 16 After a moment, the appliance will resume displaying normal operating messages. Use the web interface to further configure the appliance. Refer back to the Getting Started procedures, or refer directly to information about using the web interface to further configure the device. http://albatross.rose.hp.com/~lindsay/pdfs/english/frontpan.htm (5 of 5) [6/22/2001 11:25:49 AM]...
-
Page 17: Hardware Installation
Note: The rackmount installation should be performed by an experienced individual, using appropriate tools, and exercising appropriate safety precautions. Use the following procedure to perform the rackmount installation: Attach the rackmount brackets to the sides of the appliance. http://albatross.rose.hp.com/~lindsay/pdfs/english/hwinst.htm (1 of 3) [6/22/2001 11:25:49 AM]... - Page 18 Note: Make certain that air flow is not restricted around the back of the unit. Connect the other end of the power cable to a power source. If a UPS is being used, connect the power cable to the UPS. http://albatross.rose.hp.com/~lindsay/pdfs/english/hwinst.htm (2 of 3) [6/22/2001 11:25:49 AM]...
- Page 19 Turn on the appliance by pressing the Power button on the front panel. For initial installation, the IP address for the appliance can now be configured. Refer back to the Getting Started procedures, or refer directly to information about configuring IP addresses. http://albatross.rose.hp.com/~lindsay/pdfs/english/hwinst.htm (3 of 3) [6/22/2001 11:25:49 AM]...
-
Page 20: Web Interface For The Appliance
Enter the administrator name and password. (The default is "admin" for the username and "admin" for the password.) The Overview page is displayed with the menu on the left. Overview page displays general information about the appliance. http://albatross.rose.hp.com/~lindsay/pdfs/english/webgui.htm (1 of 3) [6/22/2001 11:25:50 AM]... - Page 21 Network Settings. MAC Address Hardware address for the appliance. Serial Number Serial number for the appliance. Firmware revision Firmware revision number currently on the appliance. Printers Number of printers currently managed by the appliance. http://albatross.rose.hp.com/~lindsay/pdfs/english/webgui.htm (2 of 3) [6/22/2001 11:25:50 AM]...
- Page 22 Select the appropriate time zone from the drop-down box. Click Cancel to keep the time and date at their previous values, or click Apply to set the date and time. System Messages for Data and Time http://albatross.rose.hp.com/~lindsay/pdfs/english/webgui.htm (3 of 3) [6/22/2001 11:25:50 AM]...
- Page 23 When NT domain authentication is not enabled, an administrator account must be configured through the web interface using the same name and password as the account used to log into the NT or Windows 2K workstation from which the native tools will be launched. http://albatross.rose.hp.com/~lindsay/pdfs/english/adminact.htm (1 of 5) [6/22/2001 11:25:51 AM]...
- Page 24 Log on to the web interface. On the menu under General, click Administrator Accounts. Click "Delete" next to the administrator account to delete. Two confirmation messages are displayed. Click OK. The Administrator Accounts page will be displayed again. http://albatross.rose.hp.com/~lindsay/pdfs/english/adminact.htm (2 of 5) [6/22/2001 11:25:51 AM]...
- Page 25 Enter the new administrator name (must be unique for the appliance). The administrator name is case sensitive and can contain alphanumeric characters and the following special characters: ~ ` ! @ $ % ^ ( ) - _ { } .. http://albatross.rose.hp.com/~lindsay/pdfs/english/adminact.htm (3 of 5) [6/22/2001 11:25:51 AM]...
- Page 26 On the menu under General, click Administrator Accounts. The Administrator Accounts page is displayed. Click "Add User". The Add an Administrator page is displayed. Complete the fields as described below. Click OK. The message "Administrator Account Added" is displayed. http://albatross.rose.hp.com/~lindsay/pdfs/english/adminact.htm (4 of 5) [6/22/2001 11:25:51 AM]...
- Page 27 Click OK. The Administrator Accounts page will be displayed. Once the administrator account name and password have been changed, the current browser session is no longer authenticated. Re-connect to the appliance, using the new administrator account name and password. http://albatross.rose.hp.com/~lindsay/pdfs/english/adminact.htm (5 of 5) [6/22/2001 11:25:51 AM]...
- Page 28 The TCP/IP Network Settings page is accessible under Network Settings on the menu. On this page, administrators can configure: the IP address subnet mask gateway Domain Name Server (DNS) address DNS Domain Name http://albatross.rose.hp.com/~lindsay/pdfs/english/tcpip.htm (1 of 3) [6/22/2001 11:25:52 AM]...
- Page 29 DNS, leave this field blank (or empty). DNS Domain Name The DNS domain name. For example, a server named mail.hp.com (hp.com is the DNS name and mail is the hostname). The domain name must match standard naming conventions. The name must be alphanumeric. It may also contain dashes ( - ) (for example : mycompany.com).
- Page 30 After this screen has been completed, complete the Microsoft Networking Settings page to identify the WINS server address and the Windows NT domain or workgroup. For the Windows NT domain security feature, complete the other fields on that page. http://albatross.rose.hp.com/~lindsay/pdfs/english/tcpip.htm (3 of 3) [6/22/2001 11:25:52 AM]...
- Page 31 If the network uses DNS to identify network resources, this name should match the DNS name. Otherwise, any name will work. The name may contain up to 220 alphanumeric characters. It may also contain dashes( - ) and periods (.). http://albatross.rose.hp.com/~lindsay/pdfs/english/ntaa.htm (1 of 6) [6/22/2001 11:25:53 AM]...
- Page 32 Select this to manually specify the domain controllers. Controllers Domain Controller Enter the domain controller's name or IP address to be added to the list of Configured Domain Contollers; use the Add button to add it to the list. http://albatross.rose.hp.com/~lindsay/pdfs/english/ntaa.htm (2 of 6) [6/22/2001 11:25:53 AM]...
- Page 33 Domain Administrator Name A valid administrator's name as stored on the NT Domain Controller. Domain Administrator Password A valid administrator's password as stored on the NT Domain Controller. http://albatross.rose.hp.com/~lindsay/pdfs/english/ntaa.htm (3 of 6) [6/22/2001 11:25:53 AM]...
- Page 34 Under Network Settings on the menu, select Microsoft Networking Settings. (See the description of the fields above for more information.) Complete the Print Server Appliance Name field. Complete the WINS Server Address field. Complete the Windows NT Domain or Workgroup field. http://albatross.rose.hp.com/~lindsay/pdfs/english/ntaa.htm (4 of 6) [6/22/2001 11:25:53 AM]...
- Page 35 Complete the fields on the Microsoft Networking Settings page. Set the appliance name and then, at a minimum, complete the following fields: "Create account in the NT Domain for this device" "Domain Administrator Name" "Domain Administrator Password" http://albatross.rose.hp.com/~lindsay/pdfs/english/ntaa.htm (5 of 6) [6/22/2001 11:25:53 AM]...
- Page 36 When NT domain authentication is not enabled, an administrator account must be configured through the web interface using the same name and password as the account used to log into the NT or Windows 2K workstation from which the native tools will be launched. http://albatross.rose.hp.com/~lindsay/pdfs/english/ntaa.htm (6 of 6) [6/22/2001 11:25:53 AM]...
- Page 37 Disable LPD printing Disables LPD printing and print job management from any and all hosts. Enable LPD printing from Enables LPD printing and print job management from any and all ALL hosts hosts (default). http://albatross.rose.hp.com/~lindsay/pdfs/english/lpd.htm (1 of 2) [6/22/2001 11:25:53 AM]...
- Page 38 To enable or disable LPD printing, follow these steps: Log on to the Administrator page of the web interface. On the menu, under Network Settings click LPD Settings. Complete the fields as described above. http://albatross.rose.hp.com/~lindsay/pdfs/english/lpd.htm (2 of 2) [6/22/2001 11:25:53 AM]...
- Page 39 IP address or the DNS name of the network printer. In order to use the DNS name, a DNS server address must be configured on the appliance in the Microsoft Networking Settings page. http://albatross.rose.hp.com/~lindsay/pdfs/english/printers.htm (1 of 18) [6/22/2001 11:25:56 AM]...
- Page 40 Or, delete a printer through Network Neighborhood: Find the appliance in Network Neighborhood. Open the Printers folder. Right-click on the printer and click Delete. Highlight the printer and press the Delete key on your keyboard. http://albatross.rose.hp.com/~lindsay/pdfs/english/printers.htm (2 of 18) [6/22/2001 11:25:56 AM]...
- Page 41 After the printer has been added to the appliance, a new printer driver can be added through Network Neighborhood. To add a printer, follow these step: Select Printers under Print Services on the menu. Click "Add Printer". The following three pages will be displayed: http://albatross.rose.hp.com/~lindsay/pdfs/english/printers.htm (3 of 18) [6/22/2001 11:25:56 AM]...
- Page 42 (.). Network Connection: HP JetDirect internal card or single-port external box: Select this if the printer has an internal HP JetDirect print server card, or is connected to an external single-port HP JetDirect print server. HP JetDirect 3-port external box: Some external HP print servers support more than one printer (for example, the HP JetDirect 500X).
- Page 43 Select this option to hide this printer's name in Network Neighborhood for printer in clients. (This does not prevent the printer from being used, just from being Network displayed in Network Neighborhood.) Neighborhood http://albatross.rose.hp.com/~lindsay/pdfs/english/printers.htm (5 of 18) [6/22/2001 11:25:56 AM]...
- Page 44 Displays all printer drivers currently installed on the appliance, and highlights the Printer driver currently associated with the specified printer. To change the driver for the Driver printer, highlight a different driver and click Apply. http://albatross.rose.hp.com/~lindsay/pdfs/english/printers.htm (6 of 18) [6/22/2001 11:25:56 AM]...
- Page 45 Field Names Description File Name Name of the file(s) or print job(s) for this printer. User Name of the client user who submitted each print job. Size Size of the print job (in bytes). http://albatross.rose.hp.com/~lindsay/pdfs/english/printers.htm (7 of 18) [6/22/2001 11:25:56 AM]...
- Page 46 Click refresh to update the page or click OK to return to the Printers page. Printer Properties The following tabs are available at the top of the page when Printer Properties is selected for a printer: General (default) Drivers Security http://albatross.rose.hp.com/~lindsay/pdfs/english/printers.htm (8 of 18) [6/22/2001 11:25:56 AM]...
- Page 47 Description of the printer. Network Connection: HP JetDirect internal card or single-port external box: Select this if the printer has an internal HP JetDirect print server card, or is connected to an external single-port HP JetDirect print server. HP JetDirect 3-port external box: Some external HP print servers support more than one printer (for example, the HP JetDirect 500X).
- Page 48 The Drivers page displays all printer drivers that are installed on the appliance. A different printer driver can be selected in the list of already installed drivers for the specified printer. (See also Printer Driver Management.) Printer Properties - Drivers Page http://albatross.rose.hp.com/~lindsay/pdfs/english/printers.htm (10 of 18) [6/22/2001 11:25:56 AM]...
- Page 49 (Print, Manage, Full Control, and No Access) appear as "Special Access". Printer Properties - Security Page Field Name Description List Names from The drop-down list contains names of the primary domain and all trusted domains. http://albatross.rose.hp.com/~lindsay/pdfs/english/printers.htm (11 of 18) [6/22/2001 11:25:56 AM]...
- Page 50 Full Control (print, pause, and delete other user's print jobs, delete printers, and change security settings (using native NT tools)) No Access Special Access (for some Windows 2000 permissions that do not map directly to the above four permission levels) http://albatross.rose.hp.com/~lindsay/pdfs/english/printers.htm (12 of 18) [6/22/2001 11:25:56 AM]...
- Page 51 Managing Printers Printer Drivers Printer Driver Management Adding New Drivers to the HP Print Server Appliance System Messages Printer Driver Management System Messages for Driver Management Printer drivers are factory-installed, or they might already be loaded from a previously-added printer. (Drivers can...
- Page 52 If desired, highlight the printer driver to delete. To delete a driver, click Remove. Note: A driver cannot be deleted if it is currently associated with a printer. The HP LaserJet 4 printer driver can never be deleted. Adding New Drivers to the Appliance System Messages for Driver Management The appliance comes preloaded with numerous HP printer drivers.
- Page 53 Once a driver has been loaded onto the appliance, it can be associated with any number of printers. If the driver for your printer is not listed, select the HP LaserJet 4 driver since that will work with the majority of HP LaserJet printers.
- Page 54 Do not install the driver. Windows NT 4.0 When the Property page appears, select "New Driver" and follow the dialog that appears http://albatross.rose.hp.com/~lindsay/pdfs/english/printers.htm (16 of 18) [6/22/2001 11:25:56 AM]...
- Page 55 Managing Printers Network Neighborhood Printer Properties Page Windows 2000 When the Property page appears, select the "Advanced" tab at the top: http://albatross.rose.hp.com/~lindsay/pdfs/english/printers.htm (17 of 18) [6/22/2001 11:25:57 AM]...
- Page 56 From the "Advanced" tab, select "New Driver" and follow the "Add Driver Wizard". Once the wizard is finished, the driver will be loaded onto the appliance and associated with the printer. The driver can also be used for any printers created on the appliance. http://albatross.rose.hp.com/~lindsay/pdfs/english/printers.htm (18 of 18) [6/22/2001 11:25:57 AM]...
- Page 57 Or, add the printer using the following steps: Make sure that the appliance is installed and that the printers are set up and turned on. Be sure the client workstation is connected to the network. http://albatross.rose.hp.com/~lindsay/pdfs/english/clientprn.htm (1 of 4) [6/22/2001 11:25:57 AM]...
- Page 58 A print queue must be set up for each printer or printer personality (text, PCL, or PostScript) used. If printing text documents from UNIX clients to an HP JetDirect print server, a special queue must be configured on the appliance. First add the printer through the Printers page in the web interface.
- Page 59 Configuring Print Queues Using SAM (HP-UX Systems) On HP-UX systems, the SAM utility can be used to configure remote print queues for printing. Before the SAM program is executed, select an IP address for the appliance and set up an entry in the /etc/hosts file on the system running HP-UX.
- Page 60 To get print queue status, type the following at the prompt: lpstat printername or on a BSD-like system: lpq -Pprintername where printername is the designated printer. Example: lpq -Pappliance1 http://albatross.rose.hp.com/~lindsay/pdfs/english/clientprn.htm (4 of 4) [6/22/2001 11:25:57 AM]...
- Page 61 A copy of the configuration parameters is saved while the appliance's settings and files are being backed Use the following procedure to restore backup settings: On the menu under Backup/Restore, select Restore Settings. http://albatross.rose.hp.com/~lindsay/pdfs/english/backup.htm (1 of 4) [6/22/2001 11:25:58 AM]...
- Page 62 Turn on the appliance again by pressing the Power button. During the restart sequence, when the front panel display reads "Configuring," press . The following message is displayed: http://albatross.rose.hp.com/~lindsay/pdfs/english/backup.htm (2 of 4) [6/22/2001 11:25:58 AM]...
- Page 63 Use the following procedure to install an upgrade: Download the firmware image from the HP support website HP support website and save it on a local hard drive or CD (http://www.hp.com/cposupport). The exact file location will be needed for http://albatross.rose.hp.com/~lindsay/pdfs/english/backup.htm (3 of 4) [6/22/2001 11:25:58 AM]...
- Page 64 Access the appliance's web interface and click Install Upgrade (under General on the menu). On the Install Upgrade page, type the complete path to the firmware image on the local hard drive (for example, "C:\TEMP\UPGRADE.HP") or click Browse to find the firmware image downloaded in step 2.
- Page 65 Spool Area Restored Date and time of last restore. TCP/IP Network Configuration Information Parameter Description IP Configuration Mode How this unit was configured (manual or DHCP). IP Address IP address of this appliance. http://albatross.rose.hp.com/~lindsay/pdfs/english/diag.htm (1 of 3) [6/22/2001 11:25:58 AM]...
- Page 66 Unique network hardware address for this appliance. Total Packets Received Total number of network packets this unit has received since the last reboot. Total Packets Transmitted Total number of network packets this unit has transmitted since the last reboot. http://albatross.rose.hp.com/~lindsay/pdfs/english/diag.htm (2 of 3) [6/22/2001 11:25:58 AM]...
- Page 67 Number of packets dropped since the last reboot while attempting to transmit because the receive buffer is full. Transmit Collisions Number of attempted transmit packets dropped since the last reboot because of excessive collisions. To refresh this page, click Refresh. http://albatross.rose.hp.com/~lindsay/pdfs/english/diag.htm (3 of 3) [6/22/2001 11:25:58 AM]...
- Page 68 The time must be entered in the format hh:mm:ss. The necessary information to set the date and time was Complete both fields and click Apply. not found. The date and/or time fields are blank. http://albatross.rose.hp.com/~lindsay/pdfs/english/sysmsgs.htm (1 of 6) [6/22/2001 11:25:59 AM]...
-
Page 69: Administrator Account
Retype the complete path to the firmware image (for example, "C:\TEMP\UPGRADE.HP") or click Browse to find the saved firmware image. If the filename is unknown, access HP's website and download the upgrade image (http://www.hp.com/cposupport). The specified file is not a valid print server appliance Retype the complete path to the firmware image (for upgrade file. - Page 70 The DNS server address address must be in the format xxx.xxx.xxx.xxx format. xxx.xxx.xxx.xxx. Note: This must be the server's IP address, not its friendly name. If the network does not have a DNS server, leave this field blank. http://albatross.rose.hp.com/~lindsay/pdfs/english/sysmsgs.htm (3 of 6) [6/22/2001 11:25:59 AM]...
-
Page 71: Microsoft Networking Settings
Dashes ( - ) and periods ( spaces. Dashes ( - ) and periods ( . ) are acceptable. . ) are acceptable. Your LPD printing settings have been updated Confirmation message Printers Message Explanation / Remedy http://albatross.rose.hp.com/~lindsay/pdfs/english/sysmsgs.htm (4 of 6) [6/22/2001 11:25:59 AM]... - Page 72 Properties - General page. A print server appliance test page has been queued to Confirmation message after the "Print Test Page" the (queue) printer queue. button was pressed. http://albatross.rose.hp.com/~lindsay/pdfs/english/sysmsgs.htm (5 of 6) [6/22/2001 11:25:59 AM]...
- Page 73 "Remove" button was pressed. Confirm removal or cancel the operation. The HP LaserJet 4 printer driver is essential and The HP LaserJet 4 printer driver is a default driver cannot be deleted. and cannot be deleted. The following drivers are in use and cannot be An attempt was made to remove a driver that is deleted..
-
Page 74: System Messages
Bad power cable or AC outlet. Replace cable and/or verify power up. that the outlet is working properly. If the outlet and cable are good, contact HP in order to replace the unit. I select DHCP and The RJ-45 network cables are not connected. Securely initialization continues. - Page 75 The printers, network configuration, and drivers will be not be automatically restored. The configuration must be restored manually using the Restore functionality with the last configuration manually backed Network Problems Num. Condition Possible Cause/Solution http://albatross.rose.hp.com/~lindsay/pdfs/english/trouble.htm (2 of 7) [6/22/2001 11:26:00 AM]...
- Page 76 A browser that is not supported or has known limitations may trying to access the be in the problem. Check the supported web browsers to see if appliance. the browser is supported. Client Setup Problems Num. Condition Possible Cause/Solution http://albatross.rose.hp.com/~lindsay/pdfs/english/trouble.htm (3 of 7) [6/22/2001 11:26:00 AM]...
-
Page 77: Printing Problems
ID and password. Check the "Domain Membership Status" field on the "Microsoft Networking Settings" page to verify that the appliance can communicate with the domain controller. http://albatross.rose.hp.com/~lindsay/pdfs/english/trouble.htm (4 of 7) [6/22/2001 11:26:00 AM]... - Page 78 Print jobs reach the middle of a print job, that job will be lost, but any other jobs queue but never print. in the queue will now print to the new printer. http://albatross.rose.hp.com/~lindsay/pdfs/english/trouble.htm (5 of 7) [6/22/2001 11:26:00 AM]...
- Page 79 LIT when there is a connection between the appliance Activity LED and other network devices. BLINKS when there is network activity between the appliance and other network devices. Disk Activity ON when there is disk activity on the appliance. http://albatross.rose.hp.com/~lindsay/pdfs/english/trouble.htm (6 of 7) [6/22/2001 11:26:00 AM]...
- Page 80 Network connection is bad. Verify network cable connections, blinks. replace cable. Alert LED remains Critical failure is detected. Note the message on LCD front lit after bootup is panel. Power cycle the unit. If the problem persists, contact HP. completed. http://albatross.rose.hp.com/~lindsay/pdfs/english/trouble.htm (7 of 7) [6/22/2001 11:26:00 AM]...
-
Page 81: Frequently Asked Questions
How are print jobs sent to the appliance? How are print jobs sent from the appliance to the printer? Is the appliance compatible with non-HP print servers? What kind of security does the appliance employ? My DHCP server automatically assigned an IP address to a new printer I've added to the network. - Page 82 APC (APC part # 940-0020B). How does an uninterruptible power supply (UPS) work with the appliance appliance when the power fails? The UPS communication cable enables the UPS to signal the appliance to perform an orderly http://albatross.rose.hp.com/~lindsay/pdfs/english/ts_faqs.htm (2 of 9) [6/22/2001 11:26:01 AM]...
- Page 83 Web JetAdmin interface. Can the appliance accept print jobs from UNIX clients? Print jobs are accepted from HP-UX, Solaris, and any other RFC 1179-compliant LPD clients. Can I print in a Novell environment? Yes.
- Page 84 LPD remote queue name for the print server. Many print servers will work without specifying a remote queue name (use the default HP PRINT SERVER setting); however, some require a special string in order to work. The LPD remote queue name can be obtained from the print server vendor.
- Page 85 If the driver for your printer is not listed, select the HP LaserJet 4 driver since that will work with the majority of HP LaserJet printers. Click "Finished" after the driver has been chosen.
- Page 86 Step 2: Adding the Driver from the Printer's Property Page in Network Neighborhood Now that the printer has been created you must find the printer in Network Neighborhood from either a Windows NT 4.0 or Windows 2000 system. http://albatross.rose.hp.com/~lindsay/pdfs/english/ts_faqs.htm (6 of 9) [6/22/2001 11:26:01 AM]...
- Page 87 Do not install the driver. Windows NT 4.0 When the Property page appears, select "New Driver", and folow the dialog that appears http://albatross.rose.hp.com/~lindsay/pdfs/english/ts_faqs.htm (7 of 9) [6/22/2001 11:26:01 AM]...
- Page 88 Frequently Asked Questions Network Neighborhood Printer Properties Page Windows 2000 When the Property page appears, select the "Advanced" tab at the top: http://albatross.rose.hp.com/~lindsay/pdfs/english/ts_faqs.htm (8 of 9) [6/22/2001 11:26:01 AM]...
- Page 89 From the "Advanced" tab, select "New Driver" and follow the "Add Driver Wizard". Once the wizard is finished, the driver will be loaded onto the appliance and associated with the printer. The driver can also be used for any printers subsequently created. http://albatross.rose.hp.com/~lindsay/pdfs/english/ts_faqs.htm (9 of 9) [6/22/2001 11:26:01 AM]...
- Page 90 Contacting HP Contact HP General Information (The central location on HP's web site for the HP Print Server Appliances and similar products) Online Customer Forum (Where customers can discuss ideas and suggestions for using using the HP Print Server Appliances)
- Page 91 HP does not warrant that the operation of HP products will be uninterrupted or error free. If HP is unable, within a reasonable time, to repair or replace any product to a condition as warranted, you will be entitled to a refund of the purchase price upon prompt return of the product.
- Page 92 HP has marketed this product. The level of warranty service you receive may vary according to local standards. HP will not alter form, fit or function of the product to make it operate in a country for which it was never intended to function for legal or regulatory reasons.
- Page 93 Note: For EU compliance, see the Declaration of Conformity. Safety Products comply with: IEC 950: (1991)+A1,A2,A3,A4/EN60950 (1992)+A1,A2,A3,A4 UL 1950 CSA 950 Australia This equipment complies with Australian EMC requirements. Canada This equipment complies with Canadian EMC Class-A requirements. http://albatross.rose.hp.com/~lindsay/pdfs/english/warr_reg.htm (3 of 22) [6/22/2001 11:26:04 AM]...
-
Page 94: Declaration Of Conformity
Product Name: HP Print Server Appliance 4200 (Model Number J4117A) HP JetDirect 4000 Network Print Appliance ( Model Number: J4107A) conforms to the following Product Specifications: Safety: EN60950 (1992) +A1,A2,A3,A4,AII / IEC 950 (1991) +A1, A2, A3, A4... - Page 95 UNIX is a registered trademark of The Open Group. JetDirect is a registered trademark of Hewlett-Packard Company. HP-UX Release 10.20 and later and HP-UX Release 11.00 and later (in both 32 and 64-bit configurations) on all HP 9000 computers are Open Group UNIX 95 branded products.
- Page 96 Stichting Mathematisch Centrum or CWI or Corporation for National Research Initiatives or CNRI http://albatross.rose.hp.com/~lindsay/pdfs/english/warr_reg.htm (6 of 22) [6/22/2001 11:26:04 AM]...
- Page 97 HOWEVER CAUSED AND ON ANY THEORY OF LIABILITY, WHETHER IN CONTRACT, STRICT LIABILITY, OR TORT (INCLUDING NEGLIGENCE OR OTHERWISE) ARISING IN ANY WAY OUT OF THE USE OF THIS SOFTWARE, EVEN IF ADVISED OF THE POSSIBILITY OF SUCH DAMAGE. http://albatross.rose.hp.com/~lindsay/pdfs/english/warr_reg.htm (7 of 22) [6/22/2001 11:26:04 AM]...
- Page 98 Version 2, June 1991 Copyright (C) 1989, 1991 Free Software Foundation, Inc. 59 Temple Place, Suite 330, Boston, MA 02111-1307 USA Everyone is permitted to copy and distribute verbatim copies of this license document, but changing it is not allowed. http://albatross.rose.hp.com/~lindsay/pdfs/english/warr_reg.htm (8 of 22) [6/22/2001 11:26:04 AM]...
- Page 99 The act of running the Program is not restricted, and the output from the Program is covered only if its contents constitute a work based on the Program (independent of having been made by running the http://albatross.rose.hp.com/~lindsay/pdfs/english/warr_reg.htm (9 of 22) [6/22/2001 11:26:04 AM]...
- Page 100 Accompany it with the complete corresponding machine-readable source code, which must be distributed under the terms of Sections 1 and 2 above on a medium customarily used for software interchange; or, http://albatross.rose.hp.com/~lindsay/pdfs/english/warr_reg.htm (10 of 22) [6/22/2001 11:26:04 AM]...
- Page 101 Program by all those who receive copies directly or indirectly through you, then the only way you could satisfy both it and this License would be to refrain entirely from distribution of the Program. http://albatross.rose.hp.com/~lindsay/pdfs/english/warr_reg.htm (11 of 22) [6/22/2001 11:26:04 AM]...
- Page 102 WHEN OTHERWISE STATED IN WRITING THE COPYRIGHT HOLDERS AND/OR OTHER PARTIES PROVIDE THE PROGRAM "AS IS" WITHOUT WARRANTY OF ANY KIND, EITHER EXPRESSED OR IMPLIED, INCLUDING, BUT NOT LIMITED TO, THE IMPLIED WARRANTIES OF MERCHANTABILITY AND FITNESS FOR A PARTICULAR PURPOSE. http://albatross.rose.hp.com/~lindsay/pdfs/english/warr_reg.htm (12 of 22) [6/22/2001 11:26:04 AM]...
- Page 103 Gnomovision version 69, Copyright (C) 19yy name of author Gnomovision comes with ABSOLUTELY NO WARRANTY; for details type `show w'. This is free software, and you are welcome to redistribute it under certain conditions; type `show c' for details. http://albatross.rose.hp.com/~lindsay/pdfs/english/warr_reg.htm (13 of 22) [6/22/2001 11:26:04 AM]...
- Page 104 These restrictions translate to certain responsibilities for you if you distribute copies of the library, or if you modify it. For example, if you distribute copies of the library, whether gratis or for a fee, you must give the http://albatross.rose.hp.com/~lindsay/pdfs/english/warr_reg.htm (14 of 22) [6/22/2001 11:26:04 AM]...
- Page 105 Note that it is possible for a library to be covered by the ordinary General Public License rather than by this special one. http://albatross.rose.hp.com/~lindsay/pdfs/english/warr_reg.htm (15 of 22) [6/22/2001 11:26:04 AM]...
- Page 106 You must cause the files modified to carry prominent notices stating that you changed the files and the date of any change. c) You must cause the whole of the work to be licensed at no charge to all third parties under the terms of this License. http://albatross.rose.hp.com/~lindsay/pdfs/english/warr_reg.htm (16 of 22) [6/22/2001 11:26:04 AM]...
- Page 107 A program that contains no derivative of any portion of the Library, but is designed to work with http://albatross.rose.hp.com/~lindsay/pdfs/english/warr_reg.htm (17 of 22) [6/22/2001 11:26:04 AM]...
- Page 108 Accompany the work with a written offer, valid for at least three years, to give the same user the materials specified in Subsection 6a, above, for a charge no more than the cost of performing this distribution. http://albatross.rose.hp.com/~lindsay/pdfs/english/warr_reg.htm (18 of 22) [6/22/2001 11:26:04 AM]...
- Page 109 If, as a consequence of a court judgment or allegation of patent infringement or for any other reason (not limited to patent issues), conditions are imposed on you (whether by court order, agreement or otherwise) that contradict the conditions of this License, they do not excuse you from http://albatross.rose.hp.com/~lindsay/pdfs/english/warr_reg.htm (19 of 22) [6/22/2001 11:26:04 AM]...
- Page 110 BECAUSE THE LIBRARY IS LICENSED FREE OF CHARGE, THERE IS NO WARRANTY FOR THE LIBRARY, TO THE EXTENT PERMITTED BY APPLICABLE LAW. EXCEPT WHEN OTHERWISE STATED IN WRITING THE COPYRIGHT HOLDERS AND/OR OTHER http://albatross.rose.hp.com/~lindsay/pdfs/english/warr_reg.htm (20 of 22) [6/22/2001 11:26:04 AM]...
- Page 111 You should have received a copy of the GNU Library General Public License along with this library; if not, write to the Free Foundation, Inc., 59 Temple Place, Suite 330, Boston, MA 02111-1307 USA Also add information on how to contact you by electronic and paper mail. http://albatross.rose.hp.com/~lindsay/pdfs/english/warr_reg.htm (21 of 22) [6/22/2001 11:26:04 AM]...
- Page 112 Yoyodyne, Inc., hereby disclaims all copyright interest in the library `Frob' (a library for tweaking knobs) written by James Random Hacker. signature of Ty Coon, 1 April 1990 Ty Coon, President of Vice That's all there is to it! http://albatross.rose.hp.com/~lindsay/pdfs/english/warr_reg.htm (22 of 22) [6/22/2001 11:26:04 AM]...
- Page 113 The hp User Support Forum is a place where you can post and receive helpful support and contact hp tips for your hp product. Please feel free to browse or post a question to the forums. All answers are provided by hp product experts and other users.
- Page 114 HP User Support Forum Guide privacy statement legal notices © 1994-2001 hewlett-packard company http://forum.support.hp.com:5050/consumer_index.html (2 of 2) [6/22/2001 11:26:12 AM]...
- Page 115 The hp user support forum is a place where you can post and receive helpful support and contact hp tips for your HP product. Please feel free to browse or post a question to the forums. All hp customer care home answers are provided by HP product experts and other users.
- Page 116 910/920 user support forum hp web printsmart user support forum Printing Instructions privacy statement legal notices © 1994-2001 hewlett-packard company http://forum.support.hp.com:5050/main_pav_index.html (2 of 2) [6/22/2001 11:26:20 AM]...
Need help?
Do you have a question about the Jetdirect 4200 and is the answer not in the manual?
Questions and answers