Frigidaire GAS COOKTOP Installation Instructions Manual
Hide thumbs
Also See for GAS COOKTOP:
- Installation instructions manual (29 pages) ,
- Use & care manual (88 pages) ,
- Important safety instructions manual (36 pages)
Table of Contents
Advertisement
Available languages
Available languages
GAS COOKTOP INSTALLATION INSTRUCTIONS
INSTALLATION AND SERVICE MUST BE PERFORMED BY
IMPORTANT: SAVE FOR LOCAL ELECTRICAL INSPECTOR'S USE.
READ AND SAVE THESE INSTRUCTIONS FOR FUTURE REFERENCE.
If the information in this manual is not followed exactly, a fire or explosion may result
causing property damage, personal injury or death.
FOR YOUR SAFETY:
— Do not store or use gasoline or other flammable vapors and liquids in the vicinity of this or any other
appliance.
— WHAT TO DO IF YOU SMELL GAS:
•
Do not try to light any appliance.
•
Do not touch any electrical switch; do not use any phone in your building.
•
Immediately call your gas supplier from a neighbor's phone. Follow the gas supplier's instructions.
•
If you cannot reach your gas supplier, call the fire department.
— Installation and service must be performed by a qualified installer, service agency or the gas supplier.
MODEL
A. LENgtH
26" Model
25 ¾"
30" Model
30"
36" Model
36"
NOTE: Wiring diagrams for these appliances are enclosed in this booklet.
Printed in Canada
A QUALIFIED INSTALLER.
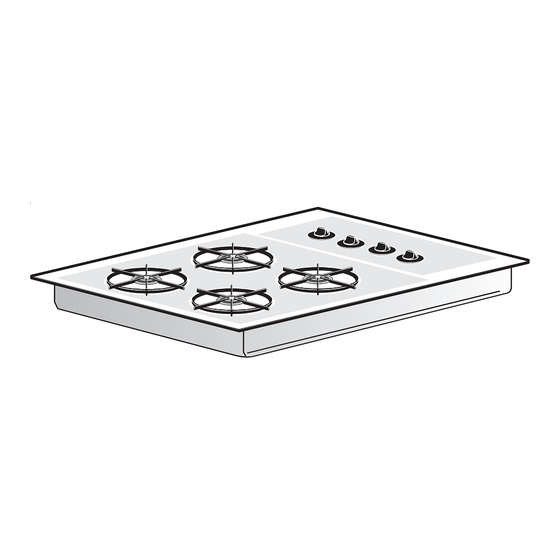
Cooktop Dimensions
A
C
Cooktop Cutout Dimensions
E
Figure 1
B. WiDtH
C. DEPtH
21 9/16"
3 ½"
21 ½"
3 1/8"
18 5/8"
3 ¼"
1
30" Min.
B
D
CUTOUT DIMENSIONS
D. LENgtH
Min.
Max.
25"
25"
26 5/8"
26 7/8"
34 ¼"
34 3/8"
E. WiDtH
Min.
Max.
20 ½"
20 ½"
19"
19 3/8"
16 5/8"
16 ¾"
P/N 318201452 (1302) Rev. H
English – pages 1-10
Español – páginas 11-22
Wiring Diagram - pages 24
Advertisement
Table of Contents

Related Manuals for Frigidaire GAS COOKTOP


Summary of Contents for Frigidaire GAS COOKTOP
- Page 1 GAS COOKTOP INSTALLATION INSTRUCTIONS INSTALLATION AND SERVICE MUST BE PERFORMED BY A QUALIFIED INSTALLER. IMPORTANT: SAVE FOR LOCAL ELECTRICAL INSPECTOR'S USE. READ AND SAVE THESE INSTRUCTIONS FOR FUTURE REFERENCE. If the information in this manual is not followed exactly, a fire or explosion may result causing property damage, personal injury or death.
- Page 2 GAS COOKTOP INSTALLATION INSTRUCTIONS 30" Min. Clearance Between the top of the Cooking Platform and Min. 13" Max. Depth Unprotected Wood For Cabinet or Metal installed Above Cabinet Cooktop. Dimensions is the Minimum Clearance Distance Required Between Rear of top Panel to Adjacent Combustible Surfaces.
-
Page 3: Important Notes To The Installer
GAS COOKTOP INSTALLATION INSTRUCTIONS Important Notes to the Installer • Do not store items of interest to children in the cabinets above the cooktop. Children could be 1. Read all instructions contained in these installation seriously burned climbing on the cooktop to reach instructions before installing the cooktop. -
Page 4: Secure The Unit
GAS COOKTOP INSTALLATION INSTRUCTIONS 1. Wall Outlet Location Safety on the Cooktop • Do not allow dry empty pans to cook on the cooktop (some models) as this could ruin the pan and cause a fire hazard. • Do not use a wok on the cooking surface if it is equipped with a round metal support placed over the burner grate. -
Page 5: Provide An Adequate Gas Supply
GAS COOKTOP INSTALLATION INSTRUCTIONS 3. Provide an Adequate Gas Supply B. 30" Cooktops Unit Clam Down Information the cooktops covered in these instructions are designed Once the cooktop is installed in the counter opening, to operate on natural gas at 4" of manifold pressure or you must clamp the unit down as shown. -
Page 6: Connection To Gas
GAS COOKTOP INSTALLATION INSTRUCTIONS 4. Connection to gas Hookup the cooktop to the gas supply line. A. 26" Cooktop Install the pressure regulator with the arrow pointing (see figure 7) toward cooktop and where you can reach the access Cooktop cap. -
Page 7: Lp/Propane Gas Conversion
GAS COOKTOP INSTALLATION INSTRUCTIONS 5. LP/Propane Gas Conversion Plunger - Enlarged A. Pressure Regulator Conversion end UP for Natural IMPORTANT: Except for Puerto Rico 30" model all cooktops are shipped from the factory set for use with Natural gas. Please verify the serial plate. Note: •... -
Page 8: Burner Flame Adjustment
GAS COOKTOP INSTALLATION INSTRUCTIONS 6. Adjustments if the air shutter needs adjusting, rotate the shutter to allow more or less air to the burner tubes as needed. A. Top Pilots Adjustment (Some models) 1. Remove valve knobs, top grates and burner For Natural gas it may be necessary to rotate the air pans. -
Page 9: Check Operation
GAS COOKTOP INSTALLATION INSTRUCTIONS 7. Connect Electricity to Gas Cooktop Note: All hookups and adjustment shall be performed by qualified technicians. Electrical Requirements Situations where appliance power cord will be 120 volt, 60 Hertz, properly grounded branch circuit disconnected frequently. Do not use an adaptor plug protected by a 15 amp circuit breaker or time delay fuse. -
Page 10: Model And Serial Number Location
GAS COOKTOP INSTALLATION INSTRUCTIONS 2. Adjust the "LO" or "SIMMER" Setting of Surface Improper installation adjustment, Burner Valves (30" Cooktops Only) (see Figure alteration, service or maintenance can cause injury or property damage. Refer to this manual. Push in and turn each control knob to the "LO" (or For assistance or additional information consult "SiMMER") setting. - Page 11 INSTRUCCIONES DE INSTALACIÓN PARA PLANCHA DE COCINAR A GAS LA INSTALACIÓN Y EL SERVICIO DEBEN SER REALIZADOS POR UN INSTALADOR CALIFICADO. IMPORTANTE: GUARDE ESTAS INSTRUCCIONES PARA USO DEL INSPECTOR ELÉCTRICO LOCAL. LEA Y GUARDE ESTAS INSTRUCCIONES PARA FUTURAS REFERENCIAS Si todas las instrucciones de éste manual no son observadas a la letra, se puede ocurrir incendios o explosiones que pueden causar daños materiales, lesiones o la muerte.
- Page 12 INSTRUCCIONES DE INSTALACIÓN PARA PLANCHA DE COCINAR A GAS 30" Mínimo entre la parte superior de la plataforma Máx. profundidad de la plancha de de gabinetes Mín. cocinar y el fondo instalados por de una madera non encima de la protegida o armario plancha de metálico.
-
Page 13: Notas Importantes Para El Instalador
INSTRUCCIONES DE INSTALACIÓN PARA PLANCHA DE COCINAR A GAS Notas importantes para el instalador • No almacene artículos que interesan los niños en los armarios que están por encima de la plancha 1. lea todas las instrucciones de instalación antes de realizar la instalación de la plancha de cocinar. - Page 14 INSTRUCCIONES DE INSTALACIÓN PARA PLANCHA DE COCINAR A GAS 1. Area para la toma de corriente Extractores de aire • Limpie los extractores frecuentemente. No se debe (algunos modelos) dejar acumular grasa en el extractor o en el filtro. • Cuando los alimentos estén dando llama, apague el extractor;...
-
Page 15: Fijación De La Unidad
INSTRUCCIONES DE INSTALACIÓN PARA PLANCHA DE COCINAR A GAS 2. Fijación de la unidad 2.1 Para liberar los quemadores Una vez que la parrilla este instalada en la cocina, como A. Plancha de cocinar 26" y 36" se mostró el los pasos anteriores, eleve la superficie de la la unidad deberá... -
Page 16: Conexión Del Gas
INSTRUCCIONES DE INSTALACIÓN PARA PLANCHA DE COCINAR A GAS 3. Provea un adecuado suministro de 4. Conexión del gas A. Plancha de cocinar 26" (vea figura 7) las planchas de cocinar abarcadas en estas instrucciones de instalación están diseñadas para funcionar con Plancha de cocinar gas natu ral de 4"... - Page 17 INSTRUCCIONES DE INSTALACIÓN PARA PLANCHA DE COCINAR A GAS 5. Conversión de gas propano/ Enganche la plancha de cocinar a la línea de suministro de gas. licuado A. Conversión el regulador de presión Instalar el regulador de presión con la flecha del IMPORTANTE: A excepción del modelo Puerto Rico regulador apuntando hacia la pieza y en una posición 30"...
- Page 18 INSTRUCCIONES DE INSTALACIÓN PARA PLANCHA DE COCINAR A GAS B. Conversión de la válvula del quemador 2. Para Convertir el regulador de presión de LP a Gas Natural, proceda de la siguiente manera (vea figura 11 y figura 12) (vea figura 10) A.
- Page 19 INSTRUCCIONES DE INSTALACIÓN PARA PLANCHA DE COCINAR A GAS 6. Ajustes B. Ajustes de obturador de aire del quemador. A. Pilotos superiores (Algunos modelos) El ajuste del obturador de aire para cada uno de los 1. Retire los botones de control, parrillas y cocas de cuatro quemadores y del horno está...
- Page 20 INSTRUCCIONES DE INSTALACIÓN PARA PLANCHA DE COCINAR A GAS 7. Conexión de la electricidad al C. Ajuste de entrada de aire de la superficie del quemador aparato 1. Ajuste de entrada de aire (figura 16) Requisitos eléctricos Si la entrada de aire está ajustada correctamente, Un circuito de cañerías conectado correctamente a tierra la llama será...
- Page 21 INSTRUCCIONES DE INSTALACIÓN PARA PLANCHA DE COCINAR A GAS 8. Verifique la operación En caso de encontrarse con un enchufe de pared estándar de dos patas, es la personal responsabilidad y la Refiera el Manual del usuario que viene con la plancha obligación del consumidor reemplazarlo por el enchufe de cocinar para las instrucciones de funcionamiento y el de pared de tres patas correspondiente.
- Page 22 INSTRUCCIONES DE INSTALACIÓN PARA PLANCHA DE COCINAR A GAS Incorrectas ajustas de instalación, modificaciones y reparaciones pueden causar quemaduras o daños a la propiedad. Consulte esté manual. Para asistencia y más información, consulte un instalador calificado, una agencia, la fabricante (distribuidor) o el suministrador de gas.
-
Page 23: Notes - Notas
NOTES - NOTAS... - Page 24 WIRING DIAGRAM - DIAGRAMA DE LA INSTALACIÓN ALÁMBRICA...
Need help?
Do you have a question about the GAS COOKTOP and is the answer not in the manual?
Questions and answers
can ypu have a drawer under this cooktop