Brother HL-4150CDN User Manual
Hide thumbs
Also See for HL-4150CDN:
- User manual (191 pages) ,
- Safety and legal (21 pages) ,
- Quick setup manual (2 pages)
Table of Contents
Advertisement
Quick Links
Advertisement
Table of Contents

Related Manuals for Brother HL-4150CDN


Summary of Contents for Brother HL-4150CDN
- Page 1 ® User s Guide User s Guide ’ ’ Safety and Legal Basic User’s Guide...
-
Page 2: Safety And Legal
The illustrations in this guide show the LCD of the product. HL-4150CDN. WARNING (HL-4150CDN) In USA: Please go to the Brother Solutions Center at WARNING indicates a potentially http://solutions.brother.com/ and click hazardous situation which, if not avoided, Manuals on your model page to download could result in death or serious injuries. -
Page 3: Compilation And Publication
Compilation and Publication Under the supervision of Brother Industries, Ltd., this manual has been compiled and published, covering the latest product descriptions and specifications. The contents of this manual and the specifications of this product are subject to change without notice. - Page 4 DO NOT put the product in a location where any slot or opening in the product is obstructed or blocked. These slots and openings are provided for ventilation. Blocking the product’s ventilation could create a risk of overheating and/or fire. Instead: •...
- Page 5 Doing so may interfere with the operation of the product, causing print quality problems. • DO NOT place your product next to sources of interference, such as speakers or the base units of non Brother cordless telephones. Doing so may interfere with the operation of the product's electronic components.
-
Page 6: To Use The Product Safely
To use the product safely Please keep these instructions for later reference and read them before attempting any maintenance. If you do not follow these safety instructions, there is a possibility of a fire, electrical shock, burn or suffocation. WARNING ELECTRICAL HAZARDS Failure to follow the warnings in this section may create the risk of an electrical shock. - Page 7 This product should be connected to an AC power source within the range indicated on the rating label. DO NOT connect it to a DC power source or inverter. If you are not sure what kind of power source you have, contact a qualified electrician. Power Cord Safety: •...
- Page 8 DO NOT use a vacuum cleaner to clean up scattered toner. Doing this might cause the toner dust to ignite inside the vacuum cleaner, potentially starting a fire. Please carefully clean the toner dust with a dry, lint-free soft cloth and dispose of it according to local regulations. DO NOT use this product in the vicinity of a gas leak or combustible dust.
- Page 9 • This product is heavy and weighs more than 46.3 lb (21.0 kg) for Printer. To prevent injuries when moving or lifting this product, make sure to use at least two people. Be careful not to pinch your fingers when you set the product back down. •...
-
Page 10: Important Safety Instructions
Authorized Service Center, please call: In USA: 1-877-BROTHER (1-877-276-8437) In Canada: 1-877-BROTHER 8 Unplug this product from the AC power outlet and refer all servicing to Brother Authorized Service Personnel under the following conditions: When the power cord is damaged or frayed. (Do not touch the damaged/frayed part while unplugging your product.) - Page 11 Regulation Federal Communications Commission (FCC) Declaration of Conformity (USA only) Responsible Party: Brother International Corporation 100 Somerset Corporate Boulevard Bridgewater, NJ 08807-0911 USA TEL: (908) 704-1700 declares, that the products Product Name: HL-4150CDN/HL-4570CDW/HL-4570CDWT Model Numbers: HL-41/HL-45 Product Options: LT-300CL comply with Part 15 of the FCC Rules. Operation is subject to the following two conditions: (1) This device may not cause harmful interference, and (2) this device must accept any interference received, including interference that may cause undesired operation.
- Page 12 IMPORTANT • Changes or modifications not expressly approved by Brother Industries, Ltd. could void the user’s authority to operate the equipment. • A shielded interface cable should be used to ensure compliance with the limits for a Class B digital device.
- Page 13 FDA regulations and must be attached to laser products marketed in the United States. Manufactured: BROTHER TECHNOLOGY (SHENZHEN) LTD. NO6 Gold Garden Ind., Nanling Buji, Longgang, Shenzhen, China This product complies with FDA performance standards for laser products except for deviations pursuant to Laser Notice No.
-
Page 14: Disconnect Device
The purpose of the International ENERGY STAR Program is to promote the development and popularization of energy-efficient office equipment. ® As an ENERGY STAR Partner, Brother Industries, Ltd. has determined that this product meets ® the ENERGY STAR specifications for energy efficiency. - Page 15 Wi-Fi and Wi-Fi Alliance are registered trademarks of the Wi-Fi Alliance. AOSS is a trademark of Buffalo Inc. Any trade names and product names of companies appearing on Brother products, related documents and any other materials are all trademarks or registered trademarks of those...
-
Page 16: Open Source Licensing Remarks
(For Macintosh) Double-click the CD-ROM icon on your desktop. Then double-click the Utilities icon. License.rtf will appear. Copyright and License ©2010 Brother Industries, Ltd. This product includes software developed by the following vendors: ©1983-1998 PACIFIC SOFTWORKS, INC. ©2010 Devicescape Software, Inc. - Page 18 Please use the Quick Setup Guide to set up the machine. You can find a printed copy in the box. Please read this User’s Guide thoroughly before you use the machine. Please visit us at http://solutions.brother.com/ where you can get product support, the latest driver updates and utilities, and answers to frequently asked questions (FAQs) and technical questions.
- Page 19 Network User's Guide This Guide provides useful information of wired and PDF file / CD-ROM / In the Box wireless network settings and security settings using Brother machine. You can also find supported protocol information for your machine and the For Other Countries: detailed troubleshooting tips.
-
Page 20: Using This Guide
Using this guide Symbols used in this guide The following symbols and conventions are used throughout the documentation. WARNING indicates a potentially hazardous situation which, if not avoided, WARNING could result in death or serious injuries. CAUTION indicates a potentially hazardous situation which, if not avoided, CAUTION may result in minor or moderate injuries. -
Page 21: Table Of Contents
Table of Contents Printing Methods About this Machine ............................1 Front view and Back view........................1 Acceptable paper and other print media....................2 Recommended paper and print media ....................2 Type and size of paper ........................2 Handling and using special paper .......................5 Unprintable area ..........................8 Printing methods............................9 Printing on plain paper.........................9 Printing on envelopes and thick paper ....................15... - Page 22 LEDs ................................66 LCD .................................67 Back light ............................67 LCD messages ..........................67 Reprinting documents........................69 Printing Secure data ..........................70 Menu table............................71 Default settings..........................82 Color Calibration ..........................83 Auto Registration ..........................83 Manual Registration...........................84 Frequency............................84 Option Lower tray (LT-300CL)..........................85 SO-DIMM..............................86 SO-DIMM types ..........................86 Installing extra memory ........................87 Routine Maintenance Replacing consumable items........................89 Before replacing the consumable items ....................93...
- Page 23 How to use Web Based Management (Web browser) ..............179 Symbol and character sets list......................180 Quick reference for bar code control commands...................181 Print bar codes or expanded characters..................181 Appendix (for Europe and Other Countries) Brother numbers ............................189 Appendix (for USA and Canada) Brother numbers ............................190 Index...
-
Page 24: Printing Methods
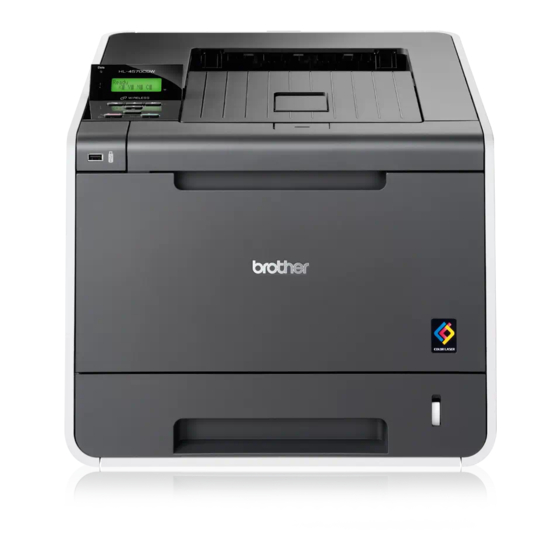
Printing Methods About this Machine Front view and Back view 1 Face-down output tray support flap (support flap) 2 Control panel with a tiltable Liquid Crystal Display (LCD) 3 USB direct print interface 4 Front cover release button 5 Front cover 6 Paper tray 7 Power switch 8 Face-down output tray... -
Page 25: Acceptable Paper And Other Print Media
Printing Methods Acceptable paper and other print media Print quality may vary according to the type of paper you are using. You can use the following types of print media: thin paper, plain paper, thick paper, bond paper, recycled paper, glossy paper, labels or envelopes. For best results, follow the instructions below: ... - Page 26 Printing Methods When looking at this page, you can jump to the page for each printing method by clicking p in the table. Media type Tray 1 Tray 2 MP Tray Choose the media type from the printer driver Plain paper Plain Paper 75 g/m to 105 g/m...
- Page 27 Printing Methods Recommended paper specifications The following paper specifications are suitable for this machine. Basis weight 75-90 g/m (20-24 lb) Thickness 80-110 μm Roughness Higher than 20 sec. Stiffness 90-150 cm /100 Grain direction Long grain Volume resistivity -10e Surface resistivity -10e ohm-cm CaCO...
-
Page 28: Handling And Using Special Paper
• that is multipart or carbonless • that is designed for inkjet printing If you use any of the types of paper listed above, they may damage your machine. This damage is not covered under any Brother warranty or service agreement. - Page 29 Printing Methods Envelopes Most envelopes designed for laser printers will be suitable for your machine. However, some envelopes may have feed and print-quality problems because of the way they have been made. A suitable envelope should have edges with straight, well-creased folds and the leading edge should not be thicker than two sheets of paper.
- Page 30 • with each side folded as shown in figure below If you use any of the types of envelopes listed above, they may damage your machine. This damage may not be covered under any Brother warranty or service agreement. Labels The machine will print on most types of labels designed for use with a laser machine.
-
Page 31: Unprintable Area
Printing Methods Unprintable area The area of the paper that cannot be printed on is shown in the table below: Note The area that cannot be printed on may vary depending on the paper size and the printer driver you are using. -
Page 32: Printing Methods
Printing Methods Printing methods Printing on plain paper Printing on plain paper from the Tray 1 and Tray 2 (For the recommended paper to use, see Type and size of paper on page 2.) Pull the paper tray completely out of the machine. WARNING DO NOT touch the shaded parts shown in the illustration. - Page 33 Printing Methods While pressing the green paper-guide release lever, slide the paper guides to fit the paper size. Make sure that the guides are firmly in the slots. Put paper in the tray and make sure: The paper is below the maximum paper mark (b b b) (1). Overfilling the paper tray will cause paper jams.
- Page 34 Printing Methods Lift up the support flap to prevent paper from sliding off the face-down output tray, or remove each page as soon as it comes out of the machine. Choose the following settings from each drop-down list of the printer driver. ...
- Page 35 Printing Methods Printing on plain paper, bond paper, labels or glossy paper from the MP tray (For the recommended paper to use, see Type and size of paper on page 2.) Open the MP tray and lower it gently. Pull out the MP tray support and unfold the flap (1). Lift up the support flap to prevent paper from sliding off the face-down output tray, or remove each page as soon as it comes out of the machine.
- Page 36 Printing Methods Put paper in the MP tray and make sure: The paper stays under the maximum paper mark (1). The paper edge positions between the arrows (2). The side to be printed on must be face up with the leading edge (top of the paper) in first. Note When you are using glossy paper, put only one sheet at a time in the MP tray to avoid a paper jam.
- Page 37 Printing Methods Media Type Plain Paper Thin Paper Recycled Paper Bond Paper Label Glossy Paper Paper Source MP Tray For any other settings, see Driver and Software in Chapter 2. Send the print data to the machine.
-
Page 38: Printing On Envelopes And Thick Paper
Printing Methods Printing on envelopes and thick paper (For the recommended paper to use, see Type and size of paper on page 2.) Open the MP tray and lower it gently. Pull out the MP tray support and unfold the flap (1). Lift up the support flap to prevent envelopes or thick sheets of paper from sliding off the face-down output tray. - Page 39 Printing Methods Put up to 3 envelopes or up to 25 sheets of thick paper (163 g/m / 43 lb paper) in the MP tray. If you add more envelopes or paper it may cause a jam. Make sure: The top of envelope edge is positioned between the arrows (1).
- Page 40 Printing Methods Choose the following settings from each drop-down list of the printer driver. Paper Size <For printing envelopes> Com-10 Monarch DL Long Edge Customized paper size <For printing thick paper> Letter Legal Executive A5 Long Edge 3 x 5 JIS B5 Folio Customized paper size...
- Page 41 Printing Methods When you have finished printing, open the back cover and reset the two gray levers their original position. Note • Remove each envelope as soon as it has been printed. Stacking the envelopes may cause them to jam or curl.
-
Page 42: Duplex Printing
Printing Methods Duplex printing ® The supplied printer drivers for Windows 2000 or greater and Mac OS X 10.4.11 or greater all enable duplex printing. For more information about how to choose the settings, see the Help text in the printer driver. Guidelines for printing on both sides of the paper ... -
Page 43: Automatic Duplex Printing
Printing Methods Automatic duplex printing If you are using the Macintosh Printer Driver, see Automatic Duplex Printing on page 59. ® Automatic duplex printing with the Windows printer driver Choose the following settings from each menu of the printer driver. ... - Page 44 Printing Methods ® Automatic duplex printing with the BR-Script printer driver for Windows Choose the following settings from each menu of the printer driver. Paper Size Letter Legal Folio Media Type Plain Paper Recycled Paper Thin Paper Glossy Paper (MP Tray only) ...
-
Page 45: Manual Duplex Printing
Printing Methods Manual duplex printing ® The BR-Script printer driver for Windows does not support manual duplex printing. If you are using the Macintosh Printer Driver, see Manual Duplex Printing on page 58. ® Manual duplex printing with the Windows printer driver Choose the following settings from each drop-down list of the printer driver. -
Page 46: Printing Data From A Usb Flash Memory Drive With Direct Print
PDF version 1.7 JPEG Exif+JPEG PRN (created by HL-4150CDN or HL-4570CDW(T) printer driver) TIFF (scanned by all MFC or DCP Brother models) ® PostScript 3™ (created by the BRScript3 printer driver for HL-4150CDN or HL-4570CDW(T)) ... -
Page 47: Creating A Prn Or Postscript ® 3™ File For Direct Printing
Printing Methods ® Creating a PRN or PostScript 3™ file for direct printing From the menu bar of an application, click File, then Print. Choose your machine model name (1) and check the Print to file box (2). Click Print. Choose the folder you want to save the file to and enter the file name if you are prompted to. -
Page 48: Printing Data Directly From The Usb Flash Memory Drive
Printing Methods Printing data directly from the USB flash memory drive If you print data from the USB flash memory drive with Secure Function Lock 2.0 enabled, see Chapter 6 of the Network User's Guide for more information about Secure Function Lock 2.0. Connect your USB flash memory drive to the USB Direct Interface (1) on the front of the machine. - Page 49 Your ID does not allow you to Print documents directly from the USB flash memory Access Denied drive to the Brother machine. The number of pages you are allowed to print has been exceeded. The print job will be Limit Exceeded canceled.
-
Page 50: Driver And Software
LPR printer driver CUPS printer driver Download the printer driver for Linux from http://solutions.brother.com/ or a link on the CD-ROM we have supplied. Depending on Linux distributions, the driver may not be available. Note • For more information about Linux printer driver, visit us at http://solutions.brother.com/. - Page 51 Driver and Software You can change the following printer settings when you print from your computer: Paper Size Orientation Copies Media Type Print Quality Color / Mono Multiple Page Duplex / Booklet Paper Source ...
-
Page 52: Features In The Printer Driver (For Windows ® )
Driver and Software ® Features in the printer driver (for Windows (For more information, see the Help text in the printer driver.) Note ® • The screens in this section are from Windows XP. The screens on your computer will vary depending on your operating system. - Page 53 Driver and Software Paper Size From the drop-down list choose the Paper Size you are using. Orientation Orientation selects the position of how your document will be printed (Portrait or Landscape). Portrait Landscape Copies The copies selection sets the number of copies that will be printed. ...
-
Page 54: Print Quality
Driver and Software Print Quality You can choose the following print quality settings. Normal (600 x 600 dpi) 600×600 dpi. Recommended for ordinary printing. Good print quality with reasonable print speeds. Fine (2400 dpi class) 2400 dpi class. The finest print mode. Use this mode to print precise images such as photographs. Since the print data is much larger than in normal mode, processing time / data transfer time and printing time will be longer. -
Page 55: Settings Dialog
Driver and Software Settings Dialog You can change the following setting by clicking Settings... from the Basic tab. Color Mode The following options are available in color Matching mode: • Normal This is the default color mode. • Vivid The color of all elements are adjusted to become a more vivid color. - Page 56 Driver and Software Multiple Page The Multiple Page selection can reduce the image size of a page allowing multiple pages to be printed on one sheet of paper or enlarging the image size for printing one page on multiple sheets of paper. ...
- Page 57 Driver and Software • Duplex Type There are four types of duplex binding direction available for each orientation. Portrait Long Edge (Left) Long Edge (Right) Short Edge (Top) Short Edge (Bottom) Landscape Long Edge (Top) Long Edge (Bottom) Short Edge (Right) Short Edge (Left) •...
- Page 58 Driver and Software • Duplex Type There are two types of duplex binding direction available for each orientation. Portrait Landscape Left Binding Right Binding Top Binding Bottom Binding • Booklet Printing Method When Divide into Sets is selected: This option allows you to print the whole booklet into smaller individual booklet sets, it still allows you to fold at the center of the smaller individual booklet sets without having to change the order of the page number.
- Page 59 Driver and Software Advanced tab Change the tab settings by clicking one of the following icons: Scaling (1) Reverse Print (2) Use Watermark (3) Header-Footer Print (4) Toner Save Mode (5) Secure Print (6) ...
- Page 60 Driver and Software Use Watermark You can put a logo or text into your documents as a watermark. You can choose one of the preset watermarks, or you can use a bitmap file or text that you have created. When you use a bitmap file as a watermark, you can change the size of the watermark and put it anywhere you like on the page.
-
Page 61: User Authentication
Driver and Software Administrator Administrators have the authority to limit access to functions such as scaling and watermark. Copies Lock Lock the copy pages selection to prevent multiple copy printing. Multiple Page & Scaling Lock Lock the scaling setting and multiple page setting. ... - Page 62 Driver and Software Other Print Options You can set the following in Printer Function: Color Calibration Use Reprint Sleep Time Improve Print Output Skip Blank Page Color Calibration The output density of each color may vary depending on the temperature and humidity of the environment the machine is in.
- Page 63 Driver and Software Sleep Time When the machine does not receive data for a certain period of time, it enters sleep mode. In sleep mode, the machine acts as though it were turned off. When you choose Printer Default, the timeout setting will be reset to the specific time set at the factory;...
-
Page 64: Accessories Tab
Driver and Software Accessories tab Note From the Start menu, select Control Panel and then Printers and Faxes . Right-click the Brother HL-4570CDW (HL-4150CDN) Series icon and select Properties to access the Accessories tab. ® Printers for Windows 2000 users. - Page 65 Brother Solutions Center... (1) The Brother Solutions Center (http://solutions.brother.com/) is a Web site offering information about your Brother product including FAQs (Frequently Asked Questions), User’s Guides, driver updates and tips for using your machine. Genuine Supplies Website... (2) You can visit our Web site for genuine Brother supplies by clicking this button.
-
Page 66: Using The Br-Script3 Printer Driver (Postscript ® 3™ Language Emulation For Windows ® )
Printing Preferences Note You can access the Printing Preferences dialog box by clicking Printing Preferences... in the General tab of the Brother HL-4570CDW (HL-4150CDN) BR-Script3 Properties dialog box. Layout tab You can change the layout setting by choosing the settings for Orientation, Print on Both Sides, Page Order and Page Per Sheet. - Page 67 Driver and Software • Page Per Sheet The Page Per Sheet selection can reduce the image size of a page by allowing multiple pages to be printed on one sheet of paper. Also, you can print a document in the booklet style automatically when you choose Booklet.
-
Page 68: Advanced Options
Driver and Software Advanced options Choose the Paper Size and Copy Count (1). Paper Size From the drop-down box choose the Paper Size you are using. Copy Count The copy selection sets the number of copies that will be printed. Set the Image Color Management, Scaling and TrueType Font settings (2). - Page 69 Driver and Software You can change settings by choosing a setting in the Printer Features list (3): Print Quality You can choose the following print quality settings. • Normal (600 x 600 dpi) 600×600 dpi. Recommended for ordinary printing. Good print quality with reasonable print speeds. •...
- Page 70 Driver and Software Secure Print Secure Print allows you to secure documents that are password protected when they are sent to the machine. Only the people who know the password will be able to print them. Since the documents are secured at the machine, you must enter the password using the control panel of the machine.
- Page 71 Driver and Software Color Mode The following options are available in Color Matching mode: • Normal This is the Default color mode. • Vivid The color of all elements are adjusted to become a more vivid color. • None ...
- Page 72 Driver and Software Ports tab Choose the port where your machine is connected or the path to the network machine you are using.
-
Page 73: Features In The Printer Driver (For Macintosh)
Driver and Software Features in the printer driver (for Macintosh) This machine supports Mac OS X 10.4.11, 10.5.x and 10.6.x. Note • The screens in this section are basically from Mac OS X 10.5.x. The screens on your Macintosh will vary depending on your operating system. -
Page 74: Choosing Printing Options
Driver and Software For Mac OS X 10.5.x and 10.6.x For more page setup options, click the disclosure triangle beside the Printer pop-up menu. Choosing printing options To control special printing features, choose the options in the Print dialog box. For the details of available options, see the following descriptions of each option. - Page 75 Driver and Software Cover Page You can make the following cover page settings: Print Cover Page If you want to add a cover page to your document, use this function. Cover Page Type Choose a template for the cover page. ...
- Page 76 Driver and Software Border If you want to add a border, use this function. Two-Sided If you want to do duplex printing, choose Long-edge binding or Short-edge binding. Reverse Page Orientation (Mac OS X 10.5.x and 10.6.x only) Check Reverse Page Orientation to reverse the data from up to down.
- Page 77 Driver and Software Print Settings You can change settings by choosing a setting in the Print Settings list: Basic tab Media Type You can change the media type to one of the following: • Plain Paper • Thin Paper •...
- Page 78 Driver and Software Print Quality You can choose the following print quality settings. • Normal (600 x 600 dpi) 600 dpi class. Recommended for ordinary printing. Good print quality with good print speed. • Fine (2400 dpi class) 2400 dpi class. The finest print mode. Use this mode to print precise images such as photographs. Since the print data is much larger than in normal mode, processing time, data transfer time, and printing time will be longer.
- Page 79 Driver and Software Reverse Print (Mac OS X 10.4.11 only) Check Reverse Print to rotate the data by 180 degrees. Advanced tab Color Mode You can change the color mode as follows: • Normal This is the Default color mode. •...
- Page 80 Driver and Software If you are printing only a few pages, you do not need to choose this setting. We recommend that you change the printer driver setting in Media Type to a thin setting. Note This operation makes the temperature of the machine’s fusing process lower. •...
- Page 81 Driver and Software Manual Duplex Printing For Mac OS X 10.4.11 Select Paper Handling. Choose Reverse (for MP tray) or Normal (for Tray 1 and Tray 2) in Page Order. Then choose Even numbered pages and click Print. Reload printed paper into the tray with the blank side facing up (for MP tray) or facing down (for Tray 1 and Tray 2).
- Page 82 Driver and Software Automatic Duplex Printing For Mac OS X 10.4.11 Select Layout. Choose Long-edged binding or Short-edged binding in Two-Sided. Select Paper Handling. Choose All Pages and click Print.
- Page 83 Driver and Software For Mac OS X 10.5.x and 10.6.x Select Layout. Choose Long-edge binding or Short-edge binding in Two-Sided. Automatically the Two-Sided check box is checked. Select Paper Handling. Choose All pages in Pages To Print and click Print. You can print pages on both sides of the paper.
-
Page 84: Status Monitor
Driver and Software Status Monitor This reports the machine status (any errors that may happen with the machine) when printing. If you would like to turn Status Monitor on, follow these steps: For Mac OS X 10.4.11 Run the Printer Setup Utility (from the Go menu, choose Applications, Utilities), then choose the machine. -
Page 85: Uninstalling The Printer Driver
7 and Windows Server 2008 R2 users ® Printer driver for Windows Click the Start button, point to All Programs , Brother, and then to your machine name. Click UnInstall. Follow the instructions on the screen. ® Program for Windows... -
Page 86: Control Panel
Control Panel Control panel This machine has one back lit Liquid Crystal Display (LCD), seven buttons and two Light Emitting Diodes (LEDs) on the control panel. The LCD is a two-line, 16 characters per line display and can be tilted up to a vertical position. -
Page 87: Buttons
Control Panel Buttons You can control the basic machine operations and change various printer settings with seven buttons (Go, Cancel, Secure, +, -, Back, OK). button Operations Clear error messages. Pause and continue printing. Switch to Reprint mode. Cancel Stop and cancel the printing job in progress. Exit from the control panel menu, Reprint menu, Secure Print menu, or Direct Print menu. -
Page 88: Cancel
Control Panel Cancel You can cancel the processing or printing of data by pressing Cancel. The LCD shows Cancel printing. until the job is canceled. To delete all jobs, press Cancel for about 4 seconds until the LCD shows Job Cancel (All) and then release it. After canceling the job, the machine returns to the Ready state. -
Page 89: Leds
Control Panel LEDs The LEDs are lights which show the machine status. Data LED (Green) LED indication Meaning Data is in the machine memory. Blinking Receiving or processing data. No remaining data in the memory. Error LED (Orange) LED indication Meaning Blinking There is a problem with the machine. -
Page 90: Lcd
Control Panel The LCD shows the current machine status. When you use the buttons on the control panel, the LCD will change. If there are any problems, the LCD will show the error message, maintenance message, or call service message so you will know that you need to take action. (For more information about these messages, see LCD messages on page 141.) Back light Light... -
Page 91: Machine Status Messages
Control Panel Machine status messages The following table shows the machine status messages during normal operation: Machine Status Message Meaning The machine is cooling down. Cooling Down Canceling the job. Job Cancel Job Cancel (All) Machine is ignoring data processed using the PS driver. Ignore Data The machine has suspended its operations. -
Page 92: Reprinting Documents
Control Panel Reprinting documents Reprinting the last job You can reprint the data from the last print job without sending it from the computer again. Note • The Reprint function is not available when Secure Function Lock 2.0 is On. For more information about Secure Function Lock 2.0, see the Chapter 6 of the Network User's Guide. -
Page 93: Printing Secure Data
Control Panel Printing Secure data Secure data Secure documents are protected by a password and only those people who know the password will be able to print the document. The machine will not print the document when you send it for printing. To print the document, you must use the control panel of the machine (with the password). -
Page 94: Menu Table
Control Panel Menu table There are eight menus. For more information about the selections available in each menu, see the tables below. If no control panel operations are performed for 30 seconds, the LCD automatically returns to Ready. Note The control panel LCD names for the paper trays are as follows. •... -
Page 95: Paper Tray
Control Panel Machine Info. (continued) Submenu Menu Selections Options Descriptions Shows the current total pages printed for the drum Drum Count unit. Shows the remaining life for the drum unit. Parts Life Drum Life Shows the remaining life for the belt unit. Belt Life Shows the pages left to print with the PF kit MP. -
Page 96: General Setup
Control Panel General Setup Submenu Menu Selections Options Descriptions Changes the LCD language for your Local Language English*/Français... country. Sets the time to return to Power Save Ecology Sleep Time 0/1/2/3*/4/5...Min mode. Increases the page yield of the toner Toner Save Off*/On cartridge. -
Page 97: Print Menu
Control Panel Print Menu Submenu Menu Selections Options Descriptions Chooses the emulation mode you Emulation Auto*/HP LaserJet/ use. BR-Script 3 If you choose Auto, the machine can change the emulation mode automatically. If you choose an option other than Auto, each emulation mode will be fixed. - Page 98 Control Panel Print Menu (continued) Submenu Menu Selections Options Descriptions HP LaserJet Font No. I000.../I059*.../I071 Font Pitch 0.44/10*.../99.99 Font Point 4.00/12*.../999.75 Sets the symbol set or the character Symbol Set PC-8*... set. Prints code table. Table Print If Change Emulation appears on the LCD, choose Auto or HP LaserJet in Emulation of Print Menu.
- Page 99 Control Panel Network for HL-4150CDN users Submenu Menu Selections Options Descriptions Chooses the IP method that best TCP/IP Boot Method Auto*/Static/RARP/ suits your needs. BOOTP/DHCP Enter the IP address. IP Address ###.###.###.### (000.000.000.000)* Enter the Subnet mask. Subnet Mask ###.###.###.### (000.000.000.000)* Enter the Gateway address.
- Page 100 Control Panel Network for HL-4570CDW(T) users Submenu 1 Submenu 2 Menu Selections Options Descriptions Chooses the IP method that best Wired LAN TCP/IP Boot Method Auto*/Static/RARP/ suits your needs. BOOTP/DHCP Enter the IP address. IP Address ###.###.###.### (000.000.000.000)* Enter the Subnet mask. Subnet Mask ###.###.###.### (000.000.000.000)*...
- Page 101 Control Panel Network for HL-4570CDW(T) users (continued) Submenu 1 Submenu 2 Menu Selections Options Descriptions Chooses the IP method that best WLAN TCP/IP Boot Method Auto*/Static/RARP/ suits your needs. BOOTP/DHCP Enter the IP address. IP Address ###.###.###.### (000.000.000.000)* Enter the Subnet mask. Subnet Mask ###.###.###.### (000.000.000.000)*...
-
Page 102: Reset Menu
Control Panel Network for HL-4570CDW(T) users (continued) Submenu 1 Submenu 2 Menu Selections Options Descriptions Shows wireless Ethernet link WLAN WLAN Status Status status. (continued) (Appears only Shows the signal condition when WLAN Signal when Status is Active. Enable is On.) Shows the channel in use when Channel... -
Page 103: Color Correction
Control Panel Color Correction Submenu Menu Selections Options Descriptions Sets the interval time you want to Frequency Normal*/Low/Off carry out the auto color correction Carries out calibration to revise the ColorCalibration Calibrate colors. (See Color Calibration on page 83.) Sets the calibration parameters back Reset to the default settings. -
Page 104: Direct Print
Control Panel Direct Print Submenu Menu Selections Options Descriptions Sets the size of paper for direct print. Paper Size Letter*/Legal/A4/ Executive/JIS B5/B5/ A5/A5 L/JIS B6/B6/A6/ Folio Sets the type of paper for direct print. Media Type Plain Paper*/ Thick Paper/ Thicker Paper/ Thin Paper/ Recycled Paper/... -
Page 105: Default Settings
Control Panel Default settings The machine has three levels of default settings; the default settings have been set at the factory before shipment (see Menu table on page 71). Network default settings Factory reset Settings reset Note •... -
Page 106: Color Calibration
Control Panel Color Calibration The output density for each color may vary depending on the environment the machine is in, such as temperature and humidity. Calibration helps you to improve the color density. Note ® If you print using the Windows printer driver, the driver will get the calibration data automatically if both Use Calibration Data and Get Device Data Automatically are on. -
Page 107: Manual Registration
Control Panel Manual Registration When you manually set the color registration, you need to print the color registration chart. Then you are required to set parameters to the machine in accordance with the instruction of the color registration chart. Print Chart You can print the color registration chart to manually check the registration of the colors. -
Page 108: Option
(21 lb) paper. If you want to buy the optional lower tray unit, call the dealer you bought the machine from or Brother Customer Service. For setup, see the User’s Guide that we have supplied with the lower tray unit. -
Page 109: So-Dimm
Capacity: 64, 128 or 256 MB Height: 30.0 mm (1.18 in.) DRAM type: DDR2 SDRAM Note • There might be some SO-DIMMs that will not work with the machine. • For more information, call the dealer you bought the machine from or Brother Customer Service. -
Page 110: Installing Extra Memory
Option Installing extra memory Note Always turn off the machine power switch before installing or removing the SO-DIMM. Turn off the machine power switch, and then unplug the machine. Disconnect all interface cables from the machine. Remove the plastic (1) and then the metal (2) SO-DIMM covers. Unpack the SO-DIMM and hold it by its edges. - Page 111 Option Put the metal (2) and then the plastic (1) SO-DIMM covers back on. Reconnect the interface cable to your machine. Plug the machine back in, and then turn on the power switch. Note To make sure that you have installed the SO-DIMM properly, you can print the printer settings page that shows the current memory size.
-
Page 112: Routine Maintenance
Routine Maintenance Replacing consumable items You will need to replace the consumable items when the machine indicates that the life of the consumable is over. You can replace the following consumable items by yourself: Toner cartridge Drum unit See Toner cartridges on page 96. See Drum unit on page 101. - Page 113 Routine Maintenance The following messages appear on the LCD in the Ready state. These messages provide advanced warnings to replace the consumable items before they reach the end of their life. To avoid any inconvenience, you may want to buy spare consumable items before the machine stops printing. LCD messages Consumable Approximate life...
- Page 114 Routine Maintenance You will need to clean the machine regularly and replace the consumable items when the following messages are displayed on the LCD. LCD messages Consumable Approximate life How to replace Order No. item to replace Toner cartridge, See page 97 1 2 5 Replace Toner 2,500 pages...
- Page 115 • Go to http://www.brother.com/original/index.html for instructions on how to return the used toner cartridge to the brother collection program. If you choose not to return your used toner cartridge, please discard the used toner cartridge according to local regulations, keeping it separate from domestic waste. If you have questions, call your local waste disposal office.
-
Page 116: Before Replacing The Consumable Items
Be careful not to inhale toner. IMPORTANT • Brother strongly recommends that you do not refill the toner cartridge provided with your machine. We also strongly recommend that you continue to use only genuine Brother brand replacement toner cartridges. Use or attempted use of potentially incompatible toner and/or cartridges in the Brother machine may cause damage to the machine and/or may result in unsatisfactory print quality. - Page 117 Routine Maintenance • We recommend that you place the drum unit and/or toner cartridge on a clean, flat surface with a piece of disposable paper underneath it in case you accidentally spill or scatter toner. • Handle the toner cartridge and the waste toner box carefully. If toner scatters on your hands or clothes, wipe or wash it off with cold water at once.
- Page 118 • Go to http://www.brother.com/original/index.html for instructions on how to return the used toner cartridge to the brother collection program. If you choose not to return your used toner cartridge, please discard the used toner cartridge according to local regulations, keeping it separate from domestic waste. If you have questions, call your local waste disposal office.
-
Page 119: Toner Cartridges
Open the Front C The second line of the LCD indicates which color you need to replace. The machine will stop printing until you replace the toner cartridge. A new and unused genuine Brother toner cartridge will reset the Replace Toner mode. - Page 120 Routine Maintenance Replacing the toner cartridges Before you replace the toner cartridges, see Before replacing the consumable items on page 93. Make sure that the machine is turned on. Press the front cover release button and then open the front cover.
- Page 121 Routine Maintenance Push to release the latches of the corona wire cover (1), and then open the cover. Clean the corona wire inside the drum unit by gently sliding the green tab from left to right and right to left several times. Note Be sure to return the tab to the home position (a) (1).
- Page 122 Routine Maintenance Close the corona wire cover. Repeat steps d to f to clean each of three remaining corona wires. Unpack the new toner cartridge. Gently shake it from side to side several times to distribute the toner evenly inside the cartridge. Pull off the protective cover.
- Page 123 Routine Maintenance Hold the handle of the toner cartridge and slide the toner cartridge into the drum unit then slightly pull it toward you until you hear it click into place. Make sure that you match the toner cartridge color to the same color label on the drum unit.
-
Page 124: Drum Unit
Because we have no control over the many factors that determine the actual drum life, we cannot guarantee a minimum number of pages that will be printed by your drum. • For best performance, use only genuine Brother toner. The machine should be used only in a clean, dust-free environment with adequate ventilation. - Page 125 We cannot guarantee the print quality. Please replace the drum unit with a new one. We recommend a genuine Brother drum unit be installed at this time. After replacement, reset the drum counter by following the instructions included with the new drum unit.
- Page 126 Routine Maintenance Turn the green lock lever (1) at the left of the machine counterclockwise to the release position. Holding the green handles of the drum unit, lift the front of the drum unit and remove it from the machine. Hold the handle of the toner cartridge and slightly push it to unlock.
- Page 127 Routine Maintenance Hold the handle of the toner cartridge and slide it into the appropriate colored section of the drum unit until it clicks into place. C - Cyan M - Magenta Y - Yellow K - Black Make sure the green lock lever (1) is in the release position as shown in the illustration. Match the guide ends (2) of the drum unit to the c marks (1) on both sides of the machine, then gently slide the drum unit into the machine until it stops at the green lock lever.
- Page 128 Routine Maintenance Turn the green lock lever (1) clockwise to the lock position. Push the drum unit in until it stops. Close the front cover of the machine. When you replace the drum unit with a new one, you need to reset the drum counter by completing the following steps: Press + or - to choose Machine Info..
-
Page 129: Belt Unit
Routine Maintenance Belt unit Order No. BU-300CL A new belt unit can print approximately 50,000 A4 or Letter size single-sided pages. Belt End Soon message Belt End Soon If the LCD shows Belt End Soon, it means the belt unit is near the end of its life. Buy a new belt unit and have it ready before you get a Replace Belt message. - Page 130 Routine Maintenance Hold the green handle of the drum unit. Pull the drum unit out until it stops. Turn the green lock lever (1) at the left of the machine counterclockwise to the release position. Holding the green handles of the drum unit, lift the front of the drum unit and remove it from the machine. Hold the green handle of the belt unit with both hands and lift the belt unit up, then pull it out.
- Page 131 Routine Maintenance Unpack the new belt unit and put the new belt unit in the machine. Make sure the belt unit is level and fits firmly into place. Make sure the green lock lever (1) is in the release position as shown in the illustration. Match the guide ends (2) of the drum unit to the c marks (1) on both sides of the machine, then gently slide the drum unit into the machine until it stops at the green lock lever.
- Page 132 Routine Maintenance Turn the green lock lever (1) clockwise to the lock position. Push the drum unit in until it stops. Close the front cover of the machine. When you replace the belt unit with a new one, you need to reset the belt unit counter by completing the following steps: Press + or - to choose Machine Info..
-
Page 133: Waste Toner Box
Routine Maintenance Waste toner box Order No. WT-300CL The life of a waste toner box is approximately 50,000 A4 or Letter size single-sided pages. WT Box End Soon message WT Box End Soon If the LCD shows WT Box End Soon, it means the waste toner box is near the end of its life. Buy a new waste toner box and have it ready before you get a Replace WT Box message. - Page 134 Routine Maintenance Hold the green handle of the drum unit. Pull the drum unit out until it stops. Turn the green lock lever (1) at the left of the machine counterclockwise to the release position. Holding the green handles of the drum unit, lift the front of the drum unit and remove it from the machine. Hold the green handle of the belt unit with both hands and lift the belt unit up, then pull it out.
- Page 135 Routine Maintenance Remove two pieces of orange packing material and discard them. Note This step is only necessary when you are replacing the waste toner box for the first time, and is not required for the replacement waste toner box. The orange packing pieces are installed at the factory to protect your machine during shipment.
- Page 136 Routine Maintenance Slide the belt unit back into the machine. Make sure the belt unit is level and fits firmly into place. Make sure the green lock lever (1) is in the release position as shown in the illustration. Match the guide ends (2) of the drum unit to the c marks (1) on both sides of the machine, then gently slide the drum unit into the machine until it stops at the green lock lever.
- Page 137 Routine Maintenance Turn the green lock lever (1) clockwise to the lock position. Push the drum unit in until it stops. Close the front cover of the machine.
-
Page 138: Cleaning
Routine Maintenance Cleaning Clean the outside and inside of the machine regularly with a dry, lint-free cloth. When you replace the toner cartridge or the drum unit, make sure that you clean the inside of the machine. If printed pages are stained with toner, clean the inside of the machine with a dry, lint-free cloth. - Page 139 Routine Maintenance Wipe the outside of the machine with a dry, lint-free cloth to remove dust. Remove anything that is stuck inside the paper tray. Wipe the inside of the paper tray with a dry, lint-free cloth to remove dust. Put the paper tray back in the machine.
-
Page 140: Cleaning The Inside Of The Machine
Routine Maintenance Cleaning the inside of the machine Turn off the machine's power switch. Disconnect all interface cables, and then unplug the AC power cord. Press the front cover release button and then open the front cover. Hold the green handle of the drum unit. Pull the drum unit out until it stops. Turn the green lock lever (1) at the left of the machine counterclockwise to the release position. - Page 141 Routine Maintenance IMPORTANT • Hold the green handles of the drum unit when you carry it. DO NOT hold the sides of the drum unit. • We recommend that you place the drum unit on a clean, flat surface with a piece of disposable paper underneath it in case you accidentally spill or scatter toner.
- Page 142 Routine Maintenance Make sure the green lock lever (1) is in the release position as shown in the illustration. Match the guide ends (2) of the drum unit to the c marks (1) on both sides of the machine, then gently slide the drum unit into the machine until it stops at the green lock lever.
- Page 143 Routine Maintenance Push the drum unit in until it stops. Close the front cover of the machine. Connect interface cables and then plug the machine back in. Turn on the power switch.
-
Page 144: Cleaning The Corona Wires
Routine Maintenance Cleaning the corona wires If you have print quality problems, clean the corona wires as follows: Press the front cover release button and then open the front cover. Hold the green handle of the drum unit. Pull the drum unit out until it stops. Hold the handle of the toner cartridge and slightly push it toward the machine to unlock it. - Page 145 Routine Maintenance Push to release the latches of the corona wire cover (1), and then open the cover. Clean the corona wire inside the drum unit by gently sliding the green tab from left to right and right to left several times. Note Be sure to return the tab to the home position (a) (1).
- Page 146 Routine Maintenance Close the corona wire cover. Repeat steps d to f to clean each of three remaining corona wires. Hold the handle of the toner cartridge and slide the toner cartridge into the drum unit then slightly pull it toward you until you hear it click into place.
- Page 147 Routine Maintenance Push the drum unit in until it stops. Close the front cover of the machine.
-
Page 148: Cleaning The Drum Unit
Routine Maintenance Cleaning the drum unit If your printout has colored spots at 94 mm (3.7 in.) intervals, the drum may have foreign material, such as glue from a label stuck on the drum surface. Follow the steps below to solve the problem. Make sure the machine is in the ready state. - Page 149 Routine Maintenance Turn the green lock lever (1) at the left of the machine counterclockwise to the release position. Holding the green handles of the drum unit, lift the front of the drum unit and remove it from the machine. IMPORTANT •...
- Page 150 Routine Maintenance Hold the handle of the toner cartridge and slightly push it to unlock. Then pull it out of the drum unit. Repeat this for all the toner cartridges. Turn the drum unit over by holding the green handles. Make sure that the drum unit gears (1) are on the left hand side.
- Page 151 Routine Maintenance Confirm suspected area of the appropriate color drum by using the numbers beside the drum which relate to the numbers of column. Turn the drum unit gear toward you by hand while looking at surface of the suspected area. When you have found the mark on the drum that matches the drum dot check sheet, wipe the surface of the drum gently with a cotton swab until the mark on the surface comes off.
- Page 152 Routine Maintenance Hold the handle of the toner cartridge and slide it into the appropriate colored section of the drum unit until it clicks into place. C - Cyan M - Magenta Y - Yellow K - Black Make sure the green lock lever (1) is in the release position as shown in the illustration. Match the guide ends (2) of the drum unit to the c marks (1) on both sides of the machine, then gently slide the drum unit into the machine until it stops at the green lock lever.
- Page 153 Routine Maintenance Turn the green lock lever (1) clockwise to the lock position. Push the drum unit in until it stops. Close the front cover of the machine. Connect interface cables and then plug the machine back in. Turn on the power switch.
-
Page 154: Cleaning The Paper Pick-Up Roller
Routine Maintenance Cleaning the paper pick-up roller Turn off the machine's power switch. Disconnect all interface cables, and then unplug the AC power cord. Pull the paper tray completely out of the machine. Tightly wring out a lint-free cloth soaked in lukewarm water, and then wipe the separator pad (1) of the paper tray with it to remove dust. -
Page 155: Shipment Of The Machine
Routine Maintenance Shipment of the machine WARNING This machine is heavy and weighs approximately 21.0 kg (46.3 lb). To prevent possible injuries at least two people should lift the machine. Be careful not to pinch your fingers when you put the machine down. If you use a Lower Tray, carry it separately from your machine. - Page 156 Routine Maintenance Turn off the machine's power switch. Disconnect all interface cables, and then unplug the AC power cord. Press the front cover release button and then open the front cover. Hold the green handle of the drum unit. Pull the drum unit out until it stops. Turn the green lock lever (1) at the left of the machine counterclockwise to the release position.
- Page 157 Routine Maintenance IMPORTANT • Hold the green handles of the drum unit when you carry it. DO NOT hold the sides of the drum unit. • We recommend that you place the drum unit on a clean, flat surface with a piece of disposable paper underneath it in case you accidentally spill or scatter toner.
- Page 158 Routine Maintenance Remove two pieces of orange packing material and discard them. Note This step is only necessary when you are replacing the waste toner box for the first time, and is not required for the replacement waste toner box. The orange packing pieces are installed at the factory to protect your machine during shipment.
- Page 159 Routine Maintenance Slide the belt unit back into the machine. Make sure the belt unit is level and fits firmly into place. Install orange packing materials to the drum unit as follows: Install one orange packing material (1) to secure the toner cartridges to the drum unit on the left and right sides respectively.
- Page 160 Routine Maintenance Put a piece of paper (A4 or letter) on the belt unit to prevent damage to the belt unit. Make sure the green lock lever (1) is in the release position as shown in the illustration. Match the guide ends (2) of the drum unit to the c marks (1) on both sides of the machine, then gently slide the drum unit into the machine until it stops at the green lock lever.
- Page 161 Routine Maintenance Turn the green lock lever (1) clockwise to the lock position. Push the drum unit in until it stops. Close the front cover of the machine. Put the Styrofoam piece (1) into the carton. Then put the waste toner box in the Styrofoam piece.
- Page 162 Routine Maintenance Wrap the machine with a plastic bag. Put the machine on the Styrofoam piece (1) and the Styrofoam piece (2) on the top of the machine. Match the front side of the machine to the “FRONT” mark on each Styrofoam piece.
-
Page 163: Troubleshooting
Troubleshooting You can correct most problems by yourself. If you need additional help, the Brother Solutions Center offers the latest FAQs and troubleshooting tips. Visit us at http://solutions.brother.com/. (HL-4150CDN) In USA: Please go to the Brother Solutions Center at http://solutions.brother.com/ and click Manuals on your model page to download the other manuals. -
Page 164: Lcd Messages
If you need more help, the Brother Solutions Center offers the latest FAQs and troubleshooting tips. Visit us at http://solutions.brother.com/. If you cannot clear the problem, call the dealer you bought the machine from or Brother Customer Service. Note The LCD names for the paper trays are as follows. - Page 165 Troubleshooting Error messages (continued) Error message Cause Action The DIMM is not installed Turn off the machine and remove the DIMM. DIMM Error correctly. Confirm the DIMM meets the required The DIMM is broken. specifications. (For details, see SO-DIMM types on page 86.) ...
- Page 166 Registration failed. See If the problem continues, call your dealer or Troubleshooting Brother Customer Service. chapter in User's Guide. The length of the paper in the tray is Open the back cover (back output tray) to let the Short Paper too short for the machine to deliver it printed paper out on the back output tray.
-
Page 167: Maintenance Messages
For the maintenance messages, see Routine Maintenance on page 89. Call service messages Call service message Action Turn off the machine. Wait a few seconds, then turn it on again. If this does not clear Print Unable ## the error, call your dealer or a Brother Customer Service. -
Page 168: Paper Handling
Troubleshooting Paper handling First, make sure that you are using paper that meets Brother recommended paper specifications. (See Type and size of paper on page 2.) Problem Recommendation The machine does not feed If there is paper in the paper tray, make sure it is straight. If the paper is curled, ... -
Page 169: Paper Jams And How To Clear Them
Troubleshooting Paper jams and how to clear them If paper jams inside the machine, the machine will stop. One of the following LCD messages will appear to tell you where to find the jammed paper. Jam MP Tray (1) Paper jam in the MP tray. -
Page 170: Jam Mp Tray (Paper Jam In The Mp Tray)
Troubleshooting Jam MP Tray (paper jam in the MP tray) Jam MP Tray If a paper jam occurs inside the MP tray, follow these steps: Remove the paper from the MP tray. Remove any jammed paper from in and around the MP Tray. Fan the paper stack, and then put it back in the MP tray. - Page 171 Troubleshooting If a paper jam occurs inside the paper tray, follow these steps: Pull the paper tray completely out of the machine. WARNING DO NOT touch the shaded parts shown in the illustration. These rollers may be rotating at high speed and can pinch or entrap your hand.
- Page 172 Troubleshooting Use both hands to slowly pull out the jammed paper. Note Pulling out the jammed paper downward allows you to remove the paper easier. Make sure that the paper is below the maximum paper mark (b b b). While pressing the green paper-guide release lever, slide the paper guides to fit the paper size.
-
Page 173: Jam Duplex (Paper Jam Underneath The Standard Paper Tray (Tray 1) Or In The Fuser Unit)
Troubleshooting Jam Duplex (paper jam underneath the standard paper tray (tray 1) or in the fuser unit) Jam Duplex If a paper jam occurs inside the duplex unit, follow these steps: Leave the machine turned on for 10 minutes to cool down. Pull the paper tray completely out of the machine and check inside the machine. - Page 174 Troubleshooting If paper is not caught inside the machine, check underneath the paper tray. Note Do not put the paper tray back in at this point. If the paper is not caught in the paper tray, open the back cover. WARNING After you have just used the machine, some internal parts of the machine will be extremely hot.
- Page 175 Troubleshooting Pull out the jammed paper slowly. Fully close the back cover. Put the paper tray back in the machine.
-
Page 176: Jam Rear (Paper Jam Behind The Back Cover)
Troubleshooting Jam Rear (Paper jam behind the back cover) Jam Rear If a paper jam occurs behind the back cover, follow these steps: Leave the machine turned on for 10 minutes to cool down. Open the back cover. WARNING After you have just used the machine, some internal parts of the machine will be extremely hot. Wait for the machine to cool down before you touch the internal parts of the machine. - Page 177 Troubleshooting Pull the green tabs (2) at the left and right hand sides toward you and fold down the fuser cover (1). Note If the envelope levers (3) inside the back cover are pulled down to the envelope position, lift these levers to the original position before pulling the green tabs (2) down.
- Page 178 Troubleshooting Close the fuser cover (1). Note If you print on envelopes, pull down the envelope levers (2) to the envelope position again before closing the back cover. Close the back cover.
-
Page 179: Jam Inside (Paper Jam Inside The Machine)
Troubleshooting Jam Inside (Paper jam inside the machine) Jam Inside If a paper jam occurs inside the machine, follow these steps: Turn off the machine's power switch and unplug the AC power cord. Press the front cover release button and then open the front cover. Hold the green handle of the drum unit. - Page 180 Troubleshooting Turn the green lock lever (1) at the left of the machine counterclockwise to the release position. Holding the green handles of the drum unit, lift the front of the drum unit and remove it from the machine. IMPORTANT •...
- Page 181 Troubleshooting Pull out the jammed paper slowly. IMPORTANT To avoid print quality problems, DO NOT touch the shaded parts shown in the illustration. Make sure the green lock lever (1) is in the release position as shown in the illustration.
- Page 182 Troubleshooting Match the guide ends (2) of the drum unit to the c marks (1) on both sides of the machine, then gently slide the drum unit into the machine until it stops at the green lock lever. Turn the green lock lever (1) clockwise to the lock position. Push the drum unit in until it stops.
-
Page 183: Improving The Print Quality
Note Using non-Brother supplies may affect the print quality, hardware performance, and machine reliability. To get the best print quality, we suggest using the recommended paper. Check that you use the paper that meets our specifications. - Page 184 ABCDEFGHIJKLMNOPQRSTUVWXYZ. 0123456789. abcdefghijklmnopqrstuvwxyz. ABCDEFGHIJKLMNOPQRSTUVWXYZ. 0123456789. abcdefghijklmnopqrstuvwxyz. toner cartridges on page 97.) To identify the color of the toner cartridge, visit us at http://solutions.brother.com/ to view our FAQs and troubleshooting tips. ABCDEFGHIJKLMNOPQRSTUVWXYZ. 0123456789. abcdefghijklmnopqrstuvwxyz. ABCDEFGHIJKLMNOPQRSTUVWXYZ. 0123456789. abcdefghijklmnopqrstuvwxyz. ABCDEFGHIJKLMNOPQRSTUVWXYZ. 0123456789. abcdefghijklmnopqrstuvwxyz. ABCDEFGHIJKLMNOPQRSTUVWXYZ. 0123456789. abcdefghijklmnopqrstuvwxyz.
- Page 185 Put in a new toner cartridge. (See Replacing the toner cartridges on page 97.) are missing To identify the color of the toner cartridge, visit us at http://solutions.brother.com/ to view our FAQs and troubleshooting tips. Put in a new drum unit. (See Replacing the drum unit on page 102.) ABCDEFGHIJKLMNOPQRSTUVWXYZ.
- Page 186 Replacing the toner cartridges on page 97.) To identify the color of the toner cartridge, visit us at http://solutions.brother.com/ to view our FAQs and troubleshooting tips. If the problem continues, put in a new drum unit. (See Replacing the drum unit on page 102.)
- Page 187 ABCDEFGHIJKLMNOPQRSTUVWXYZ. 0123456789. abcdefghijklmnopqrstuvwxyz. ABCDEFGHIJKLMNOPQRSTUVWXYZ. 0123456789. abcdefghijklmnopqrstuvwxyz. ABCDEFGHIJKLMNOPQRSTUVWXYZ. 0123456789. abcdefghijklmnopqrstuvwxyz. ABCDEFGHIJKLMNOPQRSTUVWXYZ. 0123456789. abcdefghijklmnopqrstuvwxyz. http://solutions.brother.com/ to view our FAQs and troubleshooting tips. Put in a new drum unit. (See Replacing the drum unit on page 102.) Missing image at thin line ...
- Page 188 Troubleshooting Examples of poor print quality Recommendation Poor fixing Make sure that the media type setting in the driver matches the type of paper you are using. (See Type and size of paper on page 2.) Make sure that the two gray levers inside the back cover are in the up position. ABCDEFGHIJKLMNOPQRSTUVWXYZ.
-
Page 189: Solving Print Problems
Direct Print menu on the LCD. connected to the USB direct interface. Network problems For problems concerning using your machine on a Network, see the Network User's Guide. The latest Network User's Guide in PDF format is available by accessing the Brother Solutions Center (http://solutions.brother.com/). -
Page 190: Other Problems
2000: Click Start button, and select Settings and then Printers. ® ® For Windows 7 and Windows Server 2008 R2: Right-click the Brother HL-4570CDW (HL-4150CDN) Series icon and select Brother HL-4570CDW (HL-4150CDN) BR-Script3. ® ® ® For Windows 2000, Windows XP, Windows Vista ®... -
Page 191: Appendix
Appendix Machine specifications Note This chapter provides a summary of the machines’ specifications. For additional specifications, visit http://www.brother.com/ for details. Engine Model HL-4150CDN HL-4570CDW HL-4570CDWT Technology Electrophotographic Laser Printer (Single-pass) Single side Monochrome Up to 24 ppm (A4 Print speed... -
Page 192: Controller
Macintosh utility for printer and print server management. Install from the supplied CD-ROM. ® Brother original Windows utility for printer and print server management. Download from http://solutions.brother.com/. Server based management utility. Download from http://solutions.brother.com/. Printer and print server management through Web Based Management (Web browser). -
Page 193: Software
Utilities Driver Deployment Wizard For the latest driver updates, visit http://solutions.brother.com/. Download the printer driver for Linux from http://solutions.brother.com/. Depending on Linux distributions, the driver may not be available. ® The Driver Deployment Wizard automates the installation of printers in a peer-to-peer network (Windows... -
Page 194: Direct Print Feature
, JPEG, Exif+JPEG, PRN (created by HL-4150CDN or HL-4570CDW(T) printer driver) , TIFF(scanned by all Brother MFC or DCP models), XPS version 1.0 Data that includes a JBIG2 image file, JPEG2000 image file, or a transparency file is not supported. -
Page 195: Media Specifications
Appendix Media specifications Model HL-4150CDN HL-4570CDW HL-4570CDWT Media types Multi-purpose Tray Plain paper, Thin paper, Thick paper, Thicker paper, Recycled paper, Bond paper, Label, Envelopes, Env.Thin, Env.Thick, Glossy Paper Paper tray Plain paper, Thin Paper, Recycled paper (Standard) Lower tray unit (Option) Automatic duplex Plain paper, Thin Paper, Recycled paper, Glossy Paper... -
Page 196: Supplies
Appendix Supplies Model HL-4150CDN HL-4570CDW HL-4570CDWT Order No. Toner Cartridge Standard Black TN-310BK Approx. 2,500 pages A4/Letter pages Cyan, TN-310C, Approx. 1,500 pages A4/Letter pages Magenta, TN-310M, Yellow TN-310Y High Capacity Black TN-315BK Approx. 6,000 pages A4/Letter pages Cyan, TN-315C, Approx. -
Page 197: Dimensions / Weights
Appendix Dimensions / weights Model HL-4150CDN HL-4570CDW HL-4570CDWT Dimensions (W × D × H) 410 × 486 × 313 mm 410 × 495 × 446 mm (16.1 × 19.1 × 12.3 in.) (16.1 × 19.5 × 17.6 in.) Weights Approx. 21.0 kg (46.3 lb) Approx. -
Page 198: Computer Requirements
G4/G5 Operating ® Intel Core™ Processor System OS X 10.6.x 1 GB 2 GB ® Intel Core™ Processor ® ® Microsoft Internet Explorer 6.0 or greater. Third party USB ports are not supported. For the latest driver updates, visit http://solutions.brother.com/. -
Page 199: Important Information For Choosing Your Paper
Appendix Important information for choosing your paper This section gives information to help you choose paper to use with this machine. Note If you use paper that is not recommended, a paper jam or misfeed may occur in the machine. Before you buy a large quantity of paper Make sure that the paper is suitable for the machine. - Page 200 Appendix Print surface The characteristics of the face side and reverse side of a sheet of paper may vary a little. Usually, the opening side of the paper ream package is the print side. Follow the instructions on the paper package.
- Page 201 Appendix Paper size Paper size 8.5 × 11 in. Letter Legal 8.5 × 14 in. Executive 7.25 × 10.5 in. 210 × 297 mm 148 × 210 mm 210 × 148 mm A5 (Long Edge) 105 × 148 mm Envelope Monarch 3.875 ×...
-
Page 202: Symbol And Character Sets
Appendix Symbol and character sets For the HP LaserJet emulation modes, you can choose the symbol and character sets using a Web Based Management (Web browser) or the control panel buttons. How to use Web Based Management (Web browser) To use Web Based Management (Web browser), follow the steps below. Note ®... -
Page 203: Symbol And Character Sets List
Appendix Symbol and character sets list OCR symbol sets When you choose the OCR-A or OCR-B font, the matching symbol set is always used. OCR A (0O) OCR B (1O) HP LaserJet mode ABICOMP B/P (13P) ABICOMP INTL (14P) DESKTOP (7J) GREEK8 (8G) HP GERMAN (0G) HP SPANISH (1S) -
Page 204: Quick Reference For Bar Code Control Commands
Appendix Quick reference for bar code control commands The machine can print bar codes in the HP LaserJet emulation modes. Print bar codes or expanded characters Code ESC i 27 105 1B 69 Format: ESC i n ... n \ Creates bar codes or expanded characters according to the segment of parameters ‘n ... - Page 205 Appendix This parameter selects the bar code mode as shown above. When n is ‘t5’ or ‘T5’ the bar code mode (EAN 8, EAN 13, or UPC A) varies according to the number of characters in the data. Bar code, expanded character, line block drawing and box drawing n = ‘s0’...
- Page 206 Appendix Preset: Human readable line ON (1) ‘T5’ or ‘t5’ (2) ‘T6’ or ‘t6’ (3) ‘T130’ or ‘t130’ (4) ‘T131’ or ‘t131’ Preset: Human readable line OFF All others This parameter shows whether the machine prints the human readable line below the bar code. Human readable characters are always printed with OCR-B font of 10 pitch and all the current character style enhancements are masked.
-
Page 207: Expanded Character Rotation
Appendix Bar code, expanded character, line block drawing and box drawing offset in X-axis n = ‘xnnn’ or ‘Xnnn’ This parameter shows the offset from the left margin in the ‘u’- or ‘U’-specified unit. Bar code & expanded character offset in Y-axis n = ‘ynnn’... - Page 208 Appendix When CODE 39 is chosen with the parameter ‘t0’ or ‘T0’ Forty three characters ‘0’ to ‘9’, ‘A’ to ‘Z’, ‘-’, ‘ . ’, ‘ (space)’, ‘$’, ‘ / ’, ‘+’, and ‘%’ can be accepted as bar code data.
-
Page 209: Box Drawing
Appendix When Code 128 Set A, Set B, or Set C is selected with the parameter ‘t12’ or ‘T12’, ‘t13’ or ‘T13’, or ‘t14’ or ‘T14’ Code 128 sets A, B and C can be individually selected. Set A shows characters Hex 00 to 5F. Set B includes characters Hex 20 to 7F. - Page 210 Appendix No. Code 128 Set C Input command No. Code 128 Set C Input command 0x00 0x34 0x01 0x35 0x02 0x36 0x03 0x37 0x04 0x38 0x05 0x39 0x06 0x3a 0x07 0x3b 0x08 < 0x3c 0x09 0x3d 0x0a > 0x3e 0x0b 0x3f 0x0c 0x40...
-
Page 211: Example Program Listings
Appendix Example Program Listings WIDTH "LPT1:",255 'CODE 39 LPRINT CHR$(27);"it0r1s0o0x00y00bCODE39?\"; 'Interleaved 2 of 5 LPRINT CHR$(27);"it1r1s0o0x00y20b123456?\"; 'FIM LPRINT CHR$(27);"it3r1o0x00y40bA\"; 'Post Net LPRINT CHR$(27);"it4r1o0x00y60b1234567890?\"; 'EAN-8 LPRINT CHR$(27);"it5r1o0x00y70b1234567?\"; 'UPC-A LPRINT CHR$(27);"it5r1o0x50y70b12345678901?\"; 'EAN-13 LPRINT CHR$(27);"it5r1o0x100y70b123456789012?\"; 'UPC-E LPRINT CHR$(27);"it6r1o0x150y70b0123456?\"; 'Codabar LPRINT CHR$(27);"it9r1s0o0x00y100bA123456A\"; 'Code 128 set A LPRINT CHR$(27);"it12r1o0x00y120bCODE128A12345?\";... -
Page 212: B Appendix (For Europe And Other Countries)
Frequently asked questions (FAQs) The Brother Solutions Center is our one-stop resource for all your machine needs. You can download the latest drivers, software and utilities, read FAQs and troubleshooting tips to learn how to get the most from your Brother product. -
Page 213: C Appendix (For Usa And Canada)
FAQs (frequently asked questions) The Brother Solutions Center is our one-stop resource for all your machine needs. You can download the latest software and utilities and read FAQs and troubleshooting tips to learn how to get the most from your Brother product. - Page 214 - Marketing Dept. 1, rue Hotel de Ville Dollard-des-Ormeaux, PQ, Canada H9B 3H6 Service center locator (USA only) For the location of a Brother authorized service center, call 1-877-BROTHER (1-877-276-8437), or visit us on-line at http://www.brother-usa.com/service/. Service center locations (Canada only)
- Page 215 Visa, MasterCard, Discover, or American Express credit card, you can order supplies directly from Brother. (You can visit us online for a complete selection of the Brother accessories and supplies that are available for purchase.) Note In Canada only Visa and MasterCard are accepted.
- Page 216 Back light ..............67 Bar code control ............181 Belt unit ..............106 General Setup ............73 Brother Numbers (Europe and other countries) ..189 Go button ..............64 Brother Numbers (USA/Canada) ... 190 BR-Script3 ..............43 BR-Script3 ............... 167 Interface ..............
- Page 217 Index Network connectivity ..........169 Unprintable area ............8 Network menu .............76 USB direct interface ..........23 Network software ............62 USB flash memory drive ........23 Utilities ........... 170 Paper ..............2 recommended ............2 Waste toner box ............110 size ................2 Watermark ...........
Need help?
Do you have a question about the HL-4150CDN and is the answer not in the manual?
Questions and answers