Table of Contents
Advertisement
Quick Links
Advertisement
Table of Contents

Related Manuals for Olivetti Fax-Lab 220


Summary of Contents for Olivetti Fax-Lab 220
- Page 1 Ink Jet Fax Fax-Lab 220/270 Instructions...
- Page 2 PUBLISHED BY: Editors: Olivetti I- Jet S.p.A. Olivetti Tecnost, S.p.A. Località Le Vieux Direzione @ Home/Office 11020 ARNAD (Italy) Via Jervis, 77 - 10015 IVREA (Italy) Copyright © 2003, Olivetti All rights reserved The manufacturer reserves the right to make any changes to the machine described in this manual, at any time, and without prior warning.
- Page 3 UICK GUIDE This chapter contains a simplified description of the installation, transmission, reception and copying procedures. For more detailed instructions, see the relevant sections. NSTALLATION For further details, see the "Operations essential for correct operation" chapter. 1 2 3 4 5 6 7 8 9 0 1 2 3 4 5 6 7 8 9 0 1 2 3 4 5 6 7 8 9 0 1 2 1 2 3 4 5 6 7 8 9 0 1 2 3 4 5 6 7 8 9 0 1 2 3 4 5 6 7 8 9 0 1 2 1 2 3 4 5 6 7 8 1 2 3 4 5 6 7 8 9 0 1 2 3 4 5 6 7 8 9 0 1 2 3 4 5 6 7 8 9 0 1 2 1 2 3 4 5 6 7 8 9 0 1 2 3 4 5 6 7 8 9 0 1 2 3 4 5 6 7 8 9 0 1 2 1 2 3 4 5 6 7 8 1 2 3 4 5 6 7 8 9 0 1 2 3 4 5 6 7 8 9 0 1 2 3 4 5 6 7 8 9 0 1 2 1 2 3 4 5 6 7 8 9 0 1 2 3 4 5 6 7 8 9 0 1 2 3 4 5 6 7 8 9 0 1 2 1 2 3 4 5 6 7 8 Connect the fax machine to the telephone line...
- Page 4 UICK GUIDE RANSMISSION For further details, see "To send a document" in the "Basic transmission and reception operations" chapter. 1 2 3 4 5 6 7 8 9 0 1 2 3 4 5 6 7 8 9 0 1 2 3 4 5 6 7 8 9 0 1 2 1 2 3 4 5 6 7 8 9 0 1 2 3 4 5 6 7 8 9 0 1 2 3 4 5 6 7 8 9 0 1 2 1 2 3 4 1 2 3 4 5 6 7 8 9 0 1 2 3 4 5 6 7 8 9 0 1 2 3 4 5 6 7 8 9 0 1 2 1 2 3 4 5 6 7 8 9 0 1 2 3 4 5 6 7 8 9 0 1 2 3 4 5 6 7 8 9 0 1 2 1 2 3 4 1 2 3 4 5 6 7 8 9 0 1 2 3 4 5 6 7 8 9 0 1 2 3 4 5 6 7 8 9 0 1 2 1 2 3 4 5 6 7 8 9 0 1 2 3 4 5 6 7 8 9 0 1 2 3 4 5 6 7 8 9 0 1 2 1 2 3 4 1 2 3 4 5 6 7 8 9 0 1 2 3 4 5 6 7 8 9 0 1 2 3 4 5 6 7 8 9 0 1 2 1 2 3 4 5 6 7 8 9 0 1 2 3 4 5 6 7 8 9 0 1 2 3 4 5 6 7 8 9 0 1 2 1 2 3 4...
-
Page 5: Table Of Contents
ABLE OF CONTENTS INTRODUCTION THE TELEPHONE ANSWERING DEVICE CONSULTING THE MANUAL ............1 THE TAD CONSOLE ..............24 ENVIRONMENTAL RECYCLING ........... 1 TO CHANGE OR DELETE THE TAD ACCESS CODE ....24 OPERATING PRECAUTIONS ............1 OUTGOING MESSAGES AND MEMOS ........25 INSTALLATION PRECAUTIONS ........... -
Page 7: Introduction
NTRODUCTION ONSULTING THE MANUAL ACKAGE CONTENTS This manual describes two models of fax machine: the base model In addition to the fax machine and this manual, you will find the follow- and the model with a built-in telephone answering device. In the ing elements in the package: description that follows, whenever a distinction is to be made between models, the following indications will be given: "Model with a built-... -
Page 8: Operations Essential For Correct Operation
PERATIONS ESSENTIAL FOR CORRECT OPERATION O CONNECT IT TO THE TELEPHONE LINE ONNECTING THE EXTERNAL ANSWERING MACHINE BASE MODEL AND EMERGENCY TELEPHONE As the connection to the telephone line of the fax machine, ex- (Case 1 connection) ternal answering machine (base model), emergency telephone or other devices is regulated by national standards that vary 1. - Page 9 CONNECTION ALL SOCKETS FOR CONNECTION TO TELEPHONE LINE Connection sockets MERGENCY TELEPHONE OR EXTERNAL ANSWERING MACHINE BASE MODEL CONNECTION GERMANY ALL SOCKETS FOR CONNECTION TO TELEPHONE LINE Connection sockets MERGENCY TELEPHONE OR EXTERNAL ANSWERING MACHINE BASE MODEL THER DEVICES CONNECTION AUSTRIA ALL SOCKETS FOR CONNECTION TO TELEPHONE LINE Connection sockets...
-
Page 10: To Connect The Telephone Handset
O CONNECT THE TELEPHONE HANDSET To confirm the setting. The display shows a country of des- tination. For example: To select the desired country. For example: If your country is not present among those shown on the display, see the table below: COUNTRY COUNTRY TO BE SELECTED Argentina... -
Page 11: To Set The Date And Time
Having set the language and the country, the following messages will O ADD PAPER appear on the display: or, in the models with built-in telephone answering device, the total number of messages received, in this case,"00". and alternating on the lower line: O SET THE DATE AND TIME The first time you connect the fax machine to the power supply or whenever there is a power failure you must set... -
Page 12: To Install The Print Head
O INSTALL THE PRINT HEAD UTOMATIC PRINT HEAD NOZZLE CLEANING AND TESTING PROCEDURE The print head provided with the machine allows you to print up to 80 pages*, whereas the spare print heads, with a greater Once the print head has been inserted, the fax machine starts capacity, allow you to print up to 450 pages*. -
Page 13: To Change The Date And Time
Now enter the fax number as indicated below: O CHANGE THE DATE AND TIME If the date and time shown on the display are not correct, O SET YOUR FAX NUMBER you can change them at any time. Until the display shows: The display shows: To confirm the setting. -
Page 14: To Set It Up For The Telephone Line
To view the other available option: O SET IT UP FOR THE TELEPHONE LINE The display shows: O CONNECT IT TO A PUBLIC LINE The fax machine is set up to be connected to a public line. In To view the other dialling mode: any case, it is a good idea to check that: •... -
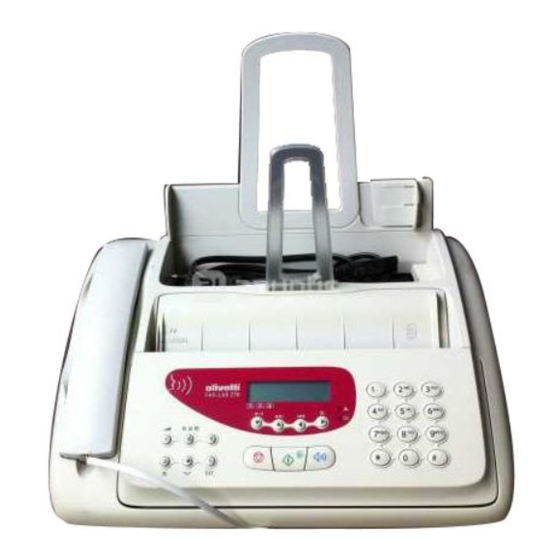
Page 15: Components
OMPONENTS The figure shows the external and internal parts common to the two fax machine models. The first row of keys illustrated in the central part of the console refers exclusively to the model with a built-in telephone answering device. Plain paper feed compartment (ASF) Adjustable to the following paper sizes: A4, Letter and Legal. -
Page 16: Console
ONSOLE The figure shows the operator console of the model with a built-in TAD. The keys of the base model that differ from the model with TAD are described one by one. • Adjusts the resolution of the documents to be sent and copied (only with the document in- serted in the ADF). - Page 17 Used to dial a telephone or fax number without • Unloads a document from the ADF. Display lifting the telephone handset. A two-line liquid crystal display • Turns off the " " LED indicator. with a capacity of 16 characters ODELS WITH A BUILT IN TAD ONLY •...
-
Page 18: Basic Transmission And Reception Operations
ASIC TRANSMISSION AND RECEPTION OPERATIONS Now that your fax machine has a name and number, you can O PLACE THE DOCUMENT IN THE ADF use it to: • send documents (also in broadcast mode, from the memory, or by polling) •... - Page 19 O REGULATE THE RESOLUTION O HEAR THE DIALLING TONE WHEN SENDING A DOCUMENT Until the desired resolution value appears on the display. Place the document in the ADF. The display shows on the top line: The resolution should be regulated on the basis of the following criteria: and on the bottom line, the default contrast value: NOR- •...
- Page 20 UTOMATIC REDIAL O SEND A DOCUMENT AT A PRESET TIME BROADCAST TRANSMISSION If no connection is established due to line errors or because the This function enables you to solve time zone problems if correspondent's number is busy, the fax machine automatically your correspondent is located thousands of kilometres away redials the number up to three times.
- Page 21 Enter the time at which you want to send the document , for The display shows: exemple "16:50", then press the key or press the If you want to delete the transmission set, press the key straight away to confirm the current time. The |/} keys: the display shows the message "CANCEL SET- display shows: TING?", then press...
-
Page 22: To Receive A Document
From this point on, proceed as indicated in the last three The fax machine starts to receive and the display shows steps of the procedure in "To send a document from the some information about the reception in progress, including memory". - Page 23 Until the display shows: The display shows: The display shows: Dial the code with which you want to associate the fax number (for exemple, ). The display shows: Press the numeric key to which you want to assign the From here on, follow the one-touch dialling procedure telephone number or the fax number (for example, starting from the steps in which the number and name of the The display shows:...
-
Page 24: To Print Reports And Lists
Press the desired numeric key, for example for more O SEND A DOCUMENT BY RECALLING ONE OF THE LAST than one second. The display shows the digits of the fax INCOMING NUMBERS OR ONE OF THE LAST NUMBERS number that you associated with it. If the name has also CALLED been saved, the display shows the latter. - Page 25 • Last broadcast transmission report: contains information about FAILED TX REPORT - the fax machine will automatically the last broadcast transmission and may be printed, once print a report only after each failed transmission. programmed, always and automatically after each broad- TX REPORT:ALWAYS - the fax machine will automatically cast transmission or on request at the desired moment.
- Page 26 O PRINT THE TRANSMISSION ACTIVITY BROADCAST O PRINT THE SETUP PARAMETERS AND THE ONE TOUCH TRANSMISSION AND CALLER ID REPORTS ON REQUEST DIALLING AND SPEED DIALLING SETTINGS Until the display shows: Until the display shows: The display shows: The display shows: Until the display shows: To view the other available options: "LAST BROAD.
-
Page 27: To Make A Call
O MAKE A CALL When you engage the line by lifting the telephone handset, you O TELEPHONE WITH SPEED DIALLING may use all the telephone functions available on ordinary telephones sold on the market. These also include the R function (REGISTER RECALL, activated Do not place the document in the ADF. -
Page 28: To Redial One Of The Last 20 Incoming Numbers Or One Of The Last 10 Outgoing Numbers
O REDIAL ONE OF THE LAST INCOMING NUMBERS OR ONE OF THE LAST OUTGOING NUMBERS Do not place the document in the ADF. Lift the handset to engage the line or press the key to activate the handsfree function. The display shows: And the length of the call in minutes and seconds in the top right-hand corner. -
Page 29: To Make A Copy
O MAKE A COPY HAT DOCUMENTS CAN BE COPIED To confirm your choice. The display shows the values that you have just selected. At this point, simply choose the reso- lution you want and set the number of copies you want to Before making a copy, make sure that the document respects the make: characteristics described in "What documents may be used",... -
Page 30: The Telephone Answering Device
HE TELEPHONE ANSWERING DEVICE If you have purchased the model of fax equipped with an integrated To start recording "MEMOS" (personal memos). telephone answering device you can perform the same functions as those performed by external telephone answering devices. To move, while playing messages and memos, to the start You can therefore: of the next message or memo. -
Page 31: Outgoing Messages And Memos
• MEMOS (Voice), which have a length that may be pro- Enter the new code, for example, "0001" to change the grammed to 30 or 60 seconds, for personal memos. This mes- current one and then press the key or press the sage is never played when an incoming call is received. -
Page 32: Messages
When it gets to the end of the message, the fax machine O SET THE LENGTH OF MEMOS AND automatically prepares to record a new OUTGOING MES- SAGE 1. In this case, if you like, you can change or replace INCOMING MESSAGES the message recorded previously by repeating the record- ing procedure. -
Page 33: To Delete Messages And Memos You Have
O DELETE MESSAGES AND MEMOS YOU HAVE O TRANSFER MESSAGES AND MEMOS TO A ALREADY LISTENED TO REMOTE TELEPHONE If you wish, you can program the TAD to call you on a You cannot delete a message or a memo until you have started remote telephone at a given time to let you listen to any listening to it. -
Page 34: Telephone
O OPERATE THE TELEPHONE ANSWERING PECIAL FUNCTIONS OF THE TELEPHONE DEVICE FROM A REMOTE LOCATION ANSWERING DEVICE You can operate the TAD not only directly using specific keys on the You can set up the TAD for the following special functions: operator console of the fax machine, but also from any other location •... -
Page 35: To Print The Tad Configuration Parameters
O PRINT THE TAD CONFIGURATION UTGOING MESSAGE ONLY PARAMETERS Using this function, whenever an incoming call is received, the TAD plays the OGM 1 but does not record any incoming messages. Until the display shows: You can use this function when you expect to be away for a long time and it would not be possible to record all mes- sages received in your absence. -
Page 36: More Sophisticated Operations
ORE SOPHISTICATED OPERATIONS N O T E THER USEFUL RECEPTION SETTINGS If you choose the "SURPLUS:AUTO" setting, the fax ma- chine will print the surplus text on another sheet providing the surplus exceeds 12 mm. O REDUCE THE PRINTING AREA OF A DOCUMENT RECEIVED If you choose the "SURPLUS:ON"... - Page 37 O DISPLAY THE CALLER ID O CHANGE THE NUMBER OF RINGS This function is only enabled in some countries. This function, which may be activated by the telephone company on request by the user, is only available in some countries and conforms to the ETSI ETS 300 If set in "PHONE/FAX"...
- Page 38 O CHANGE THE LENGTH OF THE ACOUSTIC SIGNAL O ENABLE DISABLE RECOGNITION OF THE RING FREQUENCY This function is only enabled in some countries. In some countries, local telephone companies offer the pos- When the fax machine is set up for automatic reception sibility of assigning the same telephone line two or with recognition of the type of call, it behaves as more numbers, corresponding to different users.
-
Page 39: Other Useful Transmission Settings
THER USEFUL TRANSMISSION SETTINGS O CHANGE THE REMOTE CONTROL CODE If the fax machine is connected to an extension that oper- ates in tone dialling mode and is set up for manual O CHANGE THE POSITION OF YOUR NAME AND FAX reception, whenever there is a call from a correspondent NUMBER wishing to send you a document, you can set it to receive... - Page 40 O REDUCE THE TRANSMISSION SPEED O HEAR THE LINE SIGNALS The fax machine transmits regularly at a speed of 14400 The fax machine is set up so that you can hear the dialling bps (bits per second). A transmission speed of 9600 or tones during the dialling phases as well as the connec- 4800 bps is recommended on disturbed telephone lines.
-
Page 41: Sending/Receiving A Document In Polling Mode
ENDING RECEIVING A DOCUMENT IN O CHANGE DELETE A POLLING RECEPTION THAT HAS BEEN SET POLLING MODE Until the display shows: IRST OF ALL WHAT POLLING IS It is a transmission request that a fax machine makes to another fax The display shows: machine so that the latter sends the document requested automati- cally. -
Page 42: Troubleshooting Guide
ROUBLESHOOTING GUIDE OR MINOR PROBLEMS HAT HAPPENS IF THERE IS A POWER FAILURE If there is a power failure, the fax machine keeps the follow- The list below may be used as a guide to the solution of minor prob- lems. -
Page 43: Error Codes
RROR CODES The error codes printed both on the transmission report and the activity report consist of two digits indicating the cause of the error. To save space, the two-digit code without any message is printed on the activity report. CODE MESSAGE CAUSE OF ERROR... -
Page 44: Signals And Messages
IGNALS AND MESSAGES • You aborted the copy operation by pressing the key. Any problems that may arise are generally indicated by acoustic • An error occurred during the document copying phase, prevent- signals (accompanied, in some cases, by visual signals: error ing it from being printed: check the type of fault on the display and LED "... - Page 45 Reception continues in the memory because an error occurred dur- You have set transmission from the memory. ing the reception of a document, preventing it from being printed: check the type of fault on the lower line of the display and correct it. You have installed a disposable print head for the first time or you have removed and reinstalled it: select the relevant answer.
-
Page 46: Maintenance Operations
AINTENANCE OPERATIONS n o t e O REPLACE THE PRINT HEAD If you have replaced the print head because the ink ran out, when the print head compartment cover and the opera- tor console are closed, the fax machine will automatically recognize that the print head has been replaced and the display will show the message "NEW PRINT HEAD? 1 = YES, 0 = NO". -
Page 47: Print Head
N O T E 1. Open the operator console, as indicated by the arrow. 2. Lift the print head compartment cover using the lever, as shown in The procedure may be aborted at any time, if desired, by the figure. 3. -
Page 48: To Remove Jammed Documents
O REMOVE JAMMED DOCUMENTS During transmission or copying, a document could get jammed (this condition is signalled by the display showing the message: "RE- MOVE DOCUMENT, PRESS "). Try to unload the document by pressing the key. If the docu- ment is not unloaded, remove it manually as follows: 1. -
Page 49: Technical Data
ECHNICAL DATA ENERAL CHARACTERISTICS ECEPTION CHARACTERISTICS Model ......Desktop transceiver Printing system ..... Printing on plain paper, bubble ink jet printer Display ......LCD 16 + 16 char. Max. printing width ......... 204 mm Capacity memory ..19 pages (*) Printing paper ......... - Page 51 Monochrome print head part number Single-block print head: P/N B0336F...
- Page 52 255881V...
Need help?
Do you have a question about the Fax-Lab 220 and is the answer not in the manual?
Questions and answers