Table of Contents
Advertisement
Quick Links
Advertisement
Table of Contents

Related Manuals for Olivetti Fax-Lab 470


Summary of Contents for Olivetti Fax-Lab 470
- Page 1 Ink Jet Fax Fax-Lab 470 INSTRUCTIONS...
- Page 2 Printed in Thailand. EDITED/PUBLISHED/PRODUCED BY: Code of user manual: 256652P Olivetti, S.p.A. con unico azionista Gruppo Telecom Italia Date of publication: July 2005. Direzione e coordinamento di Telecom Italia S.p.A. Copyright © 2005, Olivetti All rights reserved. No parts of this manual may be photocopied, reproduced or translated into other languages without prior written authorization from Olivetti S.p.A.
- Page 3 HORT GUIDE This chapter contains a simplified description of the installation, transmission, reception and copying procedures. For more detailed instructions, see the relevant sections. NSTALLATION For further details, see the “Delivery contents, connecting up and first-time operation” chapter. 1 2 3 4 5 6 7 8 9 0 1 2 3 4 5 6 7 8 9 0 1 2 3 4 5 6 7 8 9 0 1 2 1 2 3 4 5 6 7 8 9 0 1 2 3 4 5 6 7 8 9 0 1 2 3 4 5 6 7 8 9 0 1 2 1 2 3 4 5 6 7 8 1 2 3 4 5 6 7 8 9 0 1 2 3 4 5 6 7 8 9 0 1 2 3 4 5 6 7 8 9 0 1 2 1 2 3 4 5 6 7 8 9 0 1 2 3 4 5 6 7 8 9 0 1 2 3 4 5 6 7 8 9 0 1 2 1 2 3 4 5 6 7 8 1 2 3 4 5 6 7 8 9 0 1 2 3 4 5 6 7 8 9 0 1 2 3 4 5 6 7 8 9 0 1 2 1 2 3 4 5 6 7 8 9 0 1 2 3 4 5 6 7 8 9 0 1 2 3 4 5 6 7 8 9 0 1 2 1 2 3 4 5 6 7 8 Connect the fax machine to the telephone line...
- Page 4 HORT GUIDE RANSMITTING For further details, see “Transmitting a document” in the “Basic transmission and reception operations” chapter. 1 2 3 4 5 6 7 8 9 0 1 2 3 4 5 6 7 8 9 0 1 2 3 4 5 6 7 8 9 0 1 2 1 2 3 4 5 6 7 8 9 0 1 2 3 4 5 6 7 8 9 0 1 2 3 4 5 6 7 8 9 0 1 2 1 2 3 4 1 2 3 4 5 6 7 8 9 0 1 2 3 4 5 6 7 8 9 0 1 2 3 4 5 6 7 8 9 0 1 2 1 2 3 4 5 6 7 8 9 0 1 2 3 4 5 6 7 8 9 0 1 2 3 4 5 6 7 8 9 0 1 2 1 2 3 4 1 2 3 4 5 6 7 8 9 0 1 2 3 4 5 6 7 8 9 0 1 2 3 4 5 6 7 8 9 0 1 2 1 2 3 4 5 6 7 8 9 0 1 2 3 4 5 6 7 8 9 0 1 2 3 4 5 6 7 8 9 0 1 2 1 2 3 4 1 2 3 4 5 6 7 8 9 0 1 2 3 4 5 6 7 8 9 0 1 2 3 4 5 6 7 8 9 0 1 2 1 2 3 4 5 6 7 8 9 0 1 2 3 4 5 6 7 8 9 0 1 2 3 4 5 6 7 8 9 0 1 2 1 2 3 4...
-
Page 5: Table Of Contents
ONTENTS ESSENTIAL SAFETY NOTES MAKING A COPY RISK OF ELECTRIC SHOCK ............1 WHAT DOCUMENTS CAN BE COPIED ........26 RISK OF SUFFOCATION .............. 1 COPYING ..................26 RISK OF FIRE ................1 THE TELEPHONE ANSWERING DEVICE (TAD) RISK OF ACCIDENT ..............1 THE TAD CONSOLE .............. - Page 6 ONTENTS MANUFACTURER AND SERVICE DISPOSAL TECHNICAL DATA INDEX...
-
Page 7: Essential Safety Notes
SSENTIAL SAFETY NOTES ISK OF ELECTRIC SHOCK TTENTION • Never attempt to repair the fax machine yourself. If you remove Observe the following notes. Otherwise the fax machine may be the outer casing, you could receive an electric shock or suffer some damaged: other kind of injury. -
Page 8: Package Contents
ELIVERY CONTENTS CONNECTING UP AND FIRST TIME OPERATION ACKAGE CONTENTS ONNECTING FAX MACHINE 1. Lay the fax machine on its right side. In addition to the fax machine and this manual, you will find the following 2. Insert one end of the telephone line cable into the “LINE” socket parts in the package: on the base of the fax machine (see example). -
Page 9: Connecting Handset
ONNECTING HANDSET AKING IMPORTANT PREDETERMINED SETTINGS For the fax machine to work properly, set your language and your country. Once the fax is connected to the mains, it automatically runs a short function test to check that its components are working and the language in which the messages will appear is shown on the display. -
Page 10: Entering The Date And Time
NTERING THE DATE AND TIME COUNTRY COUNTRY TO BE SELECTED Argentina AMERICA LATINA You must enter the date and time Australia NZL/AUSTRALIA - when you connect the fax machine for the first time to Austria ÖSTERREICH the mains Belgium BELGIUM - after every power failure. -
Page 11: Inserting Paper
N O T E 10. To confirm the setting, press the key: When refilling the ASF, place new sheets under and not on top of sheets already present. The date and time setting procedure has been completed. The new date and time will be updated automatically and will be printed on each page sent. -
Page 12: Installing The Print Head
NSTALLING THE PRINT HEAD EACTIVATING THE PRINT HEAD AND TESTING THE NOZZLES The print head provided with the machine allows you to print up to 80 pages*, whereas replacement print heads with a greater capacity Once the print head has been inserted, the fax machine starts the print allow you to print up to 450 pages*. -
Page 13: Entering Name And Fax Number
NTERING YOUR FAX NUMBER NTERING NAME AND FAX NUMBER 1. Press the key: Name (max. 16 letters) and number (max. 20 digits) will remain unchanged until they are intentionally changed and will be printed on each page received by your The display shows: correspondent’s fax machine. -
Page 14: Setting Up For Line Characteristics
ETTING UP FOR LINE CHARACTERISTICS 1. Press the key until the display shows: ONNECTING TO A PUBLIC LINE 2. Press the key: The fax machine is already set up to be connected to a public line. Check, however, the following points: The display shows: •... - Page 15 N O T E Having confirmed the dialling mode to be used by the fax machine to connect to the public line, simply press the key, before dialling the correspondent’s fax or telephone number, to gain access to it. An “E” appears on the display.
-
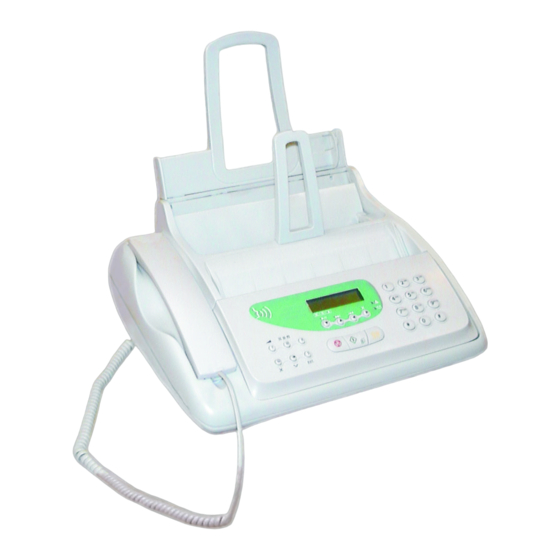
Page 16: Components
OMPONENTS The figure shows the external and internal parts of the fax machine. Plain paper automatic sheet feeder (ASF) Adjustable to the following paper sizes: A4, Letter and Legal. Maximum capacity: 100 sheets (80gr/m Paper support Connection sockets Paper adjusting lever (see base) Document support Received or copied document... -
Page 17: Console
ONSOLE • Adjusts the resolution of the documents to be sent and copied (only with the document inserted in the ADF). • Puts the line on hold during a telephone conversation (with the handset off the hook). • Dials the fax or telephone number. •... - Page 18 Unloads a document from the ADF. • Display A two-line liquid crystal display • Turns off the “ ” LED indicator. with a capacity of 16 characters Used to dial a telephone or fax number without • • Returns the fax machine to the stand-by mode. per line.
-
Page 19: Basic Transmission And Reception Operations
ASIC TRANSMISSION AND RECEPTION OPERATIONS Now that your fax machine has a name and number, it is ready to LACE THE DOCUMENT IN THE ADF operate and be used for the following functions: • Transmitting documents (also in broadcast mode, from the memory, or by polling) •... - Page 20 N o t e 7. To return the fax machine to the stand-by mode, press the key: If you want you can dial the recipient’s number using the quick dialling procedures, see “Setting one-touch and speed dialling”, “Sending with one-touch dialling” and “Sending with speed dialling”. Choose the type of contrast on the basis of the following criteria: Note •...
- Page 21 2. Lift the handset to engage the line. 6. Confirm the entry or the already existing code. Press the key: The display shows: The display shows: and the length of the transmission in minutes and seconds in the top right-hand corner. 3.
- Page 22 3. Press the key: 3. Press the key: The display shows: The display shows: If you want to delete the previously set up transmission setting, press the keys |/}. The message “CANCEL Enter the time at which you want to transmit the document. SETTING?”...
- Page 23 N o t e RANSMITTING A DOCUMENT FROM THE MEMORY If there is a power failure, the transmission from the memory will be cancelled. 1. Place the original document in the ADF. The display shows on the top line: ROGRAMMED TRANSMISSION FROM THE MEMORY CHANGING REPEATING OR DELETING and on the bottom line, the default contrast value: NORMAL.
-
Page 24: Receiving A Document
3. then hang up. ECEIVING A DOCUMENT The fax machine starts receiving. The display shows some You can set up the fax machine in four separate reception modes: information about the reception in progress, including your • Manual reception . For all occasions in which the user is present correspondent’s fax number or, if programmed, his name. -
Page 25: Delivery Contents, Connecting Up And First-Time Operation
3. Press the key 14. To confirm the entry, press the key: until the display shows: The display shows: 4. Press the key: You can terminate the procedure at this point or program another one-touch dialling key. The display shows: 15. - Page 26 ENDING WITH SPEED DIALING HANGING A ONE TOUCH DIALLING KEY OR SPEED DIALLING CODE 1. Place the original document in the ADF. The display shows on the top line: 1. Follow the one-touch dialling or speed dialling procedure until the display shows: and on the bottom line, the default contrast value: NORMAL.
-
Page 27: Printing Reports And Lists
• Last transmission report: contains information about the last RANSMITTING A DOCUMENT BY RECALLING ONE OF transmission and can be printed, once programmed, always and automatically after each transmission or on request at the desired THE LAST INCOMING NUMBERS OR ONE OF moment. - Page 28 NABLING AND DISABLING AUTOMATIC PRINTING OF 4. Press the key TRANSMISSION AND FAILED TRANSMISSION REPORTS until the display shows: 1. Press the key 5. To select the “BROADC. REP.:OFF” option, press the key: until the display shows: 6. To confirm the selection, press the key: 2.
- Page 29 n o t e 2. Press the key: If you chose “PRINT: INSTALL” or “PRINT:BLACK LIST”, when the fax The display shows: machine has finished printing, it returns automatically to the stand-by mode. If you have chosen “MENU EXIT”, press the key to return the You can choose the following options: “LAST BROAD.REP.”, “ACTIVITY REPORT”, “PRINT: ID LIST”...
-
Page 30: Making A Call
AKING A CALL When you engage the line by lifting the telephone handset, you CASE 2 may use all the telephone functions available on ordinary telephones Do not place the original document in the ADF. sold on the market. 1. Lift the handset to engage the line. These also include the R function (REGISTER RECALL, activated by pressing the key) which provides access to the special services... -
Page 31: Telephoning With The Help Of The Phone Book
ELEPHONING WITH THE HELP OF THE EDIALLING ONE OF THE LAST PHONE BOOK INCOMING NUMBERS OR ONE OF THE LAST OUTGOING NUMBERS Do not place the original document in the ADF. 1. Lift the handset to engage the line. Do not place the original document in the ADF. 1. -
Page 32: Making A Copy
AKING A COPY 9. To display the other two types of contrast available: HAT DOCUMENTS CAN BE COPIED “CONTRAST: LIGHT” or “CONTRAST: DARK”, press the key: Before making a copy, make sure that the document respects the characteristics described in “What documents may be used”, section 10. -
Page 33: The Telephone Answering Device (Tad)
HE TELEPHONE ANSWERING DEVICE The fax machine is equipped with an integrated telephone answering This key starts recording a memo. device which performs the same functions as those performed by Press the key to move, while playing messages and memos, external telephone answering devices. -
Page 34: Outgoing Messages And Memos
4. Press the key: UTGOING MESSAGES AND MEMOS The display shows the default code “1234”: You can record several different types of outgoing messages: • OGM 1, which has a maximum length of 20 seconds, prompts the caller to leave a message on the TAD. For example: “You have called the telephone number ... - Page 35 6. To start recording the outgoing message, press the key: 5. To return the fax machine to the stand-by mode, press the key: The display shows: ECORDING OUTGOING MESSAGE You have 20 seconds (counted on the display from 19 to 00) to record your outgoing message.
-
Page 36: Setting The Length Of Memos
O RECORD MEMOS LAYING INCOMING MESSAGES AND MEMOS As mentioned previously, the telephone answering device If there is one or more incoming messages in the TAD may be used to record one or more memos, which are memory that have not yet been played back, the handled in the same way as incoming messages. -
Page 37: Transferring Incoming Messages And Memos To A Remote Telephone
2. To delete the messages you are currently listening to, press 4. Press the key: the key: The display shows: The TAD moves to the next message and the display shows: 5. To select the other “FORWARD.ONE TIME” or “FORWARD.DAILY” options, press the key: 3. -
Page 38: Operating The Tad From A Remote Location
PERATING THE TAD FROM A REMOTE PECIAL TAD FUNCTIONS LOCATION You can set up the TAD for the following special functions: • TOLL SAVER You can operate the TAD not only directly using specific keys on the • ANNOUNCE ONLY fax machine console, but also from any other location. -
Page 39: Printing The Tad Configuration Parameters
UTGOING MESSAGE ONLY ILENT RECEPTION OF INCOMING MESSAGES Using this function, whenever an incoming call is received, When this function is enabled, you can receive messages the TAD plays outgoing message 1 but does not record any confidentially. In other words, the TAD receives messages incoming messages. -
Page 40: More Sophisticated Operations
ORE SOPHISTICATED OPERATIONS 4. Press the key THER USEFUL RECEPTION SETTINGS until the display shows: RINTING AREA FOR A RECEIVED DOCUMENT You can choose one of the other available settings: REDUCING “SURPLUS:OFF” or “SURPLUS:ON”. 5. To do so, press the key: 1. - Page 41 4. Press the key 4. Press the key until the display shows: until the display shows: You can choose the following options: “SILENT 5. To select the “CALLER ID: OFF” option, press the key: RX:ALWAYS” or “SILENT RX: DAILY”. 5. To do so, press the key: 6.
- Page 42 3. Press the key: 4. Press the key Until the display shows: The display shows: 5. Press the key 4. Press the key until the display shows: until the display shows: 6. To confirm the selection, press the key: You can choose from three further options: “RING VOLUME:LOW”, “RING VOLUME:MED”, and “RING The display shows: VOLUME:OFF”.
- Page 43 HANGING THE SILENCE LAPSE 5. Press the key: This function is only enabled in some countries. The display shows the code you set previously, for example: If the TAD has a shorter silence lapse set up as the fax machine,the latter can never automatically go to Reception, since the TAD occupies the line first.
-
Page 44: Other Useful Transmission Settings
THER USEFUL TRANSMISSION SETTINGS NABLING OR DISABLING NEW DOCUMENT TRANSMISSION FROM MEMORY HANGING POSITION OF NAME AND FAX NUMBER 1. Press the key The information in the heading of the document to be sent until the display shows: (name/logo, fax number, date and time and number of pages) may be received by your correspondent’s fax machine outside the text area or inside the text area. - Page 45 ETTING LOUDSPEAKER VOLUME OWERING TRANSMISSION SPEED If the volume of the dialling tones and connection signals is The fax machine normally transmits at a speed of 14400 bps (bits per second). A transmission speed of too low or too high, regulate it using the key.
-
Page 46: Transmitting And Receiving In Polling Mode
4. Press the key 4. To confirm the entry or the current time, press the key: until the display shows: The display shows: 5. To display the other “ECM:OFF” option, press the key: Dial the correspondent’s number using any of the available 6. - Page 47 REPARING THE DOCUMENT FOR TRANSMISSION POLLING TRANSMISSION 1. Place the original document in the ADF. The display shows on the top line: and on the bottom line, the default contrast value: NORMAL. The initial resolution value (even if it is not shown on the display) is: “...
-
Page 48: Troubleshooting Guide
ROUBLESHOOTING GUIDE INOR PROBLEMS F THERE IS A POWER FAILURE If there is a power failure, the fax machine keeps the following The list below may be used as a guide to the solution of minor problems. data in the memory: the numbers set for one-touch and speed dialling and the reports, while the documents present in the memory will be lost. -
Page 49: Error Codes
RROR CODES The error codes printed both on the transmission report and the activity report consist of two digits indicating the cause of the error. To save space, the two-digit code without any message is printed on the activity report. CODE MESSAGE CAUSE OF FAULT... -
Page 50: Signals And Messages
IGNALS AND MESSAGES The document received was saved because an error occurred during the reception phase, preventing it from being printed immediately: check the type of error (paper out or jammed, ink out, cover open, Any problems that may arise are generally indicated by acoustic etc.) and correct the error. - Page 51 You have made a transmission request (Polling reception). The last document was not sent correctly: to turn off the “ ” LED indicator and clear the message from the display press the key, and then send it again. The fax machine is printing a report or a list. •...
-
Page 52: Maintenance Operations
AINTENANCE OPERATIONS Note EPLACING PRINT HEAD If you have replaced the print head because the ink ran out, when the print head compartment cover and the operator console are closed, the fax machine will automatically recognize that the print head has been replaced and the display will show the message “NEW PRINT HEAD? 1 = YES, 0 = NO”. -
Page 53: Cleaning The Print Head Electrical
4. To confirm the selection, press the key: LEANING THE PRINT HEAD ELECTRICAL CONTACTS The display shows: The fax machine cleans the print head and tests the nozzles, printing out the result of the diagnostic test. Examine the diagnostic test result by consulting “Installing the print head”, chapter “Delivery contents, connecting up and first-time operation”. -
Page 54: Cleaning Optical Read Head
LEANING OPTICAL READ HEAD LEARING PAPER JAMS Dust accumulating on the glass surface of the optical read head may If the paper used to print the documents received or to copy documents cause problems in the scanning of documents. To avoid these becomes jammed, this condition is signalled on the display by the problems, the glass should be cleaned regularly. -
Page 55: Manufacturer And Service
ANUFACTURER AND SERVICE ANUFACTURER Olivetti, S.p.A. con unico azionista Gruppo Telecom Italia Direzione e coordinamento di Telecom Italia S.p.A. USTOMER SERVICE If the fax machine is not working as it should, or you want to ask the manufacturers something, call the number indicated on the "Warranty Card". -
Page 56: Disposal
Olivetti guarantees the activation of the treatment, collection, recycling and disposal procedures in accordance with Directive 2002/96/CE (and subsequent amendments). -
Page 57: Technical Data
ECHNICAL DATA ENERAL CHARACTERISTICS ECEIVING SPECIFICATIONS Model ......Desktop fax machine Printing system .... Printing on plain paper, bubble ink jet Display ....... LCD 16 + 16 char. printer Memory capacity ..2 MB Max. printing width ......204 mm Dimensions Printing paper ........ -
Page 58: Index
NDEX Aborting Date transmission 14 changing 6 Additional telephone entering 4 connecting 2 Delayed transmission Automatic dialling automatic printing 22 code number 15 changing 16 Automatic printing deleting 16 broadcast report 22 Deleting delayed transmission 22 delayed transmission 16 Automatic redial 15 TAD access code 27 Deleting memos 30 Delivery contents 2... - Page 59 Header Polling reception changing 38 automatic 40 matching 38 changing 40 Header line deleting 40 changing 38 setting 40 matching 38 Predetermined settings 3 Print head cleaning electrical contacts 47 re-enabling 46 Improving print quality 13 replacing 6 Incoming messages Print position playing 30 changing 7...
- Page 60 Transmitting at a preset time 15 Service telephone number 49 basic operations 13 Setting formats 13 incoming messages 30 from the memory 17 one-touch dialling 18 original 14 speed dialling 19 preset time 15 Setting the silence lapse 37 sheet thickness 13 Signals to a received number 21 acoustic 44, 45...
- Page 61 2) The Quality System is in compliance with the UNI EN ISO 9000 series of Standards Olivetti S.p.A. Sede Sociale Ivrea, Via Jervis, 77 - Cap. Soc. Euro 78.000.000 - C.C.I.A.A. Torino n. 547040 - Trib. Ivrea Reg. Soc. n.1927 - Cod. Fisc. e Part. IVA 02298700010...
- Page 62 Monochrome print head order number Disposable print head: P/N B0336F...
- Page 64 256652P...
Need help?
Do you have a question about the Fax-Lab 470 and is the answer not in the manual?
Questions and answers