Table of Contents
Advertisement
Available languages
Available languages
Advertisement
Chapters
Table of Contents

Related Manuals for Microlife CVS 271249


Summary of Contents for Microlife CVS 271249
- Page 1 WRIST MONITOR Blood Pressure Monitor Product #271249 Instruction Manual Instrucciones de Uso Questions? Preguntas? 1-866-464-6184 PLEASE NOTE: THIS MEDICAL INSTRUMENT MUST BE USED ACCORDING TO INSTRUCTIONS TO ENSURE ACCURATE READINGS.
-
Page 2: Table Of Contents
Table of contents 1. Introduction 1.1. Features of your blood pressure monitor 1.2. Important information about self-measurement 2. Important information on blood pressure and its measurement 2.1. How does high/low blood pressure arise? 2.2. Which values are normal? 2.3. What can be done if regular high/low values are obtained? 3. -
Page 3: Introduction
1. Introduction 1.1. Features of your blood pressure monitor This CVS blood pressure monitor, with integrated time/date display, is a fully automatic, digital blood pressure measuring device for use on the wrist. It enables very fast and reliable measurement of the systolic and diastolic blood pressure as well as pulse by way of the oscillometric method of measuring. -
Page 4: Important Information On Blood Pressure And Its Measurement
2. Important information on blood pressure and its measurement 2.1. How does high/low blood pressure arise? Your level of blood pressure is determined in a part of the brain called the cir- culatory center. This part of your brain responds to a situation through feedback with the nervous system.To adjust the blood pressure, the strength and fre- quency of the heart (Pulse) as well as the width of circulatory blood vessels is altered. - Page 5 Even with normal blood pressure values, a regular self-check with your blood pressure monitor is recommended. In this way you can detect possible changes in your values early and react appropriately, in consultation with your physician. If you are undergoing medical treatment to control your blood pressure, please keep a record of your blood pressure levels by carrying out regular self-meas- urements at specific times of the day.
- Page 6 2.3. What can be done if your blood pressure values are consistently high or low? a) Please consult your doctor. b) Increased blood pressure values (various forms of hypertension) are associated with considerable health risks over time. Arterial blood vessels in your body are endangered due to constriction caused by deposits in the vessel walls (Arteriosclerosis).
- Page 7 Lifestyle changes may assist in the reduction of a medically established high blood pressure prevention. These lifestyle changes should be practiced on a con- tinual basis: 1. Eating habits • Strive for a healthy weight corresponding to your age. • Avoid excessive consumption of common salt. (Many packed foods contain large amounts of salt.) •...
-
Page 8: Components Of Your Blood Pressure Monitor
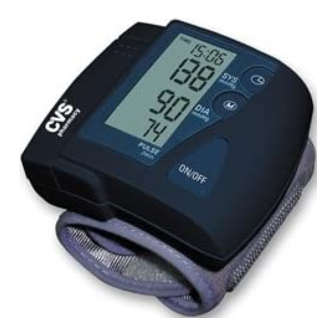
3. Components of your blood pressure monitor Your CVS wrist type blood pressure monitor consists of: Systolic Pressure Set date & time button Diastolic Pressure Memory button Pulse Battery Cover Wrist Cuff On/Off/Start button Cuff fits wrist size 5 ” to 7 ”... -
Page 9: Setting The Time And Date
a) Remove cover as illustrated. b) Insert the batteries (2 x size AAA 1.5V) following the indicated polarity. c) If the battery warning appears in the display, the batteries are discharged and must be replaced by new ones. Attention! • After the low battery indication warning appears, the Low battery device will not function until the batteries have been indicator... - Page 10 the following setting: 1999-01-01 00:00 O’clock. You must then set the date and current time. For this, please proceed as follows (Example: Entering 06-15- 2002 Time 09:30 A.M.): 1) Press the TIME button for at least 3 seconds. The display now indicates the set year, blinking.
- Page 11 6) The corresponding day can now be entered by pressing the MEMORY button. 7) Press the TIME button again. The display now switches to the current time, during which the first character (Hour) blinks. 8) The corresponding hour can now be entered by pressing the MEMORY button.
-
Page 12: Carrying Out A Measurement
11) Now after all settings have been made, press the TIME button once again. The input is now complete and the clock begins to run. You can check the time and date settings by pushing the time button. 5. Carrying out a measurement 5.1. -
Page 13: Fitting The Cuff
• A variation of 6 inches between monitor and heart level can result in a reading error of + or - 10 mmHg. • A loose cuff causes false measurement values. • With repeated measurements, blood accumulates in the measurement arm, which can lead to false results. -
Page 14: Discontinuing A Measurement
b) After automatically reaching the correct inflation pressure, the pump stops and the pressure slowly falls. The cuff pressure (large characters) is displayed during the measurement. When the device has detected the pulse, the heart symbol in the display begins to blink and a beep tone is audible for every pulse beat. -
Page 15: Error Messages/Trouble Shooting
Understanding memory readings Dec.(5) Time (8:15pm) TIME A.M. TIME DATE DATE (8:16am) Systolic Diastolic Pulse MR 02 ( MR 01: Values of the last measurement) ( MR 02- MR 30: Values of the (Alternating display) measurements before MR 01) Further information Repeating measurements without resting inbetween results in inaccurate read- ings. - Page 16 Other possible situations and solutions Situation Solution The display remains blank when the 1. Check batteries for correct polarity unit is switched on although the and if necessary re-insert. batteries are in place. 2. If the display functions erratically re- insert batteries or exchange them.
-
Page 17: Care And Maintenance
instrument yourself! Any unauthorized opening of the instrument invalidates all warrantee claims! 7. Care and maintenance a) Do not expose the device to either extreme temperatures, humidity, dust or direct sunlight. b) The cuff contains a sensitive air-tight bubble. Handle this carefully and avoid all types of straining through twisting or buckling. -
Page 18: Warranty
The manufacture of your CVS blood pressure monitor is in accordance with the terms of the European standard for blood pressure measuring devices (see technical data) under the supervision of the Technical Monitoring Association Esses (RWTüV-Essen). Never attempt to repair the instrument yourself! Any unauthorized opening of the instrument invalidates all warranty claims! 8. -
Page 19: Technical Specifications
The stipulations of the EU-Guidelines 93/42/EWG for Medical Products Class IIa have been fulfilled. 10. Technical specifications: Weight: 137g (with batteries + cuff) Size: 83 x 76 x 66mm (including cuff) Storage temperature: –5 to +50°C Operating humidity: 15 to 85% relative humidity maximum Operation temperature: 50°F to 104°F (10-40°C) Display:... - Page 20 Tensiómetro Reloj de Pulsera – Manual de instrucciones Tabla de contenido 1. Introducción 1.1. Características del 271249 1.2. Información importante sobre la automedición. 2. Información importante sobre la tensión arterial y su medición 2.1. ¿Cómo se origina la tensión arterial alta/baja? 2.2.
-
Page 21: Introducción
1. Introducción 1.1. Características del 271249 El tensiómetro CVS 271249 (con indicador integrado de hora y fecha) es un aparato digital totalmente automático de medición de la tensión arterial para ser usado en la muñeca, que permite medir muy rápidamente y de forma fiable la tensión arterial sistólica y diastólica, así... -
Page 22: Información Importante Sobre La Tensión Arterial Y Su Medición
2. Información importante sobre la tensión arterial y su medición 2.1. ¿Cómo se origina la tensión arterial alta/baja? El nivel de la tensión arterial se determina en una zona del cerebro, en el lla- mado centro circulatorio, y se adapta a cada situación concreta por retroali- mentación, a través del sistema nervioso. - Page 23 Incluso con valores normales de la tensión arterial es recomendable efectuar de forma regular automediciones con su tensiómetro. De esta forma, Ud. podrá detectar a tiempo los posibles cambios en sus valores normales y reaccionar apropiadamente. Si Ud. está siendo sometido a un tratamiento médico para controlar su tensión arterial, lleve un registro de los valores de su tensión arterial, efectuando automediciones de forma regular a determinadas horas del día.
- Page 24 • Valores de la presion diastolica medidos correctamente superiores a 120 mmHg, requiren un tratamiento médico de inmediato. 2.3. ¿Qué puede hacerse si se obtienen valores altos/bajos de forma regular? a) Consulte con su médico. b) Los valores altos de la tensión arterial (diversas formas de hipertensión) están asociadas a medio y largo plazo con riesgos importantes para la salud.
-
Page 25: Los Diversos Componentes Del Tensiómetro
• Evite el consumo excesivo de sal común. • Evite los alimentos grasos. B) Enfermedades anteriores • Siga fielmente cualquier instrucción médica para el tratamiento de posibles enfermedades anteriores, tales como: • diabetes (Diabetes mellitus) • trastornos en el metabolismo de las grasas •... -
Page 26: Puesta En Funcionamente Del Tensiómetro
Muñequera se ajusta para una circunferencia de muñeca de 13.5 a 19.5 cm (5” a 7”) 4. Puesta en funcionamiento del tensiómetro 4.1. Inserción de las pilas Una vez desempaquetado el aparato, inserte las pilas en primer lugar. El com- partimento de la batería está... -
Page 27: Lectura De La Fecha Memorizada
• Si no va a usar el tensiómetro por un largo periodo de tiempo, retire las baterías del aparato. Comprobación funcional: mantenga apretado el botón ON/OFF para com- probar todos los elementos de la pantalla. Si funciona correctamente deben aparecer todos los segmentos. Nota: Usted debe poner en hora y fecha el medidor cada vez que se le remue- van las baterias. - Page 28 3) Apriete el botón HORA otra vez. La indicación cambia ahora a la fecha actual, en la que parpadea el primerdígito (mes). 4) Ahora puede introducir el mes, apretando el botón MEMORIA. (Ejemplo: presionar 6 veces) 5) Apriete el botón HORA otra vez. Ahora parpadean los dos ultimos dígitos (día).
-
Page 29: Desarrollo De Una Medición
9) Apriete el botón HORA, otra vez. Ahora parpadean los dos últimos dígitos (minutos). 10) Ahora, puede introducir la hora exacta, apretando el botón MEMORIA. (Ejemplo: presionar 30 veces) 11) Ahora, una vez efectuados todos los ajustes, apriete el botón HORA una vez màs. Se indica brevemente la fecha y luego la hora. -
Page 30: Fuentes De Error Comunes
• Intente efectuar las mediciones de forma regular a la misma hora del día, ya que la tensión arterial se modifica con el curso del día. 5.2. Fuentes de error comunes: Tenga en cuenta: Para poder comparar los resultados de las mediciones de la tensión arterial se requiere que las condiciones sean las mismas. -
Page 31: Procedimiento De Medición
b) La distancia entre la muñequera y la mano debe ser de aprox. 10 mm. c) Asegure la muñequera con el cierre velcro, de forma quede ajustado confortablemente y no 0.5~1 demasiado fuerte, sin que quede ningún 1/4”~1” espacio entre la muñequera y la muñeca. d) Ponga el brazo sobre una mesa con la palma de la mano hacia arriba. -
Page 32: Memoria - Almacenamiento De Las 30 Últimas Mediciones
c) Una vez concluida la medición, suena un pip largo. Los valores sistólicos y diastólicos de la tensión arterial medidos, así como el número de pulsaciones se visualizan ahora en la pantalla. Ejemplo (fig.): sístole 118, diástole 73, pulso 75 Los resultados de la medición se visualizarán hasta que Ud. -
Page 33: Mensajes De Error/Funcionamiento Defectuoso
Información adicional No deben efectuarse las mediciones una inmediatamente a continuación de la otra, ya que, de lo contrario, los resultados pueden resultar falsos. Espere, por ello, durante varios minutos en una posición relajada, sentado o acostado, antes de repetir la medición. 6. - Page 34 valores medidos son demasiado tensión arterial otra vez condiciones bajos (demasiado altos). de reposo y tranquilidad, obser- vando los detalles indicados en las secciones 5.1 & 5.2. Los resultados de cada medición son 1.Preste atención a la siguiente distintos, así aunque el aparato fun- información, como a los puntos enu- ciona correctamente y los valores merados en «Fuentes de error...
-
Page 35: Cuidados Y Mantenimiento
7. Cuidados y mantenimiento a) Evite exponer el tensiómetro a temperaturas extremas, a la humedad, al polvo y a la irradiación de los rayos del sol. b) Quite las manchas del brazalete o la goma con un paño húmedo. No lavar el brazalete. c) Limpiar el aparato con un trapo suave y seco. -
Page 36: Garantía
La manufactura del medidor de presión arterial CVS está de acuerdo con los términos del estándar europeo para los aparatos de medición de presión arterial bajo la supervision de Technical Monitoring Association Esses (RWTüV- Essen). Nunca intente abrir o reparar el aparato. Esto invalida automáticamente cualquier reclamo bajo la garantía del manufacturero. -
Page 37: Especificaciones Técnicas
DIN 58130, NIBP – investigación clínica ANSI / AAMI SP10, NIBP – requerimientos Compatibilidad El aparato cumple las electromagnética: especificaciones del estándar europeo EN 60601-1-2 Ensayo clínico: Pruebas de funcionamiento clínico han sido realizadas en EU y en Alemania de acuerdo con los procedimientos DIN 58130 / 1997 N6 (secuencial) y AAMI Cumple las especificaciones de la directiva de la UE 93/42/CEE para productos... -
Page 38: Contacto Para Ayuda
SIS/DIA: 30 a 280 mmHg pulso: 40 a 200 por minuto Límites de indicación de la presión de la muñequera: 0–299 mmHg Memoria: almacenamiento automático de las 30 últimas mediciones Resolución de la medición: 1 mmHg Exactitud: presión: ± 3 mmHg pulso: ±...
Need help?
Do you have a question about the CVS 271249 and is the answer not in the manual?
Questions and answers