Table of Contents
Advertisement
Available languages
Available languages
Quick Links
Follow all instructions when assembling this dirt bike. If any parts are damaged or missing, those parts must be replaced
before proceeding.
WARNING:
To reduce the risk of injury, you must read and understand this assembly guide before attempting to
assemble this product.
SAVE THIS GUIDE FOR FUTURE REFERENCE
Siga todas las instrucciones al armar este motocross. Si falta alguna pieza o hay piezas dañadas, dichas piezas deben
reemplazarse antes de proceder a utilizar el producto.
ADVERTENCIA:
intentar armar este producto.
GUARDE ESTE MANUAL PARA FUTURAS CONSULTAS
Para reducir el riesgo de lesiones, debe leer y comprender esta guía de armado antes de
ASSEMBLY GUIDE
GUÍA DE ARMADO
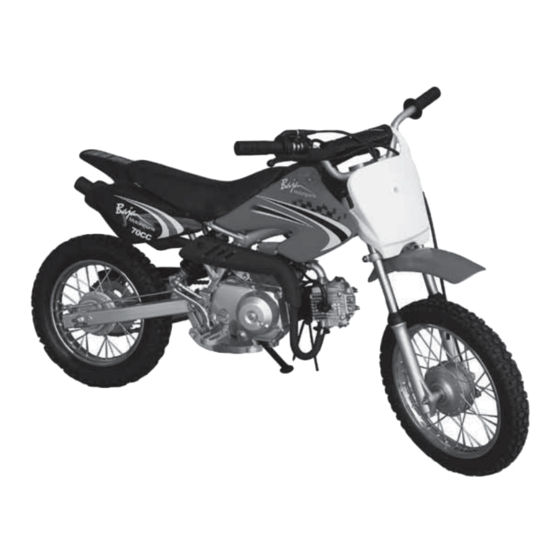
DIRT BIKE
MOTOCROSS
DR70
Advertisement
Chapters
Table of Contents

Related Manuals for Baja motorsports DR70


Summary of Contents for Baja motorsports DR70
- Page 1 ASSEMBLY GUIDE GUÍA DE ARMADO DIRT BIKE MOTOCROSS DR70 Follow all instructions when assembling this dirt bike. If any parts are damaged or missing, those parts must be replaced before proceeding. WARNING: To reduce the risk of injury, you must read and understand this assembly guide before attempting to assemble this product.
-
Page 2: Table Of Contents
We reserve the right to make product changes at any time, without notice and without incurring any obligation to make the same or similar changes to the vehicle previously built or sold. 2 — English © 2010 Baja, Inc. All Rights Reserved. -
Page 3: Symbols
NAME EXPLANATION Safety Alert Indicates a potential personal injury hazard. TOOLS NEEDED The following tools (not included or drawn to scale) are needed for assembly: TORQUE WRENCH METRIC HAND TOOLS 3 — English © 2010 Baja, Inc. All Rights Reserved. -
Page 4: Unpacking
Inspect the product carefully to make sure no breakage hoist to lift and remove the metal frame. or damage occurred during shipping. If any parts are damaged or missing, please call 1-888-863-2252 for assistance. 4 — English © 2010 Baja, Inc. All Rights Reserved. -
Page 5: Loose Parts List
Wheel Hardware result in serious personal injury. Axle Bolt (M10 x 210 mm) ....... 1 Spacer ............. 1 Nut (M10 x 1.5) ..........1 5 — English © 2010 Baja, Inc. All Rights Reserved. -
Page 6: Assembly
Lift up the rear of the dirt bike and align the rear shock with the holes in the frame. Reinstall the bolt and nut. Torque to 11.1-14.8 ft.lbs. (15- 20 Nm). 6 — English © 2010 Baja, Inc. All Rights Reserved. -
Page 7: Washer
Feed fuel vent line through opening in dirt bike frame as shown. FUEL VENT LINE BOLT HOLE HOLE WASHER LOCK NUT 7 — English © 2010 Baja, Inc. All Rights Reserved. -
Page 8: Installing Front Wheel
15-18 psi (103-124 kPa) BOTTOM PANEL SCREWS WARNING: Check the tire pressure carefully while inflating. Too much air in the tire could cause the tire to burst, causing serious personal injury. 8 — English © 2010 Baja, Inc. All Rights Reserved. - Page 9 NOTE: Used lubricant should be disposed of at an approved disposal site. See your local oil retailer for more information. CAUTION: Attempting to start the engine before it has been properly filled with lubricant will result in equipment failure. 9 — English © 2010 Baja, Inc. All Rights Reserved.
-
Page 10: Final Preparation
Do not allow dirt or water into the fuel tank. Ethanol. Gasoline containing up to 10% ethanol by volume (commonly referred to as E10) is acceptable. E85 is not. 10 — English © 2010 Baja, Inc. All Rights Reserved. - Page 11 2 — Español © 2010 Baja, Inc. Todos los derechos reservados.
-
Page 12: Símbolos
Es posible que algunos de los siguientes símbolos se usen en este producto. Estúdielos y aprenda sus significados para operar este producto con seguridad. SÍMBOLO NOMBRE EXPLICACIÓN Alerta de seguridad Indica un peligro posible de lesiones personales HERRAMIENTAS NECESARIAS Las siguientes herramientas (no incluidas o dibujadas a escala) son necesarias para el armado y la alineación: LLAVE DINAMOMÉTRICA HERRAMIENTA MANUAL MÉTRICA 3 — Español © 2010 Baja, Inc. Todos los derechos reservados. -
Page 13: Cómo Retirar El Empaque
Inspeccione el producto detenidamente para asegurarse de que no se hayan producido roturas ni daños durante el envío. Si falta alguna pieza o hay piezas dañadas, llame al 1-888-863-2252 para obtener ayuda. 4 — Español © 2010 Baja, Inc. Todos los derechos reservados. -
Page 14: Lista De Piezas Sueltas
El armado de este producto con piezas dañadas, faltantes o incorrectas podría Piezas para rueda provocar lesiones personales graves. Perno de eje (M10 x 210 mm) ........1 Separador ..............1 Tuerca (M10 x 1,5) ...........1 5 — Español © 2010 Baja, Inc. Todos los derechos reservados. -
Page 15: Armado
Levante la parte trasera de la motocross y alinee el amortiguador trasero con los orificios del bastidor. Vuelva a instalar el perno y la tuerca. Apriételos a un par de torsión de 15-20 Nm (11,1-14,8 pies libra). 6 — Español © 2010 Baja, Inc. Todos los derechos reservados. - Page 16 Avance la línea de ventilación de combustible a través de la abertura del bastidor de la motocross como se muestra. LÍNEA DE VENTILACIÓN DE COMBUSTIBLE PERNO ORIFICIO ORIFICIO ARANDELA TUERCA DE SEGURIDAD 7 — Español © 2010 Baja, Inc. Todos los derechos reservados.
- Page 17 NOTA: La presión de los neumáticos solo debe medirse o ajustarse cuando los neumáticos estén fríos. Presión recomendada 15-18 psi (103-124 kPa) ADVERTENCIA: TORNILLOS DEL PANEL INFERIOR Verifique detenidamente la presión de los neumáticos mientras los infla. Demasiado aire en un neumático podría causar que este explote, lo que causaría lesiones personales graves. 8 — Español © 2010 Baja, Inc. Todos los derechos reservados.
- Page 18 NOTA: El lubricante usado debe desecharse en un lugar de desecho aprobado. Consulte a su vendedor minorista local para obtener más información. PRECAUCIÓN: Intentar arrancar el motor antes de haberlo llenado correctamente con lubricante provocará una falla del equipo. 9 — Español © 2010 Baja, Inc. Todos los derechos reservados.
-
Page 19: Preparación Final
Etanol. La gasolina que contiene hasta un 10% de etanol por volumen (comúnmente denominada E10) es aceptable. La gasolina E85 no lo es. 10 — Español © 2010 Baja, Inc. Todos los derechos reservados. - Page 20 ASSEMBLY GUIDE GUÍA DE ARMADO DIRT BIKE MOTOCROSS DR70 / DR70C BAJA MOTORSPORTS 1428 Pearman Dairy Road Anderson, SC 29625 Phone 1-866-260-8280 www.bajamotorsports.com 988000-207 9-30-10 (REV:01)
Need help?
Do you have a question about the DR70 and is the answer not in the manual?
Questions and answers