Table of Contents
Advertisement
Available languages
Available languages
Quick Links
Follow all instructions when assembling this dirt bike. If any parts are damaged or missing, those parts must be replaced
before proceeding.
WARNING:
To reduce the risk of injury, you must read and understand this assembly guide before attempting to
assemble this product.
SAVE THIS GUIDE FOR FUTURE REFERENCE
Siga todas las instrucciones al armar este motocross. Si falta alguna pieza o hay piezas dañadas, dichas piezas deben
reemplazarse antes de proceder a utilizar el producto.
ADVERTENCIA:
intentar armar este producto.
GUARDE ESTE MANUAL PARA FUTURAS CONSULTAS
Para reducir el riesgo de lesiones, debe leer y comprender esta guía de armado antes de
ASSEMBLY GUIDE
GUÍA DE ARMADO
DIRT BIKE
MOTOCROSS
DR50
Advertisement
Chapters
Table of Contents

Related Manuals for Baja motorsports DR50


Summary of Contents for Baja motorsports DR50
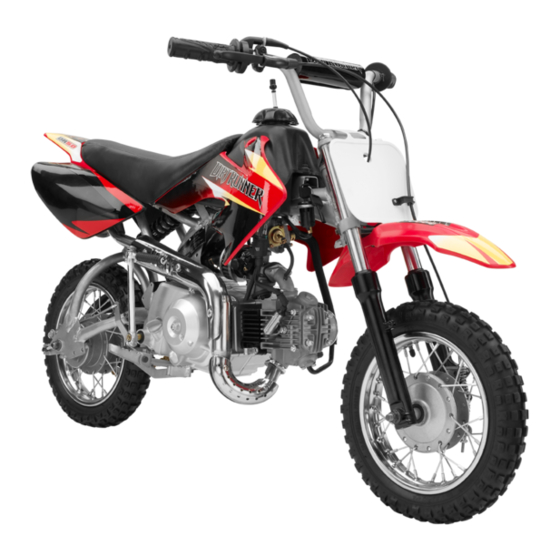
- Page 1 ASSEMBLY GUIDE GUÍA DE ARMADO DIRT BIKE MOTOCROSS DR50 Follow all instructions when assembling this dirt bike. If any parts are damaged or missing, those parts must be replaced before proceeding. WARNING: To reduce the risk of injury, you must read and understand this assembly guide before attempting to assemble this product.
-
Page 2: Table Of Contents
TABLE OF CONTENTS Rules for Safe Assembly ..............................2 Symbols .................................... 3 Tools Needed ..................................3 Unpacking ..................................4 Loose Parts List ................................5 Assembly ..................................6-9 Final Preparation ................................10 RULES FOR SAFE ASSEMBLY ... -
Page 3: Symbols
SYMBOLS The following signal words and meanings are intended to explain the levels of risk associated with this product. SYMBOL SIGNAL MEANING Indicates an imminently hazardous situation, which, if not avoided, will result in DANGER: death or serious injury. Indicates a potentially hazardous situation, which, if not avoided, could result in WARNING: death or serious injury. -
Page 4: Unpacking
UNPACKING NOTE: Having two people available will make the assembly process easier, even if using an overhead hoist. WARNING: Cut packing straps and remove cardboard carton from Carefully support the crate at all times during the removal metal frame. process. -
Page 5: Loose Parts List
LOOSE PARTS LIST Description Qty. Description Qty. Front Fender Hardware Side Panel Hardware Front Fender ............ 1 Side Panel ............2 Washer ............3 Screw (M5 x 15 mm) ........6 Bolt (M6 x 15 mm) ........... 3 Tool Kit ..............1 Number Plate ........... -
Page 6: Assembly
ASSEMBLY INSTALLING FRONT FENDER AND NUMBER WARNING: PLATE Strictly adhere to all torque wrench tightening specifica- Align the holes in the front fender with the holes in the dirt tions. Failure to do so could cause serious personal injury. bike frame as shown. - Page 7 ASSEMBLY INSTALLING HANDLEBARS Turn the handlebars fully left and right to verify proper operation and to make sure the throttle cable, brake hoses, Lift handlebars to proper operating position and insert and other wires are not squeezed or pulled too tightly. handlebar bolts into opening in frame as shown.
- Page 8 ASSEMBLY INSTALLING FRONT WHEEL INSTALLING SIDE PANELS Place the front wheel in the correct position between the Remove the two seat screws as shown. Remove seat and steering forks. set aside. Starting from the right side (opposite the chain) of the dirt ...
- Page 9 ASSEMBLY REPLACING PACKING LUBRICANT To change engine lubricant: Lubricant should be changed while the engine lubricant is still The dirt bike engine is shipped with packing lubricant in it. This warm, but not hot. This allows the lubricant to drain quickly lubricant must be drained and replaced with new engine lubri- and completely.
-
Page 10: Final Preparation
FINAL PREPARATION VERIFY FLUID LEVELS COMPLETE PRE-DELIVERY INSPECTION CHECKLIST All fluids except fuel and appropriate engine lubricant are filled at the factory. However, before attempting to operate Verify that all items on the Pre-Delivery Inspection Checklist the unit, you should verify the correct levels of all fluids. When have been completed as required. - Page 11 ÍNDICE DE CONTENIDO Reglas para un armado seguro................................2 Símbolos ........................................3 Herramientas necesarias ..................................3 Cómo retirar el empaque ..................................4 Lista de piezas sueltas ...................................5 Armado....................................... 6-9 Preparación final ....................................10 REGLAS PARA UN ARMADO SEGURO Cualquier persona que intente armar este producto debe contar con la capacitación y la experiencia adecuadas.
-
Page 12: Símbolos
SÍMBOLOS Las siguientes palabras y significados de las señales tienen como objetivo explicar los niveles de riesgo asociados con este producto. SÍMBOLO SEÑAL SIGNIFICADO Indica una situación de riesgo inminente que, si no se evita, provocará la muerte o PELIGRO: lesiones graves. Indica una situación de riesgo potencial que, si no se evita, podría provocar la muerte ADVERTENCIA: o lesiones graves Indica una situación de riesgo potencial que, si no se evita, puede provocar lesiones PRECAUCIÓN: menores o moderadas. -
Page 13: Cómo Retirar El Empaque
CÓMO RETIRAR EL EMPAQUE NOTA: Disponer de dos personas, hará que el proceso de armado sea más fácil, incluso si se utiliza un equipo de elevación. ADVERTENCIA: Corte cuidadosamente las correas del empaque y retire la caja Sostenga el embalaje con cuidado en todo momento durante de cartón. el proceso de retirar el armazón. Dejar caer el embalaje podría causar lesiones graves y/o daños al motocross. ADVERTENCIA: ... -
Page 14: Lista De Piezas Sueltas
LISTA DE PIEZAS SUELTAS Ref. Ref. Núm. Descripción Cant. Núm. Descripción Cant. Piezas para panel lateral Piezas para guardabarros delantero Panel lateral ..............2 Guardabarros delantero ...........1 Tornillo (M5 x 15 mm) ..........6 Arandela ..............3 Juego de herramientas ..........1 Perno (M6 x 15 mm) ..........3 Guía de armado (no se muestra) ........1 Placa para el número..........1 Manual del operador (no se muestra) ......1... -
Page 15: Armado
ARMADO INSTALACIÓN DEL GUARDABARROS ADVERTENCIA: DELANTERO Y LA PLACA PARA EL NÚMERO Cumpla estrictamente todas las especificaciones de ajuste con Alinee los orificios del guardabarros delantero con los orificios la llave dinamométrica. La inobservancia de esta advertencia en el bastidor de la motocross como se muestra. podría causar lesiones personales graves. Introduzca dos pernos traseros a través de las arandelas; luego, a través del guardabarros y del bastidor. - Page 16 ARMADO CÓMO INSTALAR EL MANUBRIO Gire las barras del manubrio completamente a la izquierda y a la derecha para verificar que la operación sea adecuada y para Levante las barras del manubrio hasta la posición de operación asegurarse de que el cable del acelerador, las mangueras de adecuada e introduzca los pernos de las barras del manubrio frenos y otros cables no estén apretados ni muy tirantes.
- Page 17 ARMADO INSTALACIÓN DE LOS PANELES INSTALACIÓN DE LA RUEDA DELANTERA LATERALES Coloque la rueda delantera en la posición correcta entre las horquillas de dirección. Retire los dos tornillos del asiento como se muestra. Retire el Comenzando por el lado derecho (enfrente de la cadena) de asiento y déjelo a un lado.
- Page 18 ARMADO CÓMO REEMPLAZAR EL LUBRICANTE DE Para cambiar el lubricante del motor: EMPAQUE El lubricante debe cambiarse mientras el lubricante del motor aún está tibio, pero no caliente. Esto permite que el lubricante drene El motor del motocross se envía con lubricante de empaque. Este rápida y completamente.
-
Page 19: Preparación Final
PREPARACIÓN FINAL VERIFIQUE LOS NIVELES DE LOS LÍQUIDOS LISTA COMPLETA DE VERIFICACIÓN DE INSPECCIÓN PREENTREGA Todos los líquidos, excepto el combustible y el lubricante para motor adecuado, vienen cargados de fábrica. Sin embargo, antes Verifique que todos los puntos incluidos en la Lista de verificación de de intentar operar la unidad, debe verificar que los niveles de todos inspección preentrega se hayan llevado a cabo según lo indicado. los líquidos sean los correctos. Al verificar los niveles de los líquidos, Conserve esta lista para entregarla al comprador de este producto. - Page 20 ASSEMBLY GUIDE / GUÍA DE ARMADO DIRT BIKE / MOTOCROSS DR50 BAJA MOTORSPORTS 1428 Pearman Dairy Road Anderson, SC 29625 Phone 1-866-260-8280 www.bajamotorsports.com 988000-204 8-10-10 (REV:01)
Need help?
Do you have a question about the DR50 and is the answer not in the manual?
Questions and answers