Table of Contents
Advertisement
DR90/WR90 Dirt Bike
Read this manual carefully. It contains important safety information.
No one under the age of 16 should operate this dirt bike.
OWNER'S MANUAL
No one under the age of 16 should operate this Dirtbike without
adult supervision. Parents should consider child's age, size,
maturity and ability before allowing to ride.
Always wear a helmet; It could save your Life!
Do not remove this operator's manual from this vehicle.
Please obtain, review, and follow provincial / municipal government acts and
regulations pertaining to owning and operating an off-road vehicle.
Rev. D
020409
Advertisement
Table of Contents

Related Manuals for Baja motorsports DR90


Summary of Contents for Baja motorsports DR90
- Page 1 DR90/WR90 Dirt Bike Read this manual carefully. It contains important safety information. No one under the age of 16 should operate this dirt bike. OWNER’S MANUAL No one under the age of 16 should operate this Dirtbike without adult supervision. Parents should consider child’s age, size, maturity and ability before allowing to ride.
- Page 2 Congratulations on your purchase of the BAJA INC. DR90/WR90 Dirt Bike. Your bike is warranted to be free of manufacturing defects in the material and workmanship for a period of 90 days from the date of purchase. During the warranty period BAJA, INC. will at its option, repair, provide replacement parts or replace your Baja Motorsports 90cc Dirt bike at no charge.
- Page 3 WARNING This manual should be considered as a permanent part of the vehicle and should remain with the vehicle when resold or otherwise transferred to a new user or operator. The manual contains important safety information and instructions which should be read carefully before operating the vehicle. All operators should obtain, review, and follow provincial and municipal government acts and regulations pertaining to owning and operating an off-road vehicle.
-
Page 4: Table Of Contents
Table of Contents SAFE OPERATION ....................3 SAFETY GEAR ....................3 MODIFICATION OF vEHICLE ................3 LOCATION OF WARNING LABELS..............4 PARTS & SUBASSEMBLIES ................5 OPERATION ......................7 FUEL vALvE ....................7 ENGINE STARTING ..................8 BREAkING IN THE ENGINE ...............9 SWITCHES ON THE RIGHT HANDLEBAR ..........10 GEAR SHIFTING ..................11 CHECk-UPS, ADJUSTMENT AND MAINTENANCE..........12 CHANGING THE OIL ...................13... - Page 5 Please read this manual and follow all instructions carefully. To emphasize special information, the symbol and the words WARNING or CAUTION have special meaning. Pay attention to WARNINGS and CAUTIONS. WARNING Indicates a potential hazard that could result in death or injury. CAUTION Indicates a potential hazard that could result in vehicle damage.
-
Page 6: Safe Operation
SAFE OPERATION Rules for Safe Operation A pre-operation check must be conducted before starting the engine. This check will insure safety, prevent mishaps, and prevent damage to components. It is strongly suggested that all operators take a certified motorcycle rider’s course prior to operating the vehicle. -
Page 7: Location Of Warning Labels
LOCATION OF WARNING LABELS Read and follow all of the warnings labels on your Dirtbike. Make sure you understand all the labels. keep the labels on the Dirtbike. Do not remove them for any reason. If a label comes off or becomes difficult to read, you should get a replacement by contacting Baja Inc. -
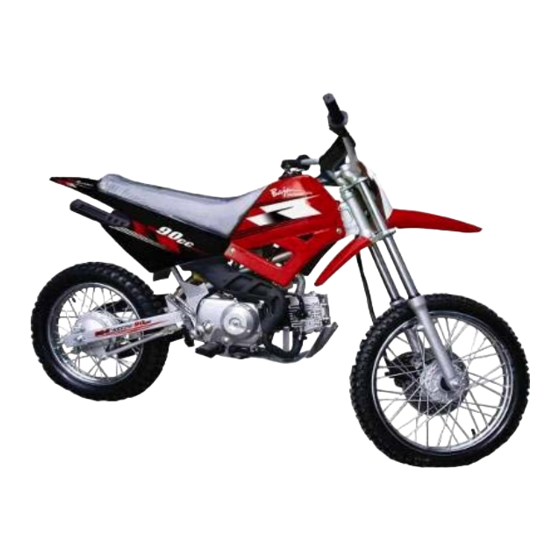
Page 8: Parts & Subassemblies
PARTS & SUBASSEMBLIES Front brake lever Throttle twist grip Fuel tank cover... - Page 9 Front Shock Absorber Front Wheel Rear Wheel Gear Shifting Pedal Fuel valve Rear Fork Side Stand Engine Number Seat Cushion Exhaust Silencer kick Lever Rear Braking Pedal...
-
Page 10: Operation
OPERATION FUEL vALvE Fuel filling The capacity of the fuel tank is 5.2L in total including 1.0L of reserve. Unscrew the gas cap by turning it counter clockwise and carefully fill the tank with unleaded gasoline through the opening. DO NOT MIX GAS AND OIL TOGETHER, THIS IS A 4-STROkE ENGINE. -
Page 11: Engine Starting
ENGINE STARTING CAUTION verify oil level prior to starting (see page 25) Starting the engine with low or no oil will damage the engine. WARNING Never start the engine in a closed place as the exhausted gas from the vehicle contains toxic carbon monoxide. Set the ignition key to “... -
Page 12: Breaking In The Engine
BREAkING IN THE ENGINE The first 600 Miles of operation should be considered the “Break-in” period and special attention should be paid to the following points: Take special care not to increase the RPM’s of engine while climbing steep slopes. Never drive your dirt bike continuously for more than 30 miles without increasing and decreasing the throttle. -
Page 13: Switches On The Right Handlebar
SWITCHES ON RIGHT HANDLEBAR Ignition switch The ignition switch is provided on the right handlebar. When ignition switch is turned to “ ” (off) position, engine will not start. If engine is running this will stop engine. When ignition switch is turned to “ ”... -
Page 14: Gear Shifting
GEAR SHIFTING A non-cycling mode of gear shifting is employed for this motorcycle. Reduce throttle before shifting. Never increase throttle while shifting gears. Do not place your foot on gear-shifting pedal while operating dirt bike to avoid damaging the clutch caused by sudden accidental gear shifting. Legend for the right figure: (N) Neutral gear (1) 1st gear... -
Page 15: Check-Ups, Adjustment And Maintenance
CHECk-UPS, ADJUSTMENT AND MAINTENANCE Checking the Oil Check engine oil each time prior to operating dirt bike. The oil level should be between the upper and lower lines of oil gauge fitted in a screw plug, which is on right cover of crankcase. Set dirt bike on level ground, screw off oil gage plug, wipe oil gage rod clean and insert gage plug into crankcase again to check oil level. -
Page 16: Changing The Oil
CHANGING THE OIL * Remove “Screw Plug” located at bottom of engine and let oil drain into an approved collection container. DO NOT PERFORM THIS PROCEDURE WHILE ENGINE IS HOT. SERIOUS BURNS COULD RESULT FROM CONTACT WITH HOT OIL. Dispose of used oil properly. For proper disposal procedures, contact your local oil recycling center. -
Page 17: Checking & Cleaning The Air Filter
CHECkING & CLEANING THE AIR FILTER Take air filter out and check if it is dirty or torn. Dismounting: Wash filter in clean water and wipe dry with a clean cloth. Soak filter element in clean machine oil. Squeeze it with a dry cloth to remove excess oil. -
Page 18: Adjusting The Throttle Cable
ADJUSTING THE THROTTLE CABLE Make sure that the adjusting and lock nuts of throttle cable work normally. Check if throttle twist grip has the required free operating movement. The required free operating movement: 2-6mm. If grip cannot be moved freely, turn adjusting nut to ensure proper operating movement. -
Page 19: Adjusting The Air Valve Gap
vALvE INSPECTION REFER TO MAINTENANCE SCHEDULE IN THIS OWNER’S MANUAL FOR vALvE ADJUSTMENT INSPECTION INTERvALS. valve clearance should be: Intake: 0.002 inch (0.051 mm) Exhaust: 0.003 inch (0.076 mm) The engine will make excess noise if the gap is too large in air valve. If gap is too small valve operation will be hindered which could result in valve malfunction and failure. -
Page 20: Adjustment Of Front Brake
FRONT HYDRAULIC DISk BRAkE INSPECTION Brake fluid reservoir Brake fluid cap Brake fluid level Front disk brake Brake hose Brake disk caliper Lower mark 1. Inspect front disk brake caliper for leakage. If brake fluid leaks, the safety of riding could be affected. 2. -
Page 21: Adjustment Of Rear Brake
ADJUSTMENT OF REAR BRAkE The vehicle should be supported for check by the side stand. The rear brake pedal has a free operating movement of 20-30mm (9/16 inch - 1 1/8 inches). To make adjustment, turn rear adjusting nut clockwise to reduce and counterclockwise to increase free operating movement of brake pedal. -
Page 22: Adjustment Of Chain
ADJUSTMENT OF CHAIN When chain adjustment is needed, loosen rear axle bolt . Turn chain adjusting nuts on the left and right sides to adjust tension of the chain and to align the marking of chain adjuster with the engraved lines in the similar position on both sides. -
Page 23: Vehicle Washing
vEHICLE WASHING Cleaning the vehicle regularly can slow down color fading of its body and make it easier to check if there is any damage and any oil leakage. CAUTION Washing the motorcycle with over-pressurized water may cause damage to some of its components. -
Page 24: Instructions For Storage
INSTRUCTIONS FOR STORAGE If the vehicle is not going to be used for a long period of time, for example, in winter time, some steps should be taken to prevent malfunction of and damage to its components which might be caused by long storage. Before storing the vehicle for a long period , proper maintenance has to be carried in case maintenance is not completed when the vehicle is put back into use after storage. -
Page 25: Resumption Of Service After Storage
RESUMPTION OF SERvICE AFTER STORAGE Remove covering and wooden blocks used in storing vehicle. Change engine oil if vehicle has been out of service for over 4 months. Drain off the remaining atomized anti-rust oil from the fuel tank, followed by filling it with fresh gasoline therein. -
Page 26: Resumption Of Service
RESUMPTION OF SERvICE Remove covering and clean the vehicle. Change lubricating oil if vehicle has been out of service for more than 4 months. Charge battery, if applicable, and remount it. Drain off anti-rust solution from fuel tank, followed by filling fuel therein to required level. -
Page 27: Maintenance Schedule
MAINTENANCE SCHEDULE Items of Maintenance Frequency Odometer km/hours 1000km 4000km 8000km 12000km * Circuit of fuel system * Fuel filter * Throttle operating system * Choke of carburetor Air filter element valve clearance - Adjust Spark plug *Air valve gap Engine lubricating oil R - YEARLY Lubricating oil screen... -
Page 28: Electrical Diagram
ELECTRICAL DIAGRAM Bl/W Bl/W B: Black W: White R: Red Gr: Green Bl: Blue... -
Page 29: Emission Control System Warranty
BAJA MOTORSPORTS – EMISSION CONTROL SYSTEM WARRANTY YOUR WARRANTY RIGHTS AND OBLIGATIONS The emission control system warranty period for this vehicle begins on the date the vehicle is delivered to the first purchaser other than an authorized dealer, or the date it... - Page 30 Coverage of repairs under this warranty applies only when repairs are completed at an authorized dealer or repair facility. The Distributor will not cover repairs performed outside of an authorized dealer or repair facility. The use of replacement parts not equivalent to the original parts may impair the effectiveness of your vehicle’s emission control system.
- Page 31 No express emission control system warranty is given by the Distributor except as specifically set forth herein. Any emission control system warranty implied by law, including any warranty of merchantability or fitness for a particular purpose is limited to the express emission control system warranty terms stated in this warranty.
- Page 32 Baja, INC. P.O. Box 61150 Phoenix, AZ 85082 Tel: 602-443-9180 Toll Free: 888-863-2252...
Need help?
Do you have a question about the DR90 and is the answer not in the manual?
Questions and answers