
Related Manuals for Hoover U8347


Summary of Contents for Hoover U8347
- Page 1 ® Owner’s Manual English pages 3-20 ESPAÑOL pág 20-31 Thank You for choosing HOOVER ® www.hoover.com...
- Page 2 HOOVER SALES & SERVICE CENTERS MICHIGAN ALABAMA COLORADO The Maples Shpg. Ctr. 10244 W. National Ave. NORTH CAROLINA Pinebrook Shpg. Ctr. Academy Pl. Shpg. Ctr. West Allis, WI 53227 1010 Murfreesboro Rd. Evergreen Plaza Shpg. Ctr. Four Seasons Plaza 3980B Airport Blvd.
-
Page 3: Table Of Contents
Replacing powered pet hair before connecting or disconnect- dropped into water, take it to a cleaning tool brush roll . 14-15 ing hose. Hoover Sales and Service Center or Authorized Hoover Warranty Replacing powered pet hair • Unplug cleaner before connect- Service Dealer. -
Page 4: Unpacking
Unpacking your cleaner Carton contents A. or B. Cleaner body and Hose F. Tools C. Telescoping handle/wand G. Floor brush* D. Tag Along™ grip H. Extra Reach™ hose* E. Hose clip and (2) Tag Along™ handle screws *Available on some models. Attach Tag Along™... -
Page 5: Attach Hose
Remove telescoping Position handle Attach hose handle/wand The telescoping handle/wand Stretch hose and guide into hose (C) needs to be positioned and clip. Align button on hose end (F) secured in place. Align the telescop- To remove the telescoping with hole on hose connector (G). Slide ing handle/wand with the recesses on handle/wand for tool use, hose end over connector until the but-... -
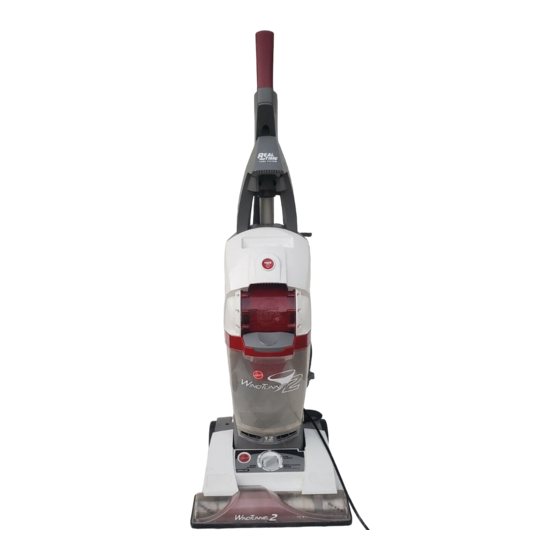
Page 6: Cleaner Description
Cleaner description Features Use the following to identify the 11. Embedded DirtFinder™ (some models) parts and features of your cleaner. Your model will resemble one of the two 12. Surface Command™ control dial (some models) illustrations shown below. 13. Surface Selector (some models) 1. -
Page 7: Using The Cleaner
Using the cleaner DO NOT USE CLEANER OUTDOORS OR ON DAMP OR WET SURFACES. Surface Selector (some Surface Command™ models) POWER button control dial (some models) The POWER button (A) is located The Surface Command™ control The Surface Selector (some at the top of the cleaner body. -
Page 8: (Some Models)
Carrying cleaner Embedded DirtFINDER™ Handle positions feature (some models) With red and green lights, the DirtFINDER™ system alerts the The cleaner can be carried by The handle of your cleaner has user to areas of carpet that may need placing hand under the carrying three positions: upright for storage more cleaning attention. -
Page 9: Using Tools
Using the tools Select proper tool Tools allow for cleaning surfaces above the floor and for reaching hard to clean areas. The cleaner is ready for tool use when the handle is in the upright posi- tion. Note: When handle is in upright posi- tion, agitator brush roll is automatically OFF. -
Page 10: Maintenance
Extra Reach™ hose How to clean tools (some models) To clean the hose and the powered Some models include an Extra hand tool, wipe off dirt with a cloth dampened in a mild detergent. Rinse Reach™ hose to provide you with a with a damp cloth. -
Page 11: Filters
Authorized mild detergent. Rinse and let filter air filter cleans itself while rotating, deposit- Hoover Sales and Service Center. dry completely before repositioning. ing fine debris in the smaller chamber of To remove this filter, remove the dirt the dirt cup (C). -
Page 12: Replacing Headlight
(A). Lift out filter (B) and replace. Replace lens and screws. Should you want to replace this filter, ask for HOOVER part no. 38769032. Agitator brush roll Check agitator brush roll Replace lens When agitator brush roll brushes are worn, the agitator brush roll should be replaced. -
Page 13: Agitator Brush Roll Belt
What to buy When purchasing a new agitator brush roll, ask for HOOVER part no. 48414140. How to replace Turn cleaner ON and rotate mode con- trol dial to HARD FLOOR. Turn cleaner OFF and disconnect from electrical out- let. Place handle in upright position and turn cleaner over so bottom side is up. -
Page 14: Powered Pet Hair Cleaning Tool
Agitator brush roll When agitator brush roll brushes on the powered pet hair cleaning tool are worn, the agitator brush roll should be replaced. Ask for HOOVER part No. 48414088. How to replace 3. Remove agitator brush roll 2. Unscrew the two Phillips... -
Page 15: Replacing Powered Pet Hair Cleaning Tool Brush Roll . 14-15 Replacing Powered Pet Hair Cleaning Tool Belt
Replace belt Belt replacement Inspect the belt When replacing belt, ask for HOOVER part No. 38528037. The powered pet hair cleaning tool belt is designed to last a long time and is 1. Remove bottom plate, belt guard not normally replaced. However, if the... -
Page 16: Clearing Blockages
Clearing blockages Disconnect cleaner from electrical outlet. Check agitator brush roll Check airflow path Low suction or pick up may be due to a blockage in the system. Refer to the fol- Turn cleaner OFF and disconnect from lowing steps to check for blockages con- electrical outlet. -
Page 17: Lubrication
Calling 1-800-944-9200 for an automated referral of authorized service outlet locations (U.S. only) Do not send your cleaner to Hoover in North Canton, Ohio for service; this will only result in delay. If further assistance is needed, contact the Hoover Consumer Response Center, Phone: 330-499-9499. -
Page 18: Troubleshooting
Troubleshooting If a minor problem occurs, it usually can be solved quite easily when the cause is found by using the check list below. What’s the problem? Cleaner won’t turn on. What’s the cause? What’s the solution? Not firmly plugged in. Plug unit in firmly. -
Page 19: Warranty
For an automated referral of authorized service outlets in the U.S.A., phone 1-800-944-9200 OR visit Hoover on-line at www.hoover.com This warranty does not cover pick up, delivery, or house calls; however, if you mail your appliance to a Hoover Sales and Service Center for warranty service, transportation will be paid one way.
Need help?
Do you have a question about the U8347 and is the answer not in the manual?
Questions and answers