Advertisement

@ReolinkTech https://reolink.com
What's in the Box

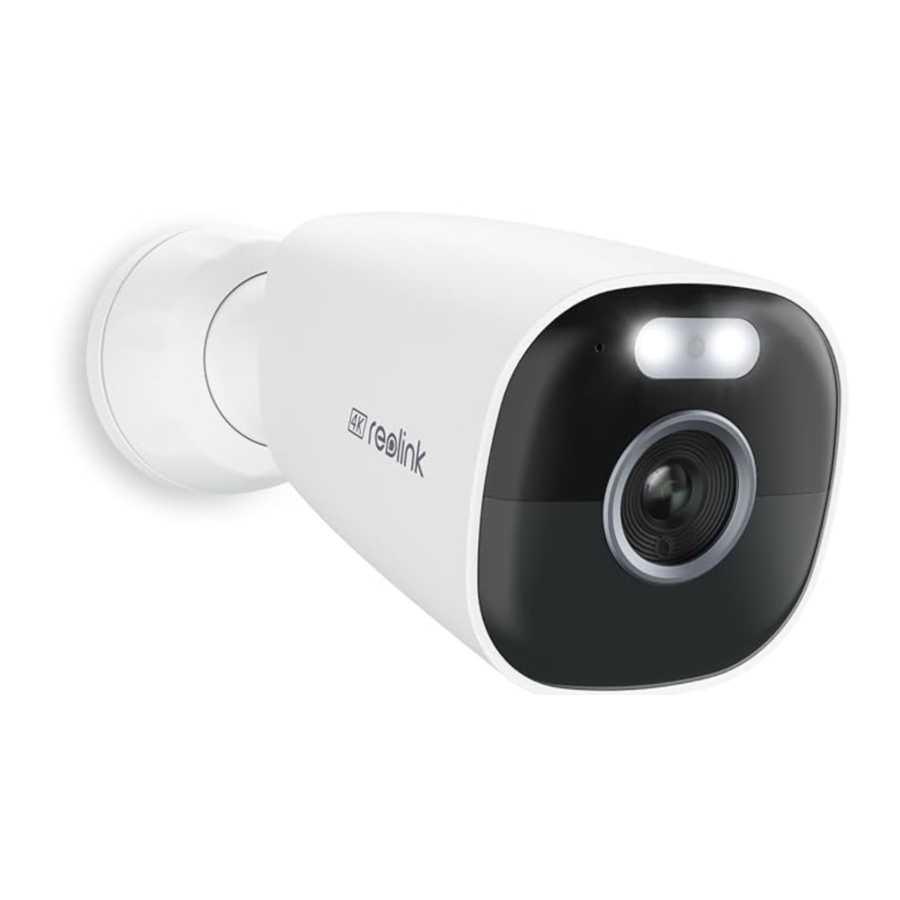
Camera Introduction

- Status LED
- Buit-in Mic
- Spotlight
- Infrared LEDs
- Lens
- Daylight Sensor
- PIR Sensor
- Power Switch
- Micro SD Card Slot
- Speaker
- USB-C Port
Different states of the status LED:
 Red Light: WiFi connection failed
Blinking: Standby status
 Blue Light: WiFi connection succeeded
On: Working status
Camera States of Different Power Switch Actions:
Power on: Press and hold for 2s
Power off: Press and hold for 5s
Reset to factory settings: Press the button 3 times in a row when the camera is on
Set up the Camera
Set up the Camera Using a Smartphone
Step 1 Scan to download the Reolink App from the App Store or Google Play store.


Step 2 Press and hold the power switch for two seconds to power on the camera.

Step 3 Launch the Reolink App, click the "![]() " button in the top right corner to add the camera. Scan the QR code on the device and follow the onscreen instructions to finish initial setup.
" button in the top right corner to add the camera. Scan the QR code on the device and follow the onscreen instructions to finish initial setup.
 NOTE: This device supports 2.4 GHz and 5 GHz Wi-Fi networks. It is recommended to connect the device to 5 GHz Wi-Fi for a better network experience.

Set up the Camera on PC (Optional)
Step 1 Download and install the Reolink Client: Go to https://reolink.com > Support > App&Client.
Step 2 Launch the Reolink Client, click the "![]() " button, input the UID code of the camera to add it and follow the onscreen instructions to finish initial setup.
" button, input the UID code of the camera to add it and follow the onscreen instructions to finish initial setup.
Charge the Camera
It's recommended to fully charge the battery before mounting the camera.

Charge the battery with a power adapter. (not included)

Charge the battery with the Reolink Solar Panel (Not included if you only purchase the camera).
Charging Indicator:
![]() Orange LED: Charging
Orange LED: Charging
![]() Green LED: Fully charged
Green LED: Fully charged

For better weatherproof performance, please always cover the charging port with the rubber plug after charging the battery.
Install the Camera
Notes on Camera Installation Position

- Install the camera 2-3 meters (7-10 ft) above the ground. This height maximizes the detection range of the PIR motion sensor.
- For better motion detection performance, please install the camera angularly.
NOTE: If a moving object approaches the PIR sensor vertically, the camera may fail to detect motion.
Mount the Camera

Drill holes in accordance with the mounting template and screw the base of the bracket to the wall. Next, attach the other part of the bracket to the base.
NOTE: Use the drywall anchors included in the package if needed.

Screw the camera to the bracket. Adjust the camera angle to get the best field of view.

Secure the camera by turning the part on the bracket identified in the chart clockwise.
NOTE: To adjust the camera angle later, please loosen the bracket by turning the upper part anticlockwise.
Install the Camera with Loop Strap

Secure the bracket's mounting plate to the base with screws.

Thread the provided strap to the plate and fasten it to a tree. Next, attach the camera to the plate and you are good to go.
Safety Instructions of Battery Usage
The camera is not designed for running 24/7 at full capacity or around-the-clock live-streaming. It's designed to record motion events and to live view remotely only when you need it. Learn useful tips on how to extend the battery life in this post: https://support.reolink.com/hc/en-us/articles/360006991893
- Do not remove a built-in battery from the camera.
- Charge the battery with a standard and high-quality DC 5V battery charger or Reolink solar panel. It's not compatible with solar panels from any other brands.
- Charge the battery only if in temperatures between 0°C and 45°C. The battery is intended for use only in temperatures between -10°C and 55°C.
- Keep the charging port dry, clean and free of any debris. Cover it with the rubber plug after the battery is fully charged.
- Do not charge, use or store the battery next to areas that may become hot. Examples include, but are not limited to, on or near a space heater, cooking surface, cooking appliance, iron, radiator, or fireplace.
- Do not use the battery if its case appears damaged, swollen, or compromised. Examples include, but are not limited to, leaking, odors, dents, corrosion, rust, cracks, swelling, melting, and scratches.
- Always follow the local waste and recycling laws to dispose of used batteries.
Troubleshooting
Camera is not Powering on
If your camera is not powering on, please apply the following solutions:
- Make sure the power switch is turned on.
- Charge the battery with a DC 5V/2A power adapter. When the green light is on, the battery is fully charged.
If these doesn't work, please contact Reolink Support https://support.reolink.com/.
Failed to Scan the QR Code on the Phone
If the camera cannot scan the QR code on your phone, please try the following solutions:
- Remove the protective film from the camera lens.
- Wipe the camera lens with a drypaper/towel/tissue.
- Vary the distance between your cameraand the mobile phone so that the camera can focus better.
- Try to scan the QR code under sufficientlighting.
If these won't work, please contact Reolink Support https://support.reolink.com/.
Specifications
Operating Temperature:
-10°C to 55°C (14°F to 131°F) Size: 188 x 75 x 78 mm
For more specifications, visit the Reolink official website.
WiFi Operating Frequency
OPERATING FREQUENCY: (the maximum transmitted power) 2.4GHz: (For 2.4GHz camera only): 2412MHz --- 2472MHz ( EIRP < 20 dBm ) 5GHz:
5150MHz --- 5250MHz ( EIRP < 23 dBm )
5745MHz --- 5825MHz ( EIRP < 14 dBm )
Technical Support
If you need any technical help, please visit our official support site and contact our support team before returning the products, https://support.reolink.com.
Documents / Resources
References
![www.apple.com]() App Store - Apple
App Store - Apple![play.google.com]() Google Play
Google PlayHow to Extend the Battery Life of Reolink Battery Powered Cameras
Reolink Support - Official Reolink Help Center
Download manual
Here you can download full pdf version of manual, it may contain additional safety instructions, warranty information, FCC rules, etc.
Advertisement


Need help?
Do you have a question about the Argus Eco Ultra and is the answer not in the manual?
Questions and answers