
Related Manuals for UfiSpace Macro


Summary of Contents for UfiSpace Macro
- Page 1 User Manual LoRa Base Station Outdoor Series 0/17 All!product!specifications!are!subject!to!change!without!notice!
-
Page 2: Table Of Contents
General Description ................... 2 HW Overview ...................... 3 SW Overview ....................... 6 Network Access ......................6 3.1.1 Use Default Configuration ..................7 3.1.2 Changing Configuration ................... 7 Web Interface ........................ 8 3.2.1 Status Page ......................... 8 3.2.2 WAN Page ........................9 3.2.3 NTP Page ........................ -
Page 3: General Description
General Description This Outdoor LoRa Gateway is designed with Semtech version 2.0 technology to provide low power and wide area (LPWA) unlicensed band wireless connection. This gateway supports connectivity for wide range of Internet of Things (IOT) applications. This outdoor gateway uses LoRaWAN technology from Semtech and is complied with specification defined by LoRa Alliance. -
Page 4: Hw Overview
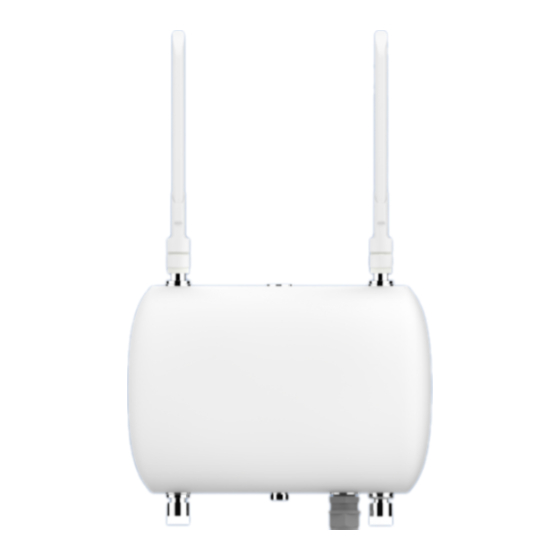
HW Overview This section describes HW overview of the Outdoor LoRa V2.1 Gateway. Connectors and Interfaces Figure 1. Gateway External Ports LoRa Antenna #1 (main) LoRa Antenna #2 (secondary) Pressure Vent GPS Antenna LTE Antenna 48 VDC-IN/ PoE Figure 2. Cabling LoRa Antenna #1 (8dBi) LoRa Antenna #2 (8dBi, optional) - Page 5 Table 1. Product Specifications Specification Description LoRa LoRa Frequency !! 863 – 870 MHz and its subset, complying with region/ country local radio requirements TX Power (ERP) !! 27 dBm @ 869.525MHz, 14 dBm @ other channels (with 8 dBi antenna + 1.5 dB cable loss) RX Sensitivity !! -138 dBm @ SF12 Sectorization...
- Page 6 Power Input !! PoE (47-57VDC) Power Consumption !! Maximum 40 watts Antenna LoRA !! 0/ 8 dBi antenna !! < 1.6 dBi antenna !! 3.3VDC active antenna Lighting Protection !! DC ground Physical Specifications Mounting !! Wall and pole mount Housing Material !! Aluminum, plastic IP Rating...
-
Page 7: Sw Overview
SW Overview LoRa Network Solution This outdoor LoRa gateway receives data from end-devices, then relay it to a backend server and routed to an application server for information processing. Figure 3. LoRa Network 3.1 ! Network Access The backhaul network configuration on Outdoor LoRa Gateway supports several connection types which can be selected as primary and secondary WAN. -
Page 8: Use Default Configuration
3.1.1 ! Use Default Configuration The primary WAN is configured as Ethernet with DHCP client through the PoE connectivity. On the device with LTE support, LTE is configured as secondary WAN. In the installation environment, no extra configuration is needed if a DHCP server is available through Ethernet connection. -
Page 9: Web Interface
3.2 ! Web Interface The outdoor LoRa Gateway has a built-in web interface which supplies the configuration of the backhaul network and displays the status of gateway. You can access it with opening a web browser and enter the IP of device. After entered IP of outdoor LoRa Gateway in the URL of web browser, you will be prompted to input the username and password. -
Page 10: Wan Page
Description of displayed items Show version of current firmware Firmware Version (May change after firmware upgrade) HW Revision Show version of current hardware Show settings and state of current backhaul connection: <WAN_type>,<IP address> or NO if WAN connection is not ready. <WAN_type>: ETH –... - Page 11 Unsafe! Select Ethernet as WAN Use DHCP Mode to get IP address automatically •! (1)! Set Primary WAN type as “Ethernet” (2)! Set Secondary WAN type as “None” (3)! Set Ethernet IP Type under Ethernet Settings as “DHCP” (4)! Press [Apply] button 10/17 All!product!specifications!are!subject!to!change!without!notice!
- Page 12 Use static IP Mode •! (1)! Set Primary WAN type as“Ethernet” (2)! Set Secondary WAN type as “None” (3)! Set Ethernet IP Type under Ethernet Settings as “Static” (4)! Configure proper settings in IP address/Netmask/Gateway /Primary DNS/Secondary DNS under Static IP Settings (5)! Press [Apply] button Select WiFi client as WAN Use DHCP Mode to get IP address automatically...
- Page 13 (1)! Set Primary WAN type as “WiFi” (2)! Set Secondary WAN type as “None” (3)! Set WiFi IP Type under WiFi Client Settings as “DHCP” (4)! Set WiFi SSID / WiFi Security Type / WEP or WPA Passphrase per external AP configuration (5)! Press [Apply] button Use static IP Mode •!
-
Page 14: Ntp Page
(1)! Set Primary WAN type as “LTE” (2)! Set Secondary WAN type as “None” (3)! Set LTE APN / LTE Username / LTE Password (4)! Set LTE Power to "Enable" (5)! Press [Apply] button Note If LTE username and LTE password are not used, please enter with “any” 3.2.3 ! NTP Page To maintain proper log records and have good reference on timestamp, NTP is used to synchronize... -
Page 15: Management Page
In this page, at most 5 NTP servers can be set for time synchronization. At least one server should be set in order to have NTP working properly. Un-used server settings could be left as blank. You need to click on [Apply] button for any changes to take effect immediately. As showed in the above picture, the default value uses NTP POOL project (http://www.pool.ntp.org) configuration which automatically select nearest time server to use. -
Page 16: Lrr Log Page
The firmware file usually had a name in following format: FW_<date code>_TI1003TP where <date code> is the release date of this firmware. You may refer the release note for version information. For firmware upgrade, first use [Browse…] button to select firmware file, then press [Upgrade] to start the upgrade process. -
Page 17: Warranty Coverage
The Filter command is not used, since full log is retrieved. Warranty Coverage The ufiSpace Gateway comes with a 3-year limited hardware warranty. The LoRa® name and associated logo are trademarks of Semtech Corporation or its subsidiaries. Semtech, the Semtech logo and LoRa® are registered trademarks of Semtech Corporation. -
Page 18: Administrator Card
Administrator Card Every outdoor LoRa Gateway is produced with a unique password for supplying better security. You may need to cut following information and keep it in a safe place. [Outdoor!LoRa!Gateway]! ! BS!ID:! ! 46584253xxxxxxxx! Web!login!username:! ! bsconfig! Web!login!password:! ! aup6g/t;3! Console!login!username:! ! mlbadmin! ! Console!login!password:! ! xm3zj4yji4! [Security!Constraint!on!Actility!Customized!Build]! !
Need help?
Do you have a question about the Macro and is the answer not in the manual?
Questions and answers