
Related Manuals for Innovative Technology ITCDS-6000


Summary of Contents for Innovative Technology ITCDS-6000
- Page 1 USB Turntable Model: ITUT-5000 ITUT-5000 is a part of ITCDS-6000. Instruction Manual PLEASE READ THIS INSTRUCTION MANUAL CAREFULLY BEFORE USE AND KEEP IT FOR FUTURE REFERENCE.
-
Page 2: Important Safety Instructions
IMPORTANT SAFETY INSTRUCTIONS 1. Read these instructions – All the safety and operating instructions should be read before this product is operated. 2. Keep these instructions – The safety and operating instructions should be retained for future reference. 3. Heed all warnings – All warnings on the appliance and in the operating instructions should be adhered to. 4. Follow all instructions – All operating and use instructions should be followed. 5. Do not use this apparatus near water – The appliance should not be used near water or moisture – for example, in a wet basement or near a swimming pool, and the like. 6. Clean only with dry cloth. 7. Do not block any ventilation openings. Install in accordance with the manufacturer’s instructions. - Page 3 user-serviceable parts inside. Refer servicing to qualified personnel. -The exclamation point within and equilateral triangle is intended to alert the user to the presence of important operating and maintenance instructions in the literature accompanying the appliance. This equipment is a Class Ⅱ or double insulated electrical appliance. It has been designed in such a way that it does not require a safety connection to electrical earth. This equipment is a Class Ⅱ or double insulated electrical appliance. It has been designed in such a way that it does not require a safety connection to electrical earth. 17. The mains plug is used as disconnect device, the disconnect device shall remain readily operable.
- Page 4 Precautions Safety Information-caution: 1. In order to shut off power to this product completely, unplug the power cord from the wall outlet. Be sure to unplug the unit if you do not intend to use it for an extended period of time, such as during a vacation. 2. Use of controls, adjustments and performance of procedures other than those specified herein may result in hazardous radiation exposure. 3. To prevent electric shock, match wide blade of plug to wide slot, fully insert. 4. If this product is experience problems during operation, contact qualified service centers, and do not use the product in defective states. Safety Precautions WARNING: To reduce the risk of fire or electric shock, do not expose this appliance to rain or moisture.
-
Page 5: Before Use
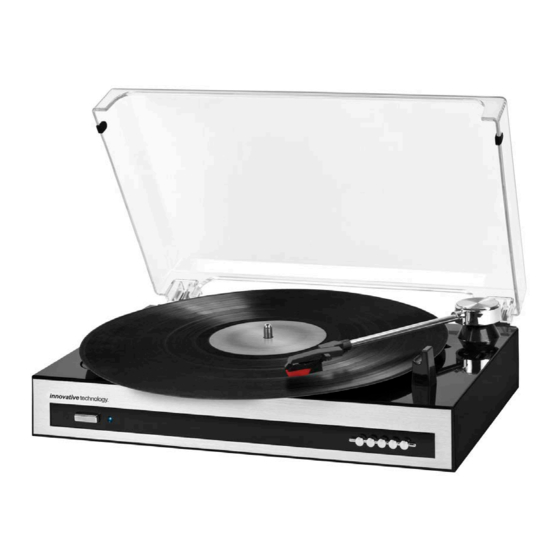
Before Use 1. Choose unit installation location carefully. Avoid placing it in direct sunlight or close to a source of heat. Also avoid locations subject to vibrations and excessive dust, cold or moisture. Keep away from sources that hum, such as transformers or motors. 2. Do not open the cabinet as this may result in damage to the circuitry or electrical shock. If a foreign object should get into the set, contact your dealer. 3. Be sure not to handle record with dirty fingers. Never play a record that has a crack on the surface. - Page 6 Layouts 1. TURNTABLE 9. POWER INDICATOR 2. 45 RPM ADAPTOR 10. POWER BUTTON 3. TONE ARM REST 1 11. DECORATION 4. SPEED SELECTOR 12. RCA LIINE-OUT SOCKET 5. TONE ARM 13. USB SOCKET 6. TONE ARM REST 2 14. DUST COVER 7. STYLUS 15. AC POWER CORD 8. NEEDLE COVER...
- Page 7 PART I: Main Function Line Out 1. Disconnect the AC power cord from the household outlet to turn the unit OFF. 2. Connect the RCA line out jacks to the auxiliary input sockets of your home amplifier device. Make sure to match the socket colors with the jack colors. 3. Connect the unit’s power cord to the household outlet. Also, power on your amplifier device and adjust its volume level. Phonograph 1. Connect the AC plug to the household outlet. 2. Press the power button to turn on the unit. 3. Put a record on the turntable. Remember to use the 45 RPM adaptor located on the bottom left corner when playing a 45 RPM record. 4. Remove the white plastic needle cover. Keep the needle cover in a safe and accessible place for future use. 5. Select the speed according to the record you are playing. 6. Lift and move the tone arm over the turntable. Record will start spinning and place the tone arm in desired position to start playing music. NOTE: It is strongly recommended to play records with the transparent dust cover closed. Also please do not place anything on top of the dust cover especially while playing a record. 7. To pause or stop playing, you need to lift and move the tone arm back to the tone arm rest manually. 8. When the end of the record is reached, the tone arm and rotation stop. Lift the tone arm and place it on the tone arm rest manually. 9. Remember to use the white plastic needle guard to protect the stylus and unplug the unit. AUX-IN 2 Function (Turntable Setup) Before use, make sure both the ITCDS-5000a and ITUT-5000 are plugged into a power source. 1. To connect the turntable unit (ITUT-5000) to the main speaker system (ITCDS-5000a), plug the included RCA Cable into the Line Out jacks (Aux-In 2) into the back of the main speaker system. Make sure that the red RCA Cable is inserted into the red jack and the white RCA Cable is inserted into the white jack. 2. Use the other end of the RCA Cable to connect to the back of the turntable unit, again being sure that the RCA Cable is plugged into the correct color coded jack. 3. Turn on both the ITCDS-5000a and the ITUT-5000 using their respective power buttons. 4. Press the Function button on main speaker system to select the AUX-IN 2 function. 5. Follow turntable operation steps for audio playback.
-
Page 8: Audacity Installation And Usb Connection
PART II: Audacity Software The provided CD disc contains the following software: (1)Audacity_for_mac---------For Mac (see page 22) (2)Audacity_for_win ---------For Windows The software is compatible with Window XP, VISTA, 7 and 8, 10 requires appropriate drives and Mac. NOTE: - Read about Audacity on Windows 8, 7 and Vista. Windows 2000, NT, and 95 are not supported. -Windows 10 is supported, but subject to all enabled devices having Windows 10-compatible drivers designed for the device. - Page 9 Note: The language choice in the Windows EXE Audacity installer only selects the language for the installer. 5. The Audacity Setup Wizard will appear. Click on Next to install the software. 6. Continue to click on the Next buttons.
- Page 10 7. Click on the Install button to start installation. 8. Click on Next to continue. 9. Click on Finish to complete installation. 10. You can now open the Audacity software and start recording your files. Note: 1. Once you set up Audacity, you do not need to re-set it with each use. 2.
- Page 11 4. Users upgrading to this release from Audacity 2.0.5 or earlier who had FFmpeg installed will see a notice that FFmpeg needs to be reconfigured. Please visit http://manual.audacityteam.org/o/man/faq_installation_and_plug_ins.html#ffdown for a link to the recommended 2.2.2 version of FFmpeg for Windows and Mac OS X, and for information for Linux. 5.
- Page 12 Audacity Preferences 1. Click the “Edit” on the Audacity interface, select “Preferences”. In the pop-up window of the Audacity Preferences, tabs of Devices, Playback, Recording, Quality, Interface, Tracks, Spectrograms, Import / Export, Extended Import, Projects, Libraries, Directories, Warnings, Effects, Keyboard, Mouse and Modules are listed on the left side of the window as shown in the picture below.
- Page 13 3. Click ‘Recording’ on the left side and the detailed contents will display on the right side. Click the checkbox beside ‘Software Play through: Listen while recording or monitoring new track’. Click the checkbox beside ‘Sound Activated Recording’ and adjust the Sound Activation Level (dB) to -36. NOTE: Once the ‘Sound Activated Recording’...
- Page 14 5. You can download the ‘lame’ software from the website. Click ‘Download’ and a website will be opened automatically. Open the website to download ‘lame_enc.dll’: click on LAME download page. Jump straight to Windows download’ in the top line. Left click 'Windows download’ and it will jump to the download chapter for Windows.
- Page 15 Close the webpage, then click OK to close the Audacity preference. Minimize Audacity interface, then open the Folder where you saved the libmp3lame-win-3.99.3.Double click on it, then double click on it again to open. Now left click on lame_enc.dll. Hold and drag it to your Desktop. NOTES: Once you move it to the Desktop you do not need to do this again.
- Page 16 4. At end of a song, click the “pause” ( ) button on the computer and press the Stop button on the turntable, move the cursor to the wave area and left click at the end of the song. For the next song, replace the album or move tone-arm to another desired song. Press the Play button on the turntable to start playing the next song.
- Page 17 • In Control Panel interface Find Sounds and Audio Devices. Double click the icon to enter Sounds and Audio Devices Properties interface. • In Sounds and Audio Devices Properties interface Volume window will display, select the Audio tab to reveal the settings. In Sound recording, select USB PnP Audio Device and click the Volume button to set the recording input level.
- Page 18 2. If you do not hear any sound when the turntable is connected and you wish to listen to the music and /or video, it is possible that the default playback device has been changed to USB PnP Audio Device when the turntable connects to the PC.
-
Page 19: Dividing Tracks
DIVIDING TRACKS After you have finished downloading, you may play back the songs through your computer before exporting. In stop mode, simply click ( ) SKIP TO START button and click then the ( ) PLAY button. 1. Press ( ) button to return to the beginning of the first song. - Page 20 5. In the next window, fill in the information in the window entitled “Edit Metadata”. Then click “OK”. Wait a few seconds before exporting the selected audio. Second song to be divided and saved: 1. Move cursor to the wave graphic at the beginning of the second song. Left click mouse and hold then drag from left to right until you reach and highlight the end of the second song.
- Page 21 EXPORT AND SAVE FOR WAV AND OGG FORMATS (AFTER RECORDING IS COMPLETE) When the song is finished, click ( ) on the screen to stop playing. You can export and save tracks individually, or export and save into one file. To export and save individually: 1.
-
Page 22: Setting The Language
5. Wait for a few seconds until the export & saving is completed. Setting the language 1. Click Edit and select Preferences. 2. Another window titled with Audacity Preferences will appear. Click the Interface tab and click the pull down arrow to select the language you wanted. -
Page 23: Audacity For Mac Users
3. Then click OK to close the window. The new setting will only be active in the next start - that means you need to close the Audacity and re-open the software again. AUDACITY FOR MAC USERS System Requirements Audacity for Mac is a Universal Binary for OS X 10.6 and later. Audacity runs best with at least 1 GB RAM and a 1 GHz processor (2 GB RAM/2 GHz on OS X 10.7 and later). - Page 24 TIPS: To check your computer OS version, you can click the Apple icon then select “About This Mac”. The next window will display and the processor type and the OS version will display as below. 3. Double click on the Audacity_for_mac folder. 4.
- Page 25 Drag the "Audacity" folder in to "Applications" as the instruction show on the window. 5. Double click the Audacity folder and in the Audacity window, files will be displayed in the folder. 6. Double click the Audacity icon to start the software running, alternatively, drag the “orange ball wearing headphones” icon down onto the desktop toolbar.
-
Page 26: Configuring Audacity For Mac
CONFIGURING AUDACITY FOR MAC Audacity Interface for Mac Audacity Interface---Settings and controls At the top of the main Audacity window, to the right of the play control buttons, you will see the input and output level meters (labeled L and R). Under the output level meter, is an icon that looks like a microphone. Next to the microphone is a black arrow that points down. - Page 27 AUDACITY CONTROLS AND BUTTONS Use the attribute control button at the top of the screen to go to Beginning, Play, Record, Pause, Stop and End. Use the File, Edit, View, Transport, Tracks, Generate, Effect and Analyze menus to Save, Export, and Edit the music. Click the ( ) button to skip to start;...
- Page 28 2. In the window of Audacity Preferences click “Devices” on the left hand side. Then on the right side within the Recording Device column, set Device to “USB PnP Audio Device”, Channels to “2 (Stereo)”. NOTE: If you cannot find the " USB PnP Audio Device" in the Device list, close the Audacity Software and re-open and try again.
- Page 29 4. Click “Quality” on the left then on the right side in the Sampling column, select “44100 Hz” in Default Sample Rate and select “16-bit” in Default Sample Format. 5. Click “Libraries” on the left then on the right side in MP3 Export Library column, check if the program has detected and shown the MP3 Library Version there.
- Page 30 If “MP3 export library not found” is displayed, you must find the “LAME”. Click “Locate…” button then a window named “Locate Lame” appears to find where the “LAME” is. Click the “Browse…” button to find it. If you cannot find it or the LAME file you found is not compatible, click the “Download” button and a website will show automatically.
-
Page 31: Recording Operation
Scroll down the webpage. You will notice a form showing the LAME for all version systems. Find a title named “For Audacity 1.3.3 or later on Mac OS X 10.4 and greater (Intel or PPC), and audacity 1.2.5 on OS X 10.4 and later (Intel)” and then click “Lame Library v3.98.2 for Audacity on OSX.dmg”... - Page 32 4. At end of the song, click “pause” ( ) button on computer and press Stop button on turntable, move cursor to the wave area and left click at the end of the song. For the next song, replace the album or move tone-arm to another desired song. Press Play button on the turntable to start playing the next song.
- Page 33 DIVIDING TRACKS 1. Press ( ) button to return to the beginning of the first song. 2. Move cursor to the wave graphic area, left click the mouse and hold then drag from left to right. Release the mouse when the highlighter has reached the end of the first song.
-
Page 34: Export And Save Files (After Recording Is Completed)
6. Edit Metadata window will appear. Complete the information then click OK. Wait for a few minutes until the saving is complete. EXPORT AND SAVE FILES (AFTER RECORDING IS COMPLETED) When the recording is finished, click the ( ) on the screen and stop the cassette playback. - Page 35 To export and save into one file, click the “File” tab on the Audacity window then select “Export Audio”. 2. A window will pop up after clicking Export. It will default to the MP3 format, but you also can select other formats by clicking the arrow located at the right of the MP3 Files.
-
Page 36: Troubleshooting Guide
TROUBLESHOOTING GUIDE If you experience any problems with your unit, kindly consult the following guide prior to calling your dealer. NO SOUND: • If you are not getting any sound into the software application, go back to the preferences as shown above and make sure that you have selected the USB PnP Audio Device for the recording device in the devices. - Page 37 Then find “System Preference” and double click it. In the new interface, find the “Sound” icon and double click it. Adjust the Output volume under “Sound Effects” Under “Input”, select “USB PnP Audio Device” and adjust the “Input volume” POOR SOUND QUALITY: •...
- Page 38 Problem Cause Solution Power does not come on Connect the unit to the when the unit is Unit is unplugged. AC power supply. switched on. The volume is turned Adjust the volume. down (to MIN). No sound comes out of the speakers. The input selector does Re-select the desired not match the playback input source. source. The unit is too close to a Turn off the TV or other The sound is noisy. TV set or another similar appliance, and relocate appliance. the unit.
- Page 39 Go back to the preferences as shown above and make sure that you have selected the “USB PnP Audio Device” for the “USB PnP Audio Device” Recording Device in the may not be selected Device Audacity when choosing a Preference Settings. Recording Device during Close Audacity, turn off No sound. the Device Audacity the turntable and unplug Preference Settings. the USB Cable. Plug the Make sure the USB Cable in after a Microphone slider it is moment, turn on the not at full volume turntable and reopen Audacity. Click on the microphone drop-down menu and select Start Monitoring. Adjust the microphone slider. Check your stylus to make sure it is secured to the tone arm. he stylus does not have Make sure that your RCA a great connection to plugs are plugged into a the tone arm. source or not touching The RCA Plugs and/or bare metal. If you are Poor sound quality...
-
Page 40: Specification
Specification USB Type……………………………………..……………………… USB series B connector Recording……………………………………..……………… USB to PC record for vinyl record Full-Speed………………………….………………………… USB 2.0 full speed PHONOGRAPH section Motor……………………………………………………….…… DC servo motor Drive system…………………………………………………. Belt drive Speeds………………………………………………………….. 33 1/3 rpm, 45 rpm and 78 rpm Wow & Flutter………………………………………………. Less than 0.25% (WTD) S/N ratio……………………………………………………….. More than 35 dB Cartridge type……………………………………………….. Ceramic stereo cartridge Stylus……………………………………………………………. ITRRS-300 Output level………………………………………………….. 160-380 mV (5 cm/sec at 1 KHz) GENERAL Power requirements……………………………………… AC 120 V ~ 60 Hz Power consumption……………………………………… 5 W Dimensions (LxDxH) …………………………………… 360mm(L)×221.6mm(D)×105mm(H) Weight………………………………………………………….. 1.76 kg (approx.) Standard accessories…………………………………….. Instruction Manual 45 RPM Adaptor A Disc for Audacity Software Driver USB Cable RCA Line-out Cable Made in China. -
Page 41: Fcc Statement
FCC Statement This device complies with Part 15 of the FCC Rules. Operation is subject to the following two conditions: (1) This device may not cause harmful interference, and (2) this device must accept any interference received, including interference that may cause undesired operation. NOTE: This equipment has been tested and found to comply with the limits for a Class B digital device, pursuant to Part 15 of the FCC Rules. These limits are designed to provide reasonable protection against harmful interference in a residential installation. This equipment generates uses and can radiate radio frequency energy and, if not installed and used in accordance with the instructions, may cause harmful interference to radio communications. However, there is no guarantee that interference will not occur in a particular installation. If this equipment does... -
Page 42: California Prop 65 Warning
CALIFORNIA PROP 65 WARNING "WARNING" This product contains chemicals known to the State of California to cause birth defects or other reproductive harm. For more information on these regulations and a list of chemicals, log on the following website address: http://www.oehha.ca.gov/prop65.html...
Need help?
Do you have a question about the ITCDS-6000 and is the answer not in the manual?
Questions and answers