Advertisement
Quick Links
Advertisement

Related Manuals for Motic 1801


Summary of Contents for Motic 1801
- Page 1 Instruction Manual 18/28 LED Series Copyright © 02/02 Motic Microscopes, European Division.
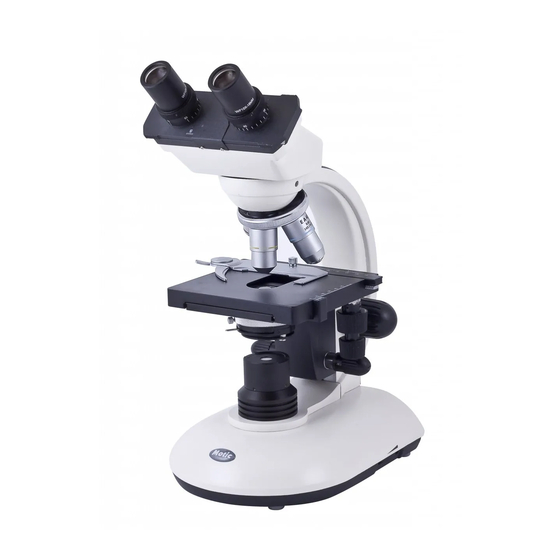
- Page 2 1. Eyepiece 13. Sliding interpupillary adjustment 2. Interpupillary 14. Eyepiece scale holder with diopter 3. Revolving adjustment nosepiece 15. Head 4.Objectives 16. Arm 5. Moveable 17. Rack stop stage clip screw 6. Specimen holder 18. Specimen mechanism holder mechanism support screws 7.
- Page 3 Introduction Thank you for your purchase of a Motic microscope. Motic microscopes are precision instruments, subjected to meticulous examination in order to reach you in perfect condition. Their design combines easy management and optimum functioning with minimum maintenance. The information contained in this manual is likely to go beyond what the average user needs to know to use the microscope, however, it is provided to answer any queries that may arise.
- Page 4 Description of Components 1. Head (15). Available in monocular or binocular, according to the model, and rotating 360º to avoid the necessity of moving the microscope, should another user wish to use it. 2. Eyepiece (1). The group of lenses closest to the eye, magnifying the image formed by the objectives. In the monocular models, the eyepiece contains a pointer to single out any particular element of the sample to another user.
- Page 5 Operation A. Starting Up. 1. Before using the microscope, adjust the light intensity control (23) to minimum position. This should be repeated every time the microscope is switched on or off to prolong the use of the bulb. 2. Press switch to position ON. (Fig. 1) 3.
- Page 6 D. Adjusting the diopter for difference in eyesight (Only in binocular models). 1. Using only the right eye, peer into the right-hand eyepiece (1) and adjust the fine focus (20). 2. Then using only the left eye, peer into the left-hand eyepiece and adjust the focus by turning the diopter adjustment (14) on the left eyepiece tube, until a sharp image is obtained.
- Page 7 Maintenance WARNING: FOR YOUR OWN SAFETY, SWITCH OFF AND DISCONNECT THE MICROSCOPE FROM ANY ELECTRICAL SOURCE BEFORE ATTEMPTING ANY MAINTENANCE PROCEDURE TO AVOID THE RISK OF ELECTROCUTION. IF THE MICROSCOPE REQUIRES ANY MAINTENANCE OR REPAIR NOT APPEARING IN THIS MANUAL, CONSULT YOUR DISTRIBUTOR. A.
- Page 8 B. Electrical Maintenance. WARNING: FOR YOUR OWN SAFETY, SWITCH OFF AND DISCONNECT THE MICROSCOPE FROM ANY ELECTRICAL SOURCE BEFORE ATTEMPTING ANY MAINTENANCE PROCEDURE TO AVOID THE RISK OF ELECTROCUTION. 1. Changing the bulb. a. Lift up the stage using the focusing knobs.
-
Page 9: Troubleshooting
a. Loosen the rack stop screw (Fig. 3) with the 2mm key. b. For the 18 series: With the fine focus adjustment (20) at mid-range, focus on specimen slide, using only the coarse focus knob (19), firstly with the 4X objective, then with the 10X. - Page 10 Bulbs and fuses are not under warrantee. The warrantee service is provided by MOTIC, or its authorised distributors. Defective products will be repaired free of charge when returned to MOTIC, or one of its distributors. Transport costs will be covered by the purchaser.
Need help?
Do you have a question about the 1801 and is the answer not in the manual?
Questions and answers