Advertisement
Quick Links
Advertisement

Subscribe to Our Youtube Channel
Related Manuals for Motic PSM1000 Series


Summary of Contents for Motic PSM1000 Series
- Page 1 User’s Manual Microscope Unit PSM1000 WWW.MOTIC.COM MOTIC CHINA GROUP CO., LTD.
- Page 2 PRECAUTIONS User Manual To obtain the best possible performance and maximum service life from the Motic Microscope PSM1000 (hereinafter referred to as “the PSM1000”), please read this manual thoroughly. This manual describes all of the components available for the PSM1000 system, including optional components available for purchase.
-
Page 3: Warranty
WARRANTY In the event that the Microscope PSM1000 series should prove defective in workmanship or material, within 5 years from date of purchase, it will be repaired or replaced, at our option, free of charge upon its return to us prepaid. - Page 4 1.1 Outline Innovative ergonomic design, leading edge optical systems and a host of unique advanced features make this Motic metallurgical/industrial microscope ideally suited to the needs of manufacturing and research & development in the fields of metallurgy, semiconductors and electronics.
- Page 5 1. OVERVIEW (CONTINUED) Part Name Part No. Qty. Note ○ ELWD2X SG01S102C3 N.A.:0. 055 Working Distance: 34 ○ ELWD5X SG01S162C3 N.A.:0. 14 Working Distance: 34 Extra Long working ○ ELWD10X SG01S022C3 N.A.:0. 28 Working Distance: 33.5 distance Plan APO ○ ELWD20X N.A.:0.
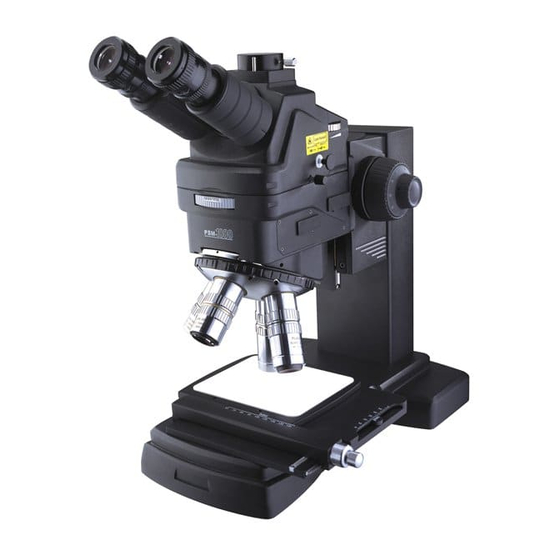
- Page 6 1. OVERVIEW (CONTINUED) 1.3 Nomenclature 1. Eyepiece 10. Tube Lens Change-over Turret 2. Binocular Tube 11. Interpupillary Scale 3. Trinocular Head 12. Focus Block 4. Body 13. Filter Slot in Light Source Side: Attaches 5. Nosepiece an optional filter polarizer. 6.
- Page 7 3. SETUP 3.1 Mount eyepiece When you first use this microscope after unpacking, remove the protective cap of the ocular upper tube and mount the eyepiece. The eyepieces use a high-eye-point system and have rubber eye cups attached. If you wear eyeglasses, turn the rims outward.
- Page 8 3. SETUP (CONTINUED) 3.3 Set up Illumination Loosen up the lock screw and remove the protective cap of the fiber insertion unit. After inserting theφ0.272″or φ6.9mm (outer diameter) illuminating fiber into the fiber insertion unit, tighten it with the lock screw. 3.4 Mount CCD Camera Unit You can select camera adapter for your CCD camera as below: 0.5X camera adapter use for 2/3″...
- Page 9 If you plan on using your PSM-1000 for laser work , you need a laser safety filter. To operate the laser safely and properly, please see the laser and/or laser filter manufacturer’s documentation. Motic Instruments assumes no responsibility whatsoever for the performance and/or safety of the laser and/or laser filter used with the PSM-1000 microscope.
- Page 10 3. SETUP (CONTINUED) Insert the safety filter, the 2 rings and the binocular tube, then hold and tighten the 3 screws as mentioned in the previous step . With a screwdriver tighten the laser safety pin. 3.6 Mount Objective Insert the objective into the flange of revolver. Note: 1、The color sticker near the flange and the color line on the objective is the same color.
- Page 11 3. SETUP (CONTINUED) Repeat this procedure for the other objective lens. 3.7 Adjusting the eyepiece diopter Adjust the diopter of the eyepiece as follows. Step1: Turn the diopter adjustment ring of the eyepiece until the lower edge of the eyepiece tube is aligned with the “0”...
- Page 12 3. SETUP (CONTINUED) Turn the coarse adjustment handle and move the main body of the microscope to either an upper or lower position to obtain the image coarsely. Turn the fine adjustment handle and move the main body of the microscope to either an upper or lower position to obtain the sharpest image.
- Page 13 3. SETUP (CONTINUED) Similarly, adjust the focal point of objective in the order of higher magnification. 3.9 Parcentration of objectives The highest objective (nonadjustable) is not required to parcenter. Insert a eyepiece with reticle into the right tube (or left tube). The highest objective (nonadjustable) can be set onto the work piece by turning the revolver until hearing a click sound.
- Page 14 3. SETUP (CONTINUED) 2X lens…………………………………………..2X VIS 1X(Ultraviolet / Visible)………………………..1X UV/VIS 1X(Near Infrared / Visible)…………………..1X NIR/VIS 3.11 Changing Objectives Change the objective by turning revolver. Note: Don’t touch the objective face by hand. It may cause damage to the objective face. 3.12 Change Optical Path Pull or push the optical path changeover knob to change the optical path of the microscope.
- Page 15 3. SETUP (CONTINUED) 3.13 Control Light Brightness Rotate the Aperture Open and Close Dial to control the light brightness. Rotate towards you: The aperture’s diameter narrows and darkens. Rotate away from you: The aperture’s diameter widens and lightens. 3.14 Polarization Insert the polarizer and analyzer all the way into the mounting slots.
-
Page 16: Troubleshooting
3. SETUP (CONTINUED) Mount the nosepiece and tighten the 4 locking screws with the Allen wrench. TROUBLE SHOOTING Phenomenon Causes Measures Visual field is insufficient or Revolver cannot turn to the Make the revolver turn to the invisible. position where the click sound position where the click sound can be heard. - Page 17 observation through Interpupillary distance Adjust the interpupillary binocular microscope, right siedentopf is not matched to distance. and left visual images do not observer’s eye. match. In observation, eyes feel tired . Interpupillary distance Adjust the interpupillary siedentopf is not matched to distance.
- Page 18 © 2001-2002 Motic China Group Co., Ltd. All rights reserved. Motic is a registered trademark and service mark of Motic China Group Co., Ltd. Microsoft Windows logo are registered trademarks of Microsoft Corporation. All other trademarks are the property of their respective owners.
Need help?
Do you have a question about the PSM1000 Series and is the answer not in the manual?
Questions and answers