Table of Contents
Advertisement
Quick Links
Advertisement
Table of Contents

Related Manuals for Motic RED30 Series


Summary of Contents for Motic RED30 Series
- Page 1 RED30 SERIES Instructions Manual English Motic Incorporation Ltd.
-
Page 3: Table Of Contents
CONTENTS Chapter Page Safety instructions 1.1 General safety instructions 1.2 Instrument safety 1.3 Unpacking, transportation & storage 1.4 Waste disposal 1.5 Operation 1.6 Quality warranty Instrument description 2.1 General views 2.2 Part names 2.3 Application 2.4 Instrument and its technical specifications First time use &... -
Page 5: Safety Instructions
Caution! Electric shock hazard! Caution! Danger! 1.2 Instrument safety The RED30 Series stereo microscopes has been designed, manufactured and inspected according to the EN 61010-1:2001 Safety Requirements for Electrical Equipment for Measurement, Control and Laboratory Use. 1.3 Unpacking, transportation & storage •... -
Page 6: Operation
1.6 Quality Warranty The RED30 Series stereo microscopes and the attached accessories are only allowed to be used for stereo micros- cope examination as described in this manual. The manufacturer takes no responsibility for any other use. -
Page 7: Instrument Description
2. INSTRUMENT DESCRIPTION 2.1 General Views RED39Z... -
Page 8: Part Names
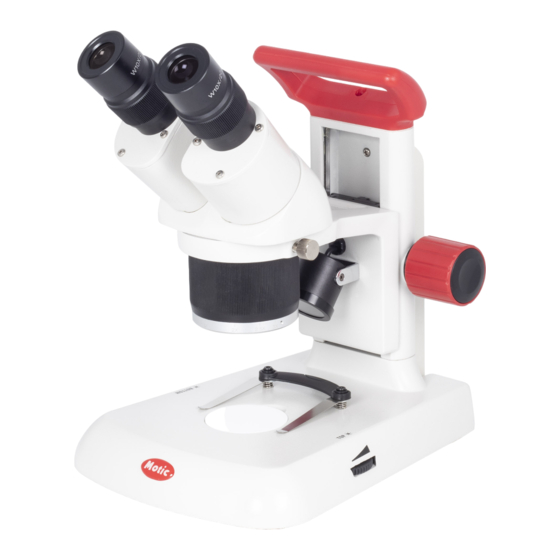
RED30 SERIES 2.2 Part names RED30S 1. Eyepiece 6. Base 2. Binocular tube 7. Handle 3. Objective turret 8. Focus knob 4. Sample clip holder 9. Brightness adjustment knob incident illumination 5. Stage plate 10. Brightness adjustment knob transmitted illumination... -
Page 9: Application
Objectives: 1X, 3X, 4X All of the models in the RED30 Series stereo microscopes are provided with incident and transmitted LED illumina- tion.. The brightness adjustment knobs on both sides of the base are used to turn on/off the incident and transmit- ted illumination, as well as regulate the brightness. -
Page 10: First Time Use & Operation
RED30 SERIES 3. FIRST TIME USE & OPERATION 3.1 First time use Before installing and using the stereo microscopes, make sure to read carefully the Safety Instructions (See Chapter 1). When unpacking and handling, please do not touch the optical surfaces and do not leave any component or accessory in the packing box. - Page 11 Figure 3a Figure 3b • Rotate the brightness control to the desired illumination. Control the incident LED brightness at the right hand of the base. (Figure 3a) • Control the transmitted LED brightness at the left hand of the base. (Figure 3b) •...
-
Page 12: Operation Of The Stereo Microscopes
RED30 SERIES 3.2 Operation of the stereo microscopes 3.2.1 Interpupillary distance adjustment Adjust the interpupillary distance by moving the left and right binocular tubes until you see a circular a single, circular field of view. 3.2.2 Focusing • Move the diopter ring to the Zero mark which is a silver line on the body tube. Change to the objective of the lowest magnification or rotate the turret zoom to the lowest magnification (for RED30S and RED39Z). -
Page 13: Modification Of The Stereo Microscopes
3.3 Modification of stereo microscope Replace the illuminator Unplug the stereo microscopes before making any modifications. • Before replacing the illuminator, be sure to turn off the power switch and disconnect the power cable. • When replacing the Incident illumination for RED30S, first use the 2mm hex wrench (included) to remove the screws from the objective turret cover. -
Page 14: Basic Structure Of The Stereo Microscope
RED30 SERIES 4. BASIC STRUCTURE OF STEREO MICROSCOPE 4.1 Binocular stereo microscope head For the RED30S and RED39Z, the binocular tubes and the objective turret are integrated to a single part called “stereo microscope head”. 4.1.1 Stereo microscope head • For RED30S model , the operator can select the desired magnification by rotating the objective turret. -
Page 15: Maintenance & Troubleshooting
5. MAINTENANCE & TROUBLESHOOTING 5.1 Maintenance The stereo microscope is limited to the following maintenance only: • Turn off the power switch after use, and put on the dustproof cover after the stereo microscope has cooled down. • Do not operate the stereo microscope in a room with humidity higher than 75%. •... -
Page 16: Appendix
RED30 SERIES 6. APPENDIX 6.1 Technical Parameters Dimension (W x L x H) RED30S ≈ 238×177×256mm RED39Z ≈ 239×177×282mm Weight RED30S ≈ 3.5KG ≈ 4.5KG RED39Z Environmental Conditions Transport (within package) : Permissible environment temperature -40 ~ +70°C Storage: +10 ~ +40°C... - Page 17 Light Sources LED illumination: Color temperature 6000K – 7000K Even illumination of field: RED30S Diameter 10mm RED39Z Diameter 20mm Applicable objective: RED30S Paired 2X and 4X 1X-3X RED39Z Opto-mechanical parameters Separate focus adjustment mechanism: Coarse focus adjustment 19.8mm/rotation Stroke 47mm Objective: RED30S Paired 2X and 4X...
- Page 20 Motic Incorporation Ltd. 130 - 4611 Viking Way. Richmond, BC V6V 2K9 Canada Motic Incorporation Limited Copyright © 2002-2015. All Rights Reserved. Tel: 1-877-977 4717 | Fax: 1-604-303 9043 Design Change: The manufacturer reserves the right to make changes in...
Need help?
Do you have a question about the RED30 Series and is the answer not in the manual?
Questions and answers