Advertisement
Table of Contents
- 1 Table of Contents
- 2 IMPORTANT - be Sure to Read this Section for Safe Use of the Equipment
- 3 Modules, External View and Dimensions
- 4 Nomenclature and Assembly
- 5 Operation
- 6 IMPORTANT - be Sure to Read this Section for Safe Use of the Equipment
- 7 Sz2-Stu2
- 8 Modules, External View and Dimensions
- 9 Nomenclature and Assembly
- 10 Operation
- Download this manual
INSTRUCTIONS
SZ2-STU1/SZ2-STU2
SZ2-STU3
UNIVERSAL STAND TYPE 1
UNIVERSAL STAND TYPE 2
TABLE CLAMP STAND
This instruction manual is for the Olympus Stands for stereo microscopes. To ensure the safety,
obtain optimum performance and to familiarize yourself fully with the use of this equipment, we
recommend that you study this manual thoroughly before operating the system.
Retain this instruction manual in an easily accessible place near the work desk for future reference.
A X 6 6 2 3
Advertisement
Table of Contents

Related Manuals for Olympus SZ2-STU2


Summary of Contents for Olympus SZ2-STU2
- Page 1 UNIVERSAL STAND TYPE 2 TABLE CLAMP STAND This instruction manual is for the Olympus Stands for stereo microscopes. To ensure the safety, obtain optimum performance and to familiarize yourself fully with the use of this equipment, we recommend that you study this manual thoroughly before operating the system.
-
Page 3: Table Of Contents
SZ2 series CONTENTS The SZ2-STU1, SZ2-STU2 and SZ2-STU3 stands are provided with ESD (Electro-Static Discharge) protection specifica- tions. Each stand is provided with electroconductive coating in their external finish to reduce the surface resistance. Connecting a grounding lead wire to the stand (and also the horizontal arm in case of the SZ2-STU2) makes it possible eliminate static electricity quickly. -
Page 4: Important - Be Sure To Read This Section For Safe Use Of The Equipment
SZ2-STU1/SZ2-STU3 IMPORTANT SAFETY PRECAUTIONS SZ2-STU1 1. Install the stand on a level desktop (inclination angle of less than 3°). 2. When moving the stand, make sure that the clamping mechanisms are secured tightly and lift the stand by holding it by the base plate. If the... - Page 5 SZ2-STU1/STU3 SZ2-STU3 1. Install the stand on a sturdy table ³ having thickness of 10 to 60 mm and edge space length of 40 mm or more. (Fig. 4) ³ 2. The load capacity is 4.6 kg regardless of the orientation.
-
Page 6: Modules, External View And Dimensions
SZ2-STU1/SZ2-STU3 MODULES, EXTERNAL VIEW AND DIMENSIONS (Unit: mm) Universal Stand Type 1 Table Clamp Stand SZ2-STU1 SZ2-STU3 (The shaded parts are identical to the SZ2-STU1.) Bonder Arm SZ2-STB1 · Base plate weight: 17.5 kg · Clamp section weight: 2 kg ·... -
Page 7: Nomenclature And Assembly
SZ2-STU1/STU3 NOMENCLATURE AND ASSEMBLY Assembling the Stand (Fig. 5) SZ2-STU1 SZ2-STU3 Applicable microscope body Horizontal arm Allen wrench Drop prevention ring To maintain the ESD protection performance, be sure to ground the equipment using the Clamping screws following tools. (x 2) -
Page 8: Operation
OPERATION 1. To move the horizontal arm horizontally along the arm shaft, loosen the Horizontal rotation/ horizontal movement clamping knob. Lift the microscope slightly for Bonder arm rotation vertical clamping knob smooth movement. clamping knob 2. To rotate the horizontal arm by 360° around the column, loosen the hori- zontal rotation clamping knob. - Page 9 SZ2-STU1/STU3 Rotating the distal end enables observation of a perpendicular plane or tall specimen. (Fig. 10) Be particularly sure to tighten the distal end rotation screws tightly. If they are loose, the distal end may rotate suddenly. Do not tighten the distal end rotation screws too much, as this may cause the distal end to slip out of the horizontal arm.
-
Page 10: Sz2-Stu2
SZ2-STU2 IMPORTANT SAFETY PRECAUTIONS 1. Install the stand on a level desktop (inclination less than 3°). 2. When moving the stand, make sure that the clamping mechanisms are secured tightly and lift the stand by holding it by the base plate. If the stand is held by the horizontal arm or column alone, the base plate may drop. -
Page 11: Modules, External View And Dimensions
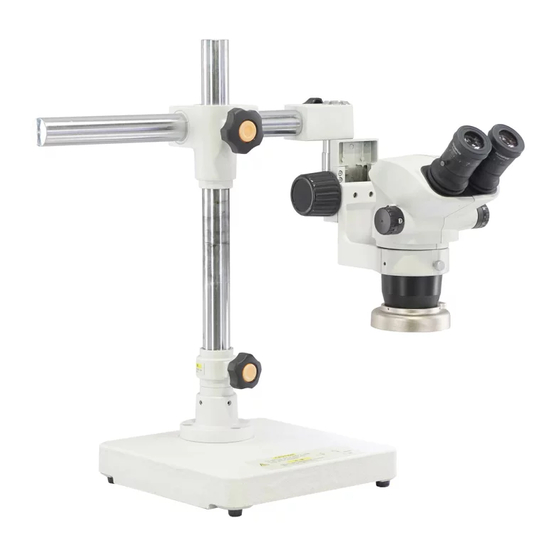
SZ2-STU2 SZ2-STU2 MODULES, EXTERNAL VIEW AND DIMENSIONS (Unit: mm) Universal Stand Type 2 SZ2-STU2 SZX Stand Arm SZ2-STS · Base plate weight: 17.5 kg · Total weight: 34 kg (excluding the SZ2-STS) Mountable Modules }To maintain the ESD protection performance, the following modules should also be provided with the ESD protection performance. -
Page 12: Nomenclature And Assembly
NOMENCLATURE AND ASSEMBLY Vertical clamping lever Horizontal arm Horizontal shaft rotation clamping lever Tilting clamping lever Horizontal movement tension knob Horizontal clamping knob Drop prevention ring Mount shaft Column Microscope body drop prevention screw SZX extension adapter Base plate clamping holes 8 (x 4 positions) Applicable microscope body Horizontal arm... - Page 13 SZ2-STU2 Installing an Applicable Microscope Body (Fig. 14) 1. Remove the microscope body drop prevention screw @ and screw the ³ SZX extension adapter ² into the mount shaft ³. 2. Insert the Allen screwdriver ƒ, provided with the SZX microscope body, into the hole | on the center of the extension adapter ²...
-
Page 14: Operation
OPERATION 1. To move the horizontal arm horizontally, loosen the horizontal clamping knob @. The tension of the horizontal movement can be adjusted with the horizontal movement tension adjustment knob ². Rotating the knob in the direction of the arrow increases the tension and rotating in the opposite direction decreases it. - Page 15 SZ2-STU2 4. To tilt the microscope body to the front or rear, loosen the tilting clamping lever @. (Fig. 19) Loosen the lever only by half when tilting the microscope body. If the lever is loosened completely, the microscope body may turn suddenly and cause danger.
- Page 16 7. To rotate the mount shaft ² around the horizontal shaft, loosen the horizontal shaft rotation clamping lever @. When the clamping lever @ is loosened and the distal end is withdrawn by 2 to 3 mm, the rotation stoppers ³ are disengaged. After rotating the mount shaft to the desired position, tighten the lever firmly to clamp the mount shaft again.
- Page 17 MEMO...
- Page 18 MEMO...
- Page 20 Manufactured by Shinjuku Monolith, 2-3-1 Nishi-Shinjuku, Shinjuku-ku, Tokyo 163-0914, Japan Distributed by 48 Woerd Avenue Waltham, MA 02453, U.S.A. 8F Olympus Tower, 446 Bongeunsa-ro, Gangnam-gu, Seoul, Korea 135-509 AX6623 04...
Need help?
Do you have a question about the SZ2-STU2 and is the answer not in the manual?
Questions and answers