
Related Manuals for Schiller DEFIGARD Touch 7


Summary of Contents for Schiller DEFIGARD Touch 7
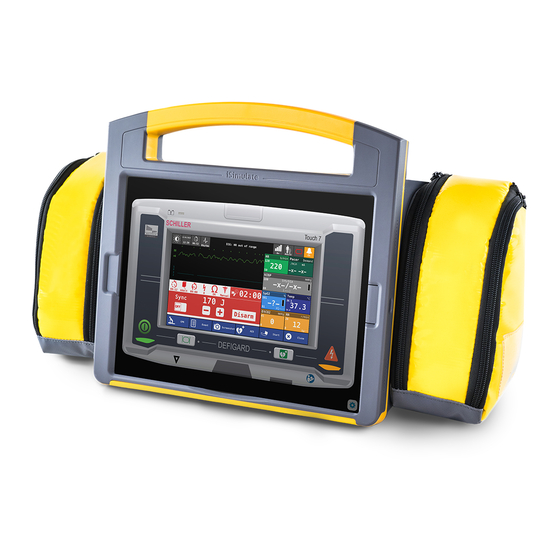
- Page 1 DEFIGARD GARD TOUCH 7 TOUCH 7 User guide...
- Page 2 Sales and Service Information The SCHILLER sales and service centre network is world-wide. For the address of your local distributor, contact your nearest SCHILLER subsidiary. In case of difficulty, you can find a complete list of all distributors and subsidiaries on our Internet site: http://www.schiller.ch...
-
Page 3: Table Of Contents
DEFIGARD/PHYSIOGARD Touch 7 User guide Table of Contents Safety notes ..........9 User profiles................9 Intended Use ................. 9 Contraindication for use ............ 10 Responsibility of the User ..........11 Organisational Measures ........... 11 Safety-Conscious Operation ..........12 Operation with other Devices ..........13 Maintenance................ - Page 4 DEFIGARD/PHYSIOGARD Touch 7 Connection to a ePCR system........... 35 3.5.1 Pairing Bluetooth devices ..............35 Monitoring ..........36 Soft keys, Waveforms and Measurement Fields ..... 36 4.1.1 View selection .................. 37 Alarm System..............38 4.2.1 Alarm priority..................38 4.2.2 Operator’s position................38 4.2.3...
- Page 5 DEFIGARD/PHYSIOGARD Touch 7 User guide 4.11 Sidestream ..............69 4.11.1 ISA gas analyser (sidestream measurement) ........69 4.11.2 Initial operation of the ISA gas analyser........... 71 4.11.3 Sensor LED indications..............71 4.11.4 Respiration rate alarms ..............72 4.11.5 Settings etCO 2 menu............... 73 4.11.6 Curve list ..................
- Page 6 DEFIGARD/PHYSIOGARD Touch 7 Pacemaker ..........99 Pacemaker Function............99 6.1.1 Fixed-rate mode (Fix)............... 99 6.1.2 Demand mode ................. 99 Safety Notes ..............100 Guidelines for the Application of External Pacemakers 100 6.3.1 Attaching the pacer pads ............... 101 6.3.2 Checking the electrodes ..............101 Start-up of the Pacemaker ..........
- Page 7 12.6.16 Email adresses................153 12.6.17 Transmission.................. 153 12.6.18 Ethernet..................153 12.6.19 WIFI....................154 12.6.20 GSM ....................154 12.6.21 SEMA ..................... 154 12.6.22 SUS (Schiller Update server) ............155 12.7 Electromagnetic interferences ........156 12.7.1 Electromagnetic emissions ............156 Page 7...
- Page 8 DEFIGARD/PHYSIOGARD Touch 7 12.7.2 Electromagnetic immunity.............. 156 12.7.3 Recommended minimum distances..........158 Appendix ..........159 13.1 Accessories and disposables ......... 159 13.2 Accessories DEFIGARD/PHYSIOGARD Touch 7... 159 13.3 Literature ................161 13.4 Glossary ................161 Index ............163 Page 8...
-
Page 9: Safety Notes
Safety notes DEFIGARD/PHYSIOGARD Touch 7 User guide User profiles 1 Safety notes ® The PHYSIOGARD Touch 7 is a monitor. ® The DEFIGARD Touch 7 is an emergency monitor / defibrillator. User profiles ® Physician The DEFIGARD Touch 7 must only be used by qualified medical or paramedic staff, if the manual defibrillation mode is activated. -
Page 10: Contraindication For Use
Safety notes DEFIGARD/PHYSIOGARD Touch 7 Contraindication for use NIBP The NIBP monitor is intended for use as an aid or adjunct to diagnosis and treatment when it is necessary to measure an adult, child and neonate patient’s blood pressure. The NIBP can be used for patients of both sexes and all races. -
Page 11: Responsibility Of The User
Safety notes DEFIGARD/PHYSIOGARD Touch 7 User guide Responsibility of the User Responsibility of the User The numerical and graphical results and any interpretation given must be examined with respect to the overall clinical condition of the patient and the general recorded data quality. -
Page 12: Safety-Conscious Operation
Immediately report any changes that impair safety (including operating behaviour) to the person responsible. Only connect original SCHILLER accessories to the device. Before switching on, check if the unit's casing and electrode connection are undamaged. -
Page 13: Operation With Other Devices
User guide Operation with other Devices Operation with other Devices Use only accessories and other parts recommended or supplied by SCHILLER. Use of other than recommended or supplied parts may result in injury, inaccurate information and/or damage to the unit. -
Page 14: Hygiene
SCHILLER takes no responsibility for the configuration of Windows. Patient data security and security of the network is the sole responsibility of the user. In order to guarantee the security of the network, Schiller recommends the following: ®... -
Page 15: Additional Terms
There are no express or implied warranties which extend beyond the warranties hereinabove set forth. SCHILLER makes no warranty of merchantability or fitness for a particular purpose with respect to the product or parts thereof. -
Page 16: Display Symbols/Indicators
Safety notes DEFIGARD/PHYSIOGARD Touch 7 1.12 Display Symbols/Indicators 1.12 Display Symbols/Indicators 1.12.1 Symbols Used in this User Guide The safety level is classified according to ISO 3864-2. The following overview contains the safety symbols and pictorals used in this user guide. -
Page 17: Symbols Used On The Device
The user can take the following measures to solve this problem: • Increase the distance between the disturbed device and the DEFIGARD/ PHYSIOGARD Touch 7. A minimum distance of 20 cm must be kept between the device and a pacemaker. -
Page 18: Symbols Used On The Batteries
Safety notes DEFIGARD/PHYSIOGARD Touch 7 1.12 Display Symbols/Indicators IP55 The device is protected against dust and spraying water from all directions. ® Used for electrical dangers during defibrillation (DEFIGARD Touch 7) 1.12.3 Symbols Used on the Batteries Common symbols The unit/component can be recycled. -
Page 19: Symbols Used On The Electrode Package
Safety notes DEFIGARD/PHYSIOGARD Touch 7 User guide Display Symbols/Indicators 1.12 1.12.4 Symbols Used on the Electrode Package ® This applies only to the DEFIGARD Touch 7. • Open clothes • Open the electrode package • Peel off the protective foil Disposable item;... -
Page 20: Components And Operation
Components and Operation DEFIGARD/PHYSIOGARD Touch 7 Design 2 Components and Opera- tion ® The DEFIGARD Touch 7 is a lightweight mains and battery powered defibrillator featuring an ECG monitor, SpO2/SpCO/SpMet, etCO2,Temperature and NIBP measurements. It is designed for clinical use. Defibrillation is possible in non- synchronised or synchronised mode. -
Page 21: Standard Unit And Options
• GSM/3G • WLAN 2.1.2 Additional accessories • SCHILLER Charging Unit CS-1. External charging and calibrating unit for rechargeable batteries. • DC/DC or AC/DC ambulance charging bracket. Holds the device securely while recharging the battery inside the device. • AC/DC desktop charging bracket. Holds the device while recharging the battery inside the device. -
Page 22: Operating Elements
Components and Operation DEFIGARD/PHYSIOGARD Touch 7 Operating Elements Operating Elements 2.2.1 Front panel DEFIGARD ® Touch 7 Power battery Loudspeaker Battery/DC Supply Status or Alarm LED Status LED TEMP: Check sensor Touch screen Adult NIBP Screenshot Event Manual Def Start... -
Page 23: Front Panel Physiogard ® Touch 7
Components and Operation DEFIGARD/PHYSIOGARD Touch 7 User guide Operating Elements 2.2.2 Front panel PHYSIOGARD ® Touch 7 Power battery Loudspeaker Battery/DC Supply Status or Alarm LED Status LED TEMP: Check sensor Touch screen Adult NIBP Screenshot Event Start Menu R-ECG... -
Page 24: Back Panel
Components and Operation DEFIGARD/PHYSIOGARD Touch 7 Operating Elements 2.2.3 Back Panel Replaceable power battery Dovetail fixing joint Safety primary cell DC input from Docking compartment backup station during battery change Fig. 2.2 Control elements at the device´s back 2.2.4 LEDs... -
Page 25: Display
Components and Operation DEFIGARD/PHYSIOGARD Touch 7 User guide Operating Elements 2.2.5 Display Filter mode: Monitoring, Rhythm or Diagnostic Patient Information Network status Intervention duration Display field for system and alarm mes- Battery charging status sages. Touch to show alarm list... -
Page 26: Initial Operation
Initial Operation DEFIGARD/PHYSIOGARD Touch 7 External DC supply and Battery Operation 3 Initial Operation Please read the safety notes in section 1 Safety notes page 9 before initial operation. Danger of explosion! The device is not designed for use in areas where an explosion hazard may occur. -
Page 27: Battery Operation
Initial Operation DEFIGARD/PHYSIOGARD Touch 7 User guide External DC supply and Battery Operation 3.1.2 Battery Operation Charging the battery Important The power battery is automatically recharged when the device is connected to the external DC supply via the docking station (LED 2). The power battery requires approx. -
Page 28: Operation With External Constant Voltage Source
Initial Operation DEFIGARD/PHYSIOGARD Touch 7 External DC supply and Battery Operation Changing the batteries • The device does not need to be switched off. Monitoring is continued. The device is powered by the safety primary cell for another 30 seconds; after that, the device is switched off automatically. -
Page 29: Operation Ambulance Charging Bracket
Initial Operation DEFIGARD/PHYSIOGARD Touch 7 User guide External DC supply and Battery Operation 3.1.4 Operation ambulance charging bracket The charging bracket must be fixed to a stable wall. Power supply connectors Power supply module AC/DC or DC/DC Click! Removing the device from the charging bracket Putting the device on the charging bracket ... -
Page 30: Operation And Fixing During Intervention
Initial Operation DEFIGARD/PHYSIOGARD Touch 7 External DC supply and Battery Operation 3.1.6 Operation and fixing during intervention During intervention, the two positioning bars (1) can be folded out to keep the device in an ergonomic position. During transportation, the device can be fixed on a rail (e.g. bed or stretcher rail) -
Page 31: Switching Off And Disconnecting From The External Dc Supply
Initial Operation DEFIGARD/PHYSIOGARD Touch 7 User guideSwitching off and disconnecting from the external DC supply Switching off and disconnecting from the external DC supply Press the on/off button. The dialogue No/Yes is displayed. Confirm switch-off or cancel with No. Remove the device from the charging station if you do not want to recharge the battery. -
Page 32: Ensuring Operational Readiness
Initial Operation DEFIGARD/PHYSIOGARD Touch 7 Switching off and disconnecting from the external DC supply 3.2.4 Ensuring Operational Readiness • Do not expose the device to direct sunlight, or extremely high or low temperatures. The ambient temperature should be in the range of 0°C to 40 °C. Lower or higher ambient temperatures will have a negative impact on the battery's life. -
Page 33: Operation
Initial Operation DEFIGARD/PHYSIOGARD Touch 7 User guide Operation Operation The menus can be accessed as follows: • Direct access by pressing on the curve or measurement field, or • by clicking on the menu soft key or any other soft key or •... -
Page 34: Printing
Initial Operation DEFIGARD/PHYSIOGARD Touch 7 Printing Printing The following data can be printed on the Bluetooth printer: • Recorded Resting ECG (incl. patient data, patient vitals, interpretation and ECG curves) • Screenshots (+/- 5 sec from the moment of the screenshot that contains all displayed curves, patient data and vital data) •... -
Page 35: Connection To A Epcr System
3.5.1 Pairing Bluetooth devices • The DEFIGARD/PHYSIOGARD Touch 7 acts like a slave to the ePCR equipment, therefore, the pairing must be initiated on the ePCR equipment. • The pairing is to be perfomed only the very first time that an ePCR equipement is connected. -
Page 36: Monitoring
Monitoring DEFIGARD/PHYSIOGARD Touch 7 Soft keys, Waveforms and Measurement Fields 4 Monitoring Operation and menu access is detailed on page Soft keys, Waveforms and Measurement Fields The waveform and measurement fields are automatically displayed when the device is switched on (if options are installed). The device can basically be operated via the touch screen. -
Page 37: View Selection
Monitoring DEFIGARD/PHYSIOGARD Touch 7 User guide Soft keys, Waveforms and Measurement Fields 4.1.1 View selection The default view after start up can be configured. Menu Go to menu “Choose another view”. Choose one of the views: Choose another view – Advanced monitoring –... -
Page 38: Alarm System
Monitoring DEFIGARD/PHYSIOGARD Touch 7 Alarm System Alarm System In some countries, it is not permitted to disable audio alarms permanently. Therefore, this function is configurable. When pausing or switching off the audio alarm, even high-priority alarms such as VT/ VF and asystole are paused/switched off! ... -
Page 39: Physiological Alarms
Monitoring DEFIGARD/PHYSIOGARD Touch 7 User guide Alarm System 4.2.4 Physiological alarms When a measurement reading exceeds a threshold, an alarm is triggered after 3 Alarm Settings Default seconds and: Wide Quick Set • the device alarm LEDs are flashing orange (medium) or red (high) Narrow Quick Set •... -
Page 40: Operator-Defined Alarm Thresholds
Monitoring DEFIGARD/PHYSIOGARD Touch 7 Operator-Defined Alarm Thresholds Operator-Defined Alarm Thresholds Make sure that the patient’s vital parameters are not critical before pressing the button Wide Quick set or Narrow quick set. Make sure that the right patient is selected (adult, child or neonate). -
Page 41: Table Of Wide/Narrow Threshold Setting
Monitoring DEFIGARD/PHYSIOGARD Touch 7 User guide Operator-Defined Alarm Thresholds 4.3.1 Table of wide/narrow threshold setting The range values in brackets () are the default values activated when pressing “De- fault” in the alarm setting menu see Fig. 4.2, page 40. - Page 42 Monitoring DEFIGARD/PHYSIOGARD Touch 7 Operator-Defined Alarm Thresholds NIBP SYS [mmHg] Pat. value Wide limits Narrow Limits Range SYS: 30-255 (50-200) mmHg High High <90 90-114 115-140 >140 Allowed values [30-245] [30-245] [30-245] [30-245] NIBP DIA [mmHg] Pat. value Wide limits...
-
Page 43: Ecg And Heart Rate Monitoring
Danger of destroying the device during defibrillation! The device is only type CF protected if the original SCHILLER patient cables are used. Important • The guidelines for patient electrode placement are provided as an overview only. -
Page 44: Connecting A 4-Wire Ecg Patient Cable
Monitoring DEFIGARD/PHYSIOGARD Touch 7 ECG and heart rate monitoring 4.4.3 Connecting a 4-wire ECG patient cable Yellow When a patient cable as well as the defibrillation electrodes are connected, you can select the heart rate signal source by touching the first curve (standard ECG:II) on the Black display and selecting ECG Defi. -
Page 45: Starting Ecg Monitoring
Monitoring DEFIGARD/PHYSIOGARD Touch 7 User guide ECG and heart rate monitoring 4.4.5 Starting ECG monitoring Apply the electrodes as shown in Fig. 4.4 Fig. 4.5. Connect the patient cable to the ECG signal input. Define the ECG settings directly via the Touch screen curve or measurement field. -
Page 46: Monitoring A Pacemaker Patient
Monitoring DEFIGARD/PHYSIOGARD Touch 7 ECG and heart rate monitoring 4.4.6 Monitoring a pacemaker patient Erroneous HR displayIn the monitoring of pacemaker patients, the possibility of pacer pulses being counted as QRS complexes cannot be excluded. Therefore, pacemaker patients should always be watched closely. It is... -
Page 47: Curve List
Monitoring DEFIGARD/PHYSIOGARD Touch 7 User guide ECG and heart rate monitoring 4.4.7 Curve list MENU Parameter Description Value Selection of the displayed first curve. The first display curve is used to calculate the II or Defi Curve list Touch first curve... -
Page 48: Print And Pdf Formats
Monitoring DEFIGARD/PHYSIOGARD Touch 7 ECG and heart rate monitoring 4.4.10 Print and pdf formats The device can generate the following formats according to its configurations: PDF resting ECG format • 12 averages + 6 leads, 12.5 mm/s (1 page) • 1x12 leads, 50 mm/s (2 pages) •... -
Page 49: Diagnostic Ecg (R-Ecg)
Monitoring DEFIGARD/PHYSIOGARD Touch 7 User guide Diagnostic ECG (R-ECG) Diagnostic ECG (R-ECG) Apply the electrodes of the 10-wire ECG cable as shown in Fig. 4.5. Connect the patient cable to the ECG signal input. Press the button R-ECG and: R-ECG –... -
Page 50: Spo Spco Spmet Monitoring (Option)
Monitoring DEFIGARD/PHYSIOGARD Touch 7 SpCO SpMet monitoring (Option) SpCO SpMet monitoring (Option) • The pulse oximeter enables the continuous, non invasive monitoring of functional oxygen saturation of arterial haemoglobin as well as the pulse rate. The signal received from the patient sensor is used to calculate the patient's functional oxygen saturation and pulse rate. -
Page 51: Inaccurate Or Incorrect Measurement Result
Only use SpO , SpCO and SpMet sensors listed in the order information for the DEFIGARD/PHYSIOGARD Touch 7. Other oxygen transducers (sensors) may lead to improper performance. The information in this user guide does not overrule any instructions given in the sensor's user guide, which must be consulted for full instructions. -
Page 52: Starting Spo 2 Monitoring And Test
Monitoring DEFIGARD/PHYSIOGARD Touch 7 SpCO SpMet monitoring (Option) 4.6.2 Starting SpO monitoring and test 1. Apply the SpO sensor to the patient. Insert the patient's forefinger into the probe as far as it will go, and make sure that the finger tip covers all of the probe window. -
Page 53: Spo 2Error And Information Messages
Monitoring DEFIGARD/PHYSIOGARD Touch 7 User guide SpCO SpMet monitoring (Option) 4.6.4 error and information messages Alarm (measurement field) Code Cause Remedy SpO2: Low Perfusion Index I.SP214 Check the patient Check the sensor and reapply. If • Weak pulse... - Page 54 Monitoring DEFIGARD/PHYSIOGARD Touch 7 SpCO SpMet monitoring (Option) Alarm (measurement field) Code Cause Remedy T.SP216 Check/replace the sensor • No sensor connected T.SP217 • Sensor life expired T.SP218 • Incompatible sensor T.SP219 • Unrecognised sensor T.SP220 • Cable and sensor fault ...
-
Page 55: Nibp Monitoring
Monitoring DEFIGARD/PHYSIOGARD Touch 7 User guide NIBP monitoring NIBP monitoring The non-invasive blood pressure is measured by the oscillometric method. The module performs single measurements and automatic measurements at selectable intervals. The automatic measurements are suitable also for pregnant or pre-eclamptic patient. - Page 56 Monitoring DEFIGARD/PHYSIOGARD Touch 7 NIBP monitoring As with occasional blood pressure measurement, petechial bleeding can occur in patients with coagulation disorders or having anticoagulant treatment even with the correct cuff size. In patients who have had a single mastectomy, the cuff can be placed on the opposite arm.
-
Page 57: Starting Nibp Monitoring
Starting NIBP monitoring Note the cuff size for the respective patient type see chapter.13.2 Accessories DEFIGARD/PHYSIOGARD Touch 7 page 159. The cuff is attached to the left or right upper arm, about 4 cm above the elbow (on children a little closer). -
Page 58: Nibp Menu
Monitoring DEFIGARD/PHYSIOGARD Touch 7 NIBP monitoring 4.7.2 NIBP Menu MENU Parameter Description Value Automatic cycle of 2/3/5/10/30 NIBP Automatic cycles Cycle time setting minutes The measurement is manually initiated by Manual soft key = Start pressing the soft key. 4.7.3... -
Page 59: Ibp Monitoring
Fill up the system with liquid so it is completely void of air. Hang the measuring kit in the holder and secure the holder. Connect the cable of the transducer to the adaptor cable. Connect the adapter cable to the DEFIGARD/PHYSIOGARD Touch 7 IBP input. Page 59... -
Page 60: Start Ipb Measurements
Monitoring DEFIGARD/PHYSIOGARD Touch 7 IBP Monitoring 4.8.2 Start IPB measurements 1. Select the IBP measurement field (1) to open the IBP menu. 2. Select OFF/ON button (2) to start the measurement. 3. Zeroing the IBP (see Zeroing) 4. Check the IBP curve on the display to see if the connections have been made correctly and the IBP value is in the expected range. -
Page 61: Ibp Zeroing
Monitoring DEFIGARD/PHYSIOGARD Touch 7 User guide IBP Monitoring 4.8.4 IBP zeroing • Zeroing must be carried out before every application. • To prevent incorrect measurement readings due to the sensor's physical null drift, calibrate the sensor every 24 hours. Note If the pressure sensor's position is changed after or during calibration, this might lead to wrong low or high values. -
Page 62: Temperature Monitoring
Monitoring DEFIGARD/PHYSIOGARD Touch 7 Temperature monitoring Temperature monitoring • Depending on the sensor type, the sensor can be applied to the ear, the skin or per rectum. • To achieve a reliable measured value, independent of the measuring site, the measurement duration must be at least 2 minutes. -
Page 63: Co2 Mainstream
Monitoring DEFIGARD/PHYSIOGARD Touch 7 User guide CO2 mainstream 4.10 4.10 CO2 mainstream 4.10.1 IRMA mainstream gas analyser IRMA mainstream gas analyser is intended to be connected to a patient breathing circuit for monitoring of inspired/expired gases during anesthesia, recovery and respiratory care. -
Page 64: Preparing The Irma Sensor
Monitoring DEFIGARD/PHYSIOGARD Touch 7 4.10 CO2 mainstream 4.10.2 Preparing the IRMA sensor 1. Insert the airway adapter. 2. Connect the 15 mm airway adapter end to the ventilator Y piece. 3. Connect the patient side of the airway adapter to the tube. -
Page 65: Initial Operation Of The Irma Sensor
Monitoring DEFIGARD/PHYSIOGARD Touch 7 User guide CO2 mainstream 4.10 4.10.3 Initial operation of the IRMA sensor • The sensor requires a warm-up time of around ten seconds to provide fully accurate measurements. • A correction related to O2 usage is available in the menu setting EtCO2>Type of ventilation. -
Page 66: Zeroing Of The Irma Co 2 Sensor
Monitoring DEFIGARD/PHYSIOGARD Touch 7 4.10 CO2 mainstream 4.10.5 Zeroing of the IRMA CO sensor An incorrect zeroing leads to wrong measurement results. Therefore, make sure that the IRMA adapter is filled with ambient air (21% O2 and 0% CO2) during the zeroing. -
Page 67: Sensor Led Indications
Monitoring DEFIGARD/PHYSIOGARD Touch 7 User guide CO2 mainstream 4.10 4.10.6 Sensor LED indications Apart from the indications on the screen, the LED on the sensor gives the following indications: Steady green: System OK Steady red: Sensor error Flashing red: Check the adapter... -
Page 68: Co 2 Error Messages
Monitoring DEFIGARD/PHYSIOGARD Touch 7 4.10 CO2 mainstream 4.10.9 error messages Alarm Code Cause Remedy P.ETCO201 Check patient • Respiration rate out of set alarm Check narrow/wide etCO2 alarm limit and RR out of range limits. adjust it if necessary. -
Page 69: Co Sidestream
Monitoring DEFIGARD/PHYSIOGARD Touch 7 User guide Sidestream 4.11 4.11 Sidestream 4.11.1 ISA gas analyser (sidestream measurement) • ISA sidestream gas analyser is intended to be connected to a patient breathing circuit for monitoring of inspired/expired gases during anaesthesia, recovery and respiratory care. - Page 70 Monitoring DEFIGARD/PHYSIOGARD Touch 7 4.11 CO Sidestream The Nomoline sampling line is designed for single use only; do not reuse. Page 70...
-
Page 71: Initial Operation Of The Isa Gas Analyser
Monitoring DEFIGARD/PHYSIOGARD Touch 7 User guide Sidestream 4.11 4.11.2 Initial operation of the ISA gas analyser • The sensor requires a warm-up time of around ten seconds. 1. Connect the sensor cable (1). Nomoline Connect the Nomoline sampling line (2) to the ISA gas analyser. -
Page 72: Respiration Rate Alarms
Monitoring DEFIGARD/PHYSIOGARD Touch 7 4.11 CO Sidestream 4.11.4 Respiration rate alarms Alarm Code Cause Remedy Check patient P.ETCO201 • Respiration rate out of set Check narrow/wide etCO2 alarm limit and RR out of range alarmlimits. adjust it if necessary. -
Page 73: Settings Etco 2 Menu
“Perform zeroing”. The green LED on the ISA sensor is blinking and the Zeroing process is displayed on the DEFIGARD/PHYSIOGARD Touch 7. 2. When the green LED on the sensor stops blinking, the calibration is finished. -
Page 74: Registering Events
Monitoring DEFIGARD/PHYSIOGARD Touch 7 4.12 Registering events 4.12 Registering events When the event button is pressed, the pre-defined event texts are displayed. Select one of these texts; this text will be recorded in the data report together with the time. -
Page 75: View Trend, R-Ecg And Screenshots
Monitoring DEFIGARD/PHYSIOGARD Touch 7 User guide View Trend, R-ECG and Screenshots 4.13 4.13 View Trend, R-ECG and Screenshots All recorded trend data, resting ECGs and screenhots can be viewed during intervention. Additionally, the viewed resting ECG can be transmitted as described in chapter page 50. -
Page 76: View /Print Screenshots
Monitoring DEFIGARD/PHYSIOGARD Touch 7 4.13 View Trend, R-ECG and Screenshots 4.13.3 View /Print Screenshots 1. Enter the main menu and select Screenshots. 2. Select one of the screenshot on the list. 3. The screenshot appears with a watermark. 4. Exit the viewing mode by pressing the Red X button on the top left corner. -
Page 77: Transmission
Monitoring DEFIGARD/PHYSIOGARD Touch 7 User guide Transmission 4.14 4.14 Transmission Various data are available for transmission via several communication channels e.g. GSM/3G, Wi-Fi, USB-Ethernet and USB storage. 4.14.1 Selecting communication media Wifi or GPRS To change the transmission media select the transmission icon Wifi or GPRS and select menu Communication media. -
Page 78: Defibrillation
Defibrillation DEFIGARD/PHYSIOGARD Touch 7 Application guidelines and safety notes 5 Defibrillation ® This chapter applies only to the DEFIGARD Touch 7. Application guidelines and safety notes Observe the following guidelines to ensure successful and safe defibrillation. Otherwise the lives of the patient, the user and bystanders are in danger. -
Page 79: Additional Safety Information For Aed Mode
Defibrillation DEFIGARD/PHYSIOGARD Touch 7 User guide Application guidelines and safety notes 5.1.1 Additional safety information for AED Mode In addition to the guidelines set forth in section 5.1, the following rules must be observed when using an AED, as failure to do so may compromise the success of the defibrillation or endanger the patient's life. -
Page 80: Defibrillating Children/Neonates
Defibrillation DEFIGARD/PHYSIOGARD Touch 7 Application guidelines and safety notes 5.1.2 Defibrillating children/neonates Please note that less energy is needed for children: For the first defibrillation of infants and small children using biphasic shock, approx. 1 joule/kg body weight is released. An increase of 2 joules/kg body weight is possible when the defibrillation is repeated. -
Page 81: General Function
Defibrillation DEFIGARD/PHYSIOGARD Touch 7 User guide General function General function ® • The DEFIGARD Touch 7 works with biphasic truncated exponential chopped defibrillation waveform impulse. Depending on the factory settings, the device either switches automatically from synchronised to non-synchronized defibrillation or the mode has to be changed manually using the Sync button. -
Page 82: Activating The Manual Defibrillation Mode
Charging progress bar Event Screenshot Selection of energy Charging button Opening menu activate/ via - or + button deactivate metronome and activating the Schiller feedback advisory system when using the Schiller LifePoint sensor FreeCPR (based impedance). Page 82... -
Page 83: Activating The Automated (Aed) Defibrillation Mode
Analyse Close Action picture Opening CPR menu to activate/deactivate metronome and activating the Schiller feedback advisory system when using the Schiller Analyse soft key LifePoint sensor or FreeCPR (based on impedance). Same AED display as above but with parameter displayed at the right side. -
Page 84: Manual Defibrillation Procedure
Defibrillation DEFIGARD/PHYSIOGARD Touch 7 General function 5.2.3 Manual defibrillation procedure 1. Select manual defibrillation (see 5.2.1, page Confirm switching to manual defibrillation (This depends on the device’s configuration see 12.6.1 General configuration) Manual def 2. Select the required energy via the touch screen (button - or +). -
Page 85: Manual Defibrillation Using Pads
Defibrillation DEFIGARD/PHYSIOGARD Touch 7 User guide Manual Defibrillation Using Pads Manual Defibrillation Using Pads Delivering a shock to a patient with normal heart rhythm may induce ventricular fibrillation. For this reason, first read the general rules and safety information in sections 5.2. -
Page 86: Applying The Electrodes
Defibrillation DEFIGARD/PHYSIOGARD Touch 7 Manual Defibrillation Using Pads 5.3.2 Applying the electrodes Good contact between the skin and the adhesive electrodes must be ensured. Suntan oil, sand or salt reduce the adhesive quality. The applied pads must have good contact with the patient's skin, and air bubbles under the pads must be avoided. -
Page 87: Checking The Electrodes
Defibrillation DEFIGARD/PHYSIOGARD Touch 7 User guide Manual Defibrillation Using Pads 5.3.3 Checking the electrodes If the resistance between the skin and the electrodes is too high, the message “CONNECT THE ELECTRODES” (AED mode) or (Manual mode) is issued. Proceed as follows: 1. -
Page 88: Manual Defibrillation Using Pads Procedure
Defibrillation DEFIGARD/PHYSIOGARD Touch 7 Manual Defibrillation Using Pads 5.3.4 Manual Defibrillation Using Pads Procedure 1. Connect the electrode cable to the pads connector. 2. If the device starts in Monitoring or AED mode, proceed according to the descrip- tion in chapter 5.2.1 Activating the manual defibrillation mode, page 82. -
Page 89: Synchronised Defibrillation
Defibrillation DEFIGARD/PHYSIOGARD Touch 7 User guide Synchronised defibrillation Synchronised defibrillation 5.4.1 Warning erroneous triggering Erroneous triggering, interpretation hazard – For synchronised defibrillation, the ECG electrodes should be applied as far from the defibrillation electrodes as possible (e.g. on the limbs). -
Page 90: Function Of The Synchronized Defibrillation Procedure
Defibrillation DEFIGARD/PHYSIOGARD Touch 7 Synchronised defibrillation 5.4.3 Function of the Synchronized Defibrillation Procedure For synchronised defibrillation, the defibrillation shock is delivered in synchronisation with the heart action, as the heart is still working. As a prerequisite, the patient's ECG signal must be supplied to the defibrillator. After the physician has triggered the defibrillation shock, the trigger signal for the actual shock delivery will be derived from the subsequent QRS complex 25 ms after the trigger mark on the monitor screen (1). -
Page 91: Synchronised Defibrillation Procedure
Defibrillation DEFIGARD/PHYSIOGARD Touch 7 User guide Synchronised defibrillation 5.4.4 Synchronised defibrillation procedure 1. Connect the electrode cable to the pads connector. 2. If the device starts in Monitoring or AED mode, proceed according description chapter 5.2.1 Activating the manual defibrillation mode, page 82. -
Page 92: Semi-Automated Defibrillation
Defibrillation DEFIGARD/PHYSIOGARD Touch 7 Semi-automated defibrillation Semi-automated defibrillation Delivering a shock to a patient with normal heart rhythm may induce ventricular fibrillation. For this reason, first read the general rules and safety information in section 5.1, page Electric shock hazard. Turn off the device before exchanging the defibrillation electrodes;... -
Page 93: Voice Messages In Aed Mode
Defibrillation DEFIGARD/PHYSIOGARD Touch 7 User guide Semi-automated defibrillation 5.5.2 Voice messages in AED Mode The sequencing of AED instructions might be very fast and could cause confusion to the user because: The “Anteriority Analyse” feature pre-analyses the heart rhythm before the actual analysis. -
Page 94: Defibrillation Procedure
Defibrillation DEFIGARD/PHYSIOGARD Touch 7 Semi-automated defibrillation 5.5.3 Defibrillation procedure When the device is switched on, spoken and displayed instructions are issued regarding the defibrillation. Closely follow the instructions. Step 1 Switching on and preparing the device 1. Switch on the device by pressing the green button or the AED button directly. - Page 95 Defibrillation DEFIGARD/PHYSIOGARD Touch 7 User guide Semi-automated defibrillation Step 3 Step 3 shock delivery As soon as the energy for a shock is charged, the device prompts the user to deliver the shock by pressing button 3. Danger of electric shock! •...
-
Page 96: Cpr Guide
DEFIGARD/PHYSIOGARD Touch 7 CPR Guide CPR Guide The manual and AED defibrillation mode offers three functions for a guided CPR: • CPR Guide with SCHILLER LifePoint sensor • CPR Guide with FreeCPR based on the impedance measurement by the defibrillation electrodes METRONOME •... -
Page 97: Freecpr
Defibrillation DEFIGARD/PHYSIOGARD Touch 7 User guide CPR Guide 5.6.2 FreeCPR • The FreeCPR measures the compression rate based on the impedance measurement by the defibrillation electrodes. Switch on the device and select manual or AED defibrillation. Apply the defibrillation electrodes. -
Page 98: Defibrillator Technical Messages
Defibrillation DEFIGARD/PHYSIOGARD Touch 7 Defibrillator Technical Messages Defibrillator Technical Messages Alarm Code Cause Remedy Contact technical service T.ECG11 T.DEFI01 T.DEFI02 T.DEFI03 T.DEFI04 • CPU peripheral board defective T.DEFI05 Defibrillator inoperative T.DEFI06 • Defi board defective T.DEFI07 T.DEFI10 T.DEFI13 T.DEFI14 T.DEFI15... -
Page 99: Pacemaker
Pacemaker DEFIGARD/PHYSIOGARD Touch 7 User guide Pacemaker Function 6 Pacemaker Pacemaker Function The pacemaker is the module for external transcutaneous stimulation of the heart. The pacemaker offers two modes of operation, demand and fixed-rate pacing. In demand mode, the pacemaker requires an ECG signal for synchronisation. -
Page 100: Safety Notes
Pacemaker DEFIGARD/PHYSIOGARD Touch 7 Safety Notes Safety Notes Shock hazard! Never touch the pads or the patient's body near the pads while the pacemaker is in use. Patient hazard, equipment failure Equipment delivering electrical energy to the patient at the same time as the pacemaker can disturb the pacemaker function. -
Page 101: Attaching The Pacer Pads
Pacemaker DEFIGARD/PHYSIOGARD Touch 7 User guide Guidelines for the Application of External Pacemakers 6.3.1 Attaching the pacer pads • The same adhesive electrodes used for defibrillation are also employed for pacing. The electrodes are designed for: • 1 hour of pacing using 140mA / 120p/min (pulse duration 20ms) •... -
Page 102: Start-Up Of The Pacemaker
Pacemaker DEFIGARD/PHYSIOGARD Touch 7 Start-up of the Pacemaker Start-up of the Pacemaker Shock hazard! Pacing is started immediately when the pacemaker is switched ON and the current is set. In order to be able to operate the pacemaker, the following conditions must be met: •... -
Page 103: Pacemaker Display
Pacemaker DEFIGARD/PHYSIOGARD Touch 7 User guide Start-up of the Pacemaker 6.4.1 Pacemaker display • Select the Pacer measurement field at the top right to display the pacemaker function. The pacemaker menu with the pacemaker parameter is displayed. The pacemaker default mode at switchover is “Demand” mode; the “Fix” mode has to be selected manually. -
Page 104: Pacemaker Settings Operational Mode Fix
Pacemaker DEFIGARD/PHYSIOGARD Touch 7 Start-up of the Pacemaker 6.4.3 Pacemaker settings operational mode fix Attach the pacer pads (see 101). Display pacemaker and select operational mode Fix. Select (1) Frequency +- to set the impulse frequency. Frequency Fixed Current Demand ... -
Page 105: Demand Mode
Pacemaker DEFIGARD/PHYSIOGARD Touch 7 User guide Start-up of the Pacemaker 6.4.4 Demand Mode To determine when a pacemaker pulse is required, the patient ECG must be monitored with a 4- or 10-lead ECG cable. 1. Attach the pacer pads (see 101). -
Page 106: Finishing The Therapy
Finishing the Therapy DEFIGARD/PHYSIOGARD Touch 7 Start-up of the Pacemaker 7 Finishing the Therapy Switch the device off as soon as the therapy is finished by pressing the button .The dialogue No/Yes is displayed. Confirm switch-off. Disconnect the electrode cable. -
Page 107: Intervention Summary
8 Intervention summary In order to document the intervention, the intervention data is saved. The information can be read and displayed with the Schiller reviewing software or viewed directly on the device • If the memory is full, the oldest data will be overwritten. -
Page 108: Post-Intervention
Intervention summary DEFIGARD/PHYSIOGARD Touch 7 Post-intervention Post-intervention Exiting this menu is only possible by switching off-on the device. 8.1.1 Reviewing intervention file on the device 1. To review the intervention data directly on the device, go to the main menu and select “Post-intervention. -
Page 109: Main Menu
General setup For the monitoring of vital parameters, physiological alarm thresholds are preset in the DEFIGARD/PHYSIOGARD Touch 7, which are activated when the device is turned on. The operator-defined thresholds (wide/narrow) can be set in the respective menus (see page 40, section 4.3);... -
Page 110: Device Settings Menu
Post- Intervention • Update config from SEMA Download the configuration Exiting “Post-Intervention from the Schiller update server. menu” only by switching The line below the parameter off the device possible. shows the current configuration file name. - Page 111 Main Menu DEFIGARD/PHYSIOGARD Touch 7 User guide General setup Menu Sub-menu/Parameter Description Note • Software update – Update from USB Exiting “ Control panel menu” only by switching off the device – Search on server possible. – Current version informa- tion •...
-
Page 112: 10 Maintenance
Maintenance DEFIGARD/PHYSIOGARD Touch 7 10.1 Maintenance interval 10 Maintenance 10.1 Maintenance interval Note The unit must be serviced on a regular basis. The test results must be recorded and compared with the values in the accompanying documents. Maintenance work described in this chapter may be performed by a qualified technician or by the user according to the Maintenance and Interval Table below. -
Page 113: Service/Shelf Life
Maintenance DEFIGARD/PHYSIOGARD Touch 7 User guide Maintenance interval 10.1 10.1.2 Service/Shelf life Device The device has a lifetime of 10 years. Accessories shelf life Power battery (approx. 5 years), safety cell (approx. 7 years), button cell (approx. 10 years) and electrodes (approx. 2 years), see expiring date on the battery or electrodes pouch. -
Page 114: Functional Test
Maintenance DEFIGARD/PHYSIOGARD Touch 7 10.2 Functional test 10.2 Functional test A detailed description of the maintenance steps is listed in table 10.8. Enter the results in the check list on page 122. 10.2.1 Visual inspection of the device and accessories Check the device and accessories for the following: ... -
Page 115: Auto Test
Maintenance DEFIGARD/PHYSIOGARD Touch 7 User guide Functional test 10.2 10.2.4 Auto Test The Auto Test can be executed any time and checks the most important function of the device. 1. Switch on the device 2. Select Menu > Post-Intervention > Auto Test 3. - Page 116 Maintenance DEFIGARD/PHYSIOGARD Touch 7 10.2 Functional test Reset the alarm limits to their original values. If the device does not behave as described in this user guide, there is an error that must be repaired by the after-sales service. Page 116...
-
Page 117: Update Software
Maintenance DEFIGARD/PHYSIOGARD Touch 7 User guide Update Software 10.3 10.3 Update Software Software updates must only be performed by authorized personnel. Select Menu > Control Panel > Software update. This function is only used for updating the software.The software can be updated via Wifi (update Server) or USB interface (memory stick). -
Page 118: Maintenance Interval Of The Batteries
Maintenance DEFIGARD/PHYSIOGARD Touch 7 10.4 Maintenance interval of the batteries 10.4 Maintenance interval of the batteries Important • The battery's performance and life largely depend on how and under which ambient conditions the battery is used. Power Battery • The rechargeable power battery is maintenance-free during its normal life. -
Page 119: Cleaning
Maintenance DEFIGARD/PHYSIOGARD Touch 7 User guide Cleaning 10.5 10.5 Cleaning Cleaning removes dust, dirt and stains; however, this does not constitute a disinfection. Use commercially available detergents intended for clinics, hospitals and practices. 10.5.1 Detergents Please refer to the manufacturer's information regarding the detergents. -
Page 120: Disinfection
Maintenance DEFIGARD/PHYSIOGARD Touch 7 10.6 Disinfection 10.6 Disinfection Use commercially available disinfectants intended for clinics, hospitals and practices to disinfect the device. Wipe disinfection removes certain bacteria and viruses. Please refer to the manufacturer's information. 10.6.1 Disinfectant Admissible disinfectants • Isopropyl alcohol 70% •... -
Page 121: Cleaning And Disinfecting The Device, Cable And Sensors
Maintenance DEFIGARD/PHYSIOGARD Touch 7 User guide Disposal at the end of the device's useful life 10.7 10.6.2 Cleaning and disinfecting the device, cable and sensors Remove the battery and close the cover before cleaning. See section Switching off and disconnecting from the external DC supply page ... -
Page 122: Inspection And Checklist Tables
Maintenance DEFIGARD/PHYSIOGARD Touch 7 10.8 Inspection and Checklist Tables 10.8 Inspection and Checklist Tables In accordance with the maintenance interval detailed previously, the following check list should be copied and followed. Checking life-saving functions The following tests (sections 10.8.1 to 10.8.3) need to be performed before or after each intervention, respectively. -
Page 123: Every 12 Months
• Return the unit to your nearest Confirm the date of the last authorised service point or your factory inspections and tests SCHILLER agent for safety and functional checks. Date of inspection: Inspector: 10.8.3 Lifed-item replacement every 5 - 10 years... -
Page 124: Error Detection
Maintenance DEFIGARD/PHYSIOGARD Touch 7 10.9 Error Detection 10.9 Error Detection If a technical alarm is still present at shut down a reminder is displayed. If it is not possible to get the device back into operating condition within a reasonable period of time, continue cardiopulmonary resuscitation. -
Page 125: Technical Information And Error Messages
Maintenance DEFIGARD/PHYSIOGARD Touch 7 User guide Error Detection 10.9 10.9.2 Technical Information and Error Messages Alarm Cause Remedy Replace device • T.CPU01 • T.CPU02 • T.CPU03 CPU BOARD INOPERATIVE • T.CPU04 • T.CPU05 • T.CPU06 • T.CPU07 Replace device •... -
Page 126: Measures To Prevent Electromagnetic Interferences
The user can help avoid electromagnetic disturbances by keeping the minimum distance between portable and mobile RF telecommunication devices (transmitters) and the DEFIGARD/PHYSIOGARD Touch 7. The distance depends on the output performance of the communication device as indicated below. “Non-ionic electromagnetic radiation"... -
Page 127: Schiller Charging Unit Cs-1
11.1 Battery Charging Options The following options are available to charge the batteries: • Batteries can be removed and charged using the optional charging unit SCHILLER CS-1 (see following). • The DEFIGARD/PHYSIOGARD Touch 7 batteries are also charged when the DEFIGARD/PHYSIOGARD Touch 7 is connected to the external power supply. -
Page 128: Control Panel
SCHILLER Charging Unit CS-1 DEFIGARD/PHYSIOGARD Touch 7 11.3 Control Panel 11.3 Control Panel Power connected indicator Battery slot Battery slot indicators indicators Calibration button The LED indicators give the following information: Function No LEDs lit - No battery inserted. Constant display for 5 seconds - When a battery is first inserted, one, two or three LEDs are lit for 5 seconds. -
Page 129: Battery Calibration
Battery Calibration Every battery has an individual calibration and capacity circuit. The DEFIGARD/ PHYSIOGARD Touch 7 uses this information to display the battery capacity. New batteries are factory calibrated before use and should not need recalibrating during their normal life cycle. If a battery seems to have a low capacity or is near the end of its life, it may need recalibrating. -
Page 130: Input And Output Supplies
DEFIGARD/PHYSIOGARD Touch 7 11.5 Input and Output Supplies 11.5 Input and Output Supplies The SCHILLER CS-1 Charging Unit has the following input and output power supplies: 2 3 4 (1) On / Off switch (2) Potential equalisation (to vehicle common earth). -
Page 131: 12 Technical Data
Technical Data DEFIGARD/PHYSIOGARD Touch 7 User guide System data 12.1 12 Technical Data Data refer to standard testing conditions. Technical data about the defibrillation (chapter 12.2) applies only to the ® DEFIGARD Touch 7. 12.1 System data Manufacturer SCHILLER MEDICAL Device type ®... - Page 132 Technical Data DEFIGARD/PHYSIOGARD Touch 7 12.1 System data Environmental conditions Operation in NORMAL USE for a period not more than 20 min under the following environmental operating conditions: For transient operation • a temperature range of - 20 °C to + 50 °C;...
- Page 133 Technical Data DEFIGARD/PHYSIOGARD Touch 7 User guide System data 12.1 Memory 24 hours memory (FIFO) Recording of Defi, ECG Lead II, Impedance curves, Events, CPR feedback, patient data, patient vitals, screenshots Safety standard IEC/EN 60601-2-4 The device is designed for intensive use •...
-
Page 134: Defibrillation Waveform
Technical Data DEFIGARD/PHYSIOGARD Touch 7 12.2 Defibrillation Waveform 12.2 Defibrillation Waveform ® The chapter 12.2 applies only to the DEFIGARD Touch 7. Form • Biphasic pulsed defibrillation waveform with fixed physiological optimum phase durations • Near stabilisation of the emitted energy in function with the patient resistance using pulse-pause modulation depending on the measured patient resistance (duty cycle 80%). - Page 135 Technical Data DEFIGARD/PHYSIOGARD Touch 7 User guide Defibrillation Waveform 12.2 Deviation at 50 3 J or 15 % (the higher value is assumed) Standard energy settings 150/200/200 joules (configurable see page 149) Adult 50/50/50 joules (configurable see page 149) Paediatric...
- Page 136 Technical Data DEFIGARD/PHYSIOGARD Touch 7 12.2 Defibrillation Waveform Safety discharge when: • the battery voltage is insufficient • the shock is not released within 20 seconds • a lower energy value is selected while the defibrillator is charging • the device is defective •...
-
Page 137: Shock Advisory System
Technical Data DEFIGARD/PHYSIOGARD Touch 7 User guide Defibrillation Waveform 12.2 12.2.1 Shock Advisory System The Shock Advisory System (SAS) validation test set consists of 17,803 ECG waveforms coming from the PhysioNet databases [1]. These files (MIT-VFDB) are subsets of the general PhysioNet databases recognised as standard in ECG tests. -
Page 138: Pacemaker
2,475 couples of ECG and transthoracic Impedance Cardiogram (ICG) from out-of-hospital cardiac arrest (OHCA) interventions, recorded with Automated External Defibrillators (FredEasy, Schiller Medical SAS, France) used by the fire brigade of Paris. This supplementary test completes the validation of both SAS configurations and provides performance fully in accordance with these summarized in Table 1. -
Page 139: Technical Data - Monitoring
Technical Data DEFIGARD/PHYSIOGARD Touch 7 User guide Technical data - monitoring 12.4 12.4 Technical data - monitoring 12.4.1 Leads Simultaneous, synchronous recording of all 9 active electrodes giving 12 leads Patient cable 4-, 10-wire cable (4+6), type CF Heart rate •... -
Page 140: Features Of Pacemaker Pulse Rejection
Technical Data DEFIGARD/PHYSIOGARD Touch 7 12.4 Technical data - monitoring ECG amplifier band pass The band pass depends on the ECG source. Patient cable Display Display “R-ECG” display Filter Filter Monitoring Rhythm Diagnostic 4 & 10 leads 0.05 – 42 Hz 0.05 –... -
Page 141: Nibp - Non-Invasive Blood Pressure
Technical Data DEFIGARD/PHYSIOGARD Touch 7 User guide Technical data - monitoring 12.4 12.4.3 NIBP - non-invasive blood pressure Measurement Automatic or manual Measuring method Oscillometric Connection Type CF Measurement range • Sys 30...255 mmHg, dia 15...220 mmHg Adults(Child • Sys 30...135 mmHg, dia 15...110 mmHg... -
Page 142: Spo 2 - Pulsoximetry
Technical Data DEFIGARD/PHYSIOGARD Touch 7 12.4 Technical data - monitoring 12.4.6 - pulsoximetry Amplifier Masimo™ Patent see web site www.masimo.com/patents.htm for detailed patent information Operation Normal and sensitive Measuring range 0 % to 100 % 25 to 240 /min 0 to 99 % SpCO 0 to 99.9 %... - Page 143 Technical Data DEFIGARD/PHYSIOGARD Touch 7 User guide Technical data - monitoring 12.4 , SpCO and SpMet accuracy was determined by testing on healthy adult volunteers in the range of 60-100% SpO , 0-40% SpCO, and 0-15% SpMet against a laboratory CO-Oximeter. SpO and SpMet accuracy was determined on 16 neonatal NICU patients ranging in age from 7-135 days old and weighing between 0.5-4.25 kg.
-
Page 144: Etco 2 - Capnography
Technical Data DEFIGARD/PHYSIOGARD Touch 7 12.4 Technical data - monitoring 12.4.7 etCO - Capnography The IRMA and ISA sensors are equipped with an automatic barometric pressure compensation. Extremely compact infrared mainstream and sidestream gas analyser. Trademarks Masimo IRMA Masimo ISA... - Page 145 Technical Data DEFIGARD/PHYSIOGARD Touch 7 User guide Technical data - monitoring 12.4 Total system response time IRMA: < 2 second ISA: < 4 seconds (using 2 m long sampling line) Protection class IP44 (IRMA) IP4X (ISA) Airway adapter IRMA Increases dead space by less than 6 ml Adults/children adapter Pressure drop less than 0.3 cm H2O @ 30 LPM...
-
Page 146: Telecommunication Gsm (Option)
Technical Data DEFIGARD/PHYSIOGARD Touch 7 12.5 Telecommunication GSM (option) 12.5 Telecommunication GSM (option) Frequency range Quad band GSM/GPRS/EDGE 850/900/1800/1900 MHz UMTS/HSPA+ 850/900/AWS1700/1900/2100 MHz Supported SIM cards 3 and 1.8 V Data transmission GPRS class B Max. transmitting power • UMTS/HSPA – Class 3 (0.25 watt) •... -
Page 147: Device Configuration
Technical Data DEFIGARD/PHYSIOGARD Touch 7 User guide Device Configuration 12.6 12.6 Device Configuration 12.6.1 General configuration Parameter Values Description This option shall be activated if artefacts are detected on ECG signals when the device is plugged to the mains. The notch filter must be chosen according the location. -
Page 148: Ecg
Technical Data DEFIGARD/PHYSIOGARD Touch 7 12.6 Device Configuration Parameter Values Description • English* German Sets of the language in which the device will always start by default. Default language French Spanish Italian Even if the language is modified during the use on the device, it will start again with the language specified here etc…... -
Page 149: Defibrillator
Technical Data DEFIGARD/PHYSIOGARD Touch 7 User guide Device Configuration 12.6 12.6.3 Defibrillator Parameter Values Description • 2, 4, 8, 15, 30, 50, 70, 90, Default energy for Sets the energy which will be displayed by default when entering adults in manual def. -
Page 150: Aed
Technical Data DEFIGARD/PHYSIOGARD Touch 7 12.6 Device Configuration 12.6.5 Parameter Values Description • False Display curve in If enabled, ECG lead Defi is displayed in AED mode • True* • High Metronome default behaviour in adult mode AED voice level •... -
Page 151: Nibp
Technical Data DEFIGARD/PHYSIOGARD Touch 7 User guide Device Configuration 12.6 12.6.8 NIBP Parameter Values Description Deflation rate • 3, 4, 5, 6, 7, 8, 9 mmHg/s Sets the cuff deflation rate • mmHg* NIBP unit Sets the unit in which the NIBP values will be displayed and stored •... -
Page 152: Time And Date
Technical Data DEFIGARD/PHYSIOGARD Touch 7 12.6 Device Configuration 12.6.12 Time and date Parameter Values Description • DD/MM/YY*, MM/DD/YY Date format Sets the format in which the date will be displayed YY/MM/DD • AM/PM Time format Sets the time format • 24H* •... -
Page 153: Transmission
Technical Data DEFIGARD/PHYSIOGARD Touch 7 User guide Device Configuration 12.6 12.6.16 Transmission Parameter Values Description If this option is activated, the device will automatically send over the media selected in configuration Transmission media during • False* Automatic R-ECG intervention to the address specified for SEMA Server transmission •... -
Page 154: Wifi
Technical Data DEFIGARD/PHYSIOGARD Touch 7 12.6 Device Configuration 12.6.18 WIFI Parameter Values Description SSID SSID of the Wi-Fi Network that shall be used for data transmission • WEP • WPA • WPA2* Type of encryption from the Wi- Fi Network that shall be used for data... -
Page 155: Sus (Schiller Update Server)
Technical Data DEFIGARD/PHYSIOGARD Touch 7 User guide Device Configuration 12.6 Parameter Values Description Sets device login to SEMA. To be able to transmit data to SEMA, a SEMA login login and password must be specified for each device (it can be the same login/password for all device though) Sets device password to SEMA. -
Page 156: Electromagnetic Interferences
Electromagnetic interferences The DEFIGARD/PHYSIOGARD Touch 7 is intended to be used in the electromagnetic environments listed in the following tables. The user of the DEFIGARD/PHYSIOGARD Touch 7 has to ensure that the device is operated in an adequate environment. 12.7.1... - Page 157 Technical Data DEFIGARD/PHYSIOGARD Touch 7 User guide Electromagnetic interferences 12.7 Interference testing IEC 60601 test level Conformity lev- Electromagnetic environment - explanations Conducted HF 3 Veff between 150 kHz and 3 5 , ------- IEC 61000-4-6 80 MHz outside of the ISM...
-
Page 158: Recommended Minimum Distances
12.7 Electromagnetic interferences 12.7.3 Recommended minimum distances The DEFIGARD/PHYSIOGARD Touch 7 is intended to be used in electromagnetic environments in which it is possible to control radiated HF interferences. The user of the DEFIGARD/PHYSIOGARD Touch 7 can prevent electromagnetic interferences... -
Page 159: 13 Appendix
Your local representative stocks all the disposables and accessories for the ® DEFIGARD Touch 7. A full list of all SCHILLER representatives can be found on the SCHILLER website (www.schiller.ch). 13.2 Accessories DEFIGARD/PHYSIOGARD Touch 7 Article no. - Page 160 Appendix DEFIGARD/PHYSIOGARD Touch 7 13.2 Accessories DEFIGARD/PHYSIOGARD Touch 7 Article no. Article description 0-13-0033 Paediatric (10-50 kg) reusable finger sensor, 1m, Rainbow DCIP Temp 2.101108 Reusable temperature probe rectal / oesophageal, adult, 2m 2.101109 Reusable temperature probe rectal / oesophageal, child, 2m 2.101104...
-
Page 161: Literature
Appendix DEFIGARD/PHYSIOGARD Touch 7 User guide Literature 13.3 13.3 Literature European Resuscitation Council Guidelines 2015 for Cardiopulmonary Resuscitation and Emergency Cardiovascular (2015) Care ( American Heart Association (2015) Guidelines 2015 for Cardiopulmonary Resuscitation and Emergency Cardiovascular Care Cansell A. (2000) Wirksamkeit und Sicherheit neuer Impulskurvenformen bei transthorakaler Defibrillation –... - Page 162 Appendix DEFIGARD/PHYSIOGARD Touch 7 13.4 Glossary Page 162...
-
Page 163: 14 Index
Index DEFIGARD/PHYSIOGARD Touch 7 User guide 14 Index Accessories and disposables ....Voice support ......... Activating the audio alarm ..... IBP calibration ........Alarm indicators ........IBP settings ........Alarm messages ........Preparing IBP measurement .... Warranty ..........Auto ............. - Page 164 Index DEFIGARD/PHYSIOGARD Touch 7 Page 164...
Need help?
Do you have a question about the DEFIGARD Touch 7 and is the answer not in the manual?
Questions and answers