Table of Contents
Advertisement
Quick Links
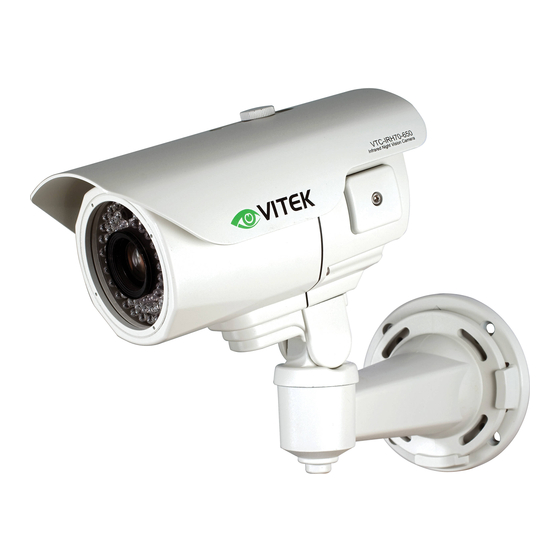
• 1/3" Super HAD Color CCD
• High Resolution with 560 TV Lines Resolution in Color (600 TV Lines in B/W mode)
• 70 IR LEDs at 850nm enable viewing in Total Darkness up to 300 Feet
• Simultaneous Color and Black & White Focus Adjustment
• Infrared LED Dynamic Intensity Control with automatic brightness adjustment of IR LEDs
to help prevent washed out images when objects are too close
• Camera and IR LED compartments are separated using a dual glass design to prevent
stray IR light from entering the lens
• Vari-Focal 6~50mm DC Auto Iris IR Lens
• Virtual Wide Dynamic Range
• OSD control
• Secondary Video Output & OSD Control Joystick are accessible inside a gasket sealed
removable side panel
• Externally adjustable Focus & Zoom with clutch mechanism to eliminate over-tightening
• Gasket sealed external focus and zoom controls with clutch mechanism to eliminate
over-tightening for ease of installation and adjustment
• Heavy Duty IP68 rated Weather/Vandal Resistant Aluminum Construction is 100% water
and dust proof
• Fully adjustable 3 axis wire feed-through mount
• Dual Voltage: 12VDC / 24VAC
VTC-IRH70/650
Long Range Weatherproof IR
Bullet Camera
Advertisement
Table of Contents

Related Manuals for Vitek VTC-IRH70


Summary of Contents for Vitek VTC-IRH70
- Page 1 VTC-IRH70/650 Long Range Weatherproof IR Bullet Camera • 1/3” Super HAD Color CCD • High Resolution with 560 TV Lines Resolution in Color (600 TV Lines in B/W mode) • 70 IR LEDs at 850nm enable viewing in Total Darkness up to 300 Feet •...
-
Page 2: Table Of Contents
Table of contents 1. Safety Instructions and Notes.................. 2 2. General Descriptions ....................3 3. Supplied Items ......................3 4. Part names ......................4 5. Installation Instructions .................... 5 5.1. Mounting The Camera ................. 5 5.2. Power Supply Connections..............5 5.3. -
Page 3: Safety Instructions And Notes
WARNING The symbol is intended to alert the user to the presence of important operating and maintenance(servicing) instructions in the literature accompanying the unit. The symbol is intended to alert the user to the presence of un-insulated "dangerous voltage" within the product's enclosure that may be of sufficient magnitude to constitute a risk of electric shock. -
Page 4: General Descriptions
2. General Descriptions Main Features · Fully external adjustment controls for lens, OSD or Dip switch settings · 1/3" Super HAD II CCD · High Resolution 560TVL (Color), 600TVL (B/W) · 3-DNR (3 Dimensional Digital Noise Reduction) · Extended Dynamic Range by the use of D-WDR technology ·... -
Page 5: Part Names
4. Part Names 4.1 Front view Sunshield attachment thumb screw IR LED Panel Double Glass Window Sunshield On Screen Display control cover Wall Mounting Bracket Mounting Plate Adaptor 4.2 Rear side view Focus adjustment Zoom adjustment... -
Page 6: Installation Instructions
5. Installation Instructions Make sure the power is not applied before installation. Once the camera is installed you may first connect the low voltage (DC12V or AC24V) wire to the camera power connector, then plug the AC adapter to AC outlets to avoid an improper reset from power jitter and possible damage from voltage surge. -
Page 7: Setup Menu
6. SETUP Menu The Setup menu can be accessed and controlled by OSD control joy stick on the side of camera. Five commands are available with the use of the joy stick. SYMBOL descriptions joystick operation; stick denotes the directions VIDEO of Joystick lever operation. -
Page 8: Exposure Menu
6.2 EXPOSURE menu To enter EXPOSURE menu, press at MAIN>EXPOSURE. Factory EXPOSURE Descriptions Default 1) If LENS at MAIN menu was set to DC, a fixed shutter is selectable from 1/60(NTSC) or 1/50(PAL), FLK, 1/250, 1/500, 1/2000, 1/5000, 1/10000, 1/100000 and a fixed sense-up rate is selectable from x256, x128, x64, x32, x16, x8, x4, x2. -
Page 9: Blc Menu
6.2.1 BLC menu To enter BLC menu, press at EXPOSURE > BLC > BLC. Factory Descriptions Default Sets the compensation gain to LOW, MIDDLE or HIGH. For best compensation results, adjust window for size and location as well as GAIN. GAIN Back Light Compensation (BLC) may not be precise if the background is varying continuously between bright... -
Page 10: Hsblc Menu
6.2.2 HSBLC menu - High Light Masking To enter HSBLC (High Sensitivity BLC) menu, press button at EXPOSURE > BLC > HSBLC. HSBLC cuts out the highlighted video and processes that area as black masked. The cut out video is excluded in measuring light level by the signal processor. Factory Descriptions Default... -
Page 11: D-Wdr Menu
6.2.3 D-WDR menu enter D-WDR (Digital Wide Dynamic Range) menu, press at EXPOSURE > D- WDR > ON. D-WDR improves dynamic range video by means of digital compensation for the dark and highlighted areas. Factory D-WDR Descriptions Default LOW COMP. - Page 12 DAY NIGHT Factory Descriptions AUTO Default DELAY is the duration which should maintain its status before making the D-->N or N-->D switches. Camera checks the light level seamlessly determine crosses over DELAY threshold levels of D-->N LEVEL or N-->D LEVEL. The state must maintain unchanged for longer than DELAY time in order to force switchover.
-
Page 13: 3Dnr Menu
CAUTION b 1) DAY / NIGHT AUTO menu is strongly recommended to be adjusted for the actual object after completing all settings of the lens. 2) If the gap between D-->N LEVEL and N-->D-LEVEL becomes too small, it is easy to repeat switching from/to DAY/ NIGHT continuously. The recommended Gap is greater than 45. -
Page 14: Picture Menu
PICTURE menu In PICTURE menu, SHARPNESS, BLUE, RED, GAMMA and WHITE BAL. can be set. To enter PICTURE menu, press at MAIN >PICTURE Factory PICTURE Descriptions Default Increases or decreases the sharpness of the picture. Too much sharpness makes the image harsh and SHARPNESS shows increased noise and line flicker at the edges of objects in the picture. -
Page 15: Special Menu
SPECIAL menu SPECIAL menu, TITLE, D-EFFECT, MOTION, PRIVACY, SYNC and LANGUAGE. can be set. enter SPECIAL menu, press MAIN >SPECIAL Factory SPECIAL Descriptions Default If set to ON, CAM TITLE is displayed on the screen. CAM TITLE See ‘6.6.1 CAM TITLE menu’ for detail. FREEZE: If set to ON, image freezes and shows a still image. -
Page 16: Camera Title Menu
6.6.1 CAM TITLE menu To enter CAM TITLE menu, press at MAIN >SPECIAL>CAM TITLE>ON Command line CAM TITLE input line Up to 15 characters from the character table can be input. to move cursor (Blinking character is on the cursor position) in the character table. -
Page 17: Motion Menu
6.6.2 MOTION menu To enter MOTION menu, press at MAIN >SPECIAL>MOTION>ON. Up to 4 motion detection areas can be programmed by size, position, sensitivity and display on/off. If MOTION in MAIN>SPECIAL menu is set to ON, ‘MOTION’ is displayed on the monitor whenever the motion is detected and the digital effect will appear if MOTION VIEW is set to ON. -
Page 18: Privacy Menu
6.6.3 PRIVACY menu To enter PRIVACY menu, press at MAIN >SPECIAL>PRIVACY>ON. Up to 8 privacy detection areas can be programmed by size, position, mask color and display on/off. If PRIVACY in MAIN>SPECIAL menu is set to ON, the masked areas are displayed on the monitor. -
Page 19: Lens Menu
6.7 LENS menu Lens can be selected as either DC (Auto Iris) or MANUAL (Disabled A/I function). To enter DC/MANUAL LENS menu, press button at MAIN >LENS>DC(MANUAL). BRIGHTNESS can be adjusted. It takes about 5 seconds for brightness to settle after the adjustment. -
Page 20: Specifications
7. Specifications Model Name VTC-IRH70650 Image Device 1/3" Sony New Structure Super HAD Color CCD TV System NTSC, 2:1interlace Scan Freq. 59.94Hz(V), 15.734Khz(H) Effective Pixels 768(H) x 494(V) Synchronization Internal H. Resolution 560TV Lines (COLOR) / 600TV Lines (B/W) Sensitivity COLOR: 0.35Lux, B/W: 0.04Lux, SENSE-UP(x4):0.0035Lux (@50IRE,F1.2) -
Page 21: Dimensional Drawings
8. Dimensional Drawings Mounting Plate Adapter... -
Page 22: Warranty
VITEK warrants to the purchaser that products manufactured by VITEK are free of any rightful claim of infringement or the like, and when used in the manner intended, will be free of defects in materials and workmanship for a period of three (3) years, or as otherwise stated above, from the date of purchase by the end user. - Page 23 ALSO AVAILABLE FROM VITEK:...
- Page 24 28492 Constellation Road ValenCia, Ca 91355 WWW.ViteKCCtV.CoM | 888-ViteK-70...
Need help?
Do you have a question about the VTC-IRH70 and is the answer not in the manual?
Questions and answers