Advertisement
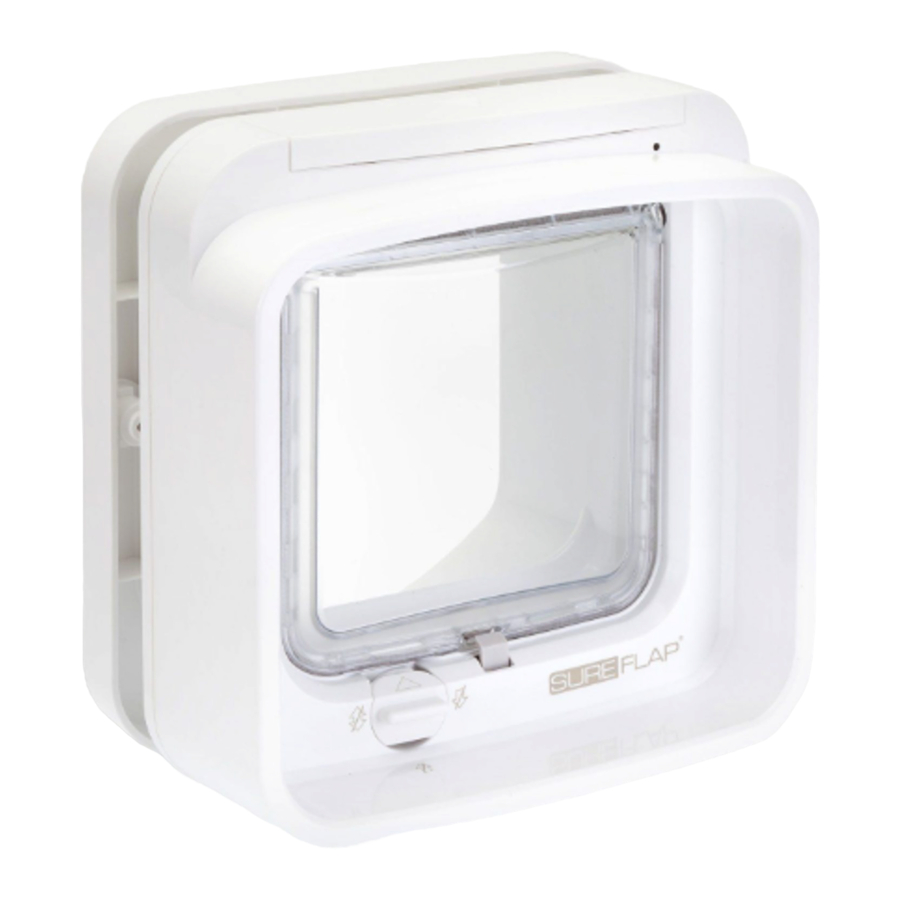
What's in the Box

- Cat Flap
- External frame
- 2 x Screw caps
- Screws (30mm, 50mm & 70mm)
Product overview

- In standard operating mode the Cat Flap is locked in both directions.
- When an authorised cat's microchip is detected on either side, the Cat Flap will unlock.
- Once your cat has entered or left the house, the Cat Flap will lock again on both sides.
- Indoor only pets won't be allowed to go outside through the Cat Flap. However, if they do get outside (e.g. through the window), they will allowed back in.
Fit the batteries
Remove the battery cover and insert the batteries with the + and - in the correct orientation. If the batteries are running low, the LED will flash red every 5 seconds.

Programming your Cat Flap
- Make sure the manual lock is set to locking mode 1.
![]()
-
- Adding a cat with outdoor access - press the
![]() button once
button once - Adding an indoor only cat - press the
![]() button twice.
button twice.
![]()
- Adding a cat with outdoor access - press the
- In 'Add a pet' mode, the catches will drop (you will hear a click)
![]()
- Adding a cat with outdoor access - the indicator light will flash GREEN.
- Adding an indoor only cat - the indicator light will flash RED.
- Using food or treats, encourage your pets to put their heads in the tunnel one at a time. The catch will go up once the pet's microchip is recognised. Repeat these steps for all animals that will use the cat flap.
![]()

 button once


Locking modes

- Enter and exit
- Exit only
- Enter only
- Fully locked
Fitting your cat flap in a wood or plastic door
- Ruler
- Spirit level
- Blu Tack
- Sharp pencil
- Electric jigsaw
- Protective eye-wear
- Electric drill with a 6mm (1/4'') drill bit
- Cross head screwdriver
- The screws and caps provided
Ensure your cat(s) can pass through the flap before fitting.
Flap opening dimensions = 142 x 120mm (5 9/16'' x 4 3/4'')
- To ensure your cat has unhindered access, first measure the height from their tummy to the floor. This measurement is the distance from the floor to the bottom edge of the hole you need to cut. Mark this on your door.
![]()
- Stick the external frame to the door aligning the bottom edge of the hole with the measured mark. Use a spirit level to ensure the frame is level, then run a sharp pencil around the inside edge of the frame.
![]()
![warning]() When using power tools, follow all safety instructions provided with the product.
When using power tools, follow all safety instructions provided with the product. - Remove the external frame. Drill pilot holes in the corners of the outline to make it easier to cut the hole. Make sure these holes are touching the line and that they are big enough for the jigsaw blade to fit through.
![]()
- Using the jigsaw, cut around the outer edge of the line you have marked. If the hole is too small, please take the time to carefully file the hole until the Cat Flap fits through easily.
![]()
![warning]() Once the hole is cut, check if there is any metal in the door.
Once the hole is cut, check if there is any metal in the door. - Now check that the Cat Flap fits through the hole. Remember the SureFlap logo must be inside the house.
![]()
- On the outside of the house, make sure the tunnel is securely pushed through the hole and slide the external frame over it. Using a sharp pencil mark through the two holes.
![]()
- Remove the Cat Flap from the door then drill the two screw holes using a 6mm (1/4'') drill bit. Remember to hold the drill horizontally.
![]()
- To choose the correct length of screw from the sets provided, compare the screw lengths to the thickness of your door. The screw needs to be between 15 to 30mm (19/32 to 1 3/16'') longer than the depth of your door.
![]()
- Put the Cat Flap back through the hole, position it centrally and replace the external frame. Using a cross head screwdriver and the screws you selected, attach the external frame and fasten the screws. Once the screws are secure, tighten them.
![]()
- Lastly, insert the two screw caps with the groove facing away from the tunnel.
![]()


Important safety information
 It is your responsibility to exercise discretion and observe all safety measures required by law and common sense. Please read the following information carefully and retain this manual for future reference. Note this product is intended for use by domestic pets only

- Your Cat Flap is not a toy. Do not allow children to play with the product.
- Your Cat Flap includes some small components. To avoid the risk of choking take care to keep any loose parts away from young children and pets and dispose of all packaging appropriately.
- This product may be used by children aged 8 years and above, and by persons with reduced physical, sensory or mental capabilities, or lack of experience and knowledge. They must be supervised or have been given instruction concerning use of the appliance in a safe way and understand the hazards involved. Cleaning and user maintenance shall not be undertaken by children without supervision.
CHILD PROOFING: In households with young children, you must include the Cat Flap in childproofing considerations. Misuse of this product by a child may result in persons coming into contact with potential dangers. Young children should be monitored at all times when in the immediate vicinity of the Cat Flap.
BATTERIES:
This product requires 4 x good quality 1.5 V LR6 alkaline "AA" cells to operate. The product is not designed for use with rechargeable batteries.
- Always change all 4 batteries at the same time and avoid mixing battery types.
- To insert the batteries remove the battery compartment cover from the front of the cat flap. Ensure the +/- symbols on the new batteries match the symbols on the Cat Flap.
- Non-rechargeable batteries are not to be recharged.
- To avoid the risk of fire always take care to ensure batteries are fitted the correct way round as marked on the Cat Flap and never short circuit the battery terminals.
- When the batteries start to run low, the indicator light will flash red once every 5 seconds.
- There is a risk of explosion if the battery is replaced by an incorrect type. Always use good quality batteries from a reputable battery manufacturer to ensure the best performance.
- Exhausted or out-of-date batteries must be removed and disposed of properly in accordance with local legislation.
- If the cat flap is going to be unused for several months, please remove the batteries.
- In case of battery leaks, wear appropriate protective equipment (PPE) to protect yourself from any exposure to harmful chemicals before disposing of the batteries and cleaning any spillage. When cleaning up a spillage, avoid contact with skin, eyes or mouth at risk of ingestion. Contact a medical professional immediately if this should occur.
PETS: To ensure your pet's safety, do not use this product if parts are missing, damaged or worn. Sure Petcare recommends the Cat Flap is used with your pet's implanted microchip, however it may also be operated using the Sure Petcare RFID Collar Tag. If using a collar tag, it must be used with a safety collar which incorporates a breakaway buckle. Sure Petcare cannot accept liability for any injury or death caused by a pet's collar.
INSTALLATION: Installing in a metal door or wall?

The steps in this manual are not suitable for installations into metal doors or walls. Do not install the Cat Flap in a fire door, it will render it unfit for purpose.
Before installing, you should consider any potential hazards present inside or outside the intended location, as well as the impact subsequent modifications to your property may have on the use of your Cat Flap. If you have any doubts concerning the installation, it is recommended you consult a professional. Only use approved Sure Petcare accessories and spare parts with your DSCF.
Documents / ResourcesDownload manual
Here you can download full pdf version of manual, it may contain additional safety instructions, warranty information, FCC rules, etc.
Advertisement


Need help?
Do you have a question about the DualScan and is the answer not in the manual?
Questions and answers