Marshall STUDIO VINTAGE SV20H / SV20C Manual
- User manual (54 pages) ,
- Quick start manual (12 pages) ,
- Quick start manual (28 pages)
Advertisement
SPECIFICATION
Based on an amp that inspired generations of iconic guitarists, the 1959SLP. Marshall Studio Vintage amps deliver the unmistakeable tone shaping and harmonics that are expected from the 1959SLP in a portable format. You can play anything from saturated blues tones to biting leads for classic rock. Studio Vintage amps provide four separate inputs for you to blend your sound, distinctive EQ settings including presence control, a DI output and power reduction.
| SV20H | |
| Power | 20W or 5W |
| Valves | 2 x ECC83, 1 x ECC83 (phase splitter) and 2x EL34 |
| Channels | Single channel with four separate inputs High and low sensitivity loudness controls |
| Equalisation | Treble, middle, bass and presence |
| Speaker Outputs | 5 x 1/4" jack sockets (16Ω load / 8Ω load / 4Ω load) |
| Outputs | DI output |
| Unit weight | 9.25kg |
| Unit width | 500mm |
| Unit height | 240mm |
| Unit depth | 230mm |
| SV20C | |
| Power | 20W or 5W |
| Valves | 2 x ECC83, 1 x ECC83 (phase splitter) and 2x EL34 |
| Channels | Single channel with four separate inputs High and low sensitivity loudness controls |
| Equalisation | Treble, middle, bass and presence |
| Speaker Outputs | 5 x 1/4" jack sockets (16Ω load / 8Ω load / 4Ω load) |
| Outputs | DI output |
| Speaker config. | 1 x 10" |
| Speaker model | Celestion V-type 10" |
| Unit weight | 15.85kg |
| Unit width | 500mm |
| Unit height | 460mm |
| Unit depth | 245mm |
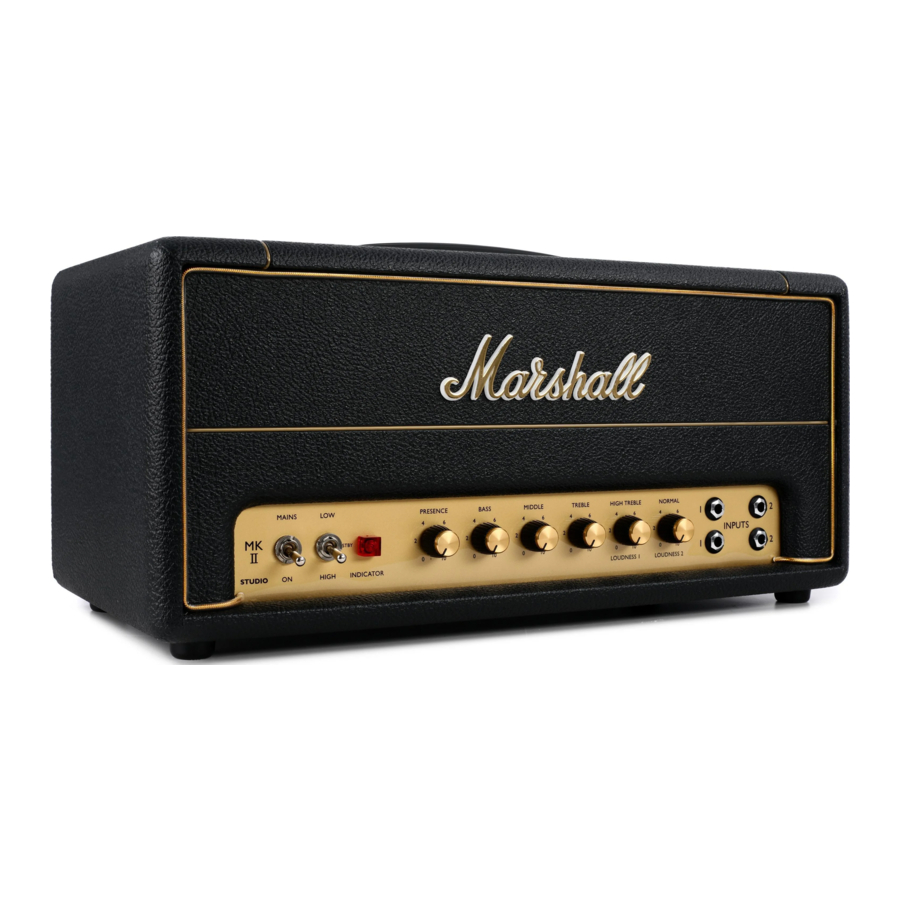
FRONT PANEL FUNCTIONS

- POWER SWITCH
Mains power is on when set to the on position. - STANDBY SWITCH
The unit power is in low power mode (5W) when set to low, it is set to standby when in the middle position and when set to high power the unit runs at full power (20W).
Standby mode: this should be used during breaks in performances, instead of leaving the amp on full power. Always turn the power on for two minutes before using the standby switch. - POWER INDICATOR
Illuminates when unit is switched on. - PRESENCE
Adjusts the high frequencies of the power amp. Increasing the high frequencies adds more bite to your sound. - BASS
Adjusts the low frequencies of the amp. It will add bottom end and depth to your sound. - MIDDLE
Adjusts the mid frequencies of the amp. Giving you anything from a fat and full sound to an aggressive tone. - TREBLE
Adjusts the upper frequencies of the amp. Your tone will get brighter as it is turned up. - HIGH TREBLE / LOUDNESS 1
A volume control that changes the loudness of input 1. - NORMAL / LOUDNESS 2
A volume control that changes the loudness of input 2. - INPUT 1
Is a high sensitivity, high treble input. - INPUT 1
Is a low sensitivity high treble input. - INPUT 2
Is a high sensitivity normal input. - INPUT 2
Is a low sensitivity normal input.
Inputs: the high treble and normal inputs can be linked together with a 1/4" patch cable to blend and create the tone that suits the player.
REAR PANEL FUNCTIONS

- SPEAKER OUT
1/4" socket for 16 Ohm speaker connection. - SPEAKER OUT
1/4" socket for 8 Ohm speaker connection – use this in conjunction with socket 3 when plugging in 2 x 16 Ohm cabinets. - SPEAKER OUT
1/4" socket for 8 Ohm speaker connection – use this in conjunction with socket 2 when plugging in 2 x 16 Ohm cabinets. - SPEAKER OUT
1/4" socket for 4 Ohm speaker connection – use this in conjunction with socket 5 when plugging in 2 x 8 Ohm cabinets. - SPEAKER OUT
1/4" socket for 4 Ohm speaker connection – use this in conjunction with socket 4 when plugging in 2 x 8 Ohm cabinets.

never attempt to connect more speakers than rated. The safe combinations are those listed in this manual. Any other speaker combinations may stress the power amp and potentially lead to valve failure.
Note: never use this amp without a speaker load.
- DI OUTPUT
Connect your amp to an external recording device or sound desk using this output socket.
Note: the DI output has added loudspeaker emulation. - LOOP SWITCH
This turns the effects loop of the amp on or off to completely remove the loop from the signal path when switched off. - EFFECTS LOOP SEND
Sends signal to effects loop / outboard equipment. - EFFECTS LOOP RETURN
Returns signal to effects loop / outboard equipment. - POWER INLET
The supplied mains power lead is connected here.
SAFETY INSTRUCTIONS
Please read this manual carefully before plugging in. Follow all instructions and heed all warnings.
before going any further, make sure that your amp is compatible with your mains electricity supply. If you have any doubt, please seek help from a qualified technician – your Marshall dealer can help you with this.
MAINS INPUT & FUSE
The specific mains input voltage rating that your amp has been manufactured for is indicated on the rear panel of the amp. Your amp is provided with a detachable mains (power) lead, which should be connected to the mains input socket on the rear panel of the amp. The correct value and type of mains fuse is specified on the rear panel of the amp.
Never attempt to bypass the fuse or fit one of the incorrect value or type.
IMPORTANT SET UP INFORMATION
- When using your amp with one or more speaker cabinets, make sure that they are connected to the correct loudspeaker jack sockets.
failure to do the above may damage your amp. When connecting a speaker cabinet make sure that you use a proper speaker cable. Never use a screened (shielded) guitar cable for this purpose.
- Ensure that the power switch is set to the off position and the standby switch is set to standby.
- Connect the supplied mains (power) lead into the mains input on the rear panel first and then into an electricity outlet.
- Ensure that any master, volume and/or output level controls on the front panel are set to zero.
- Plug your guitar into one of the input jack sockets on the front panel.
- Turn the front panel power switch on and wait a couple of minutes.
- Select between 20W / 5W using the standby switch.
- Turn the volume up to your preferred level and you're ready to play.
TRANSPORTING YOUR EQUIPMENT
Please ensure that your amp is switched off, unplugged from the mains electricity supply and all removable cables have been disconnected from your equipment before attempting to move it.
Documents / ResourcesDownload manual
Here you can download full pdf version of manual, it may contain additional safety instructions, warranty information, FCC rules, etc.
Advertisement


Need help?
Do you have a question about the STUDIO VINTAGE SV20H and is the answer not in the manual?
Questions and answers