Marshall MG15FX, MG30FX Manual
- User manual ,
- Quick start manual (12 pages) ,
- Owner's manual (7 pages)
Advertisement
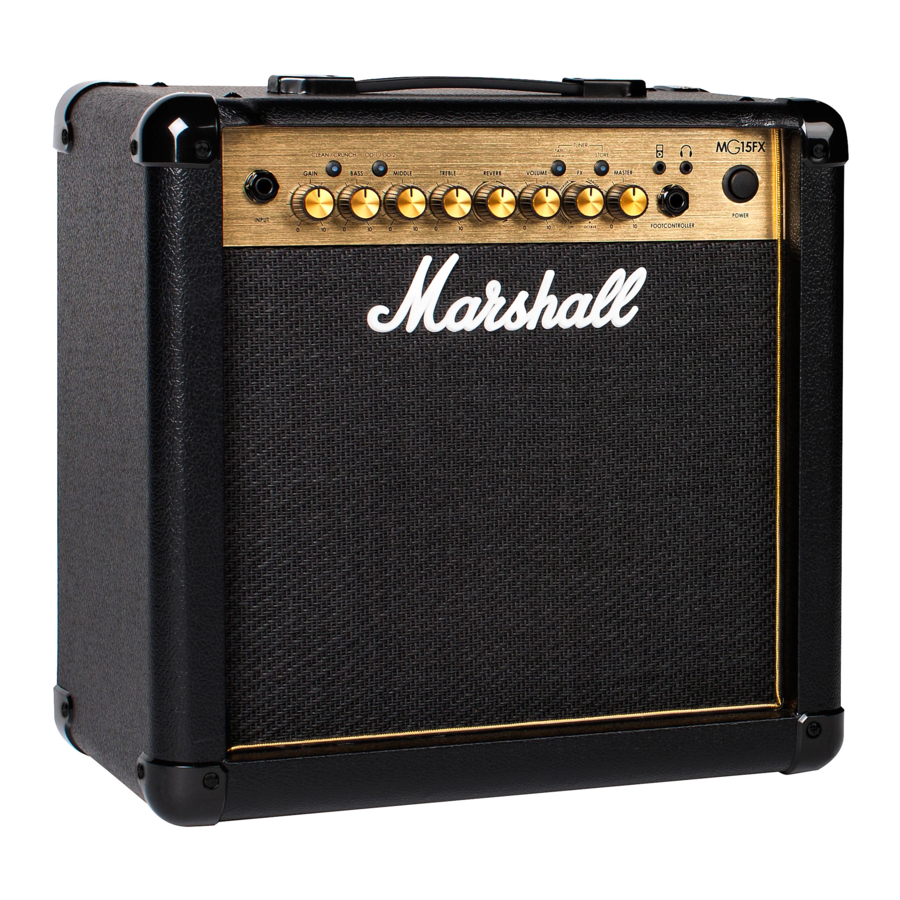
FRONT PANEL FUNCTIONS

CHANNEL SELECTION
The amplifier has 4 channels - Clean, Crunch, OD-1 & OD-2. Pressing the Clean/Crunch switch (3) selects between the Clean (Green Light) and Crunch (Red Light) channels. Pressing the OD-1/OD-2 switch (5) selects between the OD-1 (Green Light) and OD-2 (Red Light) channels.
MODES
The amplifier operates in two modes - Preset and Manual. To change between these two modes, you must hold the Tap switch (10) down for at least two seconds. When in manual mode the Store switch (12) lights red and the selected channel light (3 or 5) will start to flash.
The amplifier will remember the last mode it was in after power off and revert to it the next time it is powered on.
Preset
This is the factory default operation of the amplifier. In Preset mode the position of all controls except Master Volume (13) are stored within each channel. Each channel should be considered a preset.
Selecting a channel automatically recalls the settings stored within the channel. To store the updated settings, push the Store switch (12). If you select another channel without pressing Store (12) then any altered settings will be lost as the new channel and its settings are recalled.
Manual
In manual mode the amp's settings always match the physical positions of the controls. Pressing Store (12) will store the current settings into the selected channel. These can then be recalled when using the unit in Preset mode.
- INPUT JACK SOCKET
Input for your guitar. Use a good quality guitar cable (i.e. one that's screened/shielded) to help prevent noise, interference and unwanted feedback. - GAIN CONTROL
Controls the amount of signal entering the pre-amp and the amount of distortion created in the selected channel. - CLEAN/CRUNCH SWITCH
Selects between Clean (green) and Crunch (red) channels. - BASS CONTROL
Turning up the Bass control will add low-end depth to your sound.
- OD-1/OD-2 SWITCH
Selects between OD-1 (green) and OD-2 (red) channels. - MIDDLE CONTROL
Adjusting the middle frequencies will vary the amount of body in your sound. - TREBLE CONTROL
Increasing the Treble will make your sounds brighter and more cutting. - REVERB CONTROL
This control lets you add a lush digital reverb to the selected channel there are two distinctly different sounding reverb types – Studio or Spring. - VOLUME CONTROL
Controls the volume of the selected channel. - TAP (MANUAL) SWITCH
Matches the delay FX time to the time between two pushes. The LED flashes at the selected delay time. Holding down the Tap switch for longer than 2 seconds switches the amp between manual and preset mode. - FX CONTROL
Selects and adjusts one of five digital effects - Chorus, Phaser, Flanger, Delay and Octave.
- STORE SWITCH
Stores the current amp settings into the current channel or to recall with the optional footcontroller. When in manual mode the Store button lights red. - MASTER CONTROL
Controls the master volume of the amplifier. - MP3 LINE IN SOCKET
Jam to your favourite track by connecting the line out or headphone output of your player here. - FOOTCONTROLLER SOCKET
Socket for the connection of the optional footcontroller (PEDL-90008). - HEADPHONE SOCKET
Connection of headphones will automatically mute the internal speaker. - POWER SWITCH
The power switch turns your amplifier on and off. A channel switch will light up when your amplifier is turned on.
EXPLORE MARSHALL.COM
LIVE FOR MUSIC
Looking to take the plunge into the music industry? Marshall Live For Music has lots of advice from industry specialists and professional musicians to get your career moving. From getting your first band together to securing slots at festivals around the world, you can find everything you need to make your mark in music.
MARSHALL.COM/LIVE-FOR-MUSIC
MARSHALL WORKSHOP
We've taken it back to basics and created the Marshall Workshop videos to help you nail your sound. From understanding your equipment to perfecting your playing, the Marshall Workshop features all the tools you need to craft that killer sound.
MARSHALL.COM/WORKSHOP
SAFETY INSTRUCTIONS

PLEASE READ THIS MANUAL CAREFULLY BEFORE PLUGGING IN.
FOLLOW ALL INSTRUCTIONS AND HEED ALL WARNINGS.
Please refer to full details in separate Important Safety Instructions CATS-90009.
before going any further, make sure that your amp is compatible with your mains electricity supply. If you have any doubt, please seek help from a qualified technician – your Marshall dealer can help you with this.
MAINS INPUT & FUSE
The specific mains input voltage rating that your amp has been manufactured for is indicated on the rear panel of the amp.
Never attempt to bypass the fuse or fit one of the incorrect value or type.
IMPORTANT SET UP INFORMATION
- Ensure that the power switch is set to the off position.
- Connect the supplied mains (power) lead into an electricity outlet.
- Ensure that any master volume and/or output level controls on the front panel are set to zero.
- Plug your guitar into the input jack socket on the front panel.
- Turn the front panel power switch on.
- Turn the volume up to your preferred level and you're ready to play.
TRANSPORTING YOUR EQUIPMENT
Please ensure that your amp is switched off, unplugged from the mains electricity supply and all removable cables have been disconnected from your equipment before attempting to move it.
Documents / Resources
References
Download manual
Here you can download full pdf version of manual, it may contain additional safety instructions, warranty information, FCC rules, etc.
Advertisement


Need help?
Do you have a question about the MG15FX and is the answer not in the manual?
Questions and answers