Advertisement
Quick Links
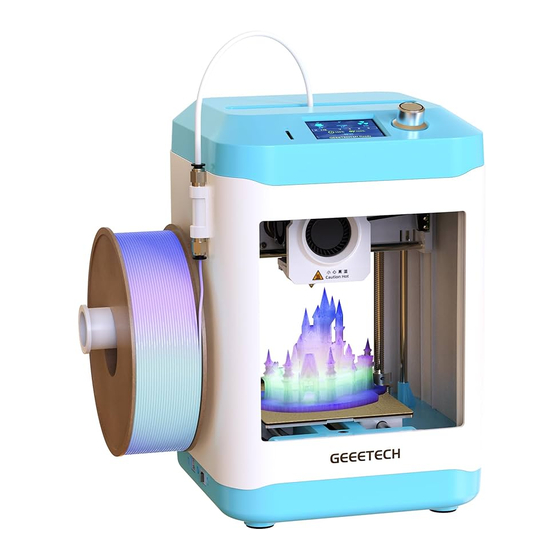
GEEETECH
M1
3D Printer
ShenZhen Getech technology Co.,Ltd.
Micro SD*1
Spool holder*1
4. Product Preview
3
2
1
9
5
12
10
01. Control Knob
04. Filament Sensor
02. Display Screen
05. Filament Holder
03. Micro SD Slot
06. Power Interface
5. Product Unpacking and Assembly
01. First, take the M1 out of the packaging box, remove the dust bag on the M1, and place the M1 on
a flat workbench.
02. Check whether the M1 shell is cracked, whether the internal structure is damaged, and
whether the accessories are missing. If the machine is damaged or accessories are missing,
please contact GEEETECH after-sales service.
03. Cut the cable tie that secures the print head.
mistake!
The position of the cable tie is shown in Figure 1 below.
04. Install the Teflon tube. Please note that the Teflon tube must be inserted to the bottom of the
pneumatic joint, otherwise the filament will not be able to pass through the Teflon tube to
reach the hot end smoothly. The specific operation is shown in Figures 2 and 3 below.
(Rev. 1.0)
1
Needle*1
Tweezers*1
11
4
8
6
7
07. Power Switch
10. Hot Bed
08. USB Interface
11.
09. Extruder
12.
Be careful not to cut the electronic wire by
3
1. Kind Reminder
Thank you for choosing GEEETECH M1 3D printer.
For optimal use of this product, please read this manual carefully and follow the instructions strictly.
In the attached TF card, we provide electronic version user manual, model slicing software, test
models, Instructional Video, etc. Please back up the files in the TF to your computer.
If you encounter any problems while using M1 , please contact us through the after-sales methods
provided in this user manual. GEEEETECH technical support will provide you with high-quality
after-sales service.
You can also log on to the Geeetech official website ( www.geeetech.com ) to Check the usage
instructions for this product, the latest firmware and other information.
2. Instructions for Use
01. Please use this product in a spacious, flat and ventilated environment. Do not use this product
in an environment with flammable or explosive materials.
02. Children and untrained persons are not allowed to use this product alone to avoid personal
injury.
03. Do not touch the moving parts while the printer is running to avoid pinching your fingers.
04. Do not touch the stepper motor, nozzle and hot bed when the printer is working to avoid burns.
05. Please use this product in an environment of 10 ~ 40 ℃ , otherwise it may have an adverse
effect on the printing quality.
06. Please use a 24V power adapter to power this product, otherwise it will cause damage to the
product;All M1 printers are tested before shipment. Residual filament in the nozzle or slight
scratches on the printing bed are normal and do not affect functionality.
07. Please level the hot bed when using this product for the first time, otherwise this product will
refuse to print the model.
08. This product has been tested for printing before leaving the factory. If there is consumables
residue in the nozzle of the device or slight scratches on the printing platform, it is normal and
will not affect the use.
09. The actual product may be slightly different from this document, please refer to the actual
product.
3. Packing List
M1 3D Printer*1
Teflon tube
*1
Figure 1
05. Install the Filament bracket. First, insert the filament bracket into the hole of the M1 shell, and
then rotate it clockwise. When you hear the sound of the buckle locking, it means that the
Filament bracket is installed successfully, as shown in Figure 4 below.
Notice:
The filament holder included with M1 can only hold 0.5 kg of GEEETECH filaments, not 1 kg.
Teflon Tube
Nozzle
06. Check the belt. If the X-axis or Y-axis belt is too loose, you can adjust the belt tension by moving
the X-axis motor or Y-axis motor. First loosen the screws that fix the motor, move the motor to
tighten the belt, and then tighten the screws, as shown in Figures 5 and 6 below.
Nozzle*1
User Manual *1
Filament *1
2
Tie
Figure 2
1
2
Figure 4
4
L-Shaped Hex Wrench*1
Wrench*1
Figure 3
Advertisement

Related Manuals for Geeetech M1


Summary of Contents for Geeetech M1
- Page 1 Nozzle 5. Product Unpacking and Assembly 01. First, take the M1 out of the packaging box, remove the dust bag on the M1, and place the M1 on a flat workbench. 02. Check whether the M1 shell is cracked, whether the internal structure is damaged, and whether the accessories are missing.
- Page 2 When the M1 is ready (the hot bed has been leveled and the filament has been pre-loaded), you can print the model by following the steps below. 13. Product Parameters 01. Put the G-code into the Micro SD and then insert it into the card slot of the M1, as shown in Figure 10 below. Molding Technology...
Need help?
Do you have a question about the M1 and is the answer not in the manual?
Questions and answers