Table of Contents
Advertisement
Advertisement
Table of Contents

Related Manuals for Geeetech ME CREATOR 2


Summary of Contents for Geeetech ME CREATOR 2
- Page 1 ME CREATOR 2 Desktop 3D Printer ——USER MANUAL——...
-
Page 2: Terms
All information in this Manual is subject to change at any time without notice and is provided for convenience purposes only. Geeetech reserves the right to modify or revise this Manual in its sole discretion and at any time. You agree to be bound by any modifications and/or revisions. Contact the Geeetech Support Team for up-to-date information. -
Page 3: Table Of Contents
Content TERMS ...................................... 2 DISCLAIMERS ..................................2 SAFETY INSTRUCTION ................................ 4 ABOUT MECREATOR2 ................................1 PREPARING WORK ................................4 1. Check Power Supply ................................8 2. Software Resources ................................8 2.1 Repetier-Host ................................8 2.2 Arduino IDE ................................8 2.3 Firmware..................................8 3 USB Driver Installation ................................ -
Page 4: Safety Instruction
Disconnect your Me Creator2 printer from the power supply and computer when not in use. Do not print using materials that have not been approved by GEEETECH for use with the MeCreator2. Only operate your Me Creator 2printer in a well-ventilated space away from moisture and heat sources... -
Page 5: About Mecreator2
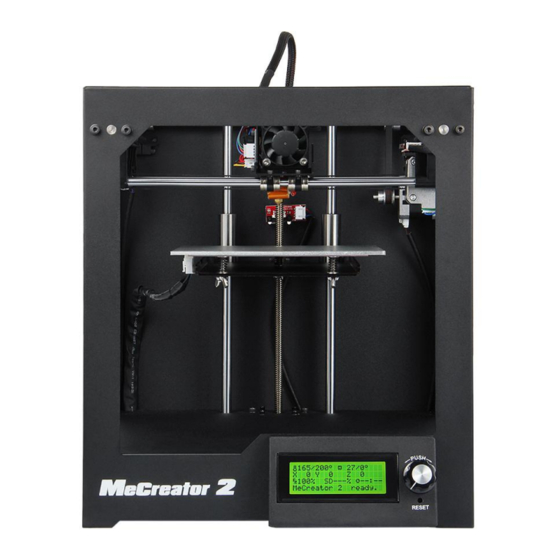
SHENZHEN GETECH TECHNOLOGY CO,.LTD ABOUT MECREATOR2 MeCreator2 makes solid, three-dimensional objects out of melted Filament such as PLA or ABS. First, use software to translate 3D design files into instructions for the MeCreator2. Then transfer those instructions to the MeCreator2 via USB drive, USB cable. The MeCreator2 will melt filament such as PLA or ABS and squeeze it out onto the build plate in thin lines to build your object layer by layer. - Page 6 SHENZHEN GETECH TECHNOLOGY CO,.LTD 1 Extruder 2 Y Axis Motor 3 X Axis Motor 4 building platform 5 heat bed...
- Page 7 SHENZHEN GETECH TECHNOLOGY CO,.LTD 6. LCD 2004 screen 7. Reset button 8. knob 9. USB port 10.power input port 11.power switch...
-
Page 8: Preparing Work
SHENZHEN GETECH TECHNOLOGY CO,.LTD PREPARING WORK 1. Opening Step1. Open the box, taking out the foam box containing your MeCreator 2. - Page 9 SHENZHEN GETECH TECHNOLOGY CO,.LTD Step 2 Remove the Me Creator 2 from foam box and set it down on a stable surface. Step3 Remove the zip tie that prevent the extruder from moving during shipping. Note: Do not move the building platform up and down with force or it will not be leveled. If you want to...
- Page 10 SHENZHEN GETECH TECHNOLOGY CO,.LTD 2. Checking accessories Filament holder Filament spool Tape Starter filament Power cord USB A-B cable...
- Page 11 SHENZHEN GETECH TECHNOLOGY CO,.LTD 3. Assemble the filament holder Assemble the filament holder together with the M3 bolt and nut. 4. Paste the tape Peel off the back of the tape and past it on the building platform smoothly. Make sure the platform is completely covered.
-
Page 12: Check Power Supply
1. Check Power Supply The power supply unit and control board of Me Creator 2 are installed in the bottom of the printer, saving space, as well as lowering the gravity center of the printer to provide stable support for printing. The printer uses DC12V, 29A power supply, choose 110V or 220V according to national power using standard. -
Page 13: Usb Driver Installation
SHENZHEN GETECH TECHNOLOGY CO,.LTD 3 USB Driver Installation 3.1 USB Driver Installation for Win7 OS Power the MeCreator 2 up and connect it to computer with the USB cable, the driver will be installed automatically. After installation, please enter Device manager and find the USB Serial Port which is the communication port for the printer and computer. -
Page 14: Set Up Repetier Host
SHENZHEN GETECH TECHNOLOGY CO,.LTD 4. Set up Repetier Host The next step should be, to configure your printer so you can connect your computer with the host. Open Repetier Host. When you start Repetier Host for the first time, you need to set up parameters for MeCreator 2. Click the Printer Settings on the top right corner, you will be presented with the following window. -
Page 15: Create New Printer
SHENZHEN GETECH TECHNOLOGY CO,.LTD 4.1 Create New Printer At the top you see a drop down box, with the currently selected printer. At the start you have only the default printer. To create a new printer you only need to change the printer name and press “Apply”. The new printer will start with the same settings as the last selected printer. -
Page 16: Connection
SHENZHEN GETECH TECHNOLOGY CO,.LTD There are six tags in Printer settings in total. Detailed configurations of the 4 relevant tags are as follow. 4.2 Connection In this first tab, you set how to connect with your printer. In “Port” you select the port, where your printer is connected. - Page 17 SHENZHEN GETECH TECHNOLOGY CO,.LTD Port:Get the printer connected to the port of computer, which is corresponding to the USB Serial Port in the Device manager. Baud Rate: Corresponding to the Baud Rate in firmware. Generally it is set as 250000. Note: If the operating system is Mac OS, please set the baud rate of the firmware and Repetier Host as 115200.
- Page 18 SHENZHEN GETECH TECHNOLOGY CO,.LTD After successfully modifying the baud rate in firmware, change the baud rate in Repetier-Host to 115200 as well. About how to upload the firmware, please refer to FAQ. Note: After re-uploading the firmware, you may need readjust the motor direction of the printer. For detailed methods please refer to following motor testing part.
-
Page 19: Printer
SHENZHEN GETECH TECHNOLOGY CO,.LTD 4.3 Printer The second tab defines important behavior you want. The Travel feed rate and Z-axis feed rate are used, when you move the extruder with the manual controls. The temperatures are set in the manual controls as start values. -
Page 20: Extruder
SHENZHEN GETECH TECHNOLOGY CO,.LTD 4.4 Extruder In the “Extruder” tab you can define the numbers of extruder, the max temperatures, that are shown in the manual control. The max volume per second defines the maximum amount of filament in mm³, the extruder can melt per second. -
Page 21: Printer Shape
SHENZHEN GETECH TECHNOLOGY CO,.LTD 4.5 Printer shape The “Printer Shape” tab defines your printer shape, or to be more exact the shape of your build area. The host will use this to limit your moves and to check, if your models fit onto the print bed. You can also define the position of the x and y end stop. - Page 22 SHENZHEN GETECH TECHNOLOGY CO,.LTD So far the setting of Me creator 2 is finished.
-
Page 23: Connect The Printer
SHENZHEN GETECH TECHNOLOGY CO,.LTD 4.6 Connect the Printer After setting, click the connect button on the top left corner of main interface. When the button turns green, the connection is successful. Watch the video here. -
Page 24: Function Testing
SHENZHEN GETECH TECHNOLOGY CO,.LTD 5. Function Testing The firmware of Me Creator 2 is already uploaded based on Windows 7 operating system, and we have done debugging to make sure that every part of it can work normally. However, there may be unpredictable factors during transportation . - Page 25 SHENZHEN GETECH TECHNOLOGY CO,.LTD Home position is in the right back corner of the printing platform. Check the video here.
- Page 26 SHENZHEN GETECH TECHNOLOGY CO,.LTD Note: origin point is the left front corner of the platform when printing. So when the printer is at home position, the coordinates of X/Y axis are: X=160mm, Y=160mm,Z=0mm. As a result:...
- Page 27 SHENZHEN GETECH TECHNOLOGY CO,.LTD If the moving direction is reverse, you can alter the direction in the firmware. Please refer to FAQ. Tips: In manual control, the high-light part of the panel stands for the current selected direction, and it moves 1mm every click.
- Page 28 SHENZHEN GETECH TECHNOLOGY CO,.LTD Meanwhile you can see the temperature at the bottom status bar of Repetier Host. 5.1.3 Extruder test Please note: It is set in the firmware that the extruder will not work before the temperature reaches above 170℃.
- Page 29 SHENZHEN GETECH TECHNOLOGY CO,.LTD filament into the loading tube. Keep pushing on the filament and click the loading filament arrow on manual control until you feel the extruder pulling it in. 4. Wait until you begin to see plastic emerging from the extruder nozzle.then you can stop. 5.
- Page 30 SHENZHEN GETECH TECHNOLOGY CO,.LTD If the extruder cannot work normally or the extrusion is not fluent, please refer to FAQ. 5.1.4 LED Light Test There is an LED strip in the MeCreator2; you can control the light by sending corresponding command. Turn on:...
-
Page 31: Lcd Controller Test
SHENZHEN GETECH TECHNOLOGY CO,.LTD 5.2 LCD Controller Test 5.2.1 LCD Menu Introduction Functions of LCD rotary knob: 1. Press the knob: confirm or enter sub-menu 2. Rotate the knob: roll to choose options or change parameters LCD homepage: 1. Extruder temperature: current temperature/target temperature 2. - Page 32 SHENZHEN GETECH TECHNOLOGY CO,.LTD Main functions of Prepare menu: 1. Disable steppers: unlock the motor so that you can move them freely. 2. Auto home: automatically homing of each axis 3. Preheat PLA: manually preheat the hotbed and the extruder before printing PLA 4.
- Page 33 SHENZHEN GETECH TECHNOLOGY CO,.LTD Main functions of Control menu: 1. Temperature: You can change the temperature of the hotbed and the extruder in real time in printing process. Meanwhile you can set the temperature of Preheat PLA and Preheat ABS. 2.
- Page 34 SHENZHEN GETECH TECHNOLOGY CO,.LTD For other detailed functions please read the following introduction of function tests. 5.2.2 Use LCD for Motor Test After understanding the functions of LCD, press the knob on LCD to enter the sub-menu, and choose Prepare: Choose Auto home in menu to do home operation:...
- Page 35 SHENZHEN GETECH TECHNOLOGY CO,.LTD If you want to move the motor, choose Move axis: Choose Move 1mm: Note: only 10mm and 1mm are available for the printer, and 0.1mm invalid. We recommend you to use move 1mm to test each axis.
- Page 36 SHENZHEN GETECH TECHNOLOGY CO,.LTD Choose the axis you need to move: Move X/Y/Z/E. Rotating the knob can make each axis move. After testing each axis, if you want to unlock the motors, choose Prepare>Disable steppers:...
- Page 37 SHENZHEN GETECH TECHNOLOGY CO,.LTD 5.3.3 LED Light Test You can control the LED light on the LCD controller. But you cannot control the light strength here.
-
Page 38: Build Platform Leveling
SHENZHEN GETECH TECHNOLOGY CO,.LTD 6. Build platform leveling Before printing, please check whether the moving path of the extruder is parallel with the heatbed or not, which is called leveling. We need make sure the distances from the nozzle of the extruder to the four cornered of the heatbed are the same, and only in this way can we get good printing quality. - Page 39 SHENZHEN GETECH TECHNOLOGY CO,.LTD Move the nozzle to the other front screw and adjust the screw until you get the same amount of friction as you felt with the first one. Then adjust the back screw the same way.
- Page 40 SHENZHEN GETECH TECHNOLOGY CO,.LTD Once you have adjusted each of the three screws, go back and check each one again, since adjusting one screw can affect another. You shouldn’t need to go around the bed more than twice. The proper printing effect of the first layer is like following picture:...
-
Page 41: Slic3R Setting
SHENZHEN GETECH TECHNOLOGY CO,.LTD 7 Slic3r Setting So far we can begin printing. But in order to achieve better effect, we need set the slicing parameters such as the diameter of the filament, speed, layer height. Open the slicing software, slic3r, which comes with Repetier host. - Page 42 SHENZHEN GETECH TECHNOLOGY CO,.LTD...
-
Page 43: Printing Setting
SHENZHEN GETECH TECHNOLOGY CO,.LTD 7.1 Printing Setting Set the layer height and height of the first layer in the option of Print settings. The layer height of Me creator 2 can be between 0.05-0.3mm. Considering of precision and speed, 0.2mm is the most appropriate. Set the first layer height as 0.35mm by default. -
Page 44: Filament Setting
SHENZHEN GETECH TECHNOLOGY CO,.LTD You can set the printing speed here: 7.2 Filament Setting Set the filament diameter and printing temperature in the tab of Filament settings. Here we use 1.75mm PLA. Usually the temperature of the print head is 195-210℃, the hot bed is 60-70℃. Here we set them as 200℃ and 65℃. -
Page 45: Printer Setting
SHENZHEN GETECH TECHNOLOGY CO,.LTD 7.3 Printer Setting Set the shape and size of the hot bed and the number of extruder in the option of Printer settings> General. Hot bed shape:... - Page 46 SHENZHEN GETECH TECHNOLOGY CO,.LTD...
- Page 47 SHENZHEN GETECH TECHNOLOGY CO,.LTD Number of extruder: 1...
-
Page 48: Other Parameters
SHENZHEN GETECH TECHNOLOGY CO,.LTD At the same time, set the diameter of the print head as 0.4mm. (input the actual diameter of your printer) 7.4 Other parameters Except for above settings, parameters like speed are also important to the printing effect, which requires your long time using experience of 3D printing. - Page 49 SHENZHEN GETECH TECHNOLOGY CO,.LTD Direct to the file Me creator2 PLA config.ini and open it.
- Page 50 SHENZHEN GETECH TECHNOLOGY CO,.LTD After you imported the config.ini file . Click the save button to rename and save. Click to save in the tab of Print Settings: Note: all the the three settings need to be saved in turn!
- Page 51 SHENZHEN GETECH TECHNOLOGY CO,.LTD Click to save in the tab of Filament Settings:...
- Page 52 SHENZHEN GETECH TECHNOLOGY CO,.LTD...
- Page 53 SHENZHEN GETECH TECHNOLOGY CO,.LTD Click to save in the tab of Printer Settings: Watch the video here.
-
Page 54: Start Printing
SHENZHEN GETECH TECHNOLOGY CO,.LTD 8 Start Printing So far the preparation work is finished. Next step is to load model, slicing and printing. The file format of the model file for 3D printer is usually .stl. Me creator2 supports following file format: STL, 3ds, obj, mf, dae, G-code. -
Page 55: Slicing
SHENZHEN GETECH TECHNOLOGY CO,.LTD 8.2 Slicing You can use the following button to enlarge, shrink or rotate it. - Page 56 SHENZHEN GETECH TECHNOLOGY CO,.LTD After setting the size, choose the slicing parameters which were imported before in slicer window, and click slicing.
- Page 57 SHENZHEN GETECH TECHNOLOGY CO,.LTD Now the .gcode file which can be recognized by the printer is generated.
- Page 58 SHENZHEN GETECH TECHNOLOGY CO,.LTD click printing button to start printing.
-
Page 59: Stand-Alone Printing With Sd Card
SHENZHEN GETECH TECHNOLOGY CO,.LTD 8.3 Stand-alone Printing with SD card If you want to use SD card to print, we can save g.code file into SD card for printing. Note: the printer can only recognize .gcode file, and it can not be put in any folder! 8.3.1 Save Click Save to File, and choose save button in the dialog. - Page 60 SHENZHEN GETECH TECHNOLOGY CO,.LTD 8.3.3 Printing Insert the SD card into the printer, choose corresponding .gcode file to print. Press the knob on LCD, enter the main menu, and choose the Print from SD. Choose corresponding g.code file to begin printing.
- Page 61 SHENZHEN GETECH TECHNOLOGY CO,.LTD Heating It will automatically print after heating is finished.
-
Page 62: Faq
9.FAQ If you have any problem when you use the printer, you can visit our forum There http://www.geeetech.com/forum/ are detailed solutions on the forum. FAQ are as follows: 9.1 How to upload the firmware? 9.1.1 upload the firmware in Win7 OS To upload the firmware, we need following tools: 1.Arduino IDE... - Page 63 SHENZHEN GETECH TECHNOLOGY CO,.LTD For detailed uploading process, please refer to: http://www.geeetech.com/forum/viewtopic.php?f=13&t=17181 9.1.2 Upload the firmware in Mac OS The way of installing driver and uploading firmware in Mac OS is similar with that in Win 7 OS. For detailed method please refer to this link:...
-
Page 64: Change The Motor Direction
#define INVERT_X_DIR true #define INVERT_Y_DIR false #define INVERT_Z_DIR true #define INVERT_E0_DIR false For detailed method, please refer to: http://www.geeetech.com/forum/viewtopic.php?f=13&t=17037... -
Page 65: Motors Can Not Work
For detailed solutions, please refer to: http://www.geeetech.com/forum/viewtopic.php?f=17&t=17038 9.4 Extruder can not work/ extrusion not fluent When you are testing the extruder, make sure the temperature is over 170℃. -
Page 66: Specifications
SHENZHEN GETECH TECHNOLOGY CO,.LTD specifications Printing specifications: Print technology: FDM Build volume: 160x160x160mm Printing precision:0.05mm Print Speed: 60-80mm/s Positioning precision: X/Y:0.05mm. Z: 0.02mm Filament diameter: 1.75mm Nozzle diameter: 0.4mm Filament type: ABS/PLA/flexible PLA/wood-polymer Software: Operating system: Windows/Mac/Linux Control software: Repetier-Host, Printrun Slicing software: Slic3r, Cura-engine File format: .STL, 3ds, obj, amf, dae, G-code Temperature:... - Page 67 SHENZHEN GETECH TECHNOLOGY CO,.LTD Build Platform: Aluminum alloy plate+ heatbed XYZ Rods: Wear-resistant, stainless steel and lead screw(Z axis) Stepper Motors: 1.8° step angle with 1/16 micro-stepping Physical Dimensions & Weight Machine Dimension: 320x320x360 mm Shipping box Dimension:460x460x410mm Machine Net weight: 9.05kg Machine Shipping weight: 17.5kg...
- Page 68 2.If you still can not solve problems yourself even with the help of above files, you can send e-mail to technical@geeetech.com,we will reply to you within 24 hours. For more products of Geeetech, please visit www.geeetech.com or send e-mail to Sales sales@geeetech.com...
- Page 69 www.geeetech.com...
Need help?
Do you have a question about the ME CREATOR 2 and is the answer not in the manual?
Questions and answers