Table of Contents
Advertisement
Quick Links
Advertisement
Table of Contents

Related Manuals for Geeetech GiantArm D200


Summary of Contents for Geeetech GiantArm D200
- Page 1 GiantArm D200 User Manual Version 1...
-
Page 2: Table Of Contents
6.2.3 Printing Setting ............................... 47 6.2.4 Slicing ..................................62 6.2.5 Save slicing ................................63 6.3 Print via Wi-Fi ................................64 7. Featured Functions of GIANTARM D200 .......................... 78 7.1 Break-resuming ................................. 78 7.2 Filament detector ............................... 83 8. FAQ ..................................... 87 8.1 About printing problem ............................. -
Page 3: Introduction
All information in this Manual is subject to change at any time without notice and is provided for convenience purposes only. Geeetech reserves the right to modify or revise this Manual in its sole discretion and at any time. You agree to be bound by any modifications and/or revisions. Contact the Geeetech Support Team for up-to-date information. -
Page 4: Safety And Compliance
Geeetech products. The foregoing exclusions do not apply to the extent prohibited by law; please refer to your local laws for any such prohibitions. We make no warranties to those defined as ―consumers‖... - Page 5 The GiantArm D200 generates high temperatures. Always allow the GiantArm D200 to cool down before you reach inside. Warning: The GiantArm D200 includes moving parts that can cause injury. Never reach inside the GiantArm D200 while it is in operation. Warning: There is a risk of shock.
-
Page 6: About Giantarm D200
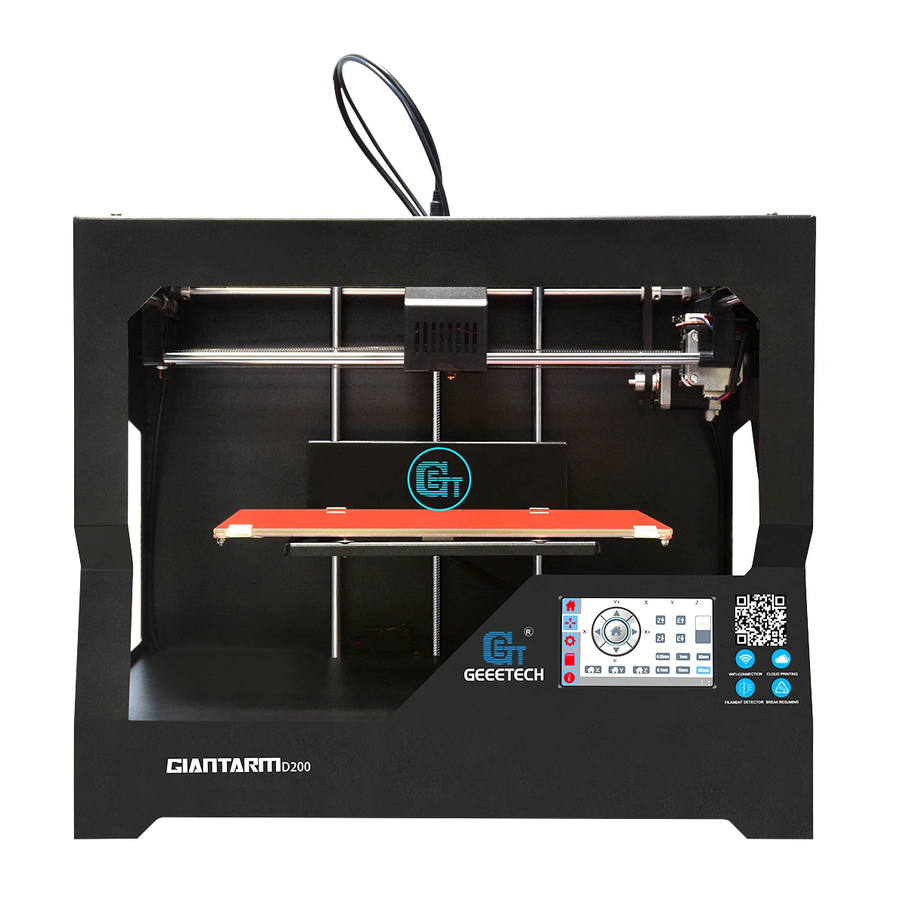
3D objects. Wi-Fi enabled, GiantArm D200 makes it a reality to direct remote control over the whole printing process by means of EasyPrint App, allowing you to enjoy the convenience and fashion of cloud 3D printing. - Page 7 1. Extruder 2. Control panel 3. SD card slot 4. Heat-resistant glass 5. Heatbed 6.Build platform...
- Page 8 7. Filament detector 8. Spool holder 9.Wi-Fi antenna 10. Extruder bar 11. USB port 12. Air vents 13. Radiator fan 14. Power port 15. Power switch...
-
Page 9: Unpacking Giantarm D200
2.1 Un-box Step 1.Open the package box Step 2.Take out GIANTARM D200 from the box; put it on the flat surface. Step3. Take out the accessories from the foam box in order. Note: The glass is in the second layer of the foam box, please handle with care! -
Page 10: Accessory Checklist
Step4. Remove the foams and cut off the zip ties. 2.2 Accessory Checklist The accessory tray includes everything you need to use your GiantArm D200, including GIANTARM PLA starter filament and all kinds of software sources etc which enable you quickly to start. If you want to order more filament or purchase spare extruder hotend, please visit www.geeetech.com... -
Page 11: Printer Set Up
Power cable USB cable Starter Filament SD card Ejector Pin Hotend opener Screw driver Ball-point pen Extruder cable and cable clamp set 2.3 Printer set up... - Page 12 Step 1.Respectively connect with the two ends of bus wire well, and fix make it on the back of the printer with cable clamp (you can fix the feeding pipe with it together)
- Page 13 Step2. Fix the filament holder on the back of the printer and then hang the filament on it. Step 3.Plug the power cable and power the printer on. Step4. Click the icon on the screen to enter the move interface, choose , and then click to raise the build platform to the middle.
- Page 14 Step 5.Open the two clips on the left and the right of the heatbed, put the glass on the build platform and fix them closely with the clips.
-
Page 15: Giantarm D200 Control Panel
3. GiantArm D200 Control Panel GiantArm D200 can be controlled via the 4.3" full-color touch screen in the bottom right corner of the printer. Stand-alone printing with SD card and remote control over the printing via EasyPrint App are available. -
Page 16: Move
The icon of the main interface: Click to return to the home interface. Printing: click to pause; Pause: click to start printing; Stop: Click to kill the present printing job; Extruder temp: click to read the real-time extruder temperature on the left disk; Printing speed: click to read the real-time feed rate on the left disk;... - Page 17 Move: Choose to enter the Move interface. If there is not any operation within 15s in this interface, it will automatically return to the main interface. Home X axis: Click to home the motor of X axis. Home Y axis: Click to home the motor of Y axis. Home Z axis: Click to home the motor of Z axis.
-
Page 18: Setting
can only move the motor with manual control. Click to disable the stepper motors. Stepper motor Disabled status: you can move the motor freely with your hand. Click to enable the stepper motors. Note: The stepper motors are enabled when you power on the printer as default. In idle mode, if there is no operation within 100s, the stepper motors will be disabled autonomously. - Page 19 3.3.1 LED light Select the button of LED strip to set the light color. If there is no operation within 30s, it will automatically return to the main interface. Turn on LED light. The default color is white when you power on the printer.; Turn off LED light;...
- Page 20 3.3.2 Leveling Choose the [Leveling] button to enter the leveling interface. This interface is used for leveling of build platform, as shown in the picture below. Click to enter the interface, the printer will be homed first and Z axis will rise to 0mm to wait for leveling Move the nozzle to the five points in turn as shown in the picture to level the platform.
- Page 21 3.3.3 Filament Choose the [Filament] button to set the relevant parameters of filament, you can set the default temp of the extruder and hotbed, direct control over the filament detector and change filament in the half way. If there is no operation within 30s on this interface, it will automatically return to the main interface. 1.
- Page 22 Turn on the default temp setting. Click the blue textbox to enter the temp value or click or long press the button to set the suitable printing temperature for the filament .After finishing setting, you need to click button to save your setting. 2.
- Page 23 If the system detects an abnormal signal of filament, either filament fracture or outage, the icon will turn into , as shown in the picture below. 3. Change filament:Click to enter the interface of changing filament as shown in the picture below. If there is no operation within 30s on this interface, it will automatically return to the main interface.
- Page 24 a. The blue textbox on the left shows the real-time temp of the extruder, and the one on the right shows the target temp. You can modify the target temp by clicking the textbox or adjusting the arrow button. b. Click , the red slash will disappear and the extruder will start to heat.
- Page 25 Increase: Click this button to increase the brightness by 1% per time (MAX= 100%). Long press the brightness keeps increasing until it reaches 100%. Decrease: Click this button to decrease the brightness by 1% per time (MIN= 10%). Long press the brightness keeps decreasing until it reaches 10%.
- Page 26 Buzzer sound turns off; Buzzer sound turns on. 3.3.6 Wi-Fi When you use EasyPrint App to remote control GiantArm D200, it is necessary to configure App and the printer. (Make reference to 6.3 Print via Wi-Fi) Choose the [Wi-Fi] icon to enter the Wi-Fi setting interface as shown in the picture below. If there is no operation within 30s on this interface, it will automatically return to the main interface.
- Page 27 Choose [About] icon to enter the interface of the information of device and view more information about GiantArm D200, as shown in the picture below. If there is no operation within 30s on this interface, it will automatically return to the main interface.
- Page 28 3.3.9 Reset Choose [Reset] icon. The prompt dialog box will pop up, as shown in the picture below. a. Choose [Yes]: The printer will save the current printing status during SD card printing, Wi-Fi printing, or when the printing job is paused. And then the printer will reset. Otherwise it will reset directly.
-
Page 29: Print From Sd Card
Choose [No]: Return to [Settings] interface. 3.4 Print from SD Card Choose SD card icon to view the 3D model files saved in the SD card. GiantArm D200 is compatible with three file formats: .gcode, .GCO, .gco. If there is no operation within 15s on this interface, it will automatically return to the main interface. -
Page 30: Information
: Select one file and click this button to start printing. : Page up. : Page down. d. File name: Showing the .gcode, .GCO, .gco files in SD Card., click it to choose the file. Check box: Mark the chosen file. How to generate G-code file? Please make reference to 6.2 Print via USB Serial Port) 3.5 Information... - Page 31 Click to enter the interface of Information and view the real-time printing status. 1. The temperature of the nozzle: Click the icon to start heating the extruder. The icon turns into As shown in the above picture,‖218‖ and ―220‖ respectively means the current temperature of the nozzle and the target temperature of the nozzle.
-
Page 32: Status Bar
3.6 Status Bar a. Printing status Printing status includes printing progress bar and progress value, ranging from 0~100%, as shown in the picture below. b. prompt message Here you can check the status of your printer. Triggering events prompt message Not detect SD card SDCard Removed! Detect SD card... -
Page 33: Other Information
C. Wi-Fi icon The status of Wi-Fi icon indicates different connection information. ①If Wi-Fi is turned off. The Wi-Fi icon will disappear. ②If Wi-Fi is turned on but not connected. The Wi-Fi will turn white; ③If Wi-Fi is turned on and connected, the Wi-Fi icon will turn blue. 3.7 Other information During heating, in the case of temperature changing abnormally or temperature surpassing a maximum of 30 degrees, you will see the following message:... - Page 34 (printing via SD card or Wi-Fi) (printing via serial port) (printing via SD card or Wi-Fi)...
-
Page 35: Leveling
Note: Before delivery, we have leveled the build platform. Generally speaking, you can directly print. Although we make the bundled-up packing to GIANTARM D200, the build platform may still incline a bit during the shipping. To ensure the best printing effect, we suggest that you do the tests and calibration job according to the following instruction. -
Page 36: Fine Tuning
If there is an obvious gap, it means the distance between the nozzle and the build platform is too far, the extruded filament will not be closely attached to the build platform. In this case, please click to upraise the build platform to reduce the distance between the extruder and the build platform until there is only a little gap between the nozzle and the build platform, and then click the button [OK] to save the current printing height. - Page 37 Step 2.Click the leveling point 1, the extruder will move to the first point. Put a piece of A4 paper between the nozzle and hotbed. Slide the paper back and forth. Stop when you feel the nozzle just start to grab a little bit.
- Page 38 If you can feel a big amount of friction, it means the distance between the nozzle and build platform is too close. The filament can‘t be extruded out or can even be jammed. You need clockwise rotate the nut in the bottom of the hotbed which is corresponding to leveling point 1 and make the build platform drop off to increase the distance between the nozzle and the build platform.
-
Page 39: Load Filament
5. Load filament GIANTARM D200 is compatible with filaments including ABS, PLA, flexible PLA, wood-polymer, PVA, HIPS, PETG, etc. Since different filament requests different temperature, please set temperature of the extruder and hotbed according to the filament factory‘s proposal. Step 1.Setting>Change filament. On this interface, you can preheat the extruder (the detailed function, please see the part Change Filament of 3.3.3 Filament) - Page 40 Step3. Sharpen the front part of filament by scissors. Press the lever bar with one hand, and insert the filament into the tube of at the very bottom of the extruder barrel with the other hand. Please ensure the filament reach the very bottom of the feeding port/ extruder barrel.
- Page 41 Step 4.Once the extruder reaches the target temperature; click the button on the screen. The hand holding the filament can obviously feel the grab from the extruder motor. Long click the button ―Load‖ until you can see the filament be extruded out smoothly from the nozzle. If the extruder cannot normally work or the feeding is not fluent, please make reference to FAQ.
-
Page 42: Start To Print
After finishing leveling and loading filament, you‘ve finished all the preparation work. The next step is to print! GIANTARM D200 supports 3 ways of printing: Print form SD card, Print form USB serial port and Print from APP (with Wi-Fi). You can download models from Internet to make the printing. Of course, you can also design the creative objects by yourself for your printing. -
Page 43: Print Via Usb Serial Port
Step 1.Install the driver Power the GIANTARM D200 up and connect it to computer with the USB cable, the driver will be installed automatically. After installation, you can enter Device manager and find the USB Serial Port which is the... - Page 44 Note: the COM port varies every time. Step2. Install EasyPrint 3D You can find EasyPrint 3D software in the SD card, or you can download it here: http://www.geeetech.net/firmware/EasyPrint.msi Then finish the installation following the installation wizard. Step 3.Start EasyPrint 3D...
- Page 45 Step4. Select the COM Port Click the Printer menu, and then select the corresponding COM Port. Step5. Select the Printer...
- Page 46 Click the Printer menu, and then choose the printer type as D200 Step6. Connect Click the Connect button on the top right. You could observe the real-time status of the printer on the bottom of the software interface.
-
Page 47: Load A File
6.2.2 Load a File Click [load] to load a.stl from your computer, or you can drag it to the 3D view window. Now you would see your model at the center of a gray rectangle, the representation of your 3D printer‘s build plate. Then you can use the tools on the left to edit your model. - Page 48 Quality High: Objects sliced with the High quality profile will have finer layers and will print more slowly. Standard: Objects sliced with the Standard quality profile will be printed using the default settings. Low: Objects sliced using the Low quality profile will be printed with thicker layers and will print faster.
- Page 49 Custom Mode For advanced users who want to exert more sophisticated control over the whole printing process, Easy Print 3D provides a series of parameters for you to engineer the printing configuration. Step 1 Create a new configuration/setting To customize settings, you need to create a new setting first. Click the [new] tab and enter the name of new configuration in the textbox.
- Page 50 Step2. Custom settings Choose the [custom] tab to enjoy the sophisticated print settings. 1) Accuracy: a. Layer Height: The layer height is one of the most often adjusted settings. It is the thickness of one printed layer (in mm). With a thinner layer height you will increase the quality of the print, leading to a smoother surface and more detail visible in the Z-direction (height) of the model.
- Page 51 2) Skirt: A skirt is a line printed around the object on the first layer, but not connected to the object. This helps prime the extrusion and can also be a good check for bed leveling before the print starts and it can ensure that the material is flowing smoothly from the extruder before it starts on the model proper.
- Page 52 3) Retraction: Retraction is used at the places in a print where the printer has to do a travel move between two printed parts. Without retraction, extruded material will hang between the parts. This means that the filament is pulled back by the feeder, so that it doesn‘t leak from the nozzle during the travel moves.
- Page 53 a. Length: The number of millimeters to retract. Note that the measurement is taken from the raw filament entering the extruder. A value of between 1 and 2mm is usually recommended. Bowden extruders may need up to 4 or 5mm due to the hysteresis introduced by the tube. b.
- Page 54 c. Fill angle: By default the infill pattern runs at 45° to the model to provide the best adhesion to wall structures. Infill extrusions that run adjacent to perimeters are liable to delaminate under stress. Some models may benefit from rotating the fill angle to ensure the optimal direction of the extrusion. d.
- Page 55 344.51mm/5mins 20s 2. Rectilinear 344.51mm/5m: 20s 3. Concentric 344.51mm/5m: 20s 4. Hilbert Curve 332.82mm /5m: 28s 5. Archimedean Chords...
- Page 56 333.66mm /5m: 27 s 6. Octagram Spiral 318.63mm/5m: 15 s 7. Honeycomb 362.73mm /5m: 39s 5) Filament:...
- Page 57 a. Diameter: In this field you can enter the diameter of the filament, so that Easy Print 3D could calculate the extrusion rate correctly. The most commonly used filament diameters are 1.75mm and 3mm, but it might be necessary to change this setting when using filament from other suppliers. b.
- Page 58 6) Speed: The print speed defines at which speed (in mm/s) the print head moves while printing. Based on this setting, Easy Print will also calculate how fast the filament must be extruded. A higher print speed will lead to a shorter print time.
- Page 59 c. First layer speed: With this setting you can specifically change the speed for the first layer of the print. By default a low speed is used for the bottom layer, so that the material sticks well to the build plate on the first layer.
- Page 60 Generally, most 3D models will print with overhanging parts by up to a certain degree. The angle is determined by several factors, most notably layer height and extrusion width, and is usually around 45° . For models with larger overhangs, a support structure may have to be printed below. This incurs the use of more material, longer print time, and post-printing clean-up.
- Page 61 a. Generate support material Some models have overhanging parts, which means that parts of the model float mid-air when you would print the model. In this case you must use a support structure under the model to prevent the plastic from falling down.
-
Page 62: Slicing
6.2.4 Slicing After loading the model file and adjusting printing parameters, you can click the [slicer] icon to slice. It will take a while. The slicing time depends on the size of the model. Upon slicing, you get the sliced .gcod file. When you are ready to print your model, click [Run job] to embark on your printing journey... -
Page 63: Save Slicing
6.2.5 Save slicing If you want to use SD card to print, we can save g.code file into SD card for printing. Click [Save job] for SD printing and select the [save] button in the dialog box. Then g.code file can be directly saved in SD card. -
Page 64: Print Via Wi-Fi
Note: The file should be saved in the root directory of the SD card. 6.3 Print via Wi-Fi GIANTARM D200 Cloud 3D printing solution conveniently provides users EasyPrint 3D App to enjoy free and giant 3D models, just slightly press to start your printing journey. Even if you are not keeping company with your printer, you can control the printer via EasyPrint 3D APP. - Page 65 Once finishing installation, enter My Center to register and log in. Note: As the EasyPrint 3D APP is continuously upgraded, some UI and workflow may be different, please follow the APP. 6.3.2. Bind printer to EasyPrint 3D APP —...
- Page 67 Detailed configuration procedures are as following: ①.In Wi-Fi setting interface on the control panel, choose Wi-Fi button to enter Wi-Fi interface, as shown in the picture below. ②.Turn on Wi-Fi and click the button “Set “to enter the Config mode, as shown in the picture below. ③.Choose Wi-Fi at the control panel on APP.
- Page 69 ④.Click [Next] to start to detect Wi-Fi built in the printer. If not detected, it will pop up a prompt “Printer Wi-Fi is not detected”. Click [OK] and again click [Next] to redetect. If the Wi-Fi is detected, you could see the following picture.
- Page 70 ⑥ Choose one of the available Wi-Fi hotspots. Click [Next], and, if the Wi-Fi needs the password, the interface will show the Wi-Fi password input box. Just input the correct password, and then click ―[OK]” , as shown in the picture below.
- Page 71 ⑦. When you succeed in connecting the Wi-Fi, the interface will show that the configuration is finished, as shown in the picture below.
- Page 72 Then the interface returns back to the control panel of the printer. You can see the prompt, as shown in the picture below. Click the button“Connect”on control panel, the interface will skip to Wi-Fi interface to connect with Network. The icon and status bar of Wi-Fi become blue on Wi-Fi interface. Meanwhile, SSID, IP Address and Server on this interface will display the relevant information, as shown in the picture below.
- Page 73 Go back to APP, click ―[OK]” to enter the home page. The status on the homepage displays that the printer is on-line. Till here, the configuration between APP and the printer is finished. Now you can print and control the printing via APP. ⑧.
- Page 74 Enter the model page; choose your favorite model, let‘s take the ―Rose‖ as an example: Enter the [Model details] page, click the button ―Print‖ here, you can preview to the model...
- Page 75 You can make some simple operations to the model on the screen with fingers, such as, zooming, rotating or moving.
- Page 76 Click the ―Print‖ button to start print. This will take a while to transfer the file from the cloud server to your printer. Please keep your wireless networks unimpeded.
- Page 77 During the uploading, you can pause the uploading or give it up. Upon uploading, it will start printing after a while.
-
Page 78: Featured Functions Of Giantarm D200
Under these two conditions, GiantArm D200 can use the stored power to record the working state and make various parts set to the power-off condition. Once the power recovers, each axis will recover the former state and continue the last printing job, hence effectively saving the filament, greatly increasing the success rate of printing and providing you with a comfortable printing experience. - Page 79 Note: The break-resuming capacity is only available for printing from SD card or via Wi-Fi. If you print with USB Serial port, after the power is off, the interrupted printing job can‘t be resumed. 1. Resume printing after pausing print: Under the conditions of SD card printing and Wi-Fi printing, choose on the main interface and a prompt will pop up, as shown in the picture below.
- Page 80 Meanwhile, the printer saves the real-time printing status and homes X/Y/Z axis. Choose [OK] and return to the main interface. turns into on the main interface. and pops up the prompt ―Recovering the job, If you want to continue the last printing job, please choose wait please…‖...
- Page 81 2. Resume printing after power outage: If the printing job is interrupted by unexpected power outage when you are printing from SD card or via Wi-Fi, the printer will save the job autonomously. Next time when you start the printer, you will see a prompt whether to resume the interrupted print job. An interrupted print job is detected;...
- Page 82 When the heating process finishes, the printer begins to print and the current interface returns to the main one. Note: If the printer does not detect the unfinished printing file, a prompt comes as follows. You can check SD card and click [refresh] to detect the file again. If there is no response after refreshing, it is suggested to re-insert SD card and click [refresh].
-
Page 83: Filament Detector
The control panel will pop up a prompt of resuming printing; you can still continue the print job. 7.2 Filament detector Filament detector is mainly developed to prevent printing failure caused by filament fracture or outage during the printing. Powerful filament detector system of GIANTARM can actively suspend the printing and send out an alarm and notification (APP printing). - Page 84 During SD card printing or Wi-Fi printing, if the filament detector cannot detect filament, the printer will immediately stop the current printing and the X/Y/Z axis will be homed. The printer will also save the current status. Then the filament icon will turn into at the right bottom corner on home page and pop ups the prompt interface of filament.
- Page 85 ①. Click [OK] to automatically return to the [Filament] interface, as shown in the picture below.
- Page 86 ②. Set the target temperature of extruder to about 200℃. Click the icon ― ‖ to heat it up. When the temperature reaches the target value, choose [unload] to take the filament out of the extruder, and then load the new filament. (The details please make reference to Change filament of 3.3.3Filament) ③.After you finish changing the filament, the current interface will skip to the main interface.
-
Page 87: Faq
8. FAQ As your deepening acquaintance with GIANTARM D200 3D printer, you may meet different problems during the printing. The following are simple guidelines to help you easily solve some issues. If you need more helps, please visit https://www.geeetech.com/wiki/index.php/Print_Quality_Troubleshooting_Guide. 8.1 About printing problem 8.1.1 Not extruding at the beginning of print... - Page 88 oozing, you may notice the same delayed extrusion. To solve this issue, make sure that you prime your extruder right before beginning a print so that the nozzle is full of plastic and ready to extrude. A common way to do this in EasyPrint is by including something called a skirt. The skirt will draw a circle around your part, and in the process, it will prime the extruder with plastic.
- Page 89 8.1.2 Print Not Sticking to the Bed It is very important that the first layer of your print is strongly connected to the printer‘s build platform so that the remainder of your part can be built on this foundation. If the first layer is not sticking to the build platform, it will create problems later on.
- Page 90 feature. Go to the speed tab; you will see a setting labeled ―First Layer Speed‖. For example, if you set a first layer speed of 50%, it means that your first layer will print 50% slower than the rest of your part. If you feel that your printer is moving too fast on the first layer, try reducing this setting.
- Page 91 ―Edit Process Settings‖ and selecting the Temperature tab. Select your extruder from the list on the left, and then double-click on the temperature set point you wish to edit. For more tips on improving printing quality, please take a glance at: https://www.geeetech.com/wiki/index.php/Print_Quality_Troubleshooting_Guide...
-
Page 92: How To Upload The Firmware
EasyPrint 3D provides all the users with online service of upgrading firmware to guarantee perfect printing performance. The specific method is as follows: 1. Connect your GEEETECH 3D printer to the computer with the USB cable. 2. Turn the printer on. 3. In Easy Print 3D, choose the COM port and the printer type. - Page 93 Click updates and confirms updating, the progress bar will turn green, and the firmware will be updated automatically. This process may take some time. When the upload is complete the message ‗update successes will be displayed.
-
Page 94: How To Change The Extruder
Click ‗ok‘ and ‗Close‘ on the windows to complete the firmware upgrade. 8.3 How to change the extruder The extruder of GiantArm D200 is characterized by its modular design. Specifically speaking, the coldend and hotend are combined together by a sliding joint, making it easy to change the extruder. - Page 95 2) Assemble the new nozzle and slide the switch to the right to lock the nozzle. This is the operation flow of change a new nozzle.
- Page 96 NOTE: 1) It is essential to wait for the temperature of the extruder to decrease to the indoor temperature before you change the nozzle. It is when the temperature of the nozzle totally returns to the indoor temperature that you could conduct the above operation. Be careful to not be scalded. 2) It is necessary to clear the debris of filament in the extruder before you change the new nozzle.
-
Page 97: Technical Specifications
4) If you have any questions, please contact with our technical support. 9. Technical Specifications Printing specifications: Print technology: FDM Build volume: 300 x180x180mm Printing precision:0.05mm Positioning precision: X/Y:0. 011mm Z: 0.0025mm Print Speed: 80-110mm/s Filament diameter: 1.75mm Nozzle diameter: 0.4mm Filament type: ABS/PLA/flexible PLA/wood-polymer/ PVA, HIPS, PETG etc. -
Page 98: Contact Us
Control software: EasyPrint 3D, Repetier-Host, Cura Slicing software: EasyPrint 3D ,Slic3r, Cura 3D model file format: .gcode/ .stl Support Operation system: Windows, Mac Temperature: Max heated bed temperature: 110 ° C Max extruder temperature: 230° C Electrical: Power input: 110V-240V Power output:DC24V/360W Connectivity: USB, SD card, Wi-Fi Mechanical:... - Page 99 For more products of Geeetech, please visit www.geeetech.com or send e-mail to sales@giantarm.com Sales In order to improve our products to provide better user experience, please send your comments and suggestions to Feedback . We will appreciate to hear your feedabck@giantarm.com...
Need help?
Do you have a question about the GiantArm D200 and is the answer not in the manual?
Questions and answers