Advertisement
Product Information
Model Number:
Manufactured in Date:
Product Registration
All products include a serial label which lists the product model number and serial number. This label is located on the base. Before contacting customer service, please have these numbers available for reference.
To register your product please visit: www.nunababy.com/register-gear
Contact
For replacement parts, service, or additional warranty questions, please contact our customer service department.
info@nunababy.com www.nunababy.com
In the United Kingdom infouk@nunababy.com www.nunababy.com
NUNA International B.V.
Van der Valk Boumanweg 178 C
2352JD Leiderdorp The Netherlands
Child Usage Requirements
This product is suitable for use with children who meet the following requirements:
Mass Group: 0+
Weight: Child weighing under 13kg
(approximately 1.5 years old or under)
For use with base
The infant child restraint with Base is a "SemiUniversal Child Restraint" and should be fitted using at 3 point adult seat belt approved to UN ECE regulation 16 or the ISOFIX connections.
![]() For Installation with 3-point-belt
For Installation with 3-point-belt
It will fit vehicles fitted with 3-point retractor safety-belts. Seat positions in other cars may also be suitable to accept this child restraint. If in doubt, consult either the child restraint manufacturer or the distributor.
![]() For Installation with ISOFIX System
For Installation with ISOFIX System
This is an ISOFIX CHILD RESTRAINT SYSTEM. It is approved to Regulation NO. 44, 04 series of amendments for general use in vehicles fitted with ISOFIX anchorages systems.
It will fit vehicles with positions approved as ISOFIX positions (as detailed in the vehicle handbook), depending on the category of the child seat and of the fixture. If in doubt, consult either the child restraint manufacturer or vehicle manufacturer. The ISOFIX size class for which this device is intended is C and D.

Always secure child in child restraint, even on short trips, as this is when most accidents occur. Any straps holding the restraint to the vehicle should be tight, that any straps restraining the child should be adjusted to the child's body, and that straps should not be twisted.
After your child is placed in this infant child restraint, the safety belt must be used correctly, and ensure that any lap strap is worn low down, so that the pelvis is firmly engaged.
Be sure that the child restraint is installed in such a way that no part of it interferes with movable seats or in the operation of vehicle doors.
Before carrying the infant child restraint by hand, ensure that the child is fastened with the safety harness, and that the handle is correctly locked in a vertical position.
Consult the distributor for issues concerning maintenance, repair and part replacement.
Frequently check the ISOFIX guides for dirt and clean them if necessary. Reliability can be effected by ingress of dirt, dust, food particles etc.
NO infant child restraint can guarantee full protection from injury in an accident. However, proper use of this infant child restraint will reduce the risk of serious injury or death to your child.
Please keep this child restraint away from sunlight, otherwise it may be too hot for child's skin. Always touch test seat before placing child in it.
Remove this infant child restraint and base from the vehicle seat when it is not in regular use.
This infant child restraint is designed ONLY for child weighing under 13kg.
The soft goods should not be replaced with any besides the ones recommended by the manufacturer. The soft goods constitute an integral part of the infant child restraint performance.
To avoid the risk of falling out, always secure the child using the safety harness when the child is placed in infant child restraint, even when the child restraint is not in the vehicle.
To avoid serious injury or death, NEVER place infant child restraint on elevated surface seat with child in it.
The parts of this child restraint should not be lubricated in any way.
DO NOT put anything other than the recommended inner cushions in this infant child restraint.
DO NOT continue to use this child restraint after it has suffered any type of crash, even a minor one. Replace immediately as there may be invisible, structural damage from the crash. DO NOT use or install this infant child restraint until you read and understand the instructions in this manual and in your vehicle owner's manual.
DO NOT make any alterations or additions to any part of the child restraint or base. Do not use accessories or parts supplied by other manufacturers. The function of the child restraint could be altered, resulting in serious injury or death.
DO NOT use this infant child restraint if it has damaged or missing parts.
DO NOT have your child in large/oversized clothes because this may prevent your child from being properly and securely fastened by the shoulder harness straps and the harnesses between thighs.
DO NOT make any modification to this infant child restraint or use it along with component parts from other manufacturers.
DO NOT leave this infant child restraint or other items unbelted or unsecured in your vehicle because unsecured infant child restraint can be thrown around and may injure occupants in a sharp turn, sudden stop, or collision.
DO NOT place rear-facing child restraint on front seat with air bag. Death or serious injury may occur. Please reference vehicle owner's manual for more information.
DO NOT use this infant child restraint without the soft goods.
DO NOT use any load bearing contact points other than those described in the instructions and marked on the child restraint.
DO NOT place any objects in the load leg area in front of your base.
NEVER leave your child unattended with this infant child restraint.
NEVER use a second-hand infant child restraint or an infant child restraint whose history you do not know because they may have structural damage that endangers your child's safety.
NEVER use ropes or any other substitutes to secure child restraint in vehicle or to secure child into child restraint. Only use vehicle belt to secure child restraint in vehicle.
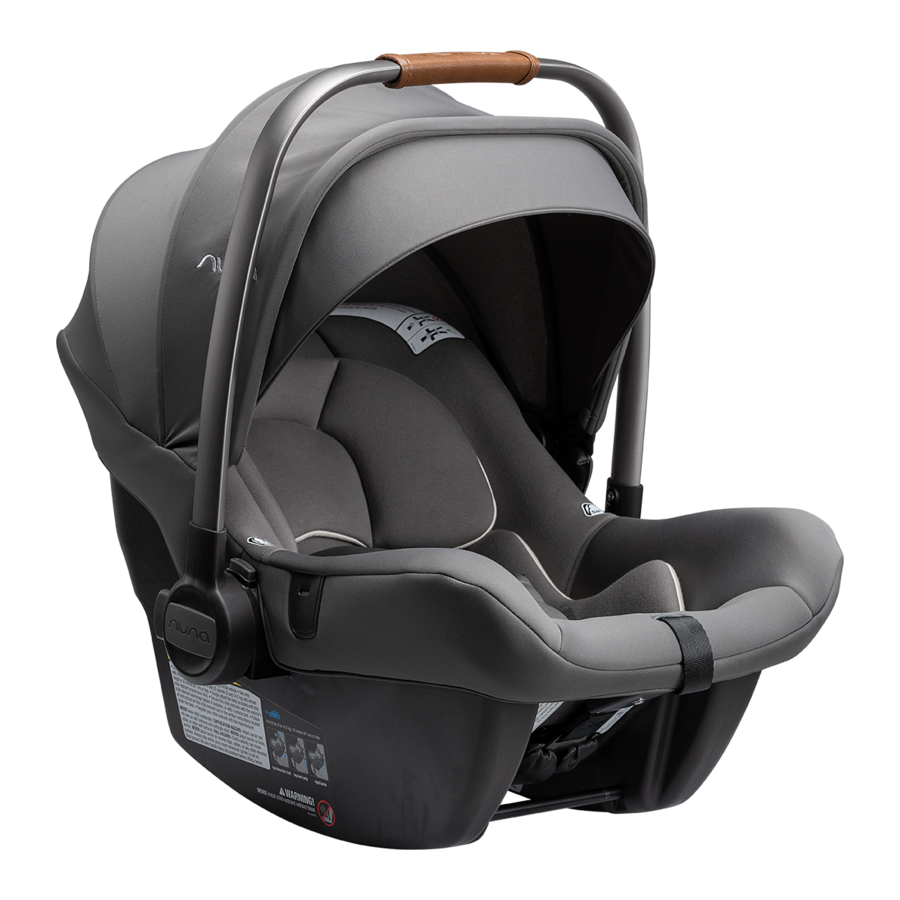
Infant Car Seat Parts List
Make sure all parts are available before assembly. If any part is missing, please contact Nuna. No tools are required for assembly.

- Seat Pad
- Body Support (x2)
- Buckle and Crotch Pad
- Harness Adjustment Button
- Harness Adjustment Strap
- Handle Adjustment Button
- Stroller Release Button*
- Shoulder Harness Pads
- Head Support (x2)
- Handle
- Canopy
- Canopy Release Button
- Stroller Release Button
- Harness Slots
- Base Attachment Bar
- Harness Straps
- Base Attachment Bar
*only used with infant car seat adapters
Base Parts List
Make sure all parts are available before assembly. If any part is missing, please contact Nuna. No tools are required fo assembly.

- Vehicle Belt Lock Off
- ISOFIX Connector (lower attachments)
- Secondary ISOFIX Connector Release Button
- Primary ISOFIX Connector Release Button
- ISOFIX Connector Guides
- Load Leg
- Carrier Release Button
- Load Leg Adjustment Button
- Load Leg Indicator
- Instruction Manual Storage
- ISOFIX releasing button
Product Overview
Canopy
- To assemble the canopy, push canopy mounts into fabric slot to attach to the seat. (1) A click sound means the canopy mounts is locked completely. (2)

- Stick the hook and loop fasteners on the rear of canopy and seat. (3)

- Snap the canopy to the canopy mount on both sides. (4)

- To open the canopy, pull the canopy toward the front of the seat, and to close the canopy, push it back.
- To remove the canopy, reverse step 1. Then unsnap the seat pad from the shell and lift fabric up. (5)

- Press the canopy release button (6)-1 and pull canopy through the fabric slot. (6)-2 Repeat on opposite side.


Seat Pad
- Open the snaps on both sides of the seat. (7)

- Press the red button to disengage the buckle. Remove the body support.
- Remove the seat pad. (8)


Installation concerns
 DO NOT install this infant child restraint on vehicle seats with 2-Point Retractor Safety Belts with the Base. (9)

This infant child restraint is suitable for vehicle seats with a 3-point Retractor Safety Belt with the Base (10), or ISOFIX anchor points WITH the Base. (11)

DO NOT place rear-facing child restraint on front seat with air bag. Death or serious injury may occur. (12) Please reference vehicle owner's manual for more information.

DO NOT install this infant child restraint on vehicle seats that face sideways or rearward with respect to the moving direction of the vehicle. (13)

It is recommended to install this infant child restraint on the rear vehicle seat. (14)

DO NOT install this infant child restraint on vehicle seats unstable during installation.
Handle Adjustment
- The infant carrier handle can be adjusted to 3 positions. (15)

- To adjust the handle position, squeeze handle adjustment buttons on both sides. (16)-1 Rotate handle until it clicks into any of the 3 positions. Handle can be used in vehicle in any locked position. (16)-2


Be sure handle is locked in the carry position before lifting Child Restraint by handle. An unlocked handle could move unexpectedly, causing injury to child. Handle MUST NOT contact the vehicle interior (side of car or seat in front) when installed.
Shoulder Harness Pad
Shoulder harness pads are removable. Unfasten the snap to remove the shoulder harness pads. (17)

Crotch Pad
- Unbuckle the harness and locate the crotch pad strap. (18)

- Keep the tab at the end of the crotch pad strap flat against the strap and then route the crotch pad strap through the front of the buckle. (19)

- Pull the crotch pad off the buckle. (20)


Head and Body Support
The head and body supports can be used as necessary, to provide a snug fit for small babies.
The head support straps cannot go through the same slots as the harness and should only be used in the top two harness slot positions.
- To remove the head support, unfasten the hook and loop ends behind the seat fabric. (21)

- Then, pull the strap on the right of head support out from the harness slots. (22)
![warning]() Please keep to using the head support while using this product.
Please keep to using the head support while using this product.

- To remove the body support, unbuckle the harness and route the buckle and crotch belt through the bottom slot of the body support. (23)

- Foam inside body support is present to ensure that harness fits child properly. Body support must be used for children 0-6 months. (24)

- To remove the low birth weight pillow, unfasten the hook and loop on the back of the body support and pull out the pillow. (25)


Shoulder Belts
- Tighten harness to fit snugly on child's shoulders. It is snug if you cannot pinch a fold in the strap. (26)

- Harness straps must be at or just below shoulders. (27)

- To adjust shoulder harness height, remove child and loosen harness by pressing the harness adjustment button (28)-1 while pulling on the harness strap (28)-2 The harness adjustment button is located inside the slot on the seat pad.

- Open the buckle. Pull loose ends of harness loop out through slots and place in correct slot. (29)


DO NOT allow harness to pass over bars. Repeat process for second shoulder harness strap.
Product Use
Securing Child in Child Restraint
- Place child in Child Restraint in seated position. (30)

- The child should be seated against both the back and bottom of the seat with no gap behind the child. DO NOT allow child to slouch. (31)
Gently guide child's arms through harness loops.

- Place the child into the infant child restraint and lock the buckle. (32)(33)(34)(35)


- Tighten harness by pulling on the adjuster strap. Pull any excess harness webbing through the buckle towards the child's shoulder and pull on the adjuster strap. This may need to be repeated several times for proper fit. (35)
Verify that the harness is snug around the child's shoulders.


Harness straps must be at or just below child's shoulders to avoid injury. If harness slots need to be moved, see Shoulder Belts section.
Make sure that nothing interferes with the harness. Make sure harness is snug around child and lays flat. Serious injury or death could occur to a child that is not secured properly.
If child is not secured properly, child could be ejected in a sudden stop or crash, resulting in serious injury or death.
Check that Child is Secure Buckle is fastened. Harness straps are not twisted. Harness is snug – A snug harness cannot be pinched, and should not allow any slack. Buckle is fastened. Harness straps are not twisted. Harness is snug – A snug harness cannot be pinched, and should not allow any slack. |
Installation
Serious injury or death can occur. The seat alone cannot be installed in the vehicle. It must be installed with the base. (36)

Base Installation Using ISOFIX (Lower Attachments)
- Unfold the load leg. (37)

- Fit the ISOFIX guides with the ISOFIX anchor points. (38) The ISOFIX guides can protect the surface of the vehicle seat from being torn. They can also guide the ISOFIX connectors.

- Rotate the ISOFIX connectors 180 degrees until they are pointing in the direction of the ISOFIX guides. (39)

- Line up the ISOFIX connectors with the ISOFIX guides, and then click both ISOFIX connectors into the ISOFIX anchor points. (40)

![warning]() Make sure that both ISOFIX connectors are securely attached to their ISOFIX anchor points. There should be two audible clicks and the colors of the indicators on the both ISOFIX connectors should be completely green. (41)
Make sure that both ISOFIX connectors are securely attached to their ISOFIX anchor points. There should be two audible clicks and the colors of the indicators on the both ISOFIX connectors should be completely green. (41)
![warning]() Check to make sure the base is securely installed by pulling on the both ISOFIX connectors.
Check to make sure the base is securely installed by pulling on the both ISOFIX connectors.

- After placing the base on the vehicle seat, extend the load leg to floor. When the load leg indicator shows green means it is installed correctly, red means it is installed incorrectly. (42)

![warning]() The load leg has 12 positions. When the load leg indicator shows red this means the load leg is in the wrong position.
The load leg has 12 positions. When the load leg indicator shows red this means the load leg is in the wrong position.
![warning]() Make sure the load leg is secure by pressing down on the front of the base.
Make sure the load leg is secure by pressing down on the front of the base.
![warning]() To shorten the load leg, squeeze the load leg adjustment button and pull the load leg upwards. (42)
To shorten the load leg, squeeze the load leg adjustment button and pull the load leg upwards. (42)

The completely assembled base is shown as (43)
![warning]() The ISOFIX connectors must be attached and locked onto the ISOFIX anchor points. (43)-1
The ISOFIX connectors must be attached and locked onto the ISOFIX anchor points. (43)-1
![warning]() The load leg must be installed correctly with green indicator. (43)-2
The load leg must be installed correctly with green indicator. (43)-2


Check the installation Base should not move side to side or forward more than 1" at belt path. Base should not move side to side or forward more than 1" at belt path. |
Attaching Child Restraint to Base
- After child is properly secured in infant carrier, press child restraint on base and listen for a click. Pull on child restraint to verify installation. (44)
DO NOT allow child restraint to contact the vehicle interior (side of car or seat in front) when installed on base.

- To release the child restraint, squeeze the carrier release button (45)-1 located on the base and then pull the child restraint up. (45)-2

- To remove the base, first push the base toward the vehicle seat with a light force. (46)

- As you push the base toward the vehicle seat, squeeze the secondary (47)-1 and primary ISOFIX release buttons (47)-2. For ease of release, push the secondary button first, then the primary button.

- Press the ISOFIX releasing button to fold the ISOFIX. (48)


Installation with 3-point-belt
- Open the vehicle belt lock-off and route the vehicle safety belt through the belt path. (49)

- Buckle the vehicle belt. Both the shoulder AND lap belt must be under the blue lock off and belts must lay flat. (50)

- While pressing the base into the vehicle seat (51)-1, tighten the vehicle belt by pulling straight along the belt path (51)-2, keeping both belts laying flat in the lock off.

- While the shoulder belt is tight, hook the bottom of blue lock off and press to close the lock off on the shoulder and lap belt. (52)

The installed base is shown as (53)
![warning]() Please ensure that there is no gap between the vehicle seat and the bottom of the base.
Please ensure that there is no gap between the vehicle seat and the bottom of the base.
![warning]() The safety belt must go under the lock off, not over the lock off. (53)-1
The safety belt must go under the lock off, not over the lock off. (53)-1
![warning]() The safety belt must be locked into the buckle. (53)-2
The safety belt must be locked into the buckle. (53)-2
![warning]() The load leg must be installed correctly with green indicator. (53)-3
The load leg must be installed correctly with green indicator. (53)-3
![warning]() The child restraint can not be used if the vehicle safety belt buckle (female buckle end) is too long to anchor the child restraint securely. (53)-4
The child restraint can not be used if the vehicle safety belt buckle (female buckle end) is too long to anchor the child restraint securely. (53)-4

- After child is properly secured in infant carrier, press Child Restraint on base and listen for a click. Pull on Child Restraint to verify installation. (54)
![warning]() DO NOT allow Child Restraint to contact the vehicle door or seat in front of it.
DO NOT allow Child Restraint to contact the vehicle door or seat in front of it.

- To release the Child Restraint, pull the infant carrier up (55)-2 while squeezing the infant carrier release button located on the base. (55)-1

- To remove the base, lift up on the the lock off. (56)

- Unbuckle the vehicle belt and un-route the shoulder and lap belt from the base. (57) Then remove the base.


Installation on a Stroller
This infant carrier can attach to Nuna strollers using adapters. Instructions are included with the adapters, which are sold separately.
This infant carrier can also attach to other brands of strollers using adapters. Please visit nunababy.com for more information.
Aeroplane Installation
Note that safety of the child for not complying with the installation and instruction manual is not guaranteed.
Note that the installation of the infant child restraint with base on an aircraft seat differs from the installation on a car seat.
Note that 2-Point "Lap Belt" attachment is only permitted in aircraft.
Note that the infant child restraint with base must remain belted on the aircraft seat even when unoccupied.
Note that the infant child restraint with base is only for use on a passenger seat authorized by the airline.
Warnings not to use the infant child restraint with base in the area of airbag deployment.
Note that Rearward facing infant child restraint with base with base should only be installed on forward facing passenger seats.
How to install the baby seat with base using the aircraft seat's safety belt:
- Place the infant child restraint with base module opposite to the flight direction onto the passenger seat.
- Ensure that the carry handle is in the topmost position.
- Place the safety belt into base belt lock-off and buckle the safety belt (refer to the safety instructions by the airline).
- Tighten the safety belt by pulling the belt end, then hook the blue lock off on the base bottom and press to close the lock off.
Removal:
Open the safety belt of the passenger seat (refer to the safety instructions by the airline) and unlock the blue lock off on the base bottom.
Now you can take the baby seat with base from the passenger seat.
Cleaning and Maintenance
Your infant carrier is a valuable piece of equipment and deserves careful handling.
For reasons of safety, only use original Nuna parts.
Refer to the care label attached to the soft goods for washing and drying instructions.
Use only mild detergent, water and a soft cloth to clean the infant carrier shell, handle and harness straps. Air dry.
To clean the buckle: rinse using warm water.
DO NOT use any soaps, solvents or lubricants. Using anything other than water can cause the buckle to malfunction. Air dry.
Remove the infant child restraint from the vehicle seat if not in use for a long period of time. Put the infant child restraint in a cool, dry place and somewhere your child can not access it.
It is normal for fabric to color from sunlight and to show wear and tear after a long period of use, even when used normally.
Check regularly if everything functions properly. If any parts are torn, broken, or missing, stop using this product.

KEEP THESE INSTRUCTIONS FOR FUTURE REFERENCE:
READ CAREFULLY
Documents / Resources
References
![www.nunababy.com]() Register Your Nuna Baby Gear → Get Recall & Safety Alerts
Register Your Nuna Baby Gear → Get Recall & Safety Alerts![www.nunababy.com]() Nuna | Functional Car Seats, Premium Strollers & Baby Gear
Nuna | Functional Car Seats, Premium Strollers & Baby Gear![nunababy.com]() Nuna | Functional Car Seats, Premium Strollers & Baby Gear
Nuna | Functional Car Seats, Premium Strollers & Baby Gear
Download manual
Here you can download full pdf version of manual, it may contain additional safety instructions, warranty information, FCC rules, etc.
Advertisement


Need help?
Do you have a question about the pipa lite and is the answer not in the manual?
Questions and answers