Advertisement
WHAT'S IN THE BOX
American Version

European Version

Note: In order to stream video from Floodlight Camera, you need to make sure the Wi-Fi signal strength is strong at the location you want to install Floodlight Camera. To avoid risk of shock, injury or death, always be cautious when working with electricity. Remember, do hire a professional electrician if you are uncomfortable working with electrical wiring.
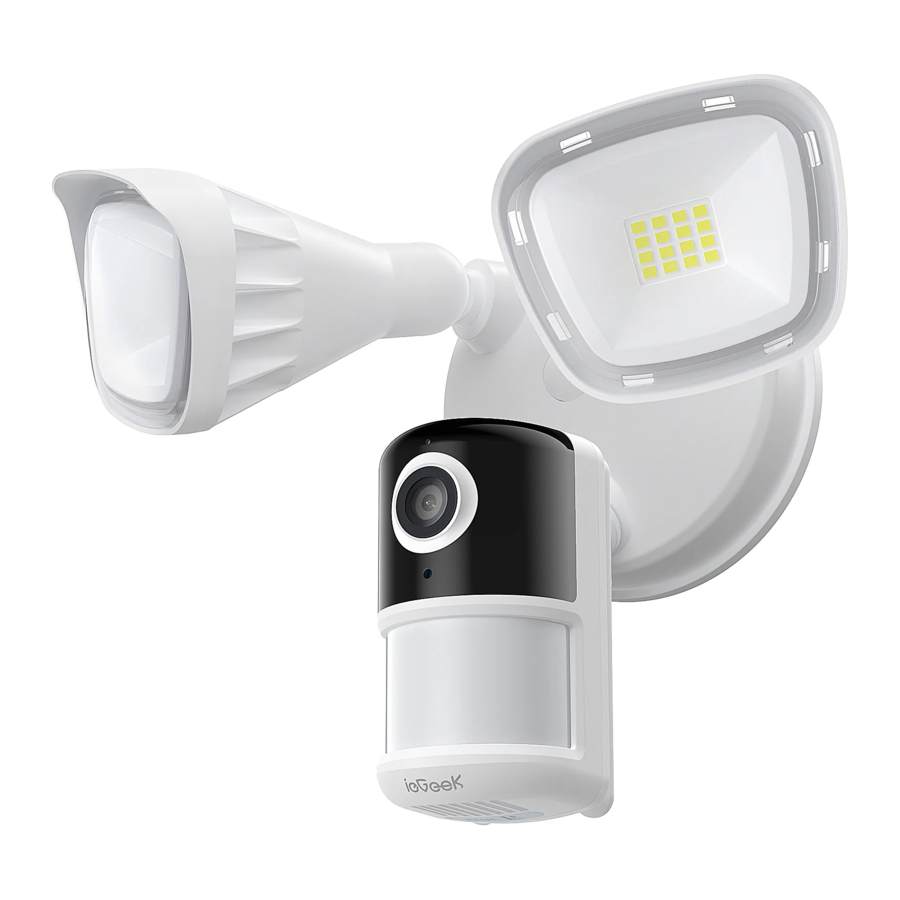
PRODUCT DESCRIPTION

- Light
- Mic
- Lens
- Status light
- PIR
- Reset button
- SD card slot
American Version

European Version

| Power | AC 100æ240V |
| Status light | Solid red light on: the camera network is abnormal |
| Blinking red light: awaiting WiFi connecting | |
| Solid blue light on: camera running correctly | |
| Blinking blue light: currently connecting | |
| Microphone | Captures sounds for your video |
| SD card slot | Supports local micro SD Card storage (Max. 128G) |
| Reset | Press and hold the 'RESET' for 5 seconds to reset the device (if you have modified settings, they will return to factory defaults) |
| Light | Turn the light on/off manually or automatically |
INSTALLATION AND WIRING
Mount floodlight Camera outdoors
Note:
- Without professional guidance, it is not allowed to disassemble or replace any part of the product. This manual is for reference only. Unless proper safety measures are taken, working with electricity is dangerous. We recommend that you hire a licensed electrician.
- Make sure the Wi-Fi signal strength of the position to install the floodlight camera, if the location Wi—Fi signal is not smooth, it is likely to cause the floodlight camera to work improperly. You may consider moving the wireless routers closer to Floodlight Camera or using a Wi—Fi range extender.
Tools Needed:

PRECAUTIONS BEFORE INSTALLATION
- Shut down the circuit breaker in your house. Swich ON/OFF the lights to make sure the electricity in your house is properly shut off.
![]()
![]()
Risk of electrical shock!


Electricity is dangerous. The power must be cut off before installing the product.
Note:
- Please make sure the power supply voltage is AC 100-240V.
- Appropriate grounding device.
- Do not connect this lighting device to a dimmer switch or timer.
- When having wired installing connections, please always follow the norms and standards.
- Do not install near flammable or combustible surfaces.
- Two Installation Methods:
User can hang Floodlight Camera upside down or install it vertically on the wall. Select the installation method that best suits the position of your junction box.

Eave Mount: For upside down installation, turn the camera down to the end when it's placed vertically, then turn the camera 1800 in clockwise direction.


![shock hazard]() To avoid risk of shock, injury or death, always be cautious when working with electricity. Remember, do hire a professional electrician if you're uncomfortable working with electrical wiring.
To avoid risk of shock, injury or death, always be cautious when working with electricity. Remember, do hire a professional electrician if you're uncomfortable working with electrical wiring.
Note: If the camera falls off during installation, please don't worry, the camera can be installed back. If you don't know how to install it please contact us service@iegeek.com

Wall Mount: For install vertically installation, hang the camera on the junction box with the hook provided then you can free your hands for wiring.
To avoid risk of shock, injury or death, always be cautious when working with electricity. Remember, do hire a professional electrician if you're uncomfortable working with electrical wiring.
American Version

European Version


 To avoid risk of shock, injury or death, always be cautious when working with electricity. Remember, do hire a professional electrician if you're uncomfortable working with electrical wiring.


AMERICAN VERSION INSTALLATION STEPS
- Install the mounting plate to the junction box Remove the old Floodlight from the junction box and install the mounting plate to the junction box.
The junction box and existing electrical wires are required to Floodlight Camera installation.
![warning]() The concavrd side of the mounting plate must face outwards.
The concavrd side of the mounting plate must face outwards.
Note:
The junction box and existing electrical wires are required to Floodlight Camera installation.
The concaved side of the mounting plate must face outwards.

- Connect ground wires
Connect both ground wires (yellow or green) from the junction box and Floodlight Camera, join the wires by using a wire nut.
Note:
If the existing ground wire has been connected to the junction box or there's no ground wire, connect the ground wire of the Floodlight Camera to the junction box or mounting plate directly.

- Connect neutral and hot wires
Use wire nuts to connect Floodlight Camera wires to the rest of the wires from junction box.
![shock hazard]() To avoid risk of shock, injury or death, always be cautious when working with electricity. Remember, do hire a professional electrician if you're uncomfortable working with electrical wiring.
To avoid risk of shock, injury or death, always be cautious when working with electricity. Remember, do hire a professional electrician if you're uncomfortable working with electrical wiring.


- Connect the white wire on the Floodlight Camera to the white wire(neutral) from junction box.
- Connect the black wire on the Floodlight Camera to the black wire(hot) from junction box.
- Insert the central screw
- Insert the central screw through the center of Floodlight Camera and screw it tightly.

- Insert the central screw through the center of Floodlight Camera and screw it tightly.

- Use the central screw cap to cover the central screw to prevent the central screw from rusting.


EUROPEAN VERSION INSTALLATION STEPS
- Remove the waterproof plug and thread
Note: If you don't have existing wires outdoors, contact a licensed electrician to run the wires.

- Remove the waterproof plug in the junction Box
- Find the wire hold and thread

- Install the junction box

- Orientate the two mounting holes vertically to ensure stable mounting.
- On wooden walls, DO NOT pre-drill holes. Use the screws provided to fix the junction box onto the wall.
- On walls that are made out of hard materials, such as brick, or concrete, drill holes with a 15/64 inch (6 mm) drill bit, and then insert the anchors provided into the holes. Use the screws provided to fix the junction box on the wall.

- Connect electrical wires to the junction box
Unscrew the bolt with a flat-head screwdriver. Connect the Neutral ("N" blue) / Ground (green/green and yellow) / Live("L" brown) wire to the Neutral /Ground/Live wire connector in the junction box respectively. Secure the wires tightly to prevent wires from falling.

- Hang floodlight camera
Hang floodlight camera on the junction box with the hook provided.

- Connect wires
Note: Green and yellow, brown and blue wires must connect to the matching colors. Never cross connect.


- Connect Ground wire from the Floodlight Camera to the Ground wire from the wire connector in the junction box.
- Connect the Live / Neutral wire form the Floodlight Camera to the Live / Neutral wire from the wire connector in the junction box respectively.
- Secure the wires with a flat-head screwdriver.
- Insert the central screw
- Insert the central screw through the center of Floodlight Camera and screw it tightly.

- Insert the central screw through the center of Floodlight Camera and screw it tightly.

- Use the central screw cap to cover the central screw to prevent the central screw from rusting.


INSTALLATION ANGLE
After installation is complete. You can turn the camera knobs on Floodlight Camera to adjust the camera to your desired angle.

 0-15 degrees is the best angle, the greater the angle, the smaller the PIR detection distance
PRECAUTIONS AFTER INSTALLATION
Switch on the main circuit breaker in the house.


Risk of electrical shock!
To check whether Floodlight Camera is operating, check if the LED indicator has turned Red.
If the work indicator of the floodlight camera is not bright, the power is failed. There may be the following reasons:
- The wires in the junction box are not energized. They are invalid wires.
- The three wires of the neutral wire, live wire and ground wire are connected in wrong sequence.
- The three wires of neutral wire, live wire and ground wire are in poor contact with the waterproof terminal.
In case Floodlight Camera is not powered on, switch off the circuit breaker before checking the wiring of Floodlight Camera. To avoid risk of shock, injury or death, always be cautious when working with electricity. Remember, do hire a professional electrician if you're uncomfortable working with electrical wiring.
APP DOWNLOAD AND CAMERA SETTINGS
- Download 'CloudEdge' APP
Search "Cloudedge" in App store or google play, or scan below QR Code to download and install on smart phone.
Download on the App Store
![]()
![itunes.apple.com]()
Get it on Google Play
![]()
![play.google.com]()
NOTE: Please OPEN 2 permissions below when first setting up the App.


- Allow CloudEdge to access mobile cellular data and wireless LAN, or it will be failed to add IP camera.
- Allow CloudEdge to receive pushed message, or the cellphone will not receive alarm push when motion detection or audible alarm is triggered.


- Register account
New users need to register by e-mail. The concrete steps are as following:- Click 'Register'.
- Follow the steps to complete the registration of the account.
- Log in.
Tips:- Please use correct email.
- Please choose correct country code.
- When registering a new account, please choose the region which you are actually in. (Different registered regions can't share the camera.)
- Connect WI-Fl
NOTE: Please note camera only works under 2.4G Wi-Fi, not supports 5G Wi-Fi.- Run CloudEdge App, Click + and select "Floodlight Camera"
- Follow the instructions to ensure that the camera is activated. (The indicator light is turning red and flashing slowly).
- Select 2.4Ghz WiFi SSID and input password, tap "Next"
- Select"QR Code Configuration"align the QR code with the camera lens in the distance of 15cm until the QRcode is recognized. After hearing the sound "Bugu", tap " Hear Tone".
- After clicking "Hear tone", the camera will start connecting WIFI. When connection finished, the app will skip to "Search to Device" page, you can edit the camera name, then click "DONE" to switch to My Device list, now you can watch real-time video.


How to deal with if there is any problem with WI-Fl connection?
- Please ensure that you have used 2.4GHz WI-Fl. According to our experience, the reasons for the failure of WI-Fl connection from most users are the wrong Wi-Fi format selection and the wrong use of 5GHz WIFI to add the camera.
- Make sure you use correct Wi—Fi password and smooth network speed.
- Make sure the Wi-Fi signal strength of the position to install the floodlight camera, if the location Wi—Fi signal is not smooth, it is likely to cause the floodlight camera to work improperly. You may consider moving the wireless routers closer to Floodlight Camera or using a Wi—Fi range extender.
- Restore the product to factory settings, restart the router, and add it again.
If the above trial is invalid, please contact the brand customer service staff to get help.
FUNCTION INTRODUCTION

- Parameter settings (alarm settings, video, lighting, equipment information, firmware upgrade, etc.)
- Real-time video screen
- Turn on/off the microphone
- Picture Clarity setting (SD, HD, FHD option)
- Full-screen display
- SD card video playback
- Cloud storage video playback
- Manually screenshot
- Voice intercom (press and hold to talk)
- Manually capture video clips
- Turn on/off the alarm
- Turn on/off the LED light
- Turn on/off the siren alarm
- Light settings (PIR linkage control, lighting plan)
- LED light brightness adjustment
- Album (store screenshots and manual video files)
Light About Settings

- Motion for Lights: Set the PIR detection sensitivity. Under the night environment, the LED lights are on when PIR sensor detects moving objects.
- Light Schedule: The LED lights are always on during the set time period.
- Adjust Brightness: Support 7-level LED brightness Adjustment.
DEVICE SHARING
How others access the Floodlight Camera?
Realize this function through 'Device Share'.

- Invite your friends to download and install 'CloudEdge' APP and log in.
- Click 'Device Share' icon to watch operation video, and follow the steps to finish share device.
Tips: When you have a sharing, please make sure the APP account is registered in the same regions. Otherwise, you won't share successfully.
SD CARD RECORDING
The SD card is not included. Please purchase it by yourself if you need SD card to store files.
Requirements for SD card
- It is recommended to use San Disk, Samsung and other brand cards;
- Support 2-128GB capacity;
- It is recommended to use standard Class 10 micro SD card;
- Only support FAT32 format.
Note: Inserting a memory card into the SD card slot of the floodlight camera before powering on, the floodlight will automatically start saving video. You can set event recording or full day recording. How to watch the video in the SD card:
- Click 'History' or 'video playback' button of alarm information icon in the APP to enter the video playback interface. Drag the time axis or select the alarm point to find corresponding time period recording that you need.
- Insert the SD card into the computer. The video files are MP4 format. You could directly use the player to play the video.
![]()

FAQS
How to solve if the device prompts offline?
- Check whether the equipment is in the power—on state, and observe whether the working indicator of the equipment is on normally.
- Check whether the WIFI network is in good condition and restart the router.
- If the device is located far away from the router, which results in the inability to obtain a good WIFI signal. It is recommended to move the router to a closer place or add a WIFI amplifier to improve the WIFI performance.
- Delete the floodlight camera from your CloudEdge account and add it again after resetting the device.
- Check whether the device firmware and application are the latest version.
How to operate if you want to update router or WIFI password?
Delete the floodlight camera from your CloudEdge account. After resetting the device, use the new WIFI or password to add it again.
How to solve if can't play historical video?
- Check the SD card status in "Settings" to ensure that the SD card has been identified successfully.
- Re—insert the SD card.
- Format the SD card in the application.
- Try another new SD card.
The alarm push frequently. How to adjust?
- In the app, lower the sensitivity of the motion detection alarm.
- Set the alarm area and control the alarm monitoring range within you need.
- Turn on "Alarm when only people appear" to use humanoid algorithm to filter useless alarms.
What should I do if the phone cannot receive the alert notification?
- Turn on the push permission of the "CloudEdge" APP in the phone system.
- Ensure that the device's motion detection is turned on successfully.
- Restart the phone. Try to clear the cache if your phone is Android system.
- Check whether the network is good.
The LED light turn on frequently at night. How to solve?
In the application-"Motion for Lights", lower the PIR monitoring sensitivity.
What should I do if the LED lights are always on?
- Check whether the 'LED' button in the APP is turned on.
- Check whether there is a problem with the time setting in the 'Light Schedule'.
What should I do if the camera falls off during installation?
Please don't worry, the camera can be installed back. If you don't know how to install it, please contact us.
TECHNICAL SUPPORT
If you need help, please contact ieGeek before returning your product. Most questions can be answered through our online support center at http://www.iegeek.com or our after—sale mailbox at service@iegeek.com
Please read this manual thoroughly before using this wireless security camera. If you have any issues, please email your order number and the problem to our after—sale mailbox: service@iegeek.com. Receiving your message, we will provide a fast solution in 24 hours.
- Shut off power at the fuse or circuit breaker before installing.
- Do not install the device near flammable surfaces.
- Must have a licensed electrician to install the Floodlight Camera.
- Do not use the device in environments where the temperature is too high or too low, avoid exposing the device to direct sunshine or very wet environments.
- The suitable temperature for the product and accessories is -20ºC to 50ºC.

Official Website: www.iegeek.com
Official Email. service@iegeek.com
Documents / Resources
References
Download manual
Here you can download full pdf version of manual, it may contain additional safety instructions, warranty information, FCC rules, etc.
Advertisement


Need help?
Do you have a question about the ZY-E1 and is the answer not in the manual?
Questions and answers