Table of Contents
Advertisement
Quick Links
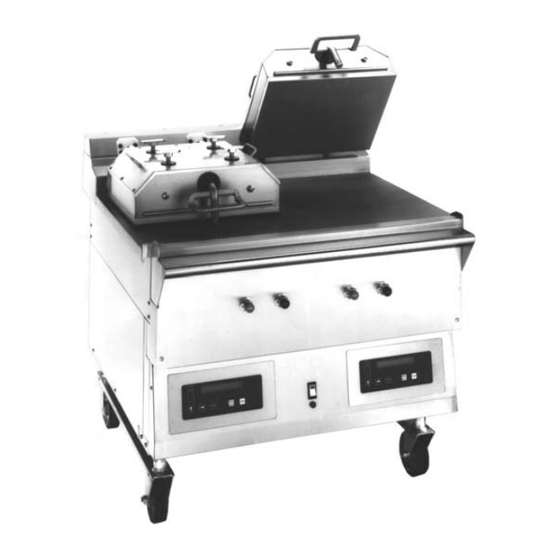
Clamshell Grill
Taylor Model 22E
Place this chapter in the Grill section of
the Equipment Manual.
Manufactured exclusively for
McDonald'sR by
Taylor
a division of Carrier Commercial
Refrigeration, Inc.
750 N. Blackhawk Blvd.
Rockton, IL 61072
Phone: (815) 624-8333
Toll Free Number
Outside Illinois:
1 (800) 228-8309
Inside Illinois:
1 (800) 851-5639
Fax: (815) 624-8000
Table of Contents
. . . . . . . . . . . . . . . . . . . . . . . . . . . . . . . . . . . . . . . . . . . . . . . . . . . . .
. . . . . . . . . . . . . . . . . . . . . . . . . . . . . . . . . . . . . . . . . . . . . . . . . . . . . . . . . .
. . . . . . . . . . . . . . . . . . . . . . . . . . . . . . . . . . . . . . . . . . . . . .
. . . . . . . . . . . . . . . . . . . . . . . . . . . . . . . . . . . . . . . . . . . . . . . . .
Warranty
A warranty checkout card is shipped with all new equipment that leaves the factory. The warranty checkout card is
packed in an envelope which also contains this operator's manual. Refer to the warranty checkout card and the warranty
classifications listed in the Parts Identification/Function section when service is performed on your machine.
It is recommended that the operator take the necessary time to carefully read through the complete warranty information
contained in the warranty checkout card. Any questions or unclear statements found within the card should be made
clear to you upon delivery of the machine. Thoroughly understand your warranty protection before you begin operation.
For any questions pertaining to the Taylor Warranty, please contact your authorized Taylor Distributor or Taylor, a
division of Carrier Commercial Refrigeration, Inc., Rockton, Illinois 61072.
This manual is for the exclusive use of licensees and employees of McDonald's Systems, Inc.
E 1997 McDonald's Corporation
All Rights Reserved
. . . . . . . . . . . . . . . . . . . . . . . . . . . . . . . . . . . . . .
. . . . . . . . . . . . . . . . . . . . . . . . . . .
. . . . . . . . . . . . . . . . . . . . . . . . . . . . . . . . . . . . . . . . . . . .
. . . . . . . . . . . . . . . . . . . . . . . . . . . . . . . . . . . . . .
. . . . . . . . . . . . . . . . . . . . . . . . . . . . . . . . . . . . . . . . . . .
Printed in May
EM SD11
. . . . . . . . . . . . . . . . . . . . . . . .
The United States of America
Page 1
Page 1
Page 4
Page 10
Page 17
Page 20
Page 23
Page 24
Page 27
Page 30
Printed in
Advertisement
Table of Contents

Related Manuals for Taylor McDonald's 22E


Summary of Contents for Taylor McDonald's 22E
-
Page 1: Table Of Contents
Thoroughly understand your warranty protection before you begin operation. For any questions pertaining to the Taylor Warranty, please contact your authorized Taylor Distributor or Taylor, a division of Carrier Commercial Refrigeration, Inc., Rockton, Illinois 61072. -
Page 3: Introduction
Contact your local place. Failure to do so may cause the grill to tip, authorized Taylor distributor for service. and will cause severe equipment damage or personal injury. DO NOT operate the clamshell grill unless all service panels and access doors are NOTICE all warning labels that have attached with screws. - Page 4 This piece of equipment is made in America and has American sizes on hardware. All metric conversions are approximate and vary in size. If the crossed out wheeled bin symbol is affixed to this product, it signifies that this NOISE LEVEL: Airborne noise emission does product is compliant with the EU Directive as not exceed 70 dB(A) when measured at a well as other similar legislation in effect after...
- Page 5 Notes:...
-
Page 6: Parts Identification/Functions
PARTS IDENTIFICATION/FUNCTIONS Exploded View ITEM PART NO. DESCRIPTION QTY. FUNCTION WARR. CLASS X79091 Panel A.-Side Upper L Provides access to internal components for service and cleaning. 079212 Panel-Side Left Provides access to internal components for service and cleaning. X78472 Panel A.-Back Service Provides access to internal components for service and cleaning. - Page 8 Front View ITEM PART NO. DESCRIPTION QTY. FUNCTION WARR. CLASS 076011 Button-Red Operator Cancels the STANDBY mode, (RAISE) raises the upper platen and deactivates the cook cycle. 076012 Button-Black Operator Deactivates the cook cycle, keeps (STANDBY) the upper platen in the closed position and displays the message STANDBY on the control.
- Page 9 Right Side View ITEM PART NO. DESCRIPTION QTY. FUNCTION WARR. CLASS X78282 Handle A.-Platen Used for lowering the upper platen.
- Page 10 Left Side View ITEM PART NO. DESCRIPTION QTY. FUNCTION WARR. CLASS 077879 Switch-Pressure Controls the air pressure. 043643 Gauge-Pressure Indicates pressure in the accumulator tank. 029830 Regulator 0-60 PSI Regulates the pressure necessary to hold platens in the COOK and STANDBY positions.
- Page 11 Accessories ITEM PART NO. DESCRIPTION QTY. FUNCTION WARR. CLASS 076213 Sheet-Release Material Prevents product from sticking to the upper platen. 075887 Scraper-Teflon Wiper Used to clean the release material sheet. *2a 075888 Wiper Strip Blade replacement for the wiper squeegee. 076155 Rod-Release Material Secures the release material to...
-
Page 12: Equipment Set Up And Close Procedures
EQUIPMENT SET-UP AND CLOSE PROCEDURES Installing Release Material Sheets Step 1. Slide the release material rod through the hemmed end of the release material sheet. Figure 3 Step 4. Place the locking clips over the release material sheet, and press them into place over the release material bar. - Page 13 Note: Temperature checks may be conducted with the release material sheet in place. This procedure should take place only if the release material is clean and free of carbon build-up and the grill is properly calibrated. Note: Rotate and reverse the release the material sheets on a daily basis.
- Page 14 Product Selection Step 3. Grasp the lift handle on the opposite side of the Step 1. same upper platen to adjust the other 2 product To adjust the product selector knobs, lower the selector knobs. upper platen into the cook position on the lower grill plate.
- Page 15 Step 3. Press and release the MENU keypad once to display the message “PROBE CALIBRATION”. Figure 14 Step 4. Press the TEMP keypad to display the message “B. FRONT TEMP ____F (or C)”. Figure 11 CAUTION: NEVER USE FORCE TO RAISE THE UPPER PLATEN.
- Page 16 Step 9. Alarm Volume Press the “MENU SELECT” keypad to return to Step 1. the “PROBE CALIBRATION” display or press While at the “SYSTEM SETUP” screen, press the “PROG” keypad to return to the “SYSTEM the “MENU” keypad three times to display the SETUP”...
- Page 17 Taylor Model 22E Clamshell Grill 10:1, 4:1, Sausage and Bacon Patty Placement Guide 1 Patty 2 Patties 3 Patties 4 Patties 5 Patties 6 Patties 7 Patties 8 Patties Maximum for Bacon and 4:1 Meat Note: Patty placement procedures for International Markets may differ. Follow the recommendations of your local McDonald’s authorities.
- Page 18 Standby Procedures Whenever the clamshell grill is idle and product is not being cooked, the upper platen must be placed in the STANDBY position. Step 1. To place the upper platen in the STANDBY position, lower the upper platen into the cook position.
-
Page 19: Closing Procedures
CLOSING PROCEDURES Step 4. Remove the vapor shield. Remove the release Step 1. material sheet from the upper platen. Holding a Raise the upper platen to the OPEN position by dry towel in both hands, remove the upper pressing the red RAISE button. release material locking clips by grasping them and sliding them off of the release material bar. - Page 20 Step 8. Open 1 packet of McD Hi-Temp Grill Cleaner (HCS) and empty its contents into a breakfast base. Figure 28 Step 13. Starting at the back of the lower grill, spread a light coating of grill cleaner over the entire Figure 26 surface.
- Page 21 Step 18. Step 21. Place the release material sheets on the still Rinse the lower grill twice with clean, warm warm lower grill plate. Scrub both sides of the water. Squeegee the grill after each rinse. sheets with the same NO-SCRATCH PAD used to clean the grill.
-
Page 22: Troubleshooting Guide
TROUBLESHOOTING GUIDE WARNING: Inspection, testing and DANGER: Use extreme care during repair of electrical equipment should be electrical circuit tests. Live circuitry may be performed only qualified service exposed. personnel. The clamshell grill should be disconnected from all electricity when servicing, except when electrical tests are required. - Page 23 PROBLEM PROBABLE CAUSE CORRECTIVE ACTION The exhaust hood and grill will The restaurant circuit breaker Reset the circuit breaker. not turn on when FAN has been tripped. INTERLOCK is placed in the ON position. FAN INTERLOCK cord is not Reconnect the cord. connected properly.
- Page 24 PROBLEM PROBABLE CAUSE CORRECTIVE ACTION The product is under-cooked or The release material sheet is Replace the release material overcooked. worn. sheet. The product selector knobs are Set the knobs to the correct set to incorrect product. product selection. Incorrect cooking time. Reset the processor control for the correct time (check the Operations and Training...
-
Page 25: Ordering Parts/Service Technical Information
ORDERING PARTS/SERVICE TECHNICAL INFORMATION Taylor Distributor: Complete for quick reference when this information is requested. Address: 1. Model Number: 22E Phone: Date of Installation: 2. Serial Number Data Label 3. Electrical Specs: The data label provides necessary information Voltage Cycle... -
Page 26: Non-Scheduled Maintenance
NON-SCHEDULED MAINTENANCE WARNING: INSPECTION, TESTING, AND REPAIR OF ELECTRICAL EQUIPMENT SHOULD ONLY PERFORMED QUALIFIED SERVICE PERSONNEL. ALL ELECTRICAL CONNECTIONS SHOULD BE DISCONNECTED AND THE HOOD CIRCUIT BREAKER SHOULD BE TURNED OFF WHEN SERVICING THE CLAMSHELL GRILL. Figure 33 Step 3. Visually check the condition of the fuse. - Page 27 Step 5. Step 5. Press the RIGHT ARROW button to move the Pressing the PROG keypad will return to the cursor (blinking digit) to the required digit “MENU ITEMS” display. Pressing the RIGHT position. ARROW keypad will return the control to the Operating Mode.
- Page 28 Step 3. Step 9. Press the MENU SELECT keypad to scroll Press the TEMP keypad again to display the top through all product names until the desired temperature. product is displayed. Step 10. Step 4. Press the TEMP keypad to display the bottom Press and release the TEMP keypad until temperature.
-
Page 29: Clamshell Grill Controls
Hysteresis To Cook in the Flat Grill Mode Step 1. Step 1. Select a flat grill menu by pressing the MENU The hysteresis (the change in temperature from SELECT keypad until the desired menu item is the time the heater turns on until the heater turns displayed. - Page 30 Indicator Lights Program Mode Button This button has two functions: There are four (4) indicator lights indicating the temperature status of each zone on the grill: 1. The primary function is to access three (3) on the lower (front to rear), and one (1) Programming and Calibration of the grill.
- Page 31 Standby Button The message “Probe Open” will flash on the display when an open probe condition occurs. By pressing this button after the platen is The controller will then deactivate the respective lowered, the controller goes into an idle state heater.
-
Page 32: Wiring Diagrams
WIRING DIAGRAM 079347-23... - Page 33 WIRING DIAGRAM 079347-62...
- Page 34 WIRING DIAGRAM 079347-66...
- Page 35 051652--M...
Need help?
Do you have a question about the McDonald's 22E and is the answer not in the manual?
Questions and answers