Advertisement
Quick Links
Advertisement

Related Manuals for RealRooms Products RH LEVA 3004209


Summary of Contents for RealRooms Products RH LEVA 3004209
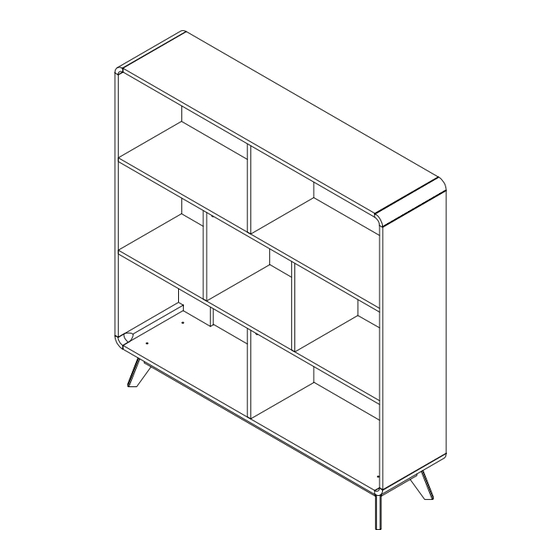
- Page 1 3004209 (Walnut/Walnut) RH LEVA DOUBLE BOOKCASE 44 lbs / 20 kg PB 2023/10/16 B34300420900-9979...
- Page 4 SIDE PANEL LEFT SIDE PANEL RIGHT TOP PANEL BOTTOM PANEL 1 PC 1 PC 1 PC 1 PC DIVIDER PANEL SHELF PANEL SHELF PANEL DIVIDER PANEL 1 PC 1 PC 2 PC 2 PC BACK PANEL BACK PANEL LEFT BACK PANEL RIGHT LEG PANEL 1 PC 4 PC...
- Page 5 LEG FRAME PANEL LEG FRAME SIDE PANEL LEG FRAME SUPPORT PANEL SIDE PROFILE PANEL 2 PC 2 PC 2 PC 4 PC 3004209 (Walnut/Walnut) U5672877-A U5672877-B U5672877-C U5672877-D U5672877-E U5672877-F U5672877-G U5672877-H U5672877-I U5672877-J U5672877-K U5672877-L U5672877-M U5672877-N U5672877-O U5672877-A1...
- Page 6 3.5mm x 15mm 6mm x 40mm 6mm x 20mm 4mm x 25mm WOOD DOWEL SCREW SCREW SCREW 8 PC 9 PC 4 PC 12 PC 12mm x 15mm 6mm x 35mm 8mm x 25mm 20mm x 5mm WOOD DOWEL WOOD DOWEL MINIFIX 42 PC 24 PC...
- Page 7 4.5mm x 32mm GLUE SAFETY STRAP WALL PLUG 30MM SCREW 6 PC 1 PC 1 PC HP# : TU5672877-01 3004209 (Walnut/Walnut)
- Page 8 For each hole with dowel (4),(5) & (6), place a small drop of glue (16), then process to insert a dowel.
- Page 11 Insert cam (8) in each panel and tighten all of it accordingly. Before attach the other panel place a small drop of glue (16) in wood dowel hole. Lastly apply the round sticker (10) on the cam hole as shown.
- Page 12 Insert cam (8) in each panel and tighten all of it accordingly. Before attach the other panel place a small drop of glue (16) in wood dowel hole.
- Page 13 Before attach the other panel place a small drop of glue (16) in wood dowel hole.
- Page 14 Attached the leg L to bottom panel D and tighten with screw (3).
- Page 15 Insert cam (8) in each panel and tighten all of it accordingly. Before attach the other panel place a small drop of glue (16) in wood dowel hole.
- Page 16 Positioning the table corner bracket (11) at the leg frame and tighten the screw (1) & (2) and make sure position the screw according to the step display.
- Page 17 Insert cam (8) & (9) in each panel and tighten all of it accordingly. Before attach the other panel place a small drop of glue (16) in wood dowel hole. Lastly apply the round sticker (10) on the cam hole (8) only as shown.
- Page 18 Attached shelf panel E to panel H I and tighten & with screw (3). Insert cam (9) in each panel and tighten all of it accordingly. Before attach the other panel place a small drop of glue (16) in wood dowel hole.
- Page 19 Insert cam (8) & (9) in each panel and tighten all of it accordingly. Before attach the other panel place a small drop of glue (16) in wood dowel hole. Lastly apply the round sticker (10) on the cam hole (8) only as shown.
- Page 20 Insert cam (8) in each panel and tighten all of it accordingly. Before attach the other panel place a small drop of glue (16) in wood dowel hole. Lastly apply the round sticker (10) on the cam hole (8) only as shown.
- Page 21 Attached shelf panel F to panel H, I & and tighten with screw (3). Insert cam (9) in each panel and tighten all of it accordingly. Before attach the other panel place a small drop of glue (16) in wood dowel hole.
- Page 22 Insert cam (8) & (9) in each panel and tighten all of it accordingly. Before attach the other panel place a small drop of glue (16) in wood dowel hole. Lastly apply the round sticker (10) on the cam hole (8) only as shown.
- Page 23 Attached shelf panel E to panel H I and tighten & with screw (3). Insert cam (9) in each panel and tighten all of it accordingly. Before attach the other panel place a small drop of glue (16) in wood dowel hole.
- Page 24 Insert cam (8) in each panel and tighten all of it accordingly. Before attach the other panel place a small drop of glue (16) in wood dowel hole. Lastly apply the round sticker (10) on the cam hole as shown.
- Page 25 Insert cam (8) in each panel and tighten all of it accordingly. Before attach the other panel place a small drop of glue (16) in wood dowel hole. Lastly apply the round sticker (10) on the cam hole as shown.
- Page 26 Attached safety strap (13) to top panel then use screw (1) to tighten it as shown.
- Page 27 Insert the wall plug (18) into the hole then use a hammer, after that use screw (14) to tighten it.
- Page 28 Helpful Hints CAUTION: This unit is intended for use only with the products and/or maximum weights indicated. Use with other products and/or products heavier than the maximum weights indicated may result in instability or cause possible injury. Move your new furniture carefully, with two people lifting and carrying the unit to its new location.
- Page 29 3004209 (Nuez/Nuez) LIBRERÍA DOBLE LEVA DER Realrooms!
- Page 30 HP# : TU5672877-01 3004209 (Walnut/Walnut) 3004209 (Walnut/walnut) Panel lateral izquierdo U5672877-A Panel lateral derecho U5672877-B Panel superior U5672877-C Panel inferior U5672877-D U5672877-E Panel de estante Panel de estante U5672877-F Panel divisor U5672877-G Panel divisor U5672877-H Panel posterior U5672877-I Panel trasero izquierdo U5672877-J Panel trasero derecho U5672877-K...
- Page 31 Paso 14 Fije el panel del estante F al panel H, apriete I y G con el tornillo (3). Inserte la leva (9) en cada panel y apriete en consecuencia. Antes de colocar el otro panel, coloque una pequeña gota de Paso 1 Para cada ori cio con clavija (4), (5) y (6), coloque una pequeña Pegue (16) en el agujero del taco de madera.
- Page 32 3004209 (Noyer/Noyer) BIBLIOTHÈQUE DOUBLE RH LEVA Realrooms!
- Page 33 HP# : TU5672877 -01 3004209 (Walnut/Walnut) 3004209 (Walnut/walnut) Panneau latéral gauche U5672877-A U5672877-B Panneau latéral droit U5672877-C Panneau du haut U5672877-D Panneau du bas U5672877-E Panneau d'étagère Panneau d'étagère U5672877-F Panneau de séparation U5672877-G Panneau de séparation U5672877-H Panneau arrière U5672877-I Panneau arrière gauche U5672877-J...
- Page 34 Étape 14 Fixez le panneau d'étagère F au panneau H, serrez I et G avec la vis (3). Insérez la came (9) dans chaque panneau et serrez en conséquence. Avant de placer l'autre panneau, déposez une petite goutte de Étape 1 Pour chaque trou d'épingle (4), (5) et (6), placez un petit Collez (16) dans le trou du goujon en bois.
Need help?
Do you have a question about the RH LEVA 3004209 and is the answer not in the manual?
Questions and answers