EINHELL TC-SY 400 P Manual
- Original operating instructions (154 pages) ,
- Original operating instructions (41 pages) ,
- Original operating instructions (102 pages)
Advertisement
- 1 Safety regulations
- 2 Layout and items supplied
- 3 Proper use
- 4 Technical data
- 5 Before starting the equipment
- 6 Operation
- 7 Replacing the power cable
- 8 Cleaning, maintenance and ordering of spare parts
- 9 Storage
- 10 Viscosity Table
- 11 Troubleshooting Guide
- 12 Service information
- 13 Documents / Resources
Safety regulations


Read the operating instructions to reduce the risk of injury


Wear ear-muffs. The impact of noise can cause damage to hearing.

Wear a breathing mask. Dust which is injurious to health can be generated when working on wood and other materials. Never use the device to work on any materials containing asbestos!

Wear safety goggles. Sparks generated during working or splinters, chips and dust emitted by the device can cause loss of sight.

Wear gloves.
![]()
 Note! Disassemble and clean the equipment immediately after each use. This is the only way to keep the wetted parts clean and prevent clogging. Parts that are not cleaned can become clogged, causing an equipment fault.
When using the equipment, a few safety precautions must be observed to avoid injuries and damage. Please read the complete operating instructions and safety regulations with due care. Keep this manual in a safe place, so that the information is available at all times. If you give the equipment to any other person, hand over these operating instructions and safety regulations as well. We cannot accept any liability for damage or accidents which arise due to a failure to follow these instructions and the safety instructions.
The corresponding safety information can be found in the enclosed booklet.
Read all safety regulations and instructions. Any errors made in following the safety regulations and instructions may result in an electric shock, fire and/or serious injury.
Keep all safety regulations and instructions in a safe place for future use. G eneral safety instructions for electric tools
Read all safety regulations and instructions. Any errors made in following the safety regulations and instructions may result in an electric shock, fire and/or serious injury. Keep all safety regulations and instructions in a safe place for future use.
The term "electric tool" used in the safety instructions refers to electric tools operated from the mains power supply (with a power cable) and to battery operated electric tools (without a power cable).
Workplace safety
- Keep your work area clean and well illu-minated. Untidy or unlit work areas can result in accidents.
- Do not operate the electric tool in an en-vironment where there is a risk of explosions and where there are infl ammable liquids, gases or dust. Electric tools produce sparks which could set the dust or vapours alight.
- Keep the electric tool out of the reach of children and other persons. If there is a distraction, you may lose control of the appliance.
Electrical safety
- The connector plug from this electric tool must fit into the socket. The plug should never be altered in any way. Never use adapter plugs together with earthed electric tools. Unaltered plugs and correct sockets reduce the risk of an electric shock.
- Avoid bodily contact with earthed sur-faces such as pipes, heating, ovens and fridges. The risk of electric shock is increased if your body is earthed.
- Keep the tool out of the rain and away from moisture. The ingress of water into an electric tool increases the risk of an electric shock.
- Do not use the cable to carry the electric tool, to hang it up or to pull it out of the socket. Keep the cable away from heat, oil, sharp edges and moving parts of the appliance. Damaged or entangled cables increase the risk of an electric shock.
- If you are working outdoors with an elec-tric tool, only use extension cables which are designed specifically for this purpose. Using specially designed outdoor extension cables, the risk of electric shock is reduced.
- If operation of the electric tool in a damp environment can not be avoided, use a earth-leakage circuit-breaker. The earthleakage circuit-breaker reduces the risk of an electric shock.
Safety of persons
- Be careful, watch what you are doing and use an electric tool sensibly. Do not use the tool if you are tired or under the infl uence of drugs, alcohol or medication. A moment of inattention when using the electric tool can result in serious injuries.
- Wear personal protection equipment and always wear safety goggles. Wearing personal protection (such as dust masks, non-slip safety shoes, safety helmet or ear protection, depending upon the type and use of the electric tool) reduces the risk of injury.
- Make sure that the appliance cannot start up accidentally. Ensure that the electric tool is switched off before you connect it to the power supply and/or insert the battery, or pick up or carry the tool. If your finger is on the switch whilst carrying the electric tool or if you connect the appliance to the mains when it is switched on, this can lead to accidents.
- Remove keys and wrenches before swit-ching on the electric tool. A tool or key which comes into contact with rotating parts of the appliance can lead to injuries.
- Avoid abnormal working postures. Make sure you stand squarely and keep your balance at all times. In this way, you can control the electric tool better in unexpected circumstances.
- Wear suitable work clothes. Do not wear loose clothing or jewellery. Keep hair, clothes and gloves away from moving parts. Loose clothing, jewellery or long hair can get trapped in moving parts.
- If vacuuming devices and draining de-vices can be fitted, make sure that these are correctly attached and correctly used. The use of a dust extraction system can reduce the danger posed by dust.
Do not lose this safety information.
Usage and treatment of the electric tool
- Do not overload the appliance. Use the correct tool for your work. You will be able to work better and more safely within the given performance boundaries.
- Do not use an electric tool with a defec-tive switch. An electric tool that cannot be switched on or off is dangerous and must be repaired.
- Pull the plug out of the socket and/or remove the battery before making any adjustments to the appliance, changing accessories or put the appliance down. This safety measure prevents starting the electric tool unintentionally.
- Keep unused electric tools out of the reach of children. Do not allow people who are not familiar with the appliance or who have not read these instructions to use the appliance. Electric tools are dangerous if they are used by inexperienced people.
- Clean your electric tool carefully. Check whether moving parts are functioning properly and not jamming, whether parts are broken or damaged enough that the functioning of this electric tool is aff ected. Have damaged parts repaired before using the appliance. Many accidents are caused by badly maintained electric tools.
- Keep your cutting tools sharp and clean. Carefully maintained cutting tools with sharp cutting edges will jam less and are easier to control.
- Make sure to use electric tools, accesso-ries, attachments, etc. in accordance with these instructions. Take the conditions in your work area and the job in hand into account. Using electric tools for any purpose other than the one for which they are intended can lead to dangerous situations.
Service
- Have your electric tool repaired only by trained personnel using only genuine spare parts. This will ensure that your electric tool remains safe to use.
Do not lose these safety instructions Special safety information
- Always disconnect the mains plug before doing any work on the equipment.
- You may only spray materials such as paint, lacquer, varnish, etc. which have a flash point above 55°C, without additional heating. (Hazard Class A II or A III, refer to material tin)
- Be aware of the hazards associated with the material you are spraying. Read the hazard information on the tin or the information provided by the manufacturer.
- Follow the manufacturer's safety precautions when working with the material you are spraying.
- Do not spray any materials if you do not know how hazardous they are.
- Use personal protective equipment (face mask) which filters the air to avoid inhalation of spray mist.
- Wear gloves and protective clothing to avoid skin contact with the paint.
- Wear suitable eye protection (goggles).
- The work area must exceed 30 m3, and sufficient ventilation must be ensured during spraying and drying.
- Be aware that paint and lacquer can be highly inflammable and potentially explosive. There must be no ignition sources such as fireplaces, open flames, buring cigarettes or machines that generate sparks.
- The paint spray gun may not be used in premises were the explosion protection directive applies.
- When you are spraying, there must be no ignition sources nearby such as open flames, cigarette smoking, sparks, hot glowing wires, hot surfaces, etc.
- The paint spray gun must not be used to spray flammable substances.
- Flammable solvents must not be used to clean the paint spray gun.
- INJURY RISK! Never point the paint spray gun at yourself, other people or animals.
- Properly dispose of residual paint and cleaning agents in accordance with local laws and regulations.
- Residual paint must be taken to a suitable collection point. If you are not sure, ask the local council where the nearest collection point is.
- When you are working with the paint spray gun indoors or outdoors, the gun must not suck in any solvent fumes.
- When you are working outdoors, pay attention to the wind direction. The wind can distribute the material over long distances and cause damage.
- Do not allow children to handle the gun.
- Never open the gun to carry out electrical repairs.
- Spraying into the skin can introduce toxins into the body. Call a doctor immediately if the jet causes a skin injury or penetrates the skin.
- Children are not allowed to use this equipment. Children should be supervised so that they do not play with the equipment. Children are not allowed to carry out cleaning or maintenance.
- This equipment must not be used by persons with reduced physical, sensory or mental capacities or those with a lack of experience and knowledge.
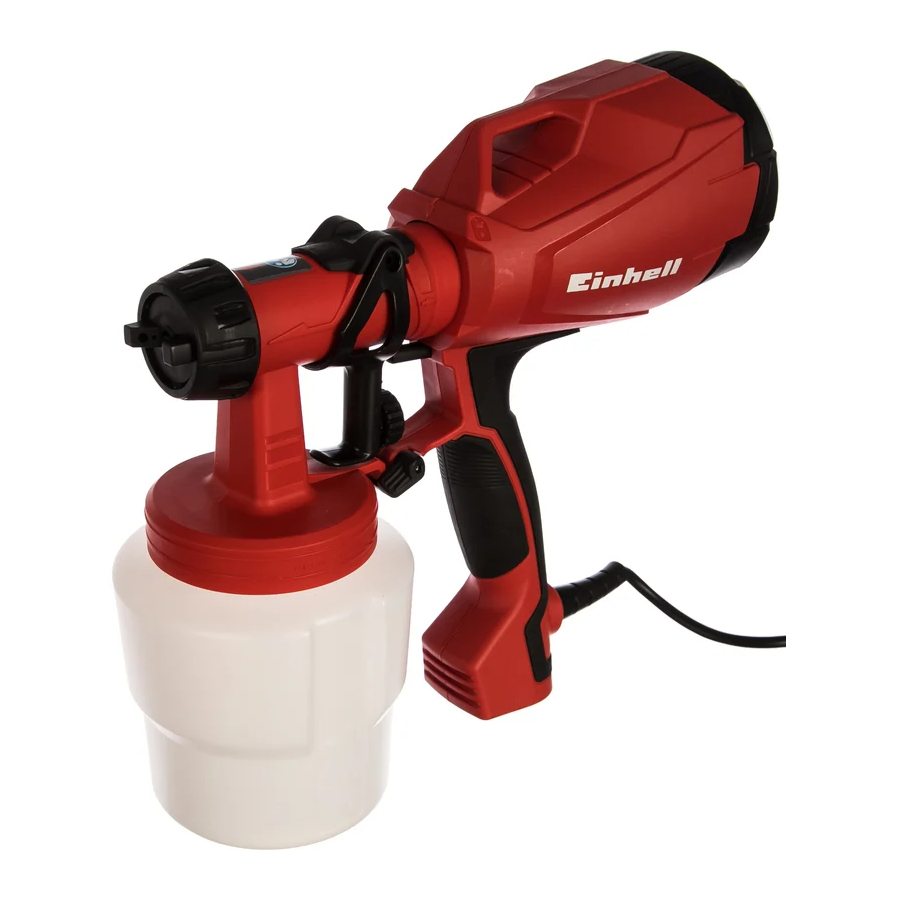
Layout and items supplied
Layout

- Air cap retaining ring
- Air cap
- Nozzle
- Locking lever
- Trigger
- Max. paint volume control
- Pistol mounting
- Viscosity cup
- Wall storage hook
- Material tube connection
- Material tube
- Container
- Fluid needle (plastic)
- Trigger unit
- Drive unit
- Filter cap
- Cleaning needle
- Adapter for fluid needle
Items supplied
Please check that the article is complete as specified in the scope of delivery. If parts are missing, please contact our service center or the sales outlet where you made your purchase at the latest within 5 working days after purchasing the product and upon presentation of a valid bill of purchase. Also, refer to the warranty table in the service information at the end of the operating instructions.
- Open the packaging and take out the equipment with care.
- Remove the packaging material and any packaging and/or transportation braces (if available).
- Check to see if all items are supplied.
- Inspect the equipment and accessories for transport damage.
- If possible, please keep the packaging until the end of the guarantee period.
The equipment and packaging material are not toys. Do not let children play with plastic bags, foils or small parts. There is a danger of swallowing or suff ocating!
- Container
- Cleaning brush (not shown)
- Cleaning needle
- Viscosity cup
- Cap
- 2.5 mm nozzle, mounted on the pistol (colour: black)
- Replacement nozzle, 2 mm (red)
- Original operating instructions
- Safety information
Proper use
The machine is suitable for spraying solvent-borne and water-borne paint, varnish, primers, transparent lacquer, vehicle basecoats and clearcoats, stains and wood preservatives. Alkali and acidic substances, spray materials containing particles, latex paint and non-drip/non-splatter paint must not be sprayed.
The equipment is to be used only for its prescribed purpose. Any other use is deemed to be a case of misuse. The user / operator and not the manufacturer will be liable for any damage or injuries of any kind caused as a result of this. Please note that our equipment has not been designed for use in commercial, trade or industrial applications. Our warranty will be voided if the machine is used in commercial, trade or industrial businesses or for equivalent purposes.
Technical data
Mains voltage/frequency 127 V ~ 60 Hz
Power rating 400 W
Max. flow rate (Qmax.) 500ml/min
Container volume 800 ml
Nozzle dia. 2.0 / 2.5 mm
Max. viscosity 60 DIN-sec
Protection Class II/
Weight approx. 1.3 kg
Sound and vibration
Sound and vibration values were measured in accordance with EN 60745.
LpA sound pressure level 82,7 dB(A)
KpA uncertainty 3 dB
LWA sound power level 93,7 dB(A)
KWA uncertainty 3 dB
Wear ear-muffs.
The impact of noise can cause damage to hearing.
Total vibration values (vector sum of three directions) determined in accordance with EN 60745.
Handle
Vibration emission value ah = 1.41 m/s2
K uncertainty = 1.5 m/s2
The specified vibration value was established in accordance with a standardized testing method. It may change according to how the electric equipment is used and may exceed the specified value in exceptional circumstances.
The specified vibration value can be used to compare the equipment with other electric power tools.
The specified vibration value can be used for initial assessment of a harmful effect.
Keep the noise emissions and vibrations to a minimum.
- Only use appliances which are in perfect working order.
- Service and clean the appliance regularly.
- Adapt your working style to suit the appliance.
- Do not overload the appliance.
- Have the appliance serviced whenever necessary.
- Switch the appliance off when it is not in use.
- Wear protective gloves.
Residual risks
Even if you use this electric power tool in accordance with instructions, certain residual risks cannot be rules out. The following hazards may arise in connection with the equipment's construction and layout:
- Lung damage if no suitable protective dust mask is used.
- Damage to hearing if no suitable ear protection is used.
- Health damage caused by hand-arm vibrations if the equipment is used over a prolonged period or is not properly guided and maintained.
Before starting the equipment
Before you connect the equipment to the mains supply make sure that the data on the rating plate are identical to the mains data.

Always pull the power plug before making adjustments to the equipment.
Spray gun assembly


- The trigger unit (14) is attached to the handle (15) with the gun mounting bayonet connector (7).
- Open the locking lever (4).
- Twist and insert the trigger unit (14) into the handle.
- Close the locking lever.
- Insert the material tube (11) into the material tube connection (10).
- Screw the container into the trigger unit.
Operation
Material preparation
The paint usually has to be thinned before it can be used in the spray gun. Instructions on how to thin the paint for spraying are not always printed on the paint tin. You should use the viscosity table as a guide (viscosity = consistency of the paint).
Measuring the viscosity (Fig. 5)

- Mix the material thoroughly before measuring.
- Completely immerse the viscosity cup (8) into the material.
- Then lift the viscosity cup (8) out of the mixture and use a stopwatch to measure the time it takes for all of the material to flow through the cup. As soon as the continuous flow out of the bottom is interrupted, stop the timer.
Repeat until you have the viscosity you need.
This is the „Draining time in seconds". (See Viscosity Table)
Nozzle diameter
The size of the nozzle and fluid needle to use depends on the viscosity of the material. Depending on the viscosity, use the 2.0 mm dia. nozzle (colour red, for lower viscosity) or the 2.5 mm dia. nozzle (colour: black, for higher viscosity). The fluid needle in the gun is suitable for both nozzle diameters.
Working with the paint spray gun

Note! Cover all surfaces which must be protected from the spray, even areas which are further away from the place where you are working. A fine mist from the spray gun can spread to areas in the wider surroundings indoors and outdoors, and the material will be deposited on surfaces there.
- Unscrew the container (12) from the paint spray gun.
- Align the material tube (11) for the object you are working on.
- Spaying on horizontal objects: Rotate the material tube (11) towards the front.
- Spaying on raised objects: Rotate the material tube (11) towards the rear.
- Never continue spraying until the container is completely empty. If the material tube no longer reaches the spray material, the spray flow will be interrupted and the coverage on the surface will be uneven.
- Once you have performed the viscosity measurement as described in Measuring the viscosity, place the container (12) on some paper, pour in the material you have prepared and tightly screw the container (12) back into the paint spray gun.
- The paint spray gun may only be set down on a clean, even surface. Otherwise it may tip over.
- After each cleaning (see Cleaning) or change of fan pattern (see Adjusting the fan pattern), tighten the air cap retaining ring (1) to prevent material from leaking out between the air cap retaining ring and the air cap (2).
Adjusting the fan pattern
You can set the paint spray gun to produce three diff erent fan patterns to suit your needs. Loosen the air cap retaining ring (1) and rotate the air cap (2) to the desired position. Re-tighten the air cap retaining ring.
Selecting the fan pattern:

A: vertical fan
-> for horizontal surfaces
B: horizontal fan
-> for vertical surfaces
C: Round fan
-> for corners, edges and surfaces that are difficult to access
Risk of injury!
Never press the trigger while you are adjusting the jet.
Adjusting the material flow
You can rotate the max. paint volume control to regulate the material flow.

- direction-> lower material flow
+ direction-> higher material flow
Spraying techniques
- The results you get depend on how smooth and clean the surface is. The surface must be carefully prepared and free of dust.
- Surfaces, threads, etc. which should not be sprayed must be covered.
- Always set the spray gun down on cardboard or something similar. You can use the cardboard as a target to properly adjust the spray gun.

Always begin spraying outside of the area to be sprayed and avoid interrupting spraying inside the area to be sprayed.
- Wrong (Fig. 9): If you only rotate the spray gun from side to side, the gun will produce a heavy mist and the coverage will be uneven.

- Right (Fig. 10): Always hold the spray gun at the same distance (about 5-15 cm) from the surface you are working on.

- Move the spray gun uniformly laterally or up and down depending on the fan pattern.
- Uniform motion of the spray gun produces uniform finish quality.
- If material residue is deposited on the nozzle (3) and the air cap (2), clean both parts with solvent or water.


Replacing the power cable
If the power cable for this equipment is damaged, it must be replaced by the manufacturer or its after-sales service or similarly trained personnel to avoid danger.
Cleaning, maintenance and ordering of spare parts
Always pull out the mains power plug before starting any cleaning work.
Cleaning
- Keep all safety devices, air vents and the motor housing free of dirt and dust as far as possible. Wipe the equipment with a clean cloth or blow it with compressed air at low pressure.
- We recommend that you clean the device immediately each time you have finished using it.
- Clean the equipment regularly with a moist cloth and some soft soap. Do not use cleaning agents or solvents; these could attack the plastic parts of the equipment. Ensure that no water can seep into the device. The ingress of water into an electric tool increases the risk of an electric shock.
Disconnecting and cleaning the gun
(Fig. 1-2, 11-15)


- Unplug the spray gun from the mains power. Press the trigger (5), so that the residual material flows back into the container (12).
- Unscrew the container (12) and empty the residual material back into the material tin.
- Clean the container (12) and the material tube (11) with a bristle brush.
- Pour solvent or water into the container. Screw the container back on. Solvents with a flash point above 55°C may not be used.
- Reinsert the mains plug into the mains outlet and turn on the paint spray gun. Set the max. paint volume control (6) to the maximum flow setting. Spray the solvent or water into a container or rag, but never into the surroundings.
- Repeat the procedure above until the clear solvent or water exits from the nozzle (3).
- Turn the paint spray gun off again and unplug it from mains power.
- Completely empty the container (12). Always keep the container (12) free of residue and check it for damage.
- Use a rag soaked in solvent or water to clean the outside of the paint spray gun and the container (12).
- Unscrew the air cap retaining ring (1) and remove the air cap (2). Remove the nozzle (3). Push the fluid needle adapter (B) onto the fluid needle (13). Twist and pull to remove the fluid needle. Clean the air cap retaining ring, air cap, nozzle and fluid needle with a bristle brush and solvent or water.
- Remove the filter cap (16) to clean the air inlet filter. Remove the filter and clean it by blowing out with air. Replace the filter and screw the filter cap onto the gun. Do not operate the gun without the filter.
- Reinsert the fluid needle. Pull the trigger and insert the nozzle on the fluid needle. While inserting, ensure that the pins on the sides of the fluid needle point up/down and not right/ left. Pull the trigger while placing the air cap on the nozzle and tightly fasten the air cap with the air cap retaining ring.
- Ensure that the paint spray gun is completely dry before storing it.
- Properly dispose of residual paint and cleaning agents in accordance with local laws and regulations. Residual paint and solvents must be taken to a suitable collection point. If you are not sure, ask the local council where the nearest collection point is.
Never immerse the paint spray gun in water or other liquids. The housing may only be cleaned with a dampened rag.
Note: If you use 2-component paint, you must clean the gun immediately. Otherwise the paint may dry inside the gun, causing an equipment fault.
Carbon brushes
In case of excessive sparking, have the carbon brushes checked only by a qualified electrician.
The carbon brushes should not be rep laced by anyone but a qualified electrician.
Maintenance
There are no parts inside the equipment which require additional maintenance.
Ordering spare parts and accessories
Please provide the following information when ordering spare parts:
- Type of unit
- Article number of the unit
- ID number of the unit
- Spare part number of the required spare part
Storage
Store the equipment and accessories in a dark and dry place at above freezing temperature. The ideal storage temperature is between 10 and 40°C. Store the electric tool in its original packaging.
Viscosity Table
| Examples of spray materials. Follow the manufacturer's instructions! | Draining time in seconds (DIN-sec) |
| Solvent-borne primers | 25-30 |
| Solvent-borne paint | 15-30 |
| Water-borne primers | 25-30 |
| Water-borne paint | 20-25 |
| Wood preservatives, stains, oils | undiluted |
| Disinfectants | undiluted |
| Vehicle topcoats | 20-25 |
Troubleshooting Guide
| Problem | Possible Cause | Solution |
No material exits from the nozzle | Nozzle clogged Material tube clogged Max. paint volume control rotated too far anti-clockwise (-) Material tube is loose No pressure build-up in the container Consistency of the material is too thick | Clean Clean Turn clockwise (+) Insert Tighten container Dilute |
Material drips from nozzle after spraying | Nozzle is loose Nozzle is worn Nozzle seal is worn Solids in the air cap or nozzle | Tighten Replace Replace Clean |
Atomization too coarse | Material viscosity too high Material volume too high Max. paint volume control turned too far clockwise (+) Dirty nozzle Insufficient pressure build-up in the container | Dilute Turn the max. paint volume control anti-clockwise (-) Clean Tighten the container |
Intermittent („fluttering") spray | Almost all of the material in the container has been used up | Add more |
Coating pattern is too light and uneven | You moved the paint spray gun too fast across the surface you are working on | Move the gun more slowly |
The paint runs or sags. | You applied too much material | Turn the max. paint volume control anti-clockwise (-) |
Excessive spray mist | The gun is held too far away from the object you are working on | Hold the gun closer Turn the max. paint volume control anti-clockwise (-) |
Service information
We have competent service partners in all countries named on the guarantee certificate whose contact details can also be found on the guarantee certificate. These partners will help you with all service requests such as repairs, spare and wearing part orders or the purchase of consumables.
Please note that the following parts of this product are subject to normal or natural wear and that the following parts are therefore also required for use as consumables.
| Dirt Water Pump | Example |
| Wear parts* Consumables* | Impeller |
* Not necessarily included in the scope of delivery!
In the effect of defects or faults, please inform the problem to the contact address indicated at the warranty card of your country. Please ensure that you provide a precise description of the problem and answer the following questions in all cases:
- Did the equipment work at all or was it defective from the beginning?
- Did you notice anything (symptom or defect) prior to the failure?
- What malfunction does the equipment have in your opinion (main symptom)?
- Describe this malfunction.
The reprinting or reproduction by any other means, in whole or in part, of documentation and papers accompanying products is permitted only with the express consent of the iSC GmbH.
Subject to technical changes
Documents / ResourcesDownload manual
Here you can download full pdf version of manual, it may contain additional safety instructions, warranty information, FCC rules, etc.
Advertisement


Need help?
Do you have a question about the TC-SY 400 P and is the answer not in the manual?
Questions and answers