
Related Manuals for BD Kiestra Track


Summary of Contents for BD Kiestra Track
- Page 1 Kiestra™ Track User's Manual L011042(08) 2024-04 446092, 446093, 446094, 446096, 446097, 446098, 446941, 446942, 446943, 446944, 446945, 446946, 446947 English bd.com/e-labeling...
- Page 2 Added the Locating expected plates from BarcodA topic. BD, the BD Logo, BD Synapsys, and Kiestra are trademarks of Becton, Dickinson and Company or its affiliates. All other trademarks are the property of their respective owners.
- Page 3 T-junction element 2.3.1.9 U-turn element 2.3.2 BD Kiestra™ ErgonomicA 2.3.2.1 BD Kiestra™ ErgonomicA integrated workstation 2.3.2.2 BD Kiestra™ ErgonomicA Standalone 2.3.3 Plate flow 2.3.4 BD Kiestra™ Track graphical user interface (GUI) 2.3.4.1 General layout 2.3.4.2 Status view 2.3.4.3 BD Kiestra™ ReadA remote view 2.3.4.4 Utilities view 2.3.4.5 Notifications 2.3.4.6 Help 2.3.4.7...
- Page 4 BD Kiestra™ Track User's Manual 4.5.2 ErgonomicA Destacker Collecting plates from a Stacker 4.6.1 Track Stacker 4.6.2 ErgonomicA Stacker Locating expected plates from BarcodA Pausing operation Opening covers 4.10 Turning off module Cleaning and maintenance Cleaning and disinfection 5.1.1 Frequency of routine cleaning 5.1.2...
- Page 5 EU Only: Users shall report any serious incident related to the device to the Manufacturer and National Competent Authority. Outside EU: Contact your local BD representative for any incident or inquiry related to this device. Technical Service and Support: In the United States contact BD at 1.800.638.8663 or bd.com.
- Page 6 INFORMATION ON AN ACTIVITY WHICH POTENTIALLY COULD CAUSE INJURY TO THE USER IS PRESENTED AS A WARNING. Symbols glossary Some symbols listed below may not apply to this product. US Customers only: For symbols glossary, refer to bd.com/symbols-glossary. Symbol Meaning CE marking; Signifies European technical conformity In vitro diagnostic medical device This only applies to US: “Caution: Federal Law restricts this device to...
- Page 7 1 - Instructions for use guidance Symbol Meaning Batch code Catalogue number Serial number <Box #> / <Total Boxes> Alternating current Biohazard Caution Collect separately. Indicates separate collection for waste of electrical and electronic equipment required. Cut or sever hazard Danger of crushing Do not step Do not use if package is damaged and consult instructions for use...
- Page 8 BD Kiestra™ Track User's Manual Symbol Meaning Moving parts - pinch point On/Off Pinch point Refer to accompanying documentation Sharp point UV lamp Indicates internal high voltage cables that remain powered after the power switch is turned off Depiction of patient information...
- Page 9 If the startup procedures are successful, the module is ready to be used. BD recommends that the module remain powered on at all times except during certain maintenance procedures.
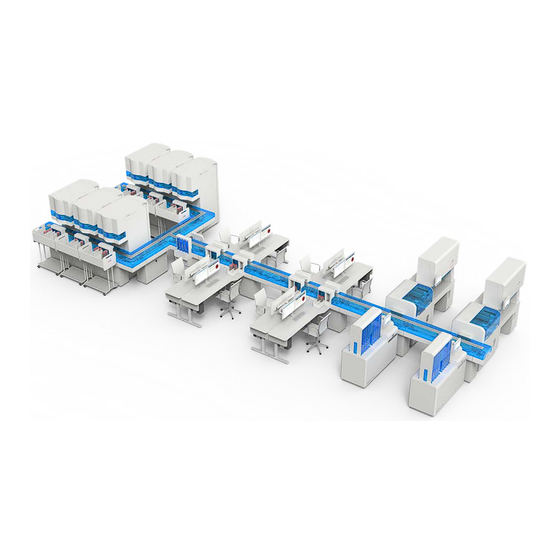
- Page 10 BD Kiestra™ Track User's Manual Figure 1 — Example of Track configuration with ReadA Figure 2 — Example of Track configuration with InoqulA Track and BarcodA Track...
- Page 11 2 - Introduction Figure 3 — Example of Track configuration with ErgonomicA workstations 2.3.1.1 Elements overview Base cabinets Track elements typically sit upon a base cabinet, although some elements are able to float. Main Base cabinet All Track modules have one designated Main Base cabinet, which houses the computer and monitor where the GUI is displayed.
- Page 12 BD Kiestra™ Track User's Manual Indicators and audible alarms Each Track element contains an LED light bar which illuminates the element during normal operations. This LED light bar, along with an audible alarm in the Main Base cabinet, is used to inform the user when a warning or error situation has occurred.
- Page 13 2 - Introduction Components Track elements include components that interact with the plates, mechanically or physically. Icon Illustration Component Sensors Sensors (1) detect the presence of a plate. The shape and size of the sensors may vary from those depicted here. Stoppers Stoppers temporarily stop a plate from traveling.
- Page 14 BD Kiestra™ Track User's Manual 2.3.1.2 Corner element The Corner element turns the plate transport direction 90 degrees. Image Schematics Note: The actual representation of the Track element may vary based on the configuration of the Track. The Corner element has two main lanes, each going in opposite directions, and is used to guide the plate in a different direction.
- Page 15 2 - Introduction 2.3.1.4 ErgonomicA Connector elements The ErgonomicA Connector Left and ErgonomicA Connector Right elements allow for plates to be delivered to the ErgonomicA integrated workstation through the ErgonomicA Stackers and transported from the ErgonomicA integrated workstation through the ErgonomicA Destacker.
- Page 16 (positive or negative) Configuration of the Stackers is done by BD Technical Services, taking into consideration the needs of each individual lab. NOTE During startup of Track, plates that are on the side lane of the Stacker element, but not yet stacked, are moved back onto the main lane.
- Page 17 2 - Introduction 2.3.1.6 Standard Connector element The Standard Connector element transports plates to most connected modules. The Standard Connector element has one main lane and two side lanes that connect to the module: one side lane sends plates to the module, one receives plates from the module. Image Schematics Note: The actual representation of the Track element may vary based on the configuration of the Track.
- Page 18 BD Kiestra™ Track User's Manual 2.3.1.8 T-junction element The T-junction element allows the configuration of Track to be split. Image Schematics Note: The actual representation of the Track element may vary based on the configuration of the Track. The T-junction element has two main lanes, each going in opposite directions, and is used to guide the plate in a different direction.
- Page 19 2 - Introduction 2.3.2 BD Kiestra™ ErgonomicA The ErgonomicA is an ergonomically designed and height-adjustable workstation module. There are two types of ErgonomicAs: Integrated and Standalone. Components These components are available for all ErgonomicAs: Image Component Workstation controller The workstation controller is under the desktop and controls the height adjustable legs.
- Page 20 BD Kiestra™ Track User's Manual Image Component Cable Set Digital Reading Workstation (optional) The Cable Set Digital Reading Workstation includes the workstation C13 power strip, power cords for the Digital Reading Workstation, and a power cord for the workstation controller.
- Page 21 Cable Set Digital Reading Workstation. 2.3.2.2 BD Kiestra™ ErgonomicA Standalone The ErgonomicA Standalone is not physically connected to the Track, and plates must be manually retrieved from the Track Stacker and placed back in the Track Destacker.
- Page 22 The BD installation team will install these plates when the workstation is freely positioned. If the plates are not required during original installation, but the workstation is freely positioned at a later time, contact BD to ensure that these plates are mounted before using the workstation. Region-specific power cords The region-specific power cords are used to connect the workstation control unit to the wall socket.
- Page 23 2 - Introduction 2.3.3 Plate flow A plate that enters the Track does so either by the use of a Destacker, an ErgonomicA, or through a connected module. The basic flow of a plate from a start location to a destination location is described below: 1.
- Page 24 Stackers on the ErgonomicA Connector. 2.3.4 BD Kiestra™ Track graphical user interface (GUI) The GUI is displayed on a touchscreen monitor mounted to the Main Base cabinet of Track. The touchscreen monitor supports multitouch gestures and is operated without the use of a keyboard or mouse.
- Page 25 7. Select Status to display the Track status. See 2.3.4.2 Status view. 8. Select ReadA to display the ReadA remote view. See 2.3.4.3 BD Kiestra™ ReadA remote view. 9. Select Utilities to display the Utilities view. See 5 Cleaning and maintenance.
- Page 26 BD Kiestra™ Track User's Manual 2.3.4.2 Status view The Status view is the default view of the Track GUI. It can also be accessed by selecting the Status tab. The Status view shows all Track elements and visually communicates their status, in addition to displaying the location of all other modules attached to the Track.
- Page 27 2 - Introduction Color or Icon Meaning Identifies a Track element in warning state. The Track continues to operate but may stop if the warning state changes to an error state. When a status is in a warning state, a notification is issued and can be viewed in the Notification panel.
- Page 28 BD Kiestra™ Track User's Manual Icon Component Catcher Scanner Figure 7 — Track element view 1. Select or zoom in on a highlighted blue Track component (1) to see detailed information. If a component is in error state, the screen element representing the component will change color from blue to red.
- Page 29 2 - Introduction Component view The component view is displayed when a component is selected or zoomed in the Track element view. It provides a static image and details of the selected component. Figure 8 — Track component view 1. The component and associated element are displayed directly beneath the image. 2.
- Page 30 BD Kiestra™ Track User's Manual 2.3.4.3 BD Kiestra™ ReadA remote view ReadA remote view provides access to the user interface of connected ReadA modules. Refer to the BD Kiestra™ ReadA User's Manual for more information on the ReadA user interface. NOTE Only ReadA modules attached to Track are displayed.
- Page 31 2 - Introduction 2.3.4.4 Utilities view Utilities view provides access to additional user functions. Figure 10 — Utilities view 1. To prepare Track for cleaning, select Clean. The module will stop accepting new plates and start emptying plates from all Track elements. The user will be informed throughout the process of the number of plates that are remaining on Track and once all plates are removed from the module it will stop, but remain powered on.
- Page 32 BD Kiestra™ Track User's Manual 2.3.4.5 Notifications Notifications panel, located in the application header, provides access to the process error, warning, and informative notifications for the module. The red count badge overlaid on top of the indicates the number of active notifications.
- Page 33 2 - Introduction 1. Select to mute the audible alarm. This button only displays when there are errors and warnings. 2. Open the Notifications panel by selecting in the application header. 3. The badge displays the number of process errors. 4.
- Page 34 Help panel, located in the application header, provides access to version information. Figure 12 — Help panel 1. Open the Help panel by selecting in the application header. 2. View the BD Kiestra™ Track UI (user interface) version and BD Kiestra™ Track MCS (machine control software) version.
- Page 35 2 - Introduction 2.3.4.7 User account User account panel, located in the application header, provides access to signing into and out of the application. See 4.3 Signing in and out for details. Figure 13 — My account panel 1. If signed in, select to view the My account panel.
- Page 36 BD Kiestra™ Track User's Manual...
- Page 37 Configuration Configuration panel, located in the application header, provides access to the configuration settings. General configuration options are only enabled when a user is logged Figure 14 — Configuration panel Open the Configuration panel by selecting in the application header. General configuration The General configuration option provides the ability to customize the behavior of Track and is only enabled when a user is logged in.
- Page 38 BD Kiestra™ Track User's Manual Figure 15 — General configuration 1. Open the Configuration panel by selecting in the application header. 2. Select General. 3. Tap anywhere on the row of the setting you wish to change to display an expanded, editable view of the setting.
- Page 39 3 - Configuration Audible alarm warning Turn the audible alarm on or off for warnings. NOTE This option is on by default. It is not recommended to deactivate this option. Set an audible alarm repeat time interval for warnings. LED illumination Turn the LED lights on or off to visualize the operational state of Track (LED light color = white).
- Page 40 It has a range between 1 and 999, with a default value of 900. NOTE The actual values of these settings may vary as they are configuration dependent. Contact BD if there is any doubt about changing a setting.
- Page 41 3 - Configuration Language settings The Language settings option provides the ability to change the GUI language settings for all users. Only one language can be chosen at a time. Default language is English. Figure 16 — Language settings 1. Open the Configuration panel by selecting in the application header.
- Page 42 BD Kiestra™ Track User's Manual...
- Page 43 Operation This section provides instructions for routine operation of Track. WARNING ALL PATIENT SPECIMENS AND MICROBIAL CULTURES ARE POTENTIALLY INFECTIOUS AND SHOULD BE TREATED WITH UNIVERSAL PRECAUTIONS. REFER TO THE CDC MANUAL BIOSAFETY IN MICROBIOLOGICAL AND BIOMEDICAL LABORATORIES, 6TH EDITION, 2020, AS WELL AS OTHER RECOMMENDED LITERATURE.
- Page 44 BD Kiestra™ Track User's Manual Turning on module Turning on Track provides electrical power to the Track elements and to all BD Kiestra™ modules, workstations, and workstation PCs physically connected to Track. Preparing Track 1. Place an empty plate cart in front of the Stackers, lowering the side panel of the cart facing the Stackers.
- Page 45 CAUTION The main power switch provides electrical power to the Track elements and to all BD Kiestra™ modules, workstations, and workstation PCs physically connected to Track. 4. Turn the PC ON by flipping up the switch cover and pressing the button.
- Page 46 BD Kiestra™ Track User's Manual Starting operation When Track is powered up and the software is visible, the module can be started. 1. Select in the GUI. 2. If the module was recently powered down and is restarting, a message will display requesting the user to empty all Stackers and connect the plate carts in order for the startup process to continue.
- Page 47 Usernames and passwords are configured in the BD Synapsys™ Informatics Solution. Refer to the BD Synapsys™ Informatics Solution instructions for use for details on setting up user accounts. Figure 18 — Sign in option Sign in 1.
- Page 48 BD Kiestra™ Track User's Manual Sign out Once a user is signed in, the system will keep track of activities performed on the GUI. If no interaction has occurred within 15 minutes, the current user will be signed out and the system will return to basic user mode.
- Page 49 4 - Operation WARNING AVOID A PINCH HAZARD WHEN THE DESKTOP IS RAISED HIGHER OR LOWER THAN THE ERGONOMICA CONNECTOR. CAUTION If the Digital Reading Workstation is installed, refrain from sitting on the desk or placing weight greater than 20 kg (44 lb) on it to prevent damage to the lifting unit. Ensure there is free space around the desk, either over or under it, to avoid collision and protect the desk and other objects from damage during desk height adjustment.
- Page 50 Contact BD to adjust the tension of the monitor arm if the monitors start to drift while in use. Resetting circuits on the ErgonomicA Connection Panel If the RCBO trips and you lose power, contact BD or your local facilities department to determine the source of the power surge and to reset the circuits. NOTE For more information regarding the ErgonomicA Connection Panel, see 2.3.1.4 ErgonomicA Connector elements.
- Page 51 4 - Operation NOTE Ensure that all plates placed into a Destacker are properly labeled. Ensure that all black agar plates are free from condensation on the bottom of the plate when placing into a Destacker. Plates in the leftmost Destacker are destacked with highest priority. The destacking function is defined within the configuration settings, with a default of 15 plates being released from a Destacker and entering Track at any given time.
- Page 52 BD Kiestra™ Track User's Manual NOTE Ensure that all plates placed into a Destacker are properly labeled. Ensure that all black agar plates are free from condensation on the bottom of the plate when placing into a Destacker. Collecting plates from a Stacker 4.6.1...
- Page 53 4 - Operation 4. Toggle Pushout single plate to ON. NOTE Changing the maximum stack height to one will impact the capacity of the plate cart. Changing this setting when the plate cart is not empty may result in stacks tipping over during pushout. Force Stacker push To force a Stacker to push plates onto a plate cart, see the Component view section in 2.3.4.2 Status...
- Page 54 BD Kiestra™ Track User's Manual 4.6.2 ErgonomicA Stacker Plates are moved to an ErgonomicA Stacker when requested at a workstation. There are two Stackers in which the plates are stored: 1. Incubated plates from ReadA or an external incubator, or inoculated plates from InoqulA, will be delivered to the "incubated"...
- Page 55 4 - Operation Figure 21 — ErgonomicA Stacker pushout lane WARNING DO NOT REMOVE PLATES DIRECTLY FROM THE STACKER. WAIT UNTIL THE STACK HAS BEEN PUSHED ONTO THE PUSHOUT LANE. CAUTION Be aware of the potential risk of cross-contamination between plates. Do not obstruct the plate detect sensor at the end of the pushout lane or a warning state will be triggered indicating the pushout lane is full.
- Page 56 BD Kiestra™ Track User's Manual Locate an expected plate Figure 22 — Plate delivery overview 1. Select the expected destination from the drop-down. 2. Plates headed toward the selected destination are displayed, with the top result being the plate expected to arrive first.
- Page 57 5. If an expected plate is not present on Track, the destination location is highlighted in red. Refer to the BD Synapsys™ Informatics Solution instructions for use for how to access a plate in Culture Workup without using a workup worklist and retrieve a replacement plate using the Discard Defective Media option.
- Page 58 4. If the plate was intended for a workbench, the deleted plate will need to be replaced manually using BD Synapsys™ Informatics. Refer to the BD Synapsys™ Informatics Solution instructions for use for how to access a plate in Culture Workup without using a workup worklist and retrieve a replacement plate using the Discard Defective Media option.
- Page 59 4 - Operation Pausing operation The transportation of plates can be paused for a brief period of time. This can be useful when a plate cart is not yet placed in front of a Stacker element, or to quickly remove an obstacle on the Track.
- Page 60 BD Kiestra™ Track User's Manual 3. When you are ready to close the straight elements, press the cover latch up (1) to release the lock with one hand while gently lowering the cover into a closed position with the other hand.
- Page 61 4.10 Turning off module BD recommends that Track remains powered on at all times except during certain cleaning and maintenance procedures. When turned off, Track will no longer accept new plates and will transport all current plates on the module to their destination. Once Track is completely empty, it will stop and the computer will shut down.
- Page 62 BD Kiestra™ Track User's Manual 6. Set the main power switch to OFF by turning the red switch (1) to the horizontal position. 7. If applicable, CLOSE the CO by turning the right blue switch (2) to the vertical position.
- Page 63 Once every 12 months, preventive maintenance is required to be performed by BD authorized personnel. If a service contract is in place, BD will contact your laboratory when preventive maintenance is due. If there is no service contract, contact BD to schedule preventive...
- Page 64 5.1.2 Cleaners and disinfectants BD recommends the use of a single agent that combines functions to facilitate fast and effective cleaning and disinfection. Any exceptions to that recommendation are specified in this protocol.
- Page 65 BD should validate efficacy as well as compatibility with all module components. BD is not liable for damages to components caused by unvalidated cleaners. Cleaning methods There are three approaches to cleaning, all of which are acceptable in specific situations:...
- Page 66 BD Kiestra™ Track User's Manual CAUTION Never spray or pour cleaner/disinfectant on or into the module or any part of the module. Always spray onto a microfiber wipe and then wipe the cleaner/disinfectant onto the module component. Do not use cleaning agent on computer screens, except when microbial contamination on the monitor surface occurs or is suspected.
- Page 67 5 - Cleaning and maintenance To start Track again, perform the following steps: 1. If it was removed, place the plate cart back in front of the Stackers, lowering the side panel of the cart facing the Stackers so that plates may be pushed onto it. Press the cart firmly against the Track module and engage the cart wheel locks to prevent any movement.
- Page 68 BD Kiestra™ Track User's Manual Cleaning components CAUTION Never pour cleaner/disinfectant on or into the module or any part of the module. Always spray onto a microfiber wipe and then wipe the cleaner/disinfectant onto the module component. 5.4.1 Blue covers Routinely clean with water.
- Page 69 5 - Cleaning and maintenance 5.4.5 Scanner windows Clean using only a dry microfiber wipe. When required, Scanner windows may be cleaned with a recommended cleaner/disinfectant. Use a microfiber wipe moistened with water to remove cleaning agent residue. Dry with a dry microfiber wipe.
- Page 70 BD Kiestra™ Track User's Manual Incidental cleaning In the event of a spill, wipe up the spill with a microfiber wipe soaked with a cleaner/disinfectant. CAUTION Never spray or pour cleaner/disinfectant on or into the module or any part of the module.
- Page 71 5 - Cleaning and maintenance Decontamination Decontaminate after spills, splashes, or obvious contamination, and before transporting the equipment out of the laboratory. WARNING CONSIDER ALL ORGANISMS AS POTENTIALLY INFECTIOUS AND HANDLE ACCORDING TO STANDARD MICROBIOLOGICAL PRACTICES, SPECIAL PRACTICES, AND SAFETY EQUIPMENT RECOMMENDED FOR BIOSAFETY LEVEL 2 (BSL-2) CONTAINMENT.* BSL-2 PRACTICES INCLUDE, BUT ARE NOT LIMITED TO THE FOLLOWING: WEAR GLOVES AND LAB COAT WHEN HANDLING POTENTIALLY...
- Page 72 BD Kiestra™ Track User's Manual CAUTION Do not use abrasive or corrosive cleaners (including bleach) inside the equipment. Do not spray or pour liquid directly on surfaces. Exposure to vaporized decontamination methods is not advised, as this may cause damage to the equipment.
- Page 73 When an error occurs, operation of the entire Track is interrupted. Follow the instructions displayed in the GUI to resolve the error condition. CAUTION When the module notifies you of alerts and errors, you should immediately respond to the condition. If the recommended corrective actions do not solve the problem, contact BD.
- Page 74 BD Kiestra™ Track User's Manual Error resolution When an error occurs, an overlay window immediately displays the error details to the user. Figure 25 — Error details screen 1. List of errors, ordered oldest to newest. The details of the first error in the list display by default.
- Page 75 In some cases, a power cycle of Track is needed to resolve an error. Track provides electrical power to the Track elements and to all BD Kiestra™ modules, workstations, and workstation PCs physically connected to Track, and will therefore render the entire solution powerless during a power cycle.
- Page 76 If an error is not actually resolved when it is acknowledged as such, it may continue to be triggered. 9. Error code. If the error cannot be resolved, contact BD and report the error code. Error displays on the GUI...
- Page 77 Power cycle the Track. connect to control boards Track initialization failed: software SYSTEM-6013 version is incorrect Track initialization failed: missing or SYSTEM-6014 Contact BD. invalid setting detected Track initialization failed: Incorrect SYSTEM-6015 software version CIO board Track operations interrupted; SYSTEM-6016 Power cycle the Track PC.
- Page 78 BD Kiestra™ Track User's Manual Error Code Error Message Error Resolution Track operations interrupted; Close the cover on the SYSTEM-6023 detecting an open cover highlighted location. Track operations interrupted; Power down the Track, cool SYSTEM-6024 temperature in main cabinet down the Track and power up the exceeded operational levels Track again.
- Page 79 6 - Troubleshooting Error Code Error Message Error Resolution Locate and inspect the Stacker A Stacker pusher did not complete its STACKER-6036 pusher; determine if something is initialization procedure blocking the function. Locate and inspect the DESTACKER- A Destacker lift did not complete its Destacker lift;...
- Page 80 BD Kiestra™ Track User's Manual Error Code Error Message Error Resolution An expected plate was not timely CATCHER-6050 detected by a Catcher DESTACKER- An expected plate was not timely 6050 detected by a Destacker An expected plate was not timely...
- Page 81 6 - Troubleshooting Error Code Error Message Error Resolution Locate and inspect the Stacker A Stacker continues to detect a plate STACKER-6052 lift; determine if something is after it has been released blocking the plate detect sensor. STANDARD A Stopper continues to detect a plate CONNECTOR after it has been released END-6052...
- Page 82 BD Kiestra™ Track User's Manual Error Code Error Message Error Resolution Locate and inspect the Destacker; determine if DESTACKER- Detecting a stack but the destacker is something is blocking the Stack 6065 empty height sensor and plate detect sensor. Unable to stack: lift failed to reach...
- Page 83 Track will try to reconnect to the Could not validate user; failed to SYSTEM-W6098 credential server; no further connect to credential server action is required. UPS battery capacity low, please Contact BD and request a SYSTEM-I6025 replace battery UPS battery replacement.
- Page 84 BD Kiestra™ Track User's Manual...
- Page 85 Voice: 1-800-638-8663 Mail: Technical.Services@bd.com Rua Alexandre Dumas 1976 bd.com 04717-004 Sao Paulo, S.P. Brazil Voice: (55) 11 5459833 BD Kiestra B.V. Fax: (55) 11 2478644 Marconilaan 6 9207 JC Drachten, The Netherlands 30 Tuas Avenue 2 Voice: +31 (0)512 540 623 Singapore 639461 Mail: Lab_Automation_phone_support@bd.com...
- Page 86 BD Kiestra™ Track User's Manual...
- Page 87 BD Kiestra™ Track resulting from the insertion or removal of cables that connect a module to systems other than those approved or supplied by BD or the failure of the owner to maintain reasonable care and precautions in the operation and maintenance of the module will void this warranty and terminate the obligations of the manufacturer as stated herein.
- Page 88 BD Kiestra™ Track User's Manual...
- Page 89 Track Main Base cabinet a direct connection with the System Control Unit (SCU) The module is to be installed and moved by BD representatives only. WARNING THE MODULE MUST BE ELECTRICALLY CONNECTED TO EARTH-GROUND AT ALL TIMES.
- Page 90 100–240V, 50/60Hz, 1N~ or 2~ or 2N~ or 3~ or 3N~ Voltage fluctuations ± 10% of the nominal voltage Constant capacity, free of moisture and oil, minimum of class 4 (ISO 8573-1) CAUTION Only use the BD supplied power cord to connect the module.
- Page 91 9 - Installation requirements Module Operating Requirements Audible Noise <65 dB Power consumption Corner element 40 W Destacker element 65 W 16 A max in, 2 x 6 A, 1 x 10 A max out ErgonomicA Connection Panel (ErgonomicA, MALDI connection) ErgonomicA Connector Left element 90 W ErgonomicA Connector Right element...
- Page 92 Measured at 1 m from surface of instrument, averaged over 30 seconds † The utility power supply for a BD Kiestra™ lab configuration enters through the Main Base cabinet. The Main Base cabinet, together with one or more Regular Base cabinets, distributes the utility power to the connected modules (ReadA, InoqulA, BarcodA, etc.) through circuit breakers.
- Page 93 496020 BD Kiestra™ ErgonomicA Integrated R1700 496021 BD Kiestra™ ErgonomicA Connection Panel 496022 BD Kiestra™ ErgonomicA Standalone 1700 496023 BD Kiestra™ Power Strip Region DE/ES/NL/SE/RU 496024 BD Kiestra™ Power Strip Region FR/BE 496026 BD Kiestra™ Power Strip Region JP 496027 BD Kiestra™ Power Strip Region UK/IE 496029 BD Kiestra™...
- Page 94 BD Kiestra™ Track User's Manual Catalog Number Item 496063 Cabinet - 3 Drawer 496064 Power Cord Region BR 496065 Power Cord Region CN 496066 Power Cord Region DK 496067 Power Cord Region AU/NZ 496068 Power Cord Region IT/CL 496069 Power Cord Region UK/IE...
- Page 95 BD Kiestra™ BarcodA/BD Kiestra™ BarcodA Track A module that stores and sorts plated media for specimen inoculation and applies barcode labels to plates for specimen traceability. The BD Kiestra™ BarcodA Track can be physically connected to the BD Kiestra™ Track.
- Page 96 BD Kiestra™ Track User's Manual Destacker element Element designed to store plates and automatically transport them, one at a time, to the main transport lane Digital Reading Workstation Workstation designed for reading images of plates. Includes PC, two monitors, label printer, keyboard, mouse, and barcode scanner.
- Page 97 11 - Glossary Main Base cabinet Base cabinet which houses the computer and monitor where the GUI is displayed Main lane Main transport lane that carries a plate across a Track element Protected Health Information. Individually identifiable health information that is created, received, stored, or transmitted by covered entities and their business associates in relation to the provision of healthcare, healthcare operations, and payment for healthcare services, in any form (e.g., oral, paper, electronic).
- Page 98 Biological material obtained from a patient for the purposes of a diagnostic test Stacker element Element designed to collect plates to be retrieved by the user Standard Connector element Element designed to transport plates from Track to connected BD Kiestra™ modules Stopper Component designed to stop a plate from traveling Straight element...
- Page 99 Index BD Kiestra™ ErgonomicA integrated workstation 20-21 Standalone Cleaning blue covers cleaners and disinfectants cleaning procedures conveyor belts decontamination disinfection dry cleaning frequency incidental internal and external surfaces methods Scanner windows sensors Stackers and Destackers touchscreen wet cleaning/disinfecting Configuration general configuration...
- Page 100 BD Kiestra™ Track User's Manual Contacts Conventions Depiction of patient information Installation requirements Intended Use Maintenance preventive maintenance Module specifications environmental requirements module operating requirements physical dimensions storage conditions utility requirements Operation collecting plates from a Stacker 52, 54 locating expected plates from BarcodA...
- Page 101 12 - Index turning on Track Using ErgonomicA Plate flow Symbols glossary Track elements Base cabinets components Corner element Destacker element ErgonomicA Connector elements indicators and audible alarms Main Base cabinet overview Regular Base cabinet Stacker element Standard Connector element Straight element T-junction element transport lanes...
- Page 102 BD Kiestra™ Track User's Manual ReadA remote view Status view User account Utilities view Troubleshooting error and alert messages resolving errors Warranty...
Need help?
Do you have a question about the Kiestra Track and is the answer not in the manual?
Questions and answers