
Related Manuals for Meubilair Zara 203684


Summary of Contents for Meubilair Zara 203684
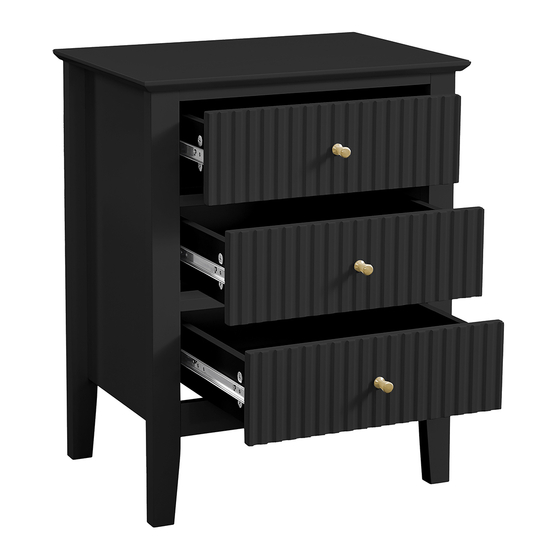
- Page 1 Zara Fluted 3 Drawer Side Table FLOOR AREA 60min 2M x 2M APPROXIMATE ASSEMBLY TIME 2 PERSON ASSEMBLY REQUIRED ASSEMBLY SPACE REQUIRED ASSEMBLY TOOLS PHILLIPS SCREWDRIVER Flat Head screwdriver DO NOT USE POWER DRILL 1 / 19...
- Page 2 Zara Fluted 3 Drawer Side Table Important Please read these instruc�ons carefully before use and keep for future reference. • This product is intended for domes�c use only and is not designed for commercial use. • Do not assemble/use this item if any components are missing or damaged. Please contact the retailer straight away.
- Page 3 Zara Fluted 3 Drawer Side Table Assembly Tips For larger items, please ensure that you have sufficient space and people (as indicated on page 1) to assemble your product safely. We recommend that, where possible, all items are assembled near to the area in which they will be placed in use, to avoid moving the product unnecessarily once assembled.
- Page 4 Zara Fluted 3 Drawer Side Table Tips before you start: QUICKFIT Tighten quickfit un�l shoulder is flush with panel. Do not over�ghten or under�ghten. CAM LOCK When fi�ng cam lock, ensure star�ng posi�on is correct before you insert connec�ng quickfit. Quickfit head should be in the centre of the cam lock when the two panels are joined.
- Page 5 Zara Fluted 3 Drawer Side Table 5 / 19...
- Page 6 Zara Fluted 3 Drawer Side Table PARTS LIST 3PCS 3PCS 13 3PCS 3PCS 3PCS 3PCS 17 1PC 6 / 19...
- Page 7 Zara Fluted 3 Drawer Side Table HARDWARE LIST Cam Bolt Cam Lock Wooden Dowel Screw Floor Pads Ax36 Bx36 Cx20 Dx36 Screw Screw Handle Screw Anti-tip Bracket Gx13 Screw Anchor Washer Cabinet Slider Drawer Slider 7 / 19...
- Page 8 Zara Fluted 3 Drawer Side Table STEP 1 16 x A Left front Right front Left back leg Right back leg STEP 2 STEP 2 4 x B 4 x C Do not use panel #7 on this step. 8 / 19...
- Page 9 Zara Fluted 3 Drawer Side Table STEP 3 SAFETY RELEASE TAB STEP 2 STEP 4 2 x A Back 9 x D 3 x N Front Front Back 9 / 19...
- Page 10 Basic Kitchen Cart Zara Fluted 3 Drawer Side Table STEP 5 4 x B 4 x C STEP 2 STEP 6 2 x A 9 x D Back 3 x N Front Back Front 10 / 19...
- Page 11 Zara Fluted 3 Drawer Side Table STEP 7 6 x B 4 x C STEP 2 STEP 8 6 x B 4 x C 11 / 19...
- Page 12 Zara Fluted 3 Drawer Side Table STEP 9 4 x E STEP 2 STEP 10 4 x C 12 / 19...
- Page 13 Zara Fluted 3 Drawer Side Table STEP 11 4 x A 2 x F STEP 2 STEP 12 4 x B 13 / 19...
- Page 14 Zara Fluted 3 Drawer Side Table STEP 13 Note: Its important not to over-�ghten screws on the drawer sides un�l all sides are aligned and the drawer base is inserted. Tighten screws fully once base is inserted correctly. Always keep drawer flat in this step so the groove for base will align correctly.
- Page 15 Zara Fluted 3 Drawer Side Table STEP 15 Back Front Front Front Back Back NOTE: When install the drawer runners please fix screws in front and back. The front screw hole on runner is an oval shape to allow for small adjustment if you find the gaps between drawers aren’t even.
- Page 16 Zara Fluted 3 Drawer Side Table Drawer Installa�on Guide Before you insert the drawers into the frame, please ensure that the ball bearing sliders (on the assembled unit) have been placed to the front of the main unit. If the bearings are in the middle of the slider it will be difficult to install the drawers correctly.
- Page 17 Zara Fluted 3 Drawer Side Table STEP 17 WARNING: ENSURE THAT WALL STRAP IS 1 x J ATTACHED TO AVOID SERIOUS INJURY To avoid any serious injury, this product has been supplied with a wall strap to prevent toppling. We strongly recommend that this product is permanently fixed to the wall or other suitable surface.
- Page 18 Zara Fluted 3 Drawer Side Table NOTE: 18 / 19...
- Page 19 Zara Fluted 3 Drawer Side Table Wall Moun�ng & Fixing Guide NOTE: Supplied wall plugs are only suitable for use in masonry walls. If you have any doubts about using the correct plug for your wall, please seek professional advice. Failure of the product due to using incorrect fixings is the responsibility of the installer.
- Page 20 Please note upon receiving your warranty claim, the supplier will send, via the post or email, a repair and refurbished goods or parts no ce. Please provide your email address and advise the supplier, if you wish to obtain a repair and refurbished goods or parts no ce via email. AFTER SALES SUPPORT EMAIL : cs@meubilair.com.au Product code: 203684...
- Page 21 In the event of a product fault, please email the Customer Service team. Please ensure that you include the product details (as shown on the card) at hand so that we are able to respond as quickly and efficiently as possible. Meubilair Direct Imports PTY LTD Customer Service Email: cs@meubilair.com.au...
Need help?
Do you have a question about the Zara 203684 and is the answer not in the manual?
Questions and answers